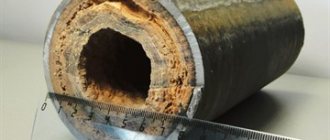
Autonomous heating is installed in many apartments and most private houses that have their own water supply. This system is not designed to operate forever without maintenance and preventative measures. The water circulating through the circuit is not ideally clean. During heating in the range of 45-75 degrees, limescale forms in the pipes, and soot collects outside. This negatively affects the efficiency of the equipment and leads to many undesirable phenomena. To prevent this, the boiler heat exchanger is cleaned. It is better to carry out this procedure yourself, since the services of a specialist will cost a hefty sum. The tubes should be cleaned regularly as they become dirty.
Need for cleaning
High-quality flushing of the gas boiler heat exchanger is the key to its long and trouble-free operation throughout the heating season. Facing the need to turn off the heat and undergo emergency repairs during this period is not the best prospect that a property owner wants to face.
If you do not clean the heat exchangers within the time recommended by the manufacturer, the following problems are likely to occur:
- Equipment overheating. It occurs due to the low speed of water movement, which receives more energy than required according to the instructions.
- Contour break. Occurs due to the transformation of liquid into vapor when stationary due to clogged channels.
Timely flushing of heat exchangers will avoid such complications. If they do occur, you must immediately stop the system, drain the water from it and clean the internal circuits.
How to prevent contamination of your home heating system
To avoid frequent contamination, blockages of household heating systems and associated cleanings, it is useful to pay attention to the following expert advice:
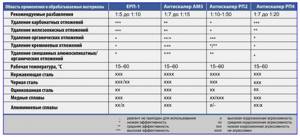
Rice. 12 Selection table for some brands of washing reagents
The simplest and most effective way to independently flush individual heating systems is to use commercially produced chemical solutions. The cleaning procedure can be carried out both with individual elements (radiators, boilers) and with a closed heating circuit if the materials of all components match.
Source
Heat exchanger flushing frequency
The frequency of cleaning heat exchangers is specified in the operating instructions supplied with the product. Most manufacturers recommend doing this every 2 years. However, if water saturated with lime is used, a thick layer of plaque can boil in just one heating season, even if the boiler has a stainless steel circuit. When a filtration system is installed in the harness, the procedure can be carried out at intervals of 4-5 years. Water needs to be changed annually, as it changes its structure and acquires properties that are aggressive towards metal.
It is best to calculate the required frequency of cleaning the heat exchanger experimentally. After the end of the heating season, you need to disassemble the boiler, remove the circuit and assess its condition. The plaque will tell you how long it will take for its thickness to reach a critical state.
At what age can a booster be used?
Boosters are divided into categories by age. There are only two of them: “2/3” and “3”.
Group “2/3” is suitable for children from 3 (sometimes from 4) to 12 years old, weighing from 15 to 36 kg and height from 99 to 145 cm. These booster seats for children have a special adapter for the car, thanks to which a standard car belt fits correctly on the child's shoulder.
Group “3” is devices for children from 6 to 12 years old, weighing from 22 to 36 kg. Boosters in this group do not have additional accessories for adjusting the height of the belt: it is assumed that the child is already quite large and his height is sufficient.
Cleaning methods
It is recommended to flush the boiler heat exchanger immediately after the end of the heating season, when the coating has not had time to gain strength. To perform this procedure, one of the available methods is selected that is most suitable for the property owner.
There are the following options for cleaning water circuits:
- Manual (mechanical). A simple and inexpensive way to rid your product of scale and deposits. The work uses improvised devices that can be found in every home. From the outside, the soot is scraped off with a knife or a metal brush. Internal deposits are removed with a steel cable, one end of which is untwisted and made into a brush. Such cables are used in the braking systems of bicycles and in adjusting the gas supply in motorcycles. After rough cleaning, which removes most of the contaminants, the product is subjected to secondary processing. It involves soaking the tubes in any reagent that dissolves limescale and is safe for metal. The duration of treatment is 20-25 minutes depending on the concentration of the substance. The hotter it is, the better the effect will be achieved.
- Chemical. The plate heat exchanger is washed using household chemicals or homemade products. The advantage of this method is that the cleaning procedure can be performed without dismantling the tubes if there is a flushing pump for heat exchangers. If this device is not yet available, the primary and secondary circuits are immersed in an acid solution, which is heated to a temperature of 40-60 degrees. Heating promotes greater activation of the chemicals. It is necessary to use an acid-resistant container so that the reagent does not damage it. The soaking time is determined experimentally by analyzing the state of exfoliation or dissolution of plaque. In a weak solution, the parts are boiled over low heat. The Laval product produced in Minsk gives a good effect.
- Hydrodynamic. A pump is used to flush the heating system. Abrasive additives are added to the water, and the station drives it through the system under pressure of up to 2 bar. The filter is first removed to ensure unhindered movement of the liquid. During flushing, you need to change the direction of pumping several times in order to better clean the channels. The cleaning effect is achieved by rapid flow of liquid and its friction against the inner walls of the tubes. Using this method, they can be given their original state.
The circuits must be cleaned carefully, without applying excessive force and without exerting pressure higher than designed. Despite the fact that high-quality steel is used in the manufacture of heat exchangers, the products can be easily damaged.
How to flush heating
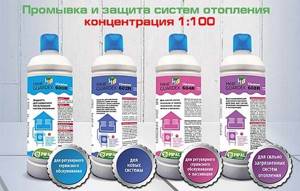
You can purchase various reagents in the retail chain, offered in 3 types:
The concentrate and powder must be diluted with water, following the manufacturer's instructions. As a rule, before cooking, the water is heated to 40...60 °C. The finished liquid for flushing the heating system is poured into a barrel and disposed of after use.
We will give a number of recommendations on the best way to flush heating pipes:
We do not recommend using various folk remedies for washing, in particular citric acid. Firstly, it is only effective against scale, which is found only in boiler heat exchangers. Secondly, a high concentration of the acid solution is required; with a large amount of water it cannot be achieved.
Note. Factory-made reagents can be discharged into the general sewer system; no additional treatment is required.
Flushing liquids
Hardware stores offer a wide range of chemicals in the form of liquids, gels and powders. Almost all of them are acid-based. The most commonly used reagents are adipic, citric and sulfamic acid.
The following brands have proven themselves best:
- Alfa;
- Baxi;
- Cip;
- Eliminate;
- Laval;
- Pump;
- Steeltex
- VV;
- Aquaprof;
- Alf.
Before purchasing, you should study the scope and conditions of use of the product, recommended brands of boilers, rules of use and warnings.
Washing machines
Designers have developed special devices to make it possible to clean the heat exchanger without removing it from the boiler body. The machine is connected to the pipes, after which it begins to drive a reagent saturated with abrasive along the circuit. At the same time, increased pressure is created inside the tubes, and the temperature of the liquid rises to 60 degrees. The most popular household appliances are Ariston and Beretta models. The products are compact and high-performance. They can easily find a place in a pantry or closet.
It makes sense to purchase such equipment only if cleaning must be carried out annually, since the estimate for a booster and reagents can reach up to 38-60 thousand rubles. But the services of professionals will also cost a lot. In large cities they cost 3-7 thousand rubles, and in the regions 2-4.5 thousand rubles. If you clean the boiler every year, the payback will begin in 6-10 years. Purchasing a booster is expensive, but you can reduce costs and even make a profit if you rent out the unit or provide services to neighbors and friends for a reasonable fee. It is enough to wash the heat exchanger yourself once to acquire the necessary skills. Since all boilers have almost the same design, there will be no problems with servicing other models.
Types of restraint devices

Types of restraints
A child restraint is purchased for a child according to his age, height and weight. Based on this feature, car seats are divided into several groups:
- Group 0 – a car seat in the form of a cradle for children from birth to six months. Installed sideways in the direction of travel. The child's weight is up to 9 kilograms.
- Group 0+ – usually a portable car seat. They can often be seen in the hands of young mothers - equipped with a special carrying handle, they are very convenient for transporting a child to a store or clinic. Suitable for children up to one year old weighing up to 13 kilograms. The child rides backwards in it.
- Group 0+/1. Quite an economical car seat. From birth to two or three years. The maximum weight of a child is 18 kilograms. A prerequisite is that the chair must be able to be installed against the direction of travel. In children under one year old, the neck muscles are still very weak; it is difficult for them to support the weight of a rather large head. Therefore, the chair for transporting them must be installed backwards, otherwise, in an accident, fatal injuries are possible (up to hidden decapitation).
- Group 1 – for children 1-4 years old, 9 – 18 kg. The car seat is installed in the direction of travel.
- Group 1/2/3 – a car seat that holds the child with standard seat belts. Adjustable headrest and armrests allow you to change the configuration, adjusting the device to the growth of the child. For children 1-12 years old.
- Group 2/3. For children 3 – 12 years old weighing 15 – 36 kg. The chair is placed in the direction of travel. Boosters can also be included in this group.
Booster – a child restraint system, a seat with slots for a seat belt. Some parents, instead of a booster, use various home-made pads:
- chair seats,
- ottomans,
- pillows.
This is incorrect because only a special child restraint system guides the seat belt correctly and protects against chest injuries during sudden braking.
Popular chair models
The buyer is now offered many different car seats, from very expensive to the most budget ones.

Popular chair models
It would seem that here is a chair - one for 10 thousand, the second for one and a half. Why overpay? It is not that simple. The main way to evaluate a restraint system is to perform crash tests. The higher the score, the better the car seat. Our Teddy Bears and Pandas are cheap, but these chairs have not undergone any tests. They only help secure the child and prevent him from falling out of the seat in the event of a collision. Foreign analogues are much more reliable in this regard.
The following companies currently have the best crash test results:
- Romer,
- Recaro,
- Britax,
- Cybex,
- Maxi-Cosi,
- Konkord,
- Kiddy.
Britax-Romer First Class plus. Group 0+/1 chair. A special soft pad for babies allows the youngest passengers to travel in comfort. The seat is installed for babies in the rear-facing direction; upon reaching one year of age and weighing more than 9 kg, it is installed in the forward-facing direction. It has two tilt positions - vertical and reclining. The seat is equipped with reliable seat belts and is protected from side impacts. Safety standard ECE R44/04. This car seat is a great option for those who do not need a carrycot.
Maxi Cosi Cabrio Fix. Car seat 0+, for children up to 12-15 months. Safety standard ECE R 44/04. A very comfortable and lightweight portable car seat weighing only 3.5 kilograms has three-point seat belts, a removable headrest, and enlarged sides. The sun visor can be extended if necessary and the baby will be protected from rain or sun rays. A comfortable handle will allow a mother to easily carry a sleeping baby without removing her from the chair. This chair is an excellent solution for mobile mothers.
Instructions for washing the heat exchanger with your own hands and at home
Before servicing the heating boiler, you need to release the coolant from the system, turn off the water and gas supply, and disconnect it from the electricity.
To work you will need the following equipment:
- screwdriver;
- indicator;
- plumbing pliers, pliers;
- paint brush, scraper;
- metal brush, thin cable with a brush, toothbrush;
- safety glasses, rubber gloves;
- container of appropriate size and volume;
- rags.
Cleaning of water circuits should be carried out in the following sequence:
- Remove the cover that covers the internal elements. Remove the casing and thermal insulation.
- Disconnect the wires from the gas valve, remove the thermocouple;
- Drain the boiler. To do this, use the outlet valve located at the bottom of the housing.
- Remove the fuel supply pipe;
- Unscrew the bolts from the burner, remove the assembly and place it on a wide, stable base.
- Cover electronic and switching units with cellophane to prevent water from entering them.
- Using a metal brush, toothbrush, or knife, scrape off the dirt from the outside of the device. Clean the igniter, flame control sensor and automatic ignition one by one.
- Take out the secondary circuit and carry out similar actions with it.
- Use a cable with a brush to carry out initial mechanical cleaning of the internal channels.
- Mix the citric acid solution. Take 200 g per 10 liters of water.
- Place the vessel on the stove, immerse the heat exchangers in it, and turn on the heat. Bring the solution to a boil and let it sit for up to 30 minutes.
- Remove the parts and wait for them to cool. Visually check the quality of the achieved result. If plaque remains, remove it with a brush or re-boil.
- After cleaning the heat exchangers, rinse them several times with clean water to remove all reagents.
- Assemble the unit, observing the sequence of installation of parts.
If you have a booster, everything is much simpler. You just need to fill the device with the reagent, connect it to the pipes and turn it on. At the end of the rinsing, the solution is poured out and replaced with clean rinsing water.
Results
A booster is a device for chemical cleaning of heat exchangers and heating systems due to the circulation of acid. Making a booster with your own hands only makes sense when you have a free pump (submersible or circulation). If you need to buy a pump, then the point of making it yourself is lost. A cheap washing machine costs only 600 rubles.
I do a little tire fitting, mostly during the season. A booster was needed to inflate caked tires. I looked at it for sale and was horrified - more than tens of thousands! I remembered that somewhere, for many years, I had an old car receiver lying idle, from some Soviet truck. I dug it up and measured it. It turned out to be quite rusty, with a volume of about 20 liters. Okay, I’m not going to push more than 4 kgf/cm2 into it, whereas on a car, its working pressure was about 8 kgf/cm2, with a huge Soviet reserve, so rust should not have a catastrophic effect on its performance.
To begin with, I bought components. The crane, the largest one I found, and the girders. After the tap I narrowed the outlet a little, maybe I’ll redo it later, without narrowing it, for now it’s just everything I found in stock in our stores.
I cut a hole for the first squeegee, and welded the squeegee to the receiver, setting it slightly deeper.
The day before, I had been listening to music all evening in my Mitsubishi Outlander XL, pumping a 700-watt subwoofer using just the battery, for which I had to pay in the morning - the car did not want to start. When trying to start, it sneezed and clicked, hinting at a lack of battery charge. But I urgently needed to go with my son on business.

This situation sometimes arises if you drive a little - the battery does not have time to be recharged by the generator and drops below the minimum level allowed for the starter factory (about 11.7 V).
There are three options here:
- Connect the battery to start from another car (not everyone wants to take risks or waste their time on this).
- Remove the battery and take it to mains charging (difficult and time-consuming, the settings in the BC and radio may go wrong).
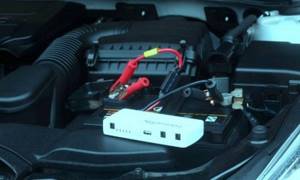
- Use a small booster booster.
A booster is a small device that is connected to a dead battery and helps it start the car, adding the necessary watts of power. Typically, a booster contains several standard lithium cans with good current (flat or 18650 size - it doesn’t matter) plus all sorts of indicator electronics.
The price of such a useful thing starts from 2000 rubles, which you don’t really want to throw away on such a simple device. Maybe someday it will be bought (assembled), but we need to go now! In general, the idea that came to mind was this: let a toy radio-controlled jeep help launch a big jeep!
Why do you need regular gas boiler cleaning?
For most of the year, water constantly circulates in the heating system. Over time, a coating of salts, lime, and impurities that enter the coolant settles on equipment parts. The harder the water, the more mineral deposits appear on the system elements. They remain in the heat exchanger for the gas boiler, which negatively affects its operation.
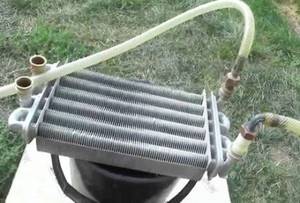
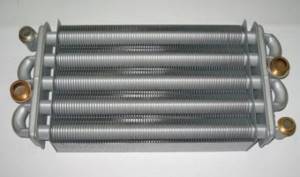
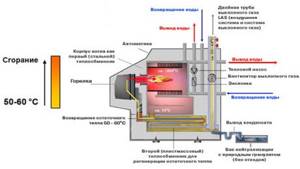
The operating principle of heating equipment is based on the fact that the coolant is heated as it passes through the curved channels of the coil. To raise the temperature of the liquid, special plates are used. Thanks to these additional elements, the coil itself and the water entering it are heated more evenly. When assembled, the system looks similar to a car radiator.
The operating efficiency of equipment largely depends on the thermal conductivity of the materials from which it is assembled. Usually copper or alloys with this metal are used. Any growths or deposits on the internal surfaces of the coil tubes lead to a decrease in thermal conductivity and deterioration of the system.
Preventive measures are beneficial
If equipment is not cleaned promptly, problems may arise:
- The heat exchanger of a gas boiler constantly overheats and fails faster. It can be replaced, but such repairs are very expensive. To this amount should also be added the inconvenience and cost of heating the house during the period when the equipment is being repaired. Electric heaters are usually turned on, and this significantly increases the cost of repairs.
- Limescale greatly impedes the passage of coolant through the system. The more scale there is, the higher the load on the circulation pump. The equipment has to constantly work in emergency mode, which leads to natural wear of spare parts and negatively affects its service life.
- A clogged boiler heat exchanger works less efficiently. It takes more energy to heat it. Accordingly, gas consumption increases (on average by 10-15%). This means that the owner will overpay for heating, and the house will not warm up as well. Simple calculations show that for the season the amount will be close to that paid on bills for a whole month.
Signs of contamination
When does a heat exchanger need to be flushed? This can be determined by the following signs. Thus, the fuel consumption of the boiler increases significantly. The boiler often stops, heat output drops, and the batteries do not warm up enough. Rapid clogging of the filters also indicates the need for washing.
If you regularly carry out flushing using installations for washing heat exchangers, then pipelines and other elements of the system get rid of blockages, as well as disturbances in coolant circulation processes.
The use of such equipment allows you to prevent accidents, failure of radiators, the need for major repairs or complete replacement, and increased energy costs.
In boiler equipment, the heat exchanger is a critical and responsible unit. The efficiency of space heating, as well as the correct flow of technological processes, depends on it. You should not refuse washing, especially if experienced specialists declared its need after diagnosis. Cleaning using a unit for washing heat exchangers using hydrochemical technology will cost much less than a major overhaul or complete replacement of heating equipment.
How often do you clean the heat exchanger in a gas boiler?
The frequency of cleaning the heat exchanger depends primarily on the type of coolant and the design features of the unit itself. It is least common to service single-circuit boilers in heating systems that use purified water as a coolant. To keep them in good condition, it is enough to carry out preventive maintenance once every 4 years.
If untreated water circulates in the system, the boiler should be flushed once every 2-3 years. If the water is hard, then the cleaning regime is once every 2 years. The secondary heat exchanger of a double-circuit boiler must be washed with the same frequency, because unfiltered tap water with impurities flows through it.
Most often, maintenance is required for equipment in heating systems where antifreeze is used as a coolant. It should be washed at least once every 2 years. In addition, you have to monitor the expiration date of antifreeze and replace it in a timely manner. Otherwise, the efficiency of the system will decrease and heating costs will increase.
When cleaning heat exchangers, pay attention to the appearance of the boilers and nozzles and, if necessary, carry out repair work. You should also monitor the condition of chimneys and clean them of soot in a timely manner. These simple measures extend the life of heating equipment and prevent breakdowns.
Flushing the heating system in a private home - methods, reagents and tools
In any heating systems used for heating individual cottages and dachas, mud deposits accumulate over time, interfering with their functioning. To bring them to a state of operation with the best efficiency, flushing the heating system in a private house is used.
Typically, many homeowners perform these procedures with their own hands without calling specialists. In this case, they should know the various options and technology for carrying out the work, and the equipment used.
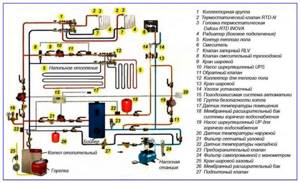
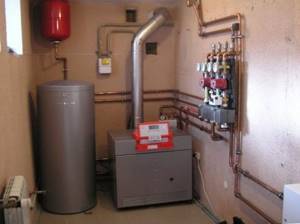
Rice. 1 Main components and diagram of a domestic heating system for a private house
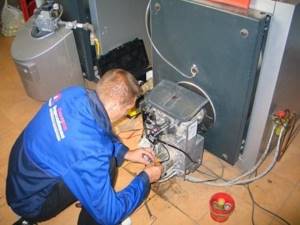
Contact a professional or do it yourself
Professional cleaning of heating boilers is an expensive proposition. Depending on the condition of the equipment and the specifics of its operation, amounts can range from several tens to hundreds of dollars. In addition, the masters rarely arrive within the next few hours; sometimes you have to wait for them for several days. It is not comfortable.
The cost of professional cleaning using a special station for washing heat exchangers pays off: the parts are washed from the inside to a shine, and the equipment works much better. But if you want, you can always save money and do the same thing yourself. The result will be no worse, and you will only have to invest your own time and effort.
When is heating flushed?
Let us immediately note that individual heating systems of apartments and country houses very rarely require flushing. Typically, deterioration in heating is associated with other reasons, for example, airing. Let's explain:
That is, a closed system can work quietly without any cleaning. If it is constantly fed from the water supply network, the amount of salt sediment will increase indefinitely. Over the years, the pipelines will become half overgrown, and silt will settle in the radiators.
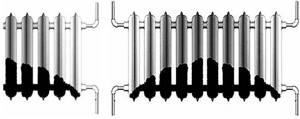
Options for clogging cast iron batteries depending on the connection method
A similar effect occurs due to the penetration of oxygen into the coolant. Air bubbles cause corrosion of metal pipes and fittings from the inside, forming iron oxide (rust) particles, which are constantly found in the mud pan. The cause may be low-quality plastic pipes without a protective oxygen barrier.
Reference. A “used-in” coolant often takes on a dark or even black color; this is quite normal. Brown water indicates a large amount of rust.
So, in what cases is heating flushing carried out:
The conclusion is simple: flushing is done when there is a problem with the water heating system; no frequency needs to be observed. There is a different approach to the centralized heat supply of multi-apartment residential buildings, where the radiator network is flushed annually, after which pressure testing is performed (in accordance with the requirements of SNiP).
Methods for cleaning the heat exchanger of a gas boiler
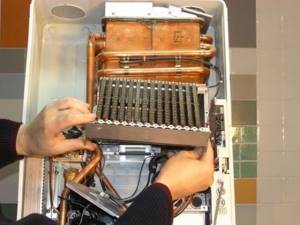
There are two main types of flushing the heat exchanger of a gas boiler - with and without disassembling the unit. To disassemble the equipment, you will need tools. Which ones specifically - it depends on the design of the heating equipment. In some cases, it is impossible to remove the heat exchanger at all, but you can gain access to it by removing some of the parts.
Before starting work, you should prepare the equipment:
- Disconnect the boiler from all power sources, drain the water from the system and expansion tank. To drain the coolant, special fittings must be provided. If this is not the case, then you will have to turn off the water supply to the house, and then drain it from the system into pre-prepared basins and buckets.
- When there is no water left in the system, you can begin to disassemble the equipment. First, remove the front of the housing to gain access to the heaters. If the boiler is double-circuit, then the second circuit heater is located closer, the main one is further away. To remove it, you need to disassemble the combustion chamber.
- Construction parts are usually dirty. It is advisable to wash them outside with special compounds that remove soot and carbon deposits. If there are no such products, you can take traditional household chemicals that are used for cleaning stoves - gels, cleaning pastes, etc. They should be used only in extreme cases, since even the most aggressive household chemicals cannot remove carbon deposits as efficiently as specialized ones, but they can damage materials.
- The inside of the unit elements can be washed with a strong aqueous solution of citric acid. It does not corrode metal, but removes plaque and lime deposits well. Most often there is a lot of scale. It is impossible to cope with it by half measures. In this case, you will need equipment for washing the heat exchangers of gas boilers. You can make a simple installation with a circulation pump with your own hands.
There are three main ways to clean boilers: manual, hydrodynamic, and chemical washing of boilers. Let's look at them in more detail below.
Option #1: DIY manual cleaning
Manual cleaning is called cleaning of boilers without the use of special mechanisms. You will only need simple tools that are found in almost any home. The boiler must be partially disassembled to gain access to the heat exchanger and remove it. Next, you should decide how best to remove the dirt - mechanically or using chemical solutions.
If you decide to remove plaque mechanically, you should stock up on a scraper, brush and vacuum cleaner to remove small particles of deposits. If you plan to chemically descale boilers, you can use a citric acid solution, or even better, buy a specialized product.
The MasterBoiler and SVOD TVN Professional brands have proven themselves well. They come in different forms. There are liquids that do not require special preparation before use, and powders. When using, you should carefully read the instructions. Some formulations foam, and you need to be prepared for this.
How to clean a gas boiler from scale? Almost all compositions are suitable for removing calcium carbonate deposits, while only certain preparations cope with iron oxide deposits. When purchasing a product, it is important to make sure that it is intended specifically for those types of deposits that are typical for a particular boiler. Among the popular preparations that remove iron oxide plaque, we recommend SVOD TVN Extra.

Advice. When disassembling and cleaning the boiler, try to be extremely careful so as not to damage the parts. When installing them in place after manipulation, check the tightness of each connection.
Option #2: chemical washing
Boosters are often used to flush boilers. These are special installations that pump liquid into the heat exchanger channels. You can make a booster for washing heat exchangers with your own hands by connecting a circulation pump so that it drives the acid solution, washing the equipment from the inside.
A good flush may take up to 10 hours if the channels are very dirty, but usually it takes much less time. Cleanliness indicators: carbonate and iron deposits completely disappear, and the internal surfaces of the channels shine. To neutralize the residues of acidic preparations, special compounds are used; they are poured into a booster to wash the heat exchangers at the end of the procedure.
Option #3: hydrodynamic cleaning
Hydrodynamic flushing of boilers and heat exchangers is similar to chemical flushing, since it also uses pumps and acid solutions. The main difference is that the liquid is pumped under high pressure. Sometimes preparations with abrasives are used as cleaning agents.
Since deposits are destroyed by water hammer, the procedure itself is quite dangerous. If the pressure is higher than permissible, the pipes may be damaged, and their repair will cost a significant amount. It’s better not to take risks and entrust this work to professionals.
Why is cleaning necessary?
Sometimes certain problems arise in the operation of the heating system and to get rid of them, it is enough to simply clean the equipment.
This is due to the fact that during the long-term operation of the boiler, various substances and deposits accumulate in the heat exchanger, which can lead to complete destruction of this part of the equipment.
In addition, under the influence of high temperatures, impurities deposited on the heat exchanger react with each other, which in turn will lead to a decrease in the performance properties of the entire heating system as a whole.
Thus, the following can interfere with high-quality heat exchange:
- hardness salts;
- dissolved iron.
Hardness salts and excess iron are typical for water in many regions of our country, so the problem is relevant for many!
To ensure that your boiler operates at the maximum level of efficiency and the heat exchanger maintains its functionality for as long as possible, it is recommended to periodically clean the equipment using special liquids and solutions, which we will discuss in more detail below.
The frequency of cleaning directly depends on what kind of liquid you use in the heating system:
- if it is ordinary, clean water, then this procedure must be performed every four years;
- if it is antifreeze, then the cleaning procedure is performed every two years.
When using antifreeze, it is extremely important to replace it on time. If this is not done, then the entire heating system of the house can be seriously damaged.
Of course, ideally this should be done by specialists, but the cost of their servants is unreasonably high. Therefore, if you wish and have a little skill, you can achieve an acceptable result with your own hands.
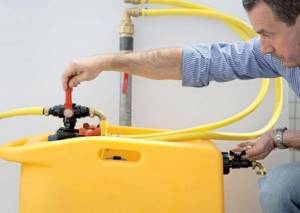
Booster preparation and pumping features
It is worth immediately noting that the biggest problem in this situation is the booster, that is, a special device that pumps liquid through the heat exchanger and simultaneously removes fumes.
It is unlikely that you will be able to borrow it from someone you know. And it doesn’t make sense to buy it yourself - its cost exceeds $300 (and these are not the highest quality and most reliable devices). It is clear that the acquisition is unjustified. Therefore, the only correct option is to make a booster from scrap materials with your own hands.
An example of how to clean the heat exchanger of a gas boiler in the video:
An old but working washing machine pump may be suitable for these purposes. If you don’t have one, then you can easily purchase it at a flea market or on the Internet for a small amount.
Connection features
It would seem that there is nothing complicated in further actions, but in fact, not everything is so simple, since it is important to correctly connect the flushing tubes coming from the pump.
To do this, you need to make a special mounting plate. Carefully study the features of your equipment and based on this:
- take two solid metal plates, the thickness of which is 2.5 millimeters;
- depending on the features of the device, drill holes to match the holes in the heat exchanger;
- in a regular plumbing store, buy four so-called “American” ones with a diameter of half an inch and several gaskets for them;
- use only the inner part of the “American” ones, installing them in the lower hole of each plate;
- using bolts, secure the plates so that the fittings are pressed as tightly as possible to the heat exchanger.
To ensure the connection of hoses, even ordinary brass fittings with a diameter of ¾ inches are suitable. They can be used for both the main and secondary heat exchangers. By the way, see how to properly connect a booster for washing heat exchangers with your own hands in the video presented in this article.
The preparation doesn't end there. Now you will need additional capacity. This could be an ordinary plastic canister or even a five or six liter water bottle. Be sure to wash the container thoroughly to remove even the slightest dirt.
At the bottom, install a fitting that will allow you to connect the hose. The fitting must be fastened tightly and firmly. You may need to melt the hole for it a little, install the fitting, and when the plastic starts to harden, it will fit tightly around it and ensure a tight seal.
If you are willing and able, install a tap at the outlet, but this is not necessary.
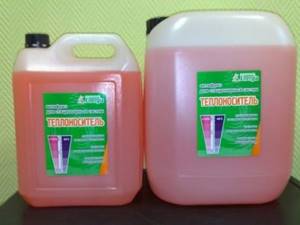
Flushing agent
The next step is to choose a cleaning agent. There are a great variety of such solutions, and on specialized forums, each specialist advises the product that he himself used. To be honest, you shouldn’t believe such statements unconditionally; there is a very high probability that the liquid is actually imperfect.
For example, some persistently advise using a 10% solution of hydrochloric acid. Or orthophosphoric acid. However, we strongly recommend not to use acidic solutions - they can burn the heat exchanger and you will have to buy a new one! Or go in search of a craftsman who can efficiently and reliably solder a hole burned by acid.
It is recommended to use special solutions for cleaning - their price is quite high, but the result is appropriate. Moreover, they are completely safe. For example, there have been positive results and a really large number of “live” good reviews for the drug Detex - one bottle is enough to create ten liters of solution.
Step-by-Step Guide to Do-It-Yourself Cleaning
Now that you have everything ready, you can start washing. The sequence of actions will be as follows:
- take the pump from the washing machine;
- connect it to the devices you created - a container for flushing liquid and the heat exchanger itself;
- fill the container with six liters of clean water preheated to a temperature of 50 degrees;
- turn on the pump;
- run water through the created circular system - this is necessary in order to make sure that the entire system is reliable, durable and does not leak liquid anywhere;
- after you are convinced of the reliability of the system, turn off the pump;
- pour a cleaning liquid into the container - Detex or any other (we remind you, do not listen to artisans and “professionals” on forums on the Internet - do not use acid solutions, they can burn the heat exchanger!);
- start the pump and leave it running for about forty minutes.
If you use a clear hose at the outlet that transfers the liquid back to the container, you will be able to see the dirt being washed out.
After washing the secondary heat exchanger for forty minutes, move your device to the main one and also wash it for about forty minutes. The result is amazing - heat transfer devices will become as clean as they were at the time of purchase.
Cleaning times are approximate. If the heat exchanger is heavily soiled, cleaning should take longer. If it is relatively clean, the pump run time can be reduced. Here you can see for yourself in the process - by the level of contamination of the liquid. That is why it is recommended to install transparent tubes that allow you to visually monitor the cleansing process.
After you finish cleaning with a special solution, connect the heat exchangers to the water tap. Run clean water for about five to seven minutes. This is necessary to wash away any remaining product.
In this case, professional craftsmen use a special neutralizer - if you have the financial opportunity, you can buy it, and if you don’t want to spend money, then use this method of removing cleaner residues; it is completely justified in terms of the final result.
To better understand how to make a booster for washing heat exchangers with your own hands, watch the video:
As you can see, it is not at all difficult to create an effective and efficient booster for washing heat exchangers with your own hands, a photo of which is presented in the article.
Conclusion, reviews, tips
Be sure to first study the issue of dismantling the heat exchanger so as not to damage it. In general, there is nothing complicated about this, but there are certain features of dismantling - it all depends on the manufacturer and model of the boiler.
Well, after you remove the heat exchanger, clean the boiler itself - why not take advantage of this opportunity? To do this, take a regular soft brush and arm yourself with a vacuum cleaner. When cleaning, pay special attention to the burner, but do not be excessively zealous so as not to accidentally break or damage anything.
Do-it-yourself cleaning from soot and soot
Soot and soot make it difficult for heating equipment to operate. There are models that automatically turn off in such cases. If this does not happen, then combustion products may enter the room. Harmful gases can poison the residents of the house, so it is important to clean boilers on time to prevent such situations.
- Prepare the tools: brushes, screwdrivers, open-end wrenches (most often wrenches size 8-17 are suitable), needle, brush, rags. If you plan to completely clean the channels at the same time, you will also need a means for flushing the gas boiler heat exchanger.
- Turn off the gas, remove the front wall of the boiler, disconnect the wires, ignition electrode, burner tube. During cleaning, it is advisable to immediately replace the pilot burner gasket
- Next, you should get the burner and swirlers. They and the surface of the heat exchanger are cleaned with brushes - soft and for metal. The inside of the channels is blown out using a vacuum cleaner.
- It is convenient to clean the burner with a brush and a needle smaller than the diameter of the burner hole.
Advice. Do not try to widen the burner hole with a thicker needle. It will be easier to clean next time, but the performance of the heating equipment may deteriorate.
- When cleaning and washing the heat exchangers of gas boilers with your own hands is completed, the equipment is reassembled in the reverse order. First, install the burner, nozzle, tube, connect the ignition electrode, etc.
- The assembled boiler is tested. It is turned on and the connections of the tubes and burners are checked for tightness. If the equipment operates normally, it can be put into operation. If there are any malfunctions, the boiler will need to be disassembled again and the connections sealed.
Conclusions and useful video on the topic
Video #1. The effectiveness of using hydropneumatic radiator flushing can be assessed by the amount of dirt thrown out:
Video #2. The subtleties of performing a chemical type of flushing of the heating system are outlined in the following story provided by the owner of a private household:
Any of the considered options for flushing heating systems does not represent an overly complicated procedure. If you have some experience in plumbing work and, in some cases, special equipment that can be rented, you can perform this operation yourself.
Would you like to talk about the effectiveness of flushing or tell us how you flushed the heating circuit in your home? Do you have valuable recommendations or important nuances that you would like to share with site visitors? Please write comments in the block form below.
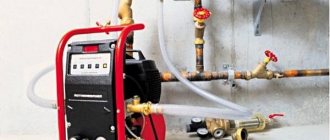
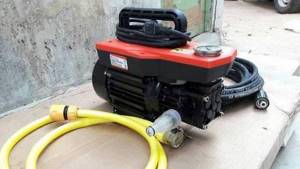
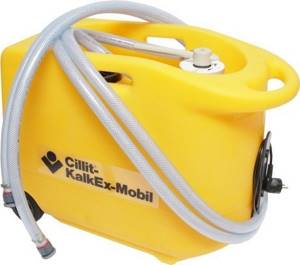
What is a booster for washing heat exchangers
Factory produced booster.
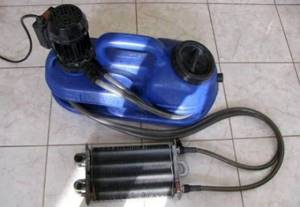
A booster is a device for chemical circulation washing of plate heat exchangers of boilers and columns, all types of radiators and heating systems in general. What is characteristic is that cleaning is carried out without disassembly. The booster for washing heat exchangers consists of three main parts:
- tank;
- water pump;
- heating element.
There are units without heating elements, but they are less efficient. For washing, an active substance is used, most often hydrochloric or phosphoric acid, the activity of which increases greatly with increasing temperature. When choosing a booster, you need to pay attention to the tank volume, maximum temperature, circulation speed and pressure, which is measured in meters. The greater the pressure, the longer the circuit can be flushed from one point. If the power is insufficient, then the system will have to be divided into small sections, which takes a lot of time.
The principle of operation is that the acid in the tank is heated and pumped through a heat exchanger or an entire circuit.
The active substance corrodes scale and, through circulation, removes it back into the tank. The process continues until the system is completely cleaned. In time it is about 2 hours. The cost of washing devices starts from 600 rubles. For domestic needs, such a unit is enough; the price of professional equipment can be 160 thousand rubles. In principle, you can make a booster for washing heat exchangers with your own hands from scrap materials. The most expensive part in this case is the pump.
Why is cleaning necessary?
Sometimes certain problems arise in the operation of the heating system and to get rid of them, it is enough to simply clean the equipment.
This is due to the fact that during the long-term operation of the boiler, various substances and deposits accumulate in the heat exchanger, which can lead to complete destruction of this part of the equipment.
In addition, under the influence of high temperatures, impurities deposited on the heat exchanger react with each other, which in turn will lead to a decrease in the performance properties of the entire heating system as a whole.
Thus, the following can interfere with high-quality heat exchange:
- hardness salts;
- dissolved iron.
Hardness salts and excess iron are typical for water in many regions of our country, so the problem is relevant for many!
To ensure that your boiler operates at the maximum level of efficiency and the heat exchanger maintains its functionality for as long as possible, it is recommended to periodically clean the equipment using special liquids and solutions, which we will discuss in more detail below.
The frequency of cleaning directly depends on what kind of liquid you use in the heating system:
- if it is ordinary, clean water, then this procedure must be performed every four years;
- if it is antifreeze, then the cleaning procedure is performed every two years.
When using antifreeze, it is extremely important to replace it on time. If this is not done, then the entire heating system of the house can be seriously damaged.
Of course, ideally this should be done by specialists, but the cost of their servants is unreasonably high. Therefore, if you wish and have a little skill, you can achieve an acceptable result with your own hands.
Booster preparation and pumping features
It is worth immediately noting that the biggest problem in this situation is the booster, that is, a special device that pumps liquid through the heat exchanger and simultaneously removes fumes.
It is unlikely that you will be able to borrow it from someone you know. And it doesn’t make sense to buy it yourself - its cost exceeds $300 (and these are not the highest quality and most reliable devices). It is clear that the acquisition is unjustified. Therefore, the only correct option is to make a booster from scrap materials with your own hands.
An example of how to clean the heat exchanger of a gas boiler in the video:
An old but working washing machine pump may be suitable for these purposes. If you don’t have one, then you can easily purchase it at a flea market or on the Internet for a small amount.
Connection features
It would seem that there is nothing complicated in further actions, but in fact, not everything is so simple, since it is important to correctly connect the flushing tubes coming from the pump.
To do this, you need to make a special mounting plate. Carefully study the features of your equipment and based on this:
- take two solid metal plates, the thickness of which is 2.5 millimeters;
- depending on the features of the device, drill holes to match the holes in the heat exchanger;
- in a regular plumbing store, buy four so-called “American” ones with a diameter of half an inch and several gaskets for them;
- use only the inner part of the “American” ones, installing them in the lower hole of each plate;
- using bolts, secure the plates so that the fittings are pressed as tightly as possible to the heat exchanger.
To ensure the connection of hoses, even ordinary brass fittings with a diameter of ¾ inches are suitable. They can be used for both the main and secondary heat exchangers. By the way, see how to properly connect a booster for washing heat exchangers with your own hands in the video presented in this article.
The preparation doesn't end there. Now you will need additional capacity. This could be an ordinary plastic canister or even a five or six liter water bottle. Be sure to wash the container thoroughly to remove even the slightest dirt.
At the bottom, install a fitting that will allow you to connect the hose. The fitting must be fastened tightly and firmly. You may need to melt the hole for it a little, install the fitting, and when the plastic starts to harden, it will fit tightly around it and ensure a tight seal.
If you are willing and able, install a tap at the outlet, but this is not necessary.
Flushing agent
The next step is to choose a cleaning agent. There are a great variety of such solutions, and on specialized forums, each specialist advises the product that he himself used. To be honest, you shouldn’t believe such statements unconditionally; there is a very high probability that the liquid is actually imperfect.
For example, some persistently advise using a 10% solution of hydrochloric acid. Or orthophosphoric acid. However, we strongly recommend not to use acidic solutions - they can burn the heat exchanger and you will have to buy a new one! Or go in search of a craftsman who can efficiently and reliably solder a hole burned by acid.
It is recommended to use special solutions for cleaning - their price is quite high, but the result is appropriate. Moreover, they are completely safe. For example, there have been positive results and a really large number of “live” good reviews for the drug Detex - one bottle is enough to create ten liters of solution.
Step-by-Step Guide to Do-It-Yourself Cleaning
Now that you have everything ready, you can start washing. The sequence of actions will be as follows:
- take the pump from the washing machine;
- connect it to the devices you created - a container for flushing liquid and the heat exchanger itself;
- fill the container with six liters of clean water preheated to a temperature of 50 degrees;
- turn on the pump;
- run water through the created circular system - this is necessary in order to make sure that the entire system is reliable, durable and does not leak liquid anywhere;
- after you are convinced of the reliability of the system, turn off the pump;
- pour a cleaning liquid into the container - Detex or any other (we remind you, do not listen to artisans and “professionals” on forums on the Internet - do not use acid solutions, they can burn the heat exchanger!);
- start the pump and leave it running for about forty minutes.
If you use a clear hose at the outlet that transfers the liquid back to the container, you will be able to see the dirt being washed out.
After washing the secondary heat exchanger for forty minutes, move your device to the main one and also wash it for about forty minutes. The result is amazing - heat transfer devices will become as clean as they were at the time of purchase.
Cleaning times are approximate. If the heat exchanger is heavily soiled, cleaning should take longer. If it is relatively clean, the pump run time can be reduced. Here you can see for yourself in the process - by the level of contamination of the liquid. That is why it is recommended to install transparent tubes that allow you to visually monitor the cleansing process.
After you finish cleaning with a special solution, connect the heat exchangers to the water tap. Run clean water for about five to seven minutes. This is necessary to wash away any remaining product.
In this case, professional craftsmen use a special neutralizer - if you have the financial opportunity, you can buy it, and if you don’t want to spend money, then use this method of removing cleaner residues; it is completely justified in terms of the final result.
To better understand how to make a booster for washing heat exchangers with your own hands, watch the video:
As you can see, it is not at all difficult to create an effective and efficient booster for washing heat exchangers with your own hands, a photo of which is presented in the article.
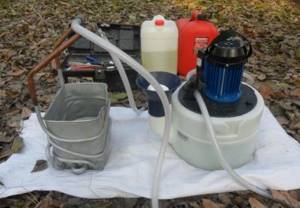
How to make a booster with your own hands
In order to make a booster for washing heat exchangers with your own hands, you will need:
- reagent reservoir - a plastic canister with a minimum capacity of 10 liters, more is possible;
- flexible hoses ½ or ¾ inches;
- water pump.
You need to make a booster based on the type of pump. This can be a submersible or free-standing pump. If the pump is submersible, then no additional holes in the tank are needed. A hose is connected to the pump, which is screwed onto the heat exchanger. The second hose (return) will carry the acid directly back into the tank. In this case, even an ordinary bucket can be used as a reservoir for the reagent. It is important that the pump is suitable for working with acids.
It is more convenient to use remote pumps; by the way, even a regular electric circulation pump for heating is suitable. To connect it, you need to insert a metal pipe at the bottom of the tank and tighten it with nuts to the walls of the tank. Everything must be sealed. Next, a coarse filter is screwed onto the squeegee - you cannot allow debris to get into the pump, and it will be better for flushing. A pump is screwed behind the filter, from which a hose goes to the heat exchanger. The circulation hose goes straight into a plastic canister.
The average service life of heating pipes in an apartment is at least 25 years, but even half a century is not the limit.
Here we told you which pipes to use for heating in a private house with autonomous heating.
The disadvantage of a DIY booster for washing heat exchangers is the absence of a heating element. Descaling with a cold reagent will take longer, but you can save on electricity.
Advice for the future
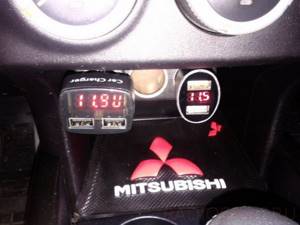
In order to always know and control the charge level of your car battery in the future, to eliminate the situations described above, buy yourself (about 300 rubles) such a voltmeter for the cigarette lighter:
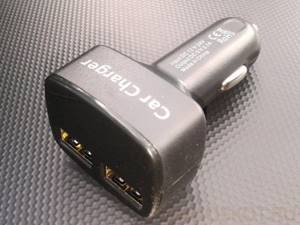
It can show battery voltage, interior temperature and current consumed via USB. The indication is displayed on the LED display alternately at intervals of 10 seconds.
Read more: Rosbank car loan interest rate
Yes, yes, they also have a couple of standard USB connectors, which will not be superfluous in the car interior. So this device is a must have for motorists!
Discuss the article HOMEMADE BOOSTER FOR CAR BATTERY
Good season! Are there still those here who have not given up on waiting for new posts?
Boredom has many faces. Sometimes you are too lazy to do something, and sometimes you are too lazy to write about it. Today, I’m too lazy to do nothing at all, so I went and made a booster from improvised means. I had some pretty good components at hand, I want to tell you:
Battery - two sections of a high-voltage Toyota Prius battery; Wires - BMW, 6mm square; Solder - POS-61; Insulation - cardboard, black insulating tape noname, bicycle inner tube cycle designe; Banjad - reinforced cattle noname, corrugated 6mm Toyota; A lanyard from some kind of camera to secure it all in the transport position.
In addition to this, I had to buy only 100A noname crocodiles for 80 rubles per pair.
Each battery section contains 6 NiMh cells (1.2V per cell nominal) connected in series. The nominal capacity is 6.5A*h, the maximum discharge current in the car is limited to 130A (when accelerating to the floor). In my case, it is not artificially limited by anything and, unfortunately, is not protected by anything. There are only emergency gas release vents. I soldered the wires to the crocodiles and to the copper plates (jumpers on which the battery in the car is assembled). I tied the wires to the battery and additionally protected them with corrugation. Since there are no fuses, and the battery is very powerful, the crocodiles are completely covered with a bicycle camera, the likelihood of shorting something is minimal. I wrapped the battery sections together with reinforced tape and insulated the terminals with the same, having previously covered them with cardboard. To prevent the wires from dangling in the transport position, I wrapped it all with a cord from the camera.
Practical application of the booster
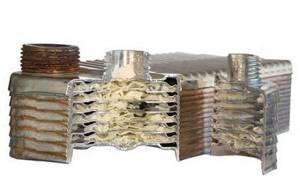
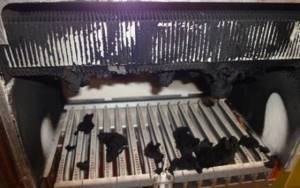
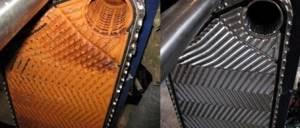
The first signs that the boiler heat exchanger needs to be flushed are clicking sounds, excessive energy consumption, and low water temperature. Heating systems may experience pressure drops. All these signs indicate that a lot of salts and scale have been deposited on the walls, which led to a decrease in nominal diameter and heat transfer.
Heat exchanger before and after cleaning.
If you are using a factory booster with a heating element, then you need:
- cut off the boiler from the circuit and drain the water from it;
- screw the hoses from the booster onto the heater;
- pour acid and turn on the unit.
If you made the booster yourself, then most likely there is no heating element in it. In this case, you can speed up the flushing process by turning on the boiler at a third of its power. With the expectation that the acid will heat up by 45-50 degrees. Just first you need to fill the heat exchanger with the active substance so that it does not burn out, and only then start the heater.
In order for the system to be reliable, it is necessary to correctly calculate the thickness of the heating pipes. The nominal passage and walls matter.
Features of selecting pipes for air heating are outlined here.
If you plan to flush the entire circuit, then the supply and output of the reagent can be organized through heating radiators. At the end of modern batteries there are plugs that can be unscrewed and ejectors installed in their place. During cleaning, the acid foams a lot, so a special substance is added to it to smooth out this process.
Flushing the heating system in a private home - options
When choosing a system cleaning option, first of all pay attention to the type of contamination. If cleaning the house is done with chemical reagents, the materials used to make the pipeline and radiators are important.
Hot water
Typically, this method is used to clean the heating circuit when replacing antifreeze that has expired - ethylene glycol, propylene glycol, glycerin.
In this case, the liquid is drained, the filters are washed, and then water is pumped into the circuit under a working pressure of 1 - 1.5 bar. Next, turn on the boiler to the operating or maximum heating temperature, and force the water to move along the circuit using an electric circulation pump.
After some time, the water is drained, after which the circuit is filled with non-freezing liquid.

Rice. 4 Types of flushing fluids
Chemical reagents
One of the most widely used methods for flushing the heating system in a private home is the use of chemicals. Usually they are an acid or alkali dissolved in ordinary water.
It is worth noting that the main sources of pollution are metal corrosion products. Since acids work best with rust, they are used much more often for flushing heating systems than aggressive alkalis. The recommended content of the most commonly used hydrochloric or sulfuric acids in washing solutions is from 3 to 10%.