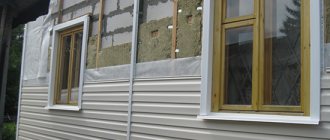
Insulation of house facades from the outside should be carried out regardless of what material they were built from. Wooden, brick, concrete houses - all of them will need additional insulation with subsequent finishing, which can protect and decorate the facade. Before you start insulating your home, you should choose the right insulation. The installation and performance characteristics of thermal insulation will depend on the type of insulation material.
Insulation today is divided into two main groups:
- synthetic;
- organic.
Synthetic insulation materials include materials obtained through the use of the latest technologies. Their peculiarity lies in their resistance to weather conditions, immunity to attack by insects and rodents and, as a result, a long period of use. In contrast, organic insulation, although completely safe for health due to the absence of substances harmful to humans in their composition, is susceptible to fungus, mold, and attracts rodents and insects, which in turn reduce the service life of the thermal insulation system. What materials are used today to insulate the walls of a house and what are the features of each of them? Read about it below.
Facade insulation technology
A good home is a warm home. Even primitive man associated comfort with warmth, so what can we say about the requirements of modern civilized and, most importantly, intelligent “sapiens”, spoiled by technology and wanting to reduce the percentage of heat loss to a minimum, while also spending a minimum of money?
According to statistics, up to 45 percent of precious heat evaporates through the facade - here is the reason to make insulation of the facade walls your first priority.
Fortunately, there are enough manufacturers of various types of building materials suitable for this purpose on the market, and they have a reputation for the quality of products in this category.
First you need to study insulation technologies. There are two of them:
- "Dry façade" Experts call it “ventilated”. There is no plastering work with this technology, but glue is used.
- "Wet façade" The correct term applied to this technology is “plaster insulated facade.”
The wet-type façade insulation system got its “name” from the use of adhesives and plasters to prepare solutions that use water. Excellent for insulation and decorative plaster and new buildings built from super-new materials, and old buildings built from GOST Soviet brick and the same cement.

A wet facade will allow the temperature inside the room to be distributed evenly, and outside it will protect the walls from the undesirable effects of atmospheric influences. This technology, in addition to its direct task (heat conservation), simultaneously performs two more functions: noise insulation and financial and economic. But it would be more correct to say economical.
No matter how progress moves forward, plaster systems for insulating facades are always beyond competition. They will be improved and remain just as necessary in the field of heat and energy saving.
Construction of houses
0 votes
+
Vote for!
—
Vote against!
For several decades, humanity has been trying to find ways to reduce energy consumption, the lion's share of which is occupied by heating buildings. By minimizing heat loss, you can count on a significant economic effect. New advanced technologies that have proven themselves well in all climatic conditions were discovered more than 30 years ago. The technique is being improved from year to year; manufacturers produce various building materials for insulating facades. Some countries have launched energy saving programs that are based on the idea of wet insulation of facades.
How to insulate a facade
Insulation of facades is a popular way of exterior finishing of buildings and saving energy at the same time. This procedure solves several problems at once: protects walls from adverse weather factors, retains heat in the house and decorates facades. Today, many companies offer their services for external wall insulation. However, the price of facade insulation does not correspond to the quality of the materials used. For this reason, developers choose the option of insulating walls themselves with polystyrene foam or other insulation.
Material selection
When insulating the walls of your home, you can choose materials rationally and creatively. There is no point in insulating all walls with material of the same thickness. Combine insulation. Since more heat reaches the south wall, different thicknesses of insulation can be used. Be sure to limit access to all kinds of rodents by insulating the base of the facades with extruded polystyrene foam. For corners, take a thicker layer of insulation.
Mineral wool
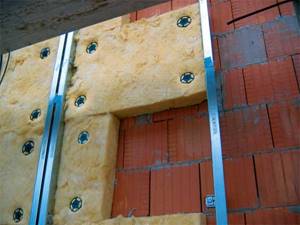
Various materials can be used to insulate facades. Mineral wool is an inorganic fibrous material that is made from silicate rock melts, mixtures of sedimentary rocks and metallurgical slags. To insulate facades with mineral wool, basalt (stone) and glass materials are used. Mineral wool boards are used to insulate facades using the “wet” method or the “hinged ventilated facade” method.
Mineral wool can withstand temperatures of more than 1000 degrees Celsius without melting; it has high thermal insulation properties and significant resistance to mechanical stress. Mineral wool does not absorb moisture, has high biological and chemical resistance, as well as good sound-absorbing properties, reducing noise by 20%. The service life of mineral wool reaches 30-40 years.
Styrofoam
Polystyrene foam is one of the popular materials intended for wall insulation. This substance began to be produced in the 30s of the last century, and at the moment polystyrene foam has not lost its leading position. The excellent thermal insulation properties of polystyrene foam are ensured due to a certain production technology, when polystyrene is foamed using special equipment, and as a result, small air-filled bubbles are formed.
Polystyrene foam consists of almost 98% air, which makes the material lightweight and moisture-resistant. Another advantage is the low cost of manufacturing and the price of insulating facades with foam plastic. Facades finished with foam plastic can reduce heat loss by approximately 70%. Modern foam plastic does not support combustion and actively resists this process. But if there are problems with rodents in your area, then it is better to abandon this idea.
Preparing the walls
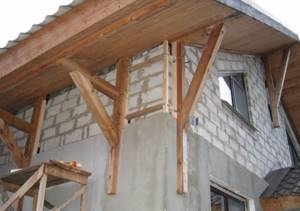
The functionality and durability of the insulation produced depends on the correct preparation of the base. Initially, all protruding structures and elements must be removed from the walls, such as ventilation grilles, storm gutters, external air conditioning units, window sills, and lighting fixtures. Communications passing along the facades that fall into the plane of the insulated wall should also be removed. In old houses, very often the brickwork has many decorative elements that are located near the eaves and windows.
We check plastered walls for the strength of the exterior finish by tapping. Using plumb lines, long rules and cords, you should find general deviations of the wall from the vertical or detect local irregularities. Mark problem areas with chalk so as not to lose sight of them. If large level differences are observed on the plane and there are weakly adhering areas, then work on insulating facades on such a base should be carried out after dismantling the protruding and breathing layers of plaster.
Particular attention should be paid to areas where oil paint remains, which has a low level of adhesion and poor vapor permeability. Be sure to remove fungus, mold, grease, efflorescence and rust from the walls. Large potholes and cracks are primed with deeply penetrating compounds using squeegees and sealed after complete drying with putties for exterior use. Cracks that are up to 2 millimeters wide do not need to be sealed. Large local depressions are usually leveled by gluing pieces of insulation.
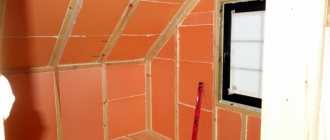
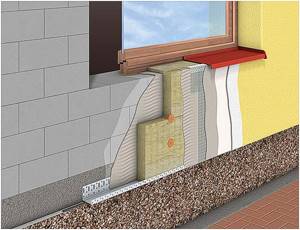
When the walls are leveled, communications have been laid, external brackets have been extended, all wet work has been completed inside the building, the roofing and waterproofing have been installed, then you can prime the surface and begin insulating the facade with polystyrene foam.
Fastening the base profile
According to the project, it is necessary to determine the lowest point of the insulated surface, then, using a hydraulic level, transfer this mark to all external and internal corners of the building, and then connect them with a coated cord to obtain a starting line. According to the markings, you need to install a base profile to hold the first row of insulation boards, because they have very serious movement on wet glue.
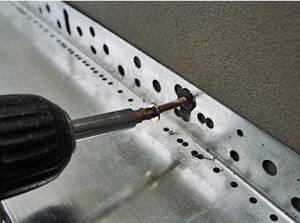
The starting strip is selected according to the size that corresponds to the width of the insulation, and secured with dowels with a diameter of 6 millimeters at intervals of 300 - 350 millimeters; it is recommended to put washers on the driven nail. The starting strip is joined at the corners using the method of oblique cuts or using a corner connector. Connecting and end elements made of plastic are placed between the sections of profiles, which compensate for temperature expansion.
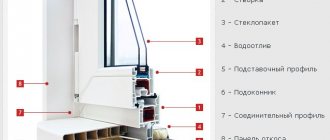
Installation of external window sills
It is better to install external window sills before installing insulation on the facade. The ebb tides are attached directly to the window itself. The removal of the window sill is done taking into account the external insulation of the facade (insulation thickness + 1 centimeter) in such a way that the window sill protrudes beyond the finished wall by 3-4 centimeters. Sometimes the window is placed on the starting profile. In this case, a cavity appears under the window sill in which moisture condenses. The cavity should be filled with pieces of insulation mixed with an adhesive mixture, or covered with plaster.
Next, you need to insulate the external slopes of the plastic windows. After installing the windows, as a rule, 20-30 millimeters remain for insulation. Foam should be used with a thinner thickness than the material for the facade. And don’t forget that there are other layers besides insulation, which take 1 centimeter. When insulating slopes, the foam plastic should protrude 1 centimeter beyond the slope. That is, the material does not need to be cut, focusing on the wall.
Glue
Prepared adhesives for gluing insulation must be used within a couple of hours, so they are mixed at the construction site in the required quantity. Pour the required amount of water into a large plastic bucket and add the dry mixture. Mix the components with a low-speed drill until a homogeneous mass is obtained without the presence of lumps. The solution matures for about five minutes, after which it is mixed again for a minute.
If the adhesive mixture thickens a little during work, then you just need to stir it. To liquefy the thickened adhesive mass, do not add water to it. Depending on what differences in the plane need to be compensated, you can choose one of these options for applying glue to the insulation.
If the unevenness reaches 15 millimeters, then a strip of glue 20 millimeters high is applied along the perimeter of the slab, and then several beacons are evenly applied in the middle of the slab. For defects up to 10 millimeters, glue strips are applied around the perimeter of the slab and in the middle. The width of the strips is 30–40 millimeters, the glue should cover 50–60% of the total sheet area.
Insulation sticker
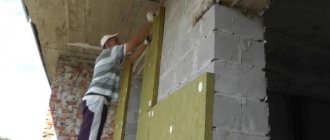
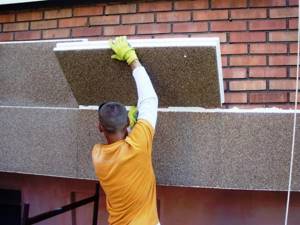
When the insulation is glued to the slopes and the window sills are installed, you can begin gluing the material to the walls. The technology of facade insulation involves fastening the insulation in such a way that it is first glued and then nailed. We begin gluing the foam from the bottom, where we install the starting bar. For gluing you will need 2 spatulas: small (80mm) and large (200mm). We use a small tool to apply the adhesive mass onto a large spatula.
It is customary to apply the mixture not on the sheet, but on the wall. As a rule, the wall is not completely flat. Therefore, you can put more mixture there if you need to remove unevenness. Thus, the mixture is not spread evenly. Spread only on a perfectly flat surface. The sheets should be fastened in such a way that T-shaped joints are formed.
The sheets should be applied to the place with a slight offset, about 20–30 millimeters, then they are pressed with a long trowel or a rule into the surface of the adjacent slabs. Excess adhesive must be removed from the inside of the slabs and from the surface of the base. The vertical installation of sheets is checked by a level, the direction of the plane is controlled by control threads.
All sheets should be pressed tightly together at a distance that should not exceed 2 millimeters, so you should make sure that the mixture does not get into the seams. If in the end there are gaps, they can be filled with strips of insulation, or blown out with polyurethane foam. At the joints of products, the permissible difference in thickness is no more than 3 millimeters.
It is important that near doors and windows the vertical joints with the side slopes do not fall in line. The connection must be made above or below the opening, the displacement must be at least 200 millimeters. If different materials are connected on the base, then the slabs should not be joined in this place; it is necessary to ensure an offset of at least 100 millimeters.
At the outer and inner corners of the facades, it is necessary to carry out a toothed connection of the insulation. The slabs of the corresponding rows must be wedged into the surface of adjacent walls so that a long vertical seam does not form, which is subject to cracks. On slopes and corners, the slabs are mounted with an outlet sufficient for dressing. After the glue has set and the corner has formed, the insulation can be trimmed.
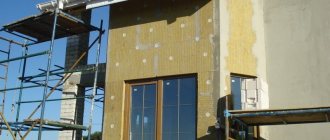
Between gluing the insulation and nailing it is worth waiting three days so that the glue sets properly and all the material “settles”. If you independently insulate the facade with polystyrene foam, you can do it differently and cover the house in sections. Half the work will have to be done from the ground, and the other half from some kind of scaffolding. Therefore, it is more advisable to carry out the procedure in parts, so as not to rearrange or carry the scaffolding several times.
If you insulate the entire house at once, the foam will remain in the sun for about two weeks. And this will not do him any good. In addition, if it rains, the insulation will pick up excess moisture. The height of the sections should be the height of the stacker and the width of the scaffolding.
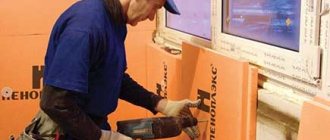
Nailing insulation
It is recommended to nail the insulation three days after gluing is completed. If you start drilling into material with an adhesive mixture that has not dried, it may move away from the wall. When nailing “fresh”, there is a possibility of getting into the recess under the sheet, which causes the edges of the sheet to lift.
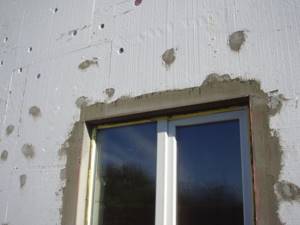
The glued insulation should be secured to the wall with fungi. This dowel is a plastic circle - a cap, which has a plastic sleeve - a leg, and a nail driven into this sleeve. Nails come in plastic and metal. No matter how strange it may sound, it is better to choose plastic products, because metal ones create an additional cold bridge and are also more expensive, which leads to an increase in the cost of facade insulation.
As a rule, fastening is carried out in the center and at the corners of the slab, 6–8 dowels per 1 square meter. At the corners of the building, near door and window slopes, in the area of the base, it is necessary to install additional fasteners, which are located 200 mm from the edge of the slabs. The pitch and number of additional placement of nails is determined by the dimensions of the house, the size of the slabs, the load-bearing characteristics of the fasteners and wind loads.
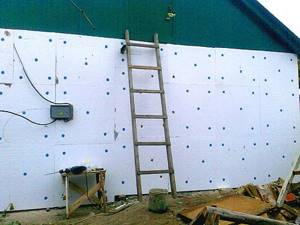
Using a hammer drill, holes of the required depth and diameter are drilled, and dust is removed. The length of the fungus is determined in this way: the thickness of the insulation board + 1 centimeter (thickness of other layers) + 4 centimeters into the wall. It is recommended to make the holes 10-15 millimeters deeper than the length of the rod. If you drill holes in depth equal to the length of the fungus, then the debris that crumbles during work will not allow the dowel to be driven in properly.
Next, you need to insert a dowel into the hole and hammer in a spacer nail with a rubber hammer. You can just hit him with your fist. The disc-shaped nail head should be level with the surface of the insulation, or protrude no more than 1 millimeter. If the mushroom does not reach the required level and sticks out, then the drill may have worn off or the hole has been made too short. In the latter case, you need to pull out the mushroom, drill it out and reinsert it.
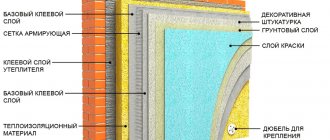
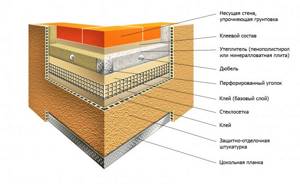
Reinforced layer arrangement
A reinforced layer implies the creation of an auxiliary, reinforcing mesh layer. Corners near door and window openings should be glued with patches of reinforcing mesh. The size of such patches should be 200 by 300 mm or more. This operation helps prevent the appearance of cracks near the inner corners of the opening.
All external corners of the building, including protruding decorations and slopes, should be reinforced with plastic or aluminum perforated corners, which are available with mesh strips. First, the adhesive composition is applied, then the pre-cut perforated corner should be pressed tightly against the insulation with a spatula and leveled horizontally or vertically.
Exposed glue must be smoothed onto the wall plane. If the need arises, the perforated corner can be temporarily fixed, leveled, and tensioned by inserting nails into the insulation board through the perforation holes. After the preparatory layer has completely dried and the reinforcing elements have been secured, we install the main mesh.
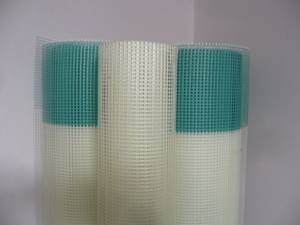
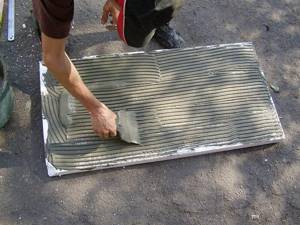
To strengthen the foam, a mesh is used, which is specially designed for facade work. It is made of alkali-resistant fiberglass that can withstand design loads. To protect the installation of the reinforcing mesh, a special mixture is used, which is slightly different from the one with which the facade is insulated with cotton wool.
Before starting work, the glued boards are sanded with hand floats using coarse sandpaper to eliminate possible differences at the joints of the sheets. Before applying the solution, the surface must be cleaned of grinding products, dust and various contaminants. The mesh is cut into strips that are equal to the height of the walls. Glue is applied to the walls in vertical strips equal to the width of the canvas.
The solution is applied in a uniform layer, the thickness of which is approximately 2 mm. For this, it is most convenient to use a metal grater. The prepared fabric should be unwound over the entire length of the surface, applied to the solution and embedded into it using a smooth metal spatula. The mesh must be carefully smoothed from the middle to the edges. Smooth any protruding glue onto the surface.
Another layer of solution must be applied to the glued reinforcing layer using the “wet on wet” method. The second layer is leveled more carefully; the finished mesh should not be visible from it. The next day, the reinforcing cake can be sanded using sandpaper, and small sinks can also be puttied. After about 3 days, the walls will dry completely; they should be treated with a primer with quartz sand, which simplifies the application of decorative plaster.
And finally. The technology of insulating a façade with polystyrene foam involves performing work at an outside air temperature of plus 5 to 25 degrees and a relative humidity of close to 80%. At each stage, working surfaces should be protected from exposure to sunlight, strong wind and rain. Strictly follow the recommendations described above, and you will succeed!
Wet type façade insulation systems
The plaster system predetermines two types of insulation:
- Heavy wet facade. The peculiarity of the technology is not to glue the insulation to the surface, but to place it on hooks (accordingly, the insulation should be tiled, not rolled) and fixed with a metal mesh.
- This design is labor-intensive and expensive; its effect is to ensure separate operation of the wall and insulation.
- Light wet facade. This option involves gluing the insulation to the wall, as well as the use of additional, “safety” fasteners - dowels or “mushrooms”.
The system is very light, does not create a load on the surface and costs several times less than a “heavy facade”.
When choosing materials for insulating facades with wet insulation, pay attention to the details. It is important! The chemical composition and thickness of the layer that protects from the cold will certainly affect the indoor temperature in winter. More information about the technology of installing a wet facade with a video can be found here.
Installation process
Insulating a facade is not a problem today. Builder specialists are ready to help you at any time and make all your wishes come true. However, this can be expensive.
Installing insulation yourself helps save money and time. The main thing is to understand the technology and carry out the work step by step. Below we have tried to briefly describe the principles and meaning of each stage.
Preparing the walls
The durability and functionality of DIY insulation depends on careful preparation of the walls. Remove all elements and protruding parts from the work plane, such as ventilation grilles, skylights, outdoor air conditioners and window trims.
Also remove all wires and communications that run in the area of the future insulation of the facade. Windows and doors of old houses are often decorated with various stucco elements; it is also better to remove them. It is a good idea to clean loose plaster from the walls.
Pay attention to areas covered with oil paint. They can reduce vapor permeability and adhesion. Fungus, mold, rust and salt secretions - all this must be removed.
Cracks and dents noticed on the facade must be filled with primer and wait until it is completely dry.
Profile installation
The order of materials when insulating the facade.
When the preparation of the facade is completed, you can begin installing the profile.
When performing the installation yourself, please note that the profile is attached to the wall horizontally using special galvanized dowels. To avoid problems due to temperature changes, leave a small gap between the profiles. 2-5 millimeters will be enough.
Installation of window sills
It is better to install external window sills before fixing the insulation to the façade of the house.
The ebbs are attached directly to the window, the window sill is moved outside taking into account the thickness of the insulation plus one centimeter. As a result, the protrusion of the window sill beyond the finished insulated wall should be 3-4 centimeters.
Preparation of glue
Sheets of insulation are attached to the facade of the house in two stages: first with glue, and then secured with dowels. To prevent the glue from hardening, use it within two hours after preparation.
It is more rational to prepare it directly at the work site. Pour the required amount of water into a large plastic bucket and add the dry glue mixture to it. Then mix the composition with a drill with a special attachment until you get a homogeneous mass without lumps. Let the solution sit for five minutes and then stir again.
During the process of insulating the facade, the glue may thicken. Under no circumstances should you try to dilute it with water; it is better to simply mix it again with a drill and attachment.
There are two ways to apply glue to insulation boards. If the walls are smooth, then simply spread the glue evenly on the insulation with a spatula. If there are unevenness in the walls, the glue is applied in small piles.
And when fastening the slabs, pendulums are used. During work, it is very important to remove excess adhesive solution so that it does not seep into the joints between the insulation sheets.
The insulation sheets are glued from top to bottom horizontally. The distance between the plates should not be more than two millimeters, so carefully press them together. All gaps will allow cold penetration. But if gaps cannot be avoided, fill them with polyurethane foam or insulation cut into thin strips.
If the volume of work is large and the facade is insulated independently, it is advisable to attach the insulation in parts. In addition, some of the work will be carried out from the ground, and the other part from construction scaffolds.
It’s better not to drag them from place to place, but to complete all the steps at once in one place. If you cover the entire house at once, the insulation will have to be exposed to the sun or rain for a long time, and this in any case will not do it any good.
Fastening insulation with dowels
Before proceeding to the next stage - attaching the insulation with dowels - you should wait three days so that the adhesive solution dries and the slabs themselves shrink. To attach the insulation, holes are drilled in the wall into which dowels are driven.
Their caps should fit flush with the insulation board. Then the core is screwed or driven in. The number of dowels may vary, depending on the number of storeys of the house and the climatic conditions in this area.
Installation of the reinforced layer
After fixing the slabs with dowels, a special aluminum mesh is glued over the insulation.
To do this, first apply glue on top of the insulation, embed the reinforcing mesh in it, and then level the working surface again. This layer will additionally protect your home from weather conditions and mechanical influences.
Decorative plaster
At the final stage, the insulated facade is covered with a layer of decorative plaster. The main thing to remember when doing the work yourself is that the thickness of the layer of decorative plaster should not be greater than the filler.
Everything else is a matter of taste. Do not forget that decorative plaster can play the role of an additional insulating layer. The most in demand are acrylic, silicate and silicone plasters, which are distinguished by a rich palette, a wide range of textures and the ability to give the decorative layer any relief.
Want more information on the topic?
Look at these articles: Foam plastic as a material for finishing the facade of a house External finishing of the facade with foam plastic is a great way... A brick house: how to insulate its facade A brick house itself is one of the most reliable and... Cinder block house: how to insulate it from the outside? A cinder block house, unlike buildings from other... Penoplex for insulating walls from the outside When building a wooden house, it is very important to carry out...
Insulating the facade with foam plastic
This system has gained the greatest popularity in recent years. Firstly, insulating the facade with polystyrene foam is financially beneficial (i.e., cheap), and secondly, the insulation scheme is so simple that a non-professional can easily cope with it. [vimeoyoutubepopup_video displaytype=”image” videoplayer=”youtube” videoid=”26LNUWcmIvg” text=”Video - How to insulate a house with polystyrene foam” autoplay=”true”]
Insulation work takes place as standard - in three stages:
- Strengthening thermal insulation boards.
- Protective putty that ensures the safety of the foam.
- Decorative works.
The advantages of foam plastic are its lightness, ease of fastening, both at low and high heights, maximum safety during operation, excellent heat and sound insulation properties.
Facade insulation with expanded polystyrene
As for the procedure for insulating a facade with polystyrene foam, it differs little from working with polystyrene foam. [vimeoyoutubepopup_video displaytype=”image” videoplayer=”youtube” videoid=”449ctrLa-2Q” text=”Video - Insulating the facade with polystyrene foam” autoplay=”true”] Moreover, even sellers don’t see much difference between these two materials.
And yet it exists, even though they are very similar in appearance.
Expanded polystyrene, unlike its brother foam, created by foaming, appeared thanks to the extrusion method (melting polymers and filling free cells with gas), so its technical characteristics are an order of magnitude higher.
The main value of polystyrene foam insulation is the complete guarantee of moisture resistance, vapor permeability and durability of this material.
Material selection
The most common materials for facade insulation include polystyrene foam and mineral wool. When doing work with your own hands, you can approach the process creatively, rationally combining and combining different materials. The walls of the house freeze in different ways, so it is not necessary to use the same thickness of insulation everywhere.
Typically, southern walls receive more heat, which means less voluminous insulation can be used there. To block access for rodents, try insulating the base with polystyrene foam. Use a thicker layer on the corners of the façade.
Mineral wool
Mineral wool is an inorganic fiber obtained from sedimentary rocks and metallurgical slag using the silicate melt method. The facade can be insulated with stone wool or glass wool. They are used as an insulating layer when installing curtain walls or for insulating a house using the “wet” method.
Mineral wool boards perfectly withstand mechanical stress, chemical and biological factors, do not melt at high temperatures and have excellent thermal insulation qualities.
The temperature they can withstand is a thousand degrees Celsius. This insulation does not lose its performance properties for forty years, does not absorb water and reduces noise levels by twenty percent.
Expanded polystyrene
Another popular material used for insulating facades is polystyrene foam. Having emerged in the 30s of the twentieth century, this material remains in demand today. Expanded polystyrene is obtained through foaming processes. As a result, small polystyrene bubbles containing air are formed. This environmentally friendly material consists of 98% air, which explains its lightness, sound insulation and excellent moisture resistance.
An important advantage that contributed to its popularity was the ease of manufacture and low cost of this material. Facades finished with polystyrene foam retain heat seventy percent better.
Modern polystyrene foam does not burn and does not contribute to the spread of flame. However, if you have a problem with rodents in your home, it is better to use a different insulation material.
Insulation of the facade with mineral wool (mineral wool)
This technology also belongs to the “light facade” type, however, insulating the facade with mineral wool will cost slightly more than the foam version. But the advantages of this material more than compensate for the costs. [vimeoyoutubepopup_video displaytype=”image” videoplayer=”youtube” videoid=”_6VCbFDScmY” text=”Video - Insulation of external walls with mineral wool” autoplay=”true”] So, the advantages:
- Environmentally friendly
- Mechanically strong and vapor permeable
- Very dense and soundproof
- Fireproof
Another benefit of this technology is that insulating the facade with mineral wool does not require any special skills and can be completed in a very short time.
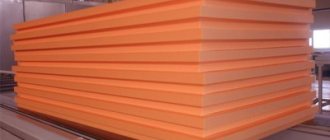
Insulation of the facade with penoplex
This insulation is a type of foam plastic, has similar properties, and is used in the same repair and construction field. [vimeoyoutubepopup_video displaytype=”image” videoplayer=”youtube” videoid=”kHL8-Uq5pXI” text=”Video - Penoplex insulation” autoplay=”true”] But how does facade insulation with penoplex differ from polystyrene foam and polystyrene foam?
The technical characteristics of penoplex show that it is able to withstand high compressive loads, while ordinary foam plastic will not be able to withstand such heavy loads.
The fire safety of penoplex is several times higher than that of expanded polystyrene: after extinguishing, expanded polystyrene continues to emit acrid smoke, which is completely unusual for penoplex.
As for the rest, it is just as easy to use, just as light in weight, and just as good as a heat insulator.
Features of insulating the facade of a wooden house
In this section we will talk not so much about elite new buildings, but about old rural wooden houses, draped with God knows what: from clay to used bricks. It's probably time to reconsider insulation standards.
Features of insulating the facade of a wooden house are:
- Insulation of walls exclusively from the outside.
- Creation of vapor-removing moisture and windproofing layers.
- Combining the process of insulating a wooden house with the finishing process.
You can insulate wooden walls with the most modern and inexpensive materials: polystyrene foam and mineral wool. You can read about insulating the facade of a frame wooden house at this link.
Penoplex insulation - features
Penoplex is a type of expanded polystyrene. For wall insulation, certain brands are used, usually numbered 31 and 35.
The process of insulating a house from the outside begins with installing the starting strip, cleaning and leveling the base. After this, plaster is applied to the walls, onto which penoplex is in turn attached. When the entire surface of the walls is covered with sheets, it is re-coated with plaster and alkali-resistant façade mesh. The finished surface of the walls is primed with high-quality compounds.