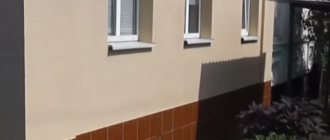
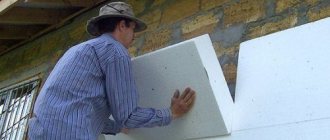
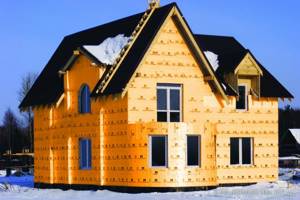
If during the cold season the electric heater in the house does not turn off, and mold has grown on the walls due to dampness, it’s time to think about thermal insulation. The most popular method is to line the building with insulating material on the outside.
However, this option is difficult to implement in apartment buildings. Therefore, residents are wondering whether it is possible to insulate the interior with penoplex in order to retain heat in the apartment without disturbing the aesthetics of the building.
In an apartment, using penoplex you can insulate the walls, floor, and balcony.
General information
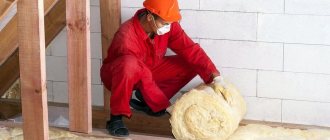
Previously, foam plastic and glass wool were used for such work. From the point of view of reliability, moisture resistance and heat-saving properties, there are no complaints about these materials. But glass wool contains harmful substances that, if inhaled, can cause an allergic reaction or poisoning. Extruded polystyrene foam developed in Russia is safe for health and easy to use.
There are products from different manufacturers on the market.
Preference should be given to brands whose names are associated with high-quality and reliable building materials.
The influence of production technology on harmful properties
During the creation process, expanded polystyrene is subjected to melting and chemical treatment. It acquires a dense, solid structure and loses its negative properties, i.e. stops releasing any harmful fumes into the air.
Unlike glass wool and low-grade foam, the material obtained as a result of extrusion is environmentally friendly and can be used in rooms where small children or allergy sufferers live.
Characteristics and properties of penoplex
Depending on the installation location, there are 4 types of penoplex: for roofing, for walls, for foundations and universal. The color is the same, orange, but the design is slightly different. For example, wall panels have ribs to improve adhesion to the surface.
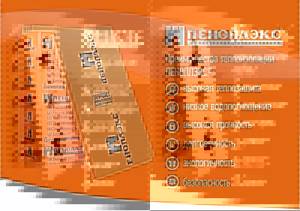
The qualitative characteristics of penoplex make it a universal insulation material.
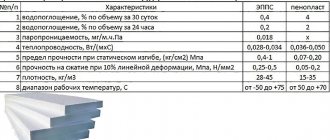
The main characteristics of the material include:
- low ability to absorb and retain moisture;
- no loss in thermal conductivity coefficient during the service life;
- resistance to water vapor;
- extended service life - up to 50 years;
- flammability class - G1-G4;
- Possibility of installation in rooms with temperatures -50…+75°C.
Required thickness

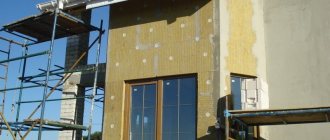
In each climate zone, it is important to choose the right thickness of penoplex for insulating walls from the outside, since such positioning allows you to protect the masonry from freezing and extend the service life of wall structures.
It will be necessary to apply a finishing non-ventilated coating to the front side, which will protect the polymer from the effects of outside air.
The value of the thermal resistance of the wall is recommended by SNiPs for each region. In an abbreviated version, the SNiP table 02/23/2003 looks like this:
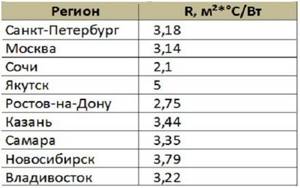
The specified resistance value is obtained by the sum of the indicators of all materials used, including finishing coatings.
Calculation
For a wall with a thickness of 1.5 bricks, five-centimeter insulation is suitable.
As an example, you can take a Moscow wall with a thickness of 1.5 bricks, which will be 0.38 m. The thermal resistance of such masonry is 0.76 m² × ° C / W (thermal conductivity coefficient of brick 0.5 W/m²×°C, 0.38:0.5=0.76). The remaining resistance value (3.14-0.76=2.38 m²×°C/W) is provided by insulation and finishing materials. If we multiply the thermal conductivity of penoplex by 0.028 W/m²×°C, we get the required thickness of 6.6 cm. Taking into account external plaster and interior decoration, it is permissible to choose slabs 5 cm thick.
The practice of performing work has shown that when using standard sheets of extruded polystyrene foam, the insulation layer on average is made of the following thickness:
- for internal insulation of premises, slabs with an end face of up to 4 cm are sufficient;
- for external arrangement in a temperate climate, set 5 cm;
- in cold zones 10 cm and conditions of the far north 15 - 20 cm. For more information on calculating the thickness of insulation for walls, see this video:
Sheets whose thickness is less than the calculated value should not be applied in 2 layers; it is better to insulate on both sides of the wall.
Before working with this material, we recommend that you familiarize yourself with the technology of wall insulation with penoplex.
Types of penoplex

Wall panels are suitable for heat and sound insulation
Penoplex is produced in the form of 5 main varieties, differing in the purpose of the types of work.
- Fundamental. They are mounted on the basement (underground) part of the building and used as permanent formwork. Protect the base of the building from freezing.
- Wall. Needed for external work on thermal and sound insulation.
- "Roof". Installed on attic floors and roof slopes, attic spaces. Blocks heat and sound from rain.
- "Comfort". Designed for interior work (walls, floors, ceilings, balconies).
- Road. The densest grade of this material is labeled “penoplex-45”.
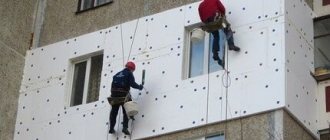
Work on installation on the outer part of the wall is no different in composition from performing internal insulation.
Key Benefits
Along with durability, soundproofing properties and ease of installation, extruded polystyrene foam has an impressive range of advantages.
Permeability
Foam plastic, like many other porous materials, allows moisture to pass through. There are voids inside it, which, when gradually filled with moisture or steam, worsen the thermal insulation properties. Penoplex is free from this drawback due to its integral structure. It absorbs moisture on average 10 times less than foam.
Mechanical strength and safety
The integrity of the structure affects the strength characteristics of penoplex.
With temperature changes and increased pressure during vertical installation, it does not crumble, deform or shrink like glass wool.
The flammability of the material is determined by the manufacturer. Depending on what processing was carried out during its creation, a class is assigned from low to high flammable. When purchasing, you should study the technical description of the goods and choose the safest one.
The undoubted advantage of penoplex is its non-toxicity.
The best option
A comparison of the advantages and disadvantages of various materials allows us to conclude that extruded polystyrene foam is the most suitable option for insulating rooms from the inside, loggias, floors, roofs, garages or verandas.
Medium thickness slabs (40 mm) are conveniently and securely installed on wood, concrete or brick surfaces.
Types of penoplex
Based on technical features and installation location, penoplex is divided into several types:
- “C” - used for thermal insulation of rooms on the ground floors, walls and room partitions;
- “F” - used for insulating foundations and basements;
- “K” - installed on roofing structures;
- “Comfort” - used when arranging loggias and free-standing small buildings;
- “45” (density 35 - 47 kg/m³) - suitable for thermal insulation of industrial structures, used at airfields and in civil engineering.
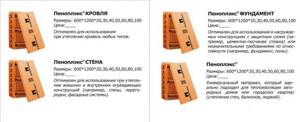
Main types of penoplex.
Material selection criteria
In order for the insulation to serve for a long time and justify the money invested in it, you should check whether it complies with GOST. Sometimes manufacturers offer products that are made in accordance with their internal requirements, but have passed state certification. In this case, the properties of the material may differ from generally accepted ones and require careful study.
It is recommended to touch the material before purchasing. It should be durable and not deform from light pressure. You should evaluate the storage location of the product, its protection from sunlight and possible exposure to solvents (acetone, petroleum products, etc.).
Before purchasing penoplex, you need to check the certificates of conformity.
The thickness of sheets of the same type must be the same. Pay attention to the fire safety mark. If, as a result of finishing, it is necessary to enhance sound insulation, the layer of material should be thicker.
How to insulate walls outside with penoplex?

Contents Hide ▲ Show ▼
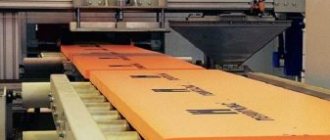
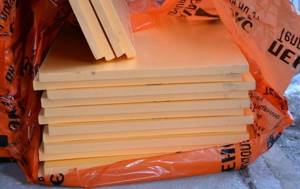
Penoplex is an excellent heat insulator of a new generation, which was developed through extrusion and foaming methods from polystyrene. It is characterized by vapor permeability, reduced thermal conductivity, compressive strength, and water resistance. Foamed heat insulator is produced in the form of slabs of different sizes and can be easily cut by hand.
It can be cut both lengthwise and widthwise, but a longitudinal cut still requires a special cutting tool. Thanks to these features, the parameters of the width and length of penoplex sheets are not critical in the process of thermal insulation of walls. The main parameter for insulation purposes is the thickness of the product.
According to standards, the thermal insulation material penoplex is produced in slabs, the width of which is 600 mm, and the thickness varies from 20 mm to 100 mm. The most complete information about wall insulation with penoplex is available in this article on our website.
So which penoplex to choose for wall insulation? For example, the standardized length of type 35 slabs is about 1200 mm, including quarter processing around the perimeter. It is worth noting that penoplex is available in only three variations:
- Penoplex with a density of 35 kg/m3, G1 is extrusive. It is one of the most common materials in the construction process. It is used in the insulation of building envelopes, roofs, floors, load-bearing surfaces, as well as shallow foundations of buildings. During the manufacturing process of this type of insulation, a chemically effective product, a fire retardant, is added to the extrusion process. This contributes to the development of resistance of penoplex slabs to fire. Compared to organic insulation materials, which produce many toxic substances when burned, penoplex is prone to only two - carbon dioxide and carbon monoxide;
- Standard with a density of 32 kg/m3, G4 specialize in insulating foundations, pool structures, floors, underground networks, wells, fire tanks, shallow foundations, etc. This type of heat insulator is often used in the arrangement of private houses with a local water supply or sewer system. This feature is extremely important for pipes in the freezing zone;
- Plates with a density of 45 kg/m2, G4 are used for insulation of highly loaded foundations, floors, for the construction of railways and roads on swelling and frozen soils, as well as for the purpose of creating thermal insulation layers in runway structures.
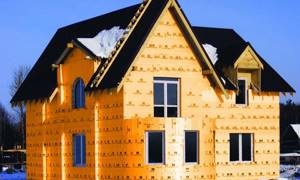
Before insulating a wall with penoplex, it is important to clearly understand the sequence of actions of this process. The main thing is careful preparation for installation in accordance with the rules. The process itself can be divided into certain stages. Finishing the facade with penoplex is considered one of the most important. However, let's return to the above topic and describe the procedure for external insulation with penoplex - it's not difficult.
Preparation for installation
Correctly insulating the outside walls of a house with penoplex means first preparing for this not only the surface of the walls, but also the penoplex itself. It is important to make the load-bearing partition as even as possible, remove loose layers (old paint, cement chips, dust), and preferably prime it.
If your foam boards are corrugated, then you don’t need to do anything with them. If the insulation is smooth, then for better adhesion to the adhesive mixture on the wall of the building, it needs to be “roughed” - with a special needle roller (the one used for drywall is also suitable for insulation) or with improvised means.
Now, penoplex for external insulation of facades is ready.
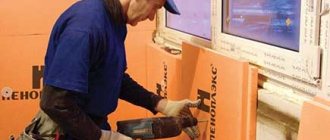
Before carrying out external installation of penoplex on the wall of the house, you should understand the window sills, slopes and ebbs. If the window has just been installed, then it is also a good idea to fill the gap between the window sill and the supporting plane with insulation, using an adhesive compound to secure it. They can also insulate external slopes. How to frame a window from the outside with penoplex beautifully - use insulation that is thinner than the façade insulation, but do not lay it flush, but so that it protrudes a centimeter beyond the plane of the wall. This will make it more convenient to join it with the main layer of penoplex on the wall of the house.
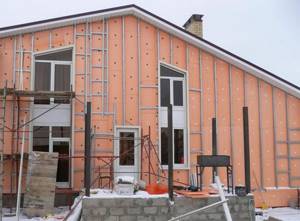
Installation of penoplex on the walls of the house
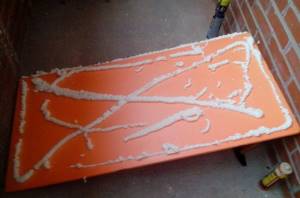
After the window sills are installed and the slopes are made, you can begin external insulation with penoplex. For this purpose, an adhesive composition for insulation is used. According to the rules, laying penoplex on the wall begins from the bottom; it is advisable to use a starting bar to securely support the first row of penoplex slabs.
The glue is distributed over the insulation, and not along the wall, and it is applied in separate “blunders”, the size of which depends on the unevenness in a particular section of the wall. There is a recess - in this place there is more of a “blunder”, the bulge is thinner (by the way, the bulges on the walls of the house should have been removed at the first stage).
In the case when the insulation of the house is done in two layers, at the second stage the glue is evenly applied to the already installed foam plastic - its surface is smooth and “cakes”, like on the wall, are not required.
It is better to choose penoplex for external use with a quarter - the sheets fit tightly to each other, and the selected quarter eliminates cold bridges in the insulation. The sheets are placed on the wall in a checkerboard pattern. Insulating the corner of a building from the outside with penoplex may require the use of reinforcing corner elements for the walls.
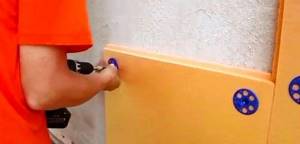
The technology of external insulation with penoplex requires that three days pass between gluing the slabs to the wall and their subsequent nailing. This is important so that the glue dries well and the insulation does not move when we start drilling holes for fasteners with a hammer drill. They fasten foam boards to the wall of the house with mushrooms, preferably plastic ones with a metal nail. Polyurethane foam is used to fill all cracks larger than 5 mm formed at the joints of insulation boards and in places where fungi are nailed down. If there are protruding joints, they can be corrected using a utility knife. A foam grater will not work.
Sequence of work
If you decide to carry out the insulation work yourself, it is better to study in advance and subsequently follow the procedure for performing the work.
Insulation calculation
First, determine the required thickness of the sheets. The final consumption of material depends on it. The thermal resistance indicator (in Russia it ranges between 3.5 to 4.6 m*K/W) is divided by the thermal conductivity coefficient of penoplex slabs. The second parameter is found in the characteristics of the material.
After taking measurements of the insulated room, the required amount of material is calculated. When purchasing, it is recommended to make a reserve of 10-15% to compensate for possible losses from defects or installation errors.
Required tools and materials
If work is carried out on the ceiling, scaffolding will be required to avoid the collapse of the structure. In all other situations, a basic set of tools is sufficient:
- drill with hammer;
- hacksaw;
- sandpaper or fine construction grater;
- laser level;
- hammer;
- spatulas of different sizes.
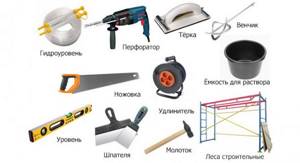
A set of tools for laying penoplex.
Auxiliary materials will also be required:
- dry adhesive mixture for installation of extruded polystyrene foam;
- polyurethane foam;
- reinforcing mesh;
- dowels;
- plaster mixture;
- finishing materials (lining, drywall, etc.).
Preparation
To ensure that the slabs are light, even and dense, before installation, you need to remove old finishing materials, dust and cement residues from the working surface. After this, using a building level, you should check the evenness of the structure and, if necessary, eliminate deviations with putty and plaster. Then the surface is primed.
When it stops being wet, you can start insulating it. There are 2 common installation methods: with glue and with the additional use of dowels. Whichever one is chosen, the slabs are first lightly rubbed with sandpaper to improve adhesion. The glue is applied with a spatula.
During installation, you can lay the finishing material directly on the insulation, or you can use a wooden frame and guides installed at the width of the slabs. The frame method will take more time, but is considered more reliable.
Walls
It is recommended to start insulation from the bottom corner of the wall, slightly moving the slabs at each next level. For reliable fixation, use bitumen mastic, cement-based glue, polyurethane glue or polyurethane foam.
The slabs are attached to the wall using special glue.
After applying glue to the slab, it should be pressed firmly against the wall and held for 1 minute, if necessary driving in dowels in the corners and in the center. The adhesive layer may be uneven, so it is necessary to check the evenness of the installation from time to time using a level. The gaps between the plates are filled with polyurethane foam. When it dries, the resulting mounds are cut off.
Ceiling
As in the case of walls, it can be mounted with or without a frame of guides. If a private house is being insulated, then penoplex is laid on the ceiling from the inside and outside, from the attic side.
In apartments there is no possibility to use the outside, so installation is carried out only from the room.
The ceiling should be cleaned, leveled and primed. Glue is applied to the material and pressed tightly to the installation site. For best fixation, dowels can be used. The seams are sealed with foam.
Finishing
Depending on what decorative material will be used to complete the finishing, the finishing of the insulation is carried out. Reinforcing plaster is applied under the tiles or wallpaper, then a reinforcing mesh is laid, plastered again (the second layer is at least 3 mm) and puttied.
It is permissible not to apply plaster under drywall. When the glue has dried, the decorative sheets are mounted to the insulating structure with self-tapping screws, and the joints between them are puttied. Before gluing wallpaper, the surface should be sanded.
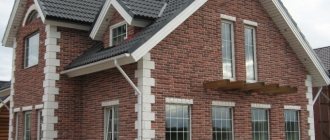
What thickness should I choose for thermal insulation for the exterior walls of a house?
To begin with, let's say that living quarters are best insulated from the outside.
- firstly, this will help avoid freezing of the walls;
- secondly, it will protect the main structure from other negative influences;
- thirdly, you won’t have to sacrifice useful living space.
In order to correctly select the thickness of the thermal insulation material, it is necessary to take into account one very important point - the climatic conditions in which the house is located. If in winter the ambient temperature drops to -20 degrees Celsius, then you will have to choose a thicker insulating material.
In warm regions, the thickness of the penoplex may be minimal. The amount of precipitation must also be taken into account. Where it rains often, it is better to choose insulation materials that are resistant to moisture - that is, they have moisture-repellent properties.
Approximate values of insulation thickness are found in SNiP documents. There is also a formula by which you can calculate the exact values for a certain material. But it’s difficult to understand all the variables on your own. Therefore, seek help from a specialist.
The need to install vapor and waterproofing
If the outside of the wall is not insulated, experts recommend adding a vapor barrier.
Vapor barrier installation diagram.
This rule does not apply to wood and other “breathable” surfaces. The waterproofing layer is added when installing extruded polystyrene foam using a frame method, with lathing. At the same time, it is secured with a stapler, overlapping, after first checking that the layer is laid correctly. The joints are taped.
On the walls: yes or no?
Insulating walls with Penoplex is permissible only if you agree to make an effective ventilation system that will regulate the humidity in the house.
In this case there are two options:
- Insulate the walls with EPS from the inside. With this solution, moisture practically does not enter the enclosing structures (the material from which the walls are made) due to the low vapor permeability of the material. In this case, the Penoplex layer for walls can be of small thickness. Specifically, it is necessary to count, since it depends on the material and thickness of the walls, and the region of residence. But, with such insulation, it is necessary to select the external finishing of the facade so that moisture is not trapped inside the wall. Ventilated facades are most suitable for this purpose.
- Stick the EPS on the outside. But at the same time, it is necessary to make an effective vapor barrier inside the room. It is needed to prevent moisture from entering the walls. Since there is EPS on the outside, it will not come out. To prevent moisture from accumulating in the wall, a vapor barrier is required. In this case, the thickness of Penoplex will be large. So large that the dew point is not in the wall, but in the thickness of the insulation. That is, in this case it will be necessary to insulate EPS walls with a thickness of 100 mm or more.
As you can see, there are options for using extruded polystyrene foam for wall insulation, but they are far from the best. Despite the fact that the material itself is good, it is poorly suited for this purpose.
And we must also take into account that the second option is only for non-hygroscopic materials. Such a scheme is very undesirable for wooden, frame buildings; it is poorly suited for foam blocks. The fact is that no matter how good the vapor barrier is, some of the moisture will still get into the walls. If the material is non-hygroscopic, moisture will gradually be removed from the wall during the dry season. With hygroscopic materials this process is more complicated. As a result, the wood rots and the foam block walls “bloom.”
Common Mistakes
At first glance, insulation work looks simple. However, inexperienced installers may make mistakes that will not allow them to achieve the required thermal insulation properties or may lead to delamination of the material. Most often, beginners make the following mistakes:
- The number of slabs is calculated incorrectly or the design stage is completely neglected. There is not enough material or there is a large residue.
- During installation, moisture is allowed to enter the work surface or the temperature regime is not observed.
- The place and tools are poorly prepared. This increases the risk of damage to the insulation or contamination of surfaces.
- They do not follow a checkerboard pattern when laying them. Because of this, cracks form and heat escapes from the room.
- Glue is applied unevenly or in insufficient quantities.
- Neglect grinding the material. The grip becomes less strong.
- Do not fill the seams with foam.

To insulate the joints, fill them with polyurethane foam.
Myths and misconceptions
To finally decide to install extruded polystyrene foam, it is worth understanding the misconceptions and myths associated with it:
- Penoplex is harmful to health. It releases toxic substances into the environment. This is a myth, because during initial processing the material becomes denser and loses the ability to release any vapors.
- Walls must “breathe”, and insulation prevents this. This is a misconception, because if city houses were permeable to air or steam, they would be damp and cold in winter.
- Using insulation increases the risk of fire. This statement is partly true. To reduce the risk of fire, you should choose a material with a high class of fire protection and additionally treat them with protective substances.
Is it profitable to use?
Standards recommend that private owners create economically feasible insulation so that it pays off at current energy prices over a certain period of time - up to 12 years. Therefore, in the design documentation for private houses and apartments, heat insulators are laid out that are quite reliable (durable), but at a reasonable price - insulation should be beneficial for the owner.
You won’t find too expensive foam glass in projects. But cheap high-density polystyrene foam (foam) is widely used.
In house designs, extruded polystyrene foam is used strictly for its intended purpose.
No one will use extruded polystyrene foam where polystyrene foam, which is much cheaper, can be used. Otherwise, the meaning of insulation is lost - it simply will not pay for itself in normal terms, and violation of the standard threatens with deprivation of the design license, for example.
Reviews about penoplex insulation from the inside
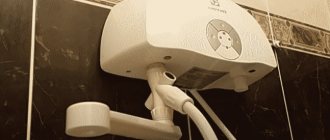
Oleg, 36 years old, Moscow: “Our loggia runs along the room and kitchen. They installed double-glazed windows, but in the frosty winters we were still cold, and this also affected the temperature in the apartment. I read the reviews on the forum and chose penoplex for insulation. I did it myself by watching videos on the Internet. I liked that almost no debris was generated during operation. I installed all the slabs in a day, and another 2 were spent on clapboard cladding. The temperature on the loggia is now significantly higher than before insulation.”
Mikhail, 45 years old, Kaluga: “I bought an apartment on the ground floor with a rough finish. I decided to use thermal insulation when screeding the floor. The building materials store recommended penoplex. I was surprised by its weight - the slabs are light, but they are not so easy to break. I placed a reinforced mesh between the insulation and the cement. Installation went quickly and without any difficulties. And I didn’t have to spend money on electric heated floors.”
Tools and materials:
- Penoplex slabs - insulation for interior decoration,
- Deep penetration primer to strengthen the base,
- Dowels for foam plastic, as additional fasteners,
- Adhesive for foam plastic - foam or dry mixture,
- Reinforced mesh - for strengthening before decorative finishing,
- Cement-based plaster - used before finishing work,
- Maklovitsa brush - used when applying primer, you can also use a roller,
- Perforated corner to give clarity to corner bends (internal or external),
- Notched trowel for applying and spreading glue,
- Plaster spatula 300 - 400mm wide,
- Decorative finishing.
Following the rules of economy, craftsmen use a mixture for gluing, which can be glue or glue-plaster.