Home \ Our services \ Chimney installation \ Installation of a chimney through a wall
A chimney through a wall or along the facade is a common solution when arranging countryside housing. Applicable in cases not covered by the construction project, repair work, or the need to maintain the integrity of the interior. Here it is important to take into account the purpose of the building, the combination of materials, and the installation option.
Only if the work is professionally carried out can we talk about the reliability and safety of heating and heating equipment.
What is a chimney through a wall and how does it work?
A chimney is an engineering life support system for buildings and structures, a structure made of pipes. The purpose of installation is to remove harmful combustion products and water vapor from the premises to a safe height using natural or forced draft formation.
The location is vertical; the rules allow the formation of a horizontal section, taking into account the norms.
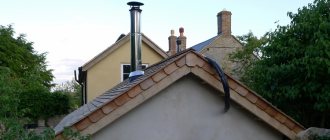
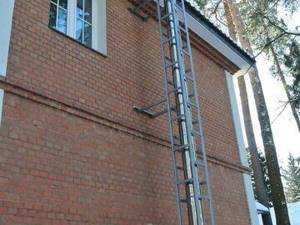
A chimney through a wall involves a horizontal outlet of the pipe through a hole in the wall near the heat source and installation of the pipe along the facade of the building up by means of fastening to the wall.
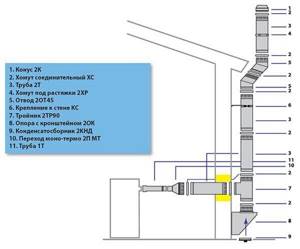
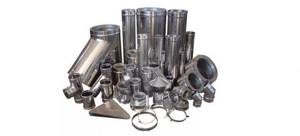
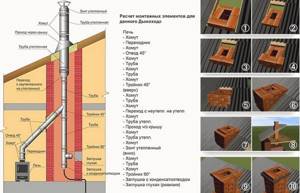
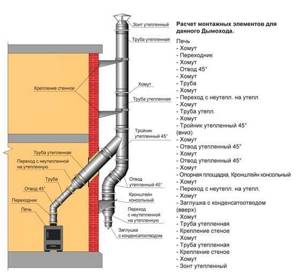
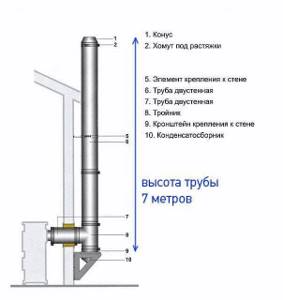
The chimney equipment set includes:
- pipes and bends,
- vertical boxes with inspection holes,
- tees and plugs,
- valves,
- fastening elements,
- condenser collectors, etc.
Depending on the type and design, the number and appearance of elements may vary.
Which one is better to choose?
The choice of chimney largely depends on the parameters of the installed heating unit (design, temperature, type of fuel used), the degree of readiness of the house (we are modernizing an old house with a stove and a wall pipe, the house is only “in design”, or the load-bearing structures have already been installed, or there is already finishing) ; heated volumes.
Features of various types of chimneys are given in the table:
Table 1
| Name | Advantages | Flaws |
| Brick | Durable and high temperature resistant masonry construction, durability depending on the liner material. | Complex installation requiring highly qualified masons; heavy weight, need for a foundation; long installation time, the need to replace the liner approximately every 10 years. When working with modern boilers and fireplaces, a brick without a liner can collapse in literally 10 years. Wall structures can only be installed during the construction of a house. |
| Ceramic | Service life up to 50 years, smooth internal surface, high installation speed; high acid resistance, good thermal insulation; withstands temperatures up to 550° | Expensive option; installation requires some qualifications; there is a need for a foundation; fragility |
| Single-layer steel (and asbestos-cement) | Smooth inner surface, lightweight, inexpensive, high speed of installation, easy to repair; resistance to corrosion and condensation | Insulation required; When passing through structures made of flammable materials, large offsets are required; They burn out in 10-15 years, there are no components - during installation you will have to make all the elements yourself. Galvanization will last five years (or less) |
| Steel sandwich type | Long service life, smooth inner surface, light weight, quick easy installation, easy repairs, high resistance to corrosion and condensation; can be installed/suspended outside the building; good thermal insulation | Quite expensive elements |
You should not use flexible steel corrugation - they burn out very quickly.
Despite the price, it is worth choosing modern ceramic chimneys or “sandwich”. If necessary, they can be installed both in a finished house and outside the house, they are durable, fairly easy to assemble, resistant to high temperatures, well insulated, and have a large assortment of ready-made factory elements.
If you want to use an old wall box from a conventional heating stove, you need to insert a stainless steel liner and insulate it. But perhaps you should choose a sandwich - there will be less hassle.
Operating principle
Based on the physical properties of gases: the density of substances decreases when heated, which causes them to rush up the chimney channels. The fresh air flow entering the firebox is designed to provide the required level of draft.
Installing a chimney through a wall in a wooden house, brick or stone building cannot be done without taking into account such parameters and conditions as:
- Structure height;
- Cross-sectional area of the internal channel;
- Features of the circuit requiring insulation;
- The location of the head relative to the top of the roof or ridge.
Traction force
Factors influencing traction force:
- pipe height;
- condition of the surface of the internal channel - regularity of soot removal, wall roughness;
- the presence of inclined or horizontal sections. The presence of horizontal and inclined sections is undesirable, since lengthening the chimney is undesirable - the gases will cool, the draft will decrease until it tips over;
- installation of a deflector;
- quality of insulation;
- air supply to the firebox.
Your safety depends on the force of traction, so it is necessary to regularly check the presence of traction and take measures to clean the channel from soot and the pipe head from ice.
Chimney through the wall: classification by materials and installation methods
In private suburban construction, both traditional and modern technologies are used. Based on the materials used, chimneys are classified into:
- brick;
- ceramic;
- metal (including stainless steel);
- sandwich construction.
A chimney with a wall passage is mounted either on an external wall (wall version) or on a separate foundation (root version).
Primary chimney

Stove with main chimney
A root canal is a variation of the classic brick chimney. The only difference is the possibility of using several furnaces and boilers for this channel at once, both on the same floor and on different levels. They are especially convenient when placing two stoves on the opposite side of the wall. That is, one is used as a heater, the other for cooking. The root canal is installed between them; by the way, even three or four furnaces can be connected to it. But, in this case, it is necessary to take into account the peculiarities of formation, both diameter and height, so that the required thrust reaches each source.
What type of chimney can be routed through the wall?
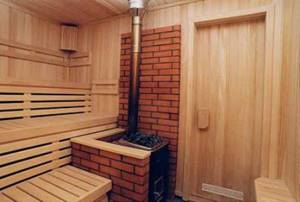
This installation method is applicable when arranging wooden, brick and stone houses, as well as bathhouses and summer kitchens.
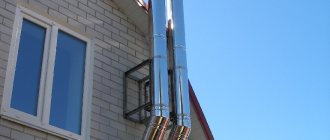
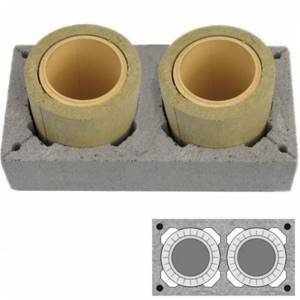
On the outside, double-circuit metal and sandwich structures are often installed.
Ready-to-assemble sections consist of two pipes of different diameters and a layer of insulator.
When they talk about the diameter of a sandwich chimney, they mean the internal diameter of the pipe. The most popular sizes (in mm) are 115 by 200, 120 by 200, 150 by 220.
There are special requirements for installing a chimney in a bathhouse through a wall. It is important to consider the type of fuel used and the properties of the materials. From the point of view of safety and durability, it is recommended to install pipes made of stainless and special steel and ceramics.
Chimney through a wooden wall: general requirements
The structure is erected in accordance with PPB, SNiP, GOST, taking into account:
- specific features of the installation site;
- characteristics of heating equipment.
In addition to the requirements for height and compliance with section diameters, special attention is paid to:
- competent planning of the configuration, number of bends and angles;
- selection of kit elements (preferably round);
- adhesion of materials;
- sealing wall passages;
- protection of elements from ignition;
- insulation of external surfaces, etc.
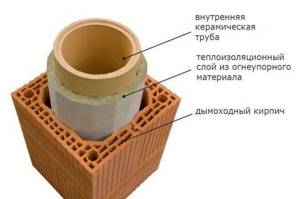
Assembling a ceramic chimney
A prefabricated structure consists of several elements:
- Inner layer. The base is made of ceramic. It is thanks to it that no harmful substances or residues accumulate inside.
- Intermediate layer. Its main purpose is heat insulation. Naturally, it is made from various non-flammable materials (mineral wool).
- External covering. Typically made from expanded clay blocks or a stainless steel casing.
Assembly order
So, in order to understand how to properly install a chimney pipe, you need to keep in mind that a ceramic chimney has several key features.
First, you need to build a foundation. A flat surface without the slightest shifts or roughness is required.
Secondly, we connect the tee using a special module. It has a pipe, and all joints are covered with a solution when connecting.
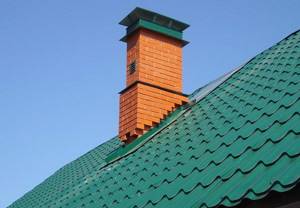
The part protruding above the roof can be covered with bricks or blocks to create a pleasant appearance and protect the thermal insulation from external influences.

Nuances
Remember that you are dealing with a modular system. And all fastenings should be as tight as possible, without any gaps.
Ceramics are a fragile structure; care should be taken; a strong mechanical shock can crack the product.
If the elements have chips or cracks, replace them immediately; they are no longer suitable for use.
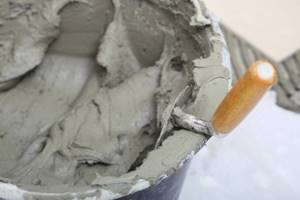
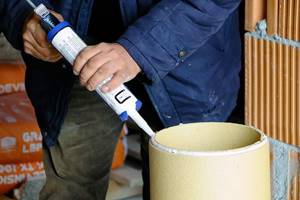
Working with glue
A special acid-resistant glue is used. It is purchased in powder form and diluted with water in a ratio of approximately seven to one. Cooking time is only ten minutes.

Remember that before applying the surface must be thoroughly wetted with a sponge. And it is better to use glue with a reserve so as not to accidentally miss the gap
Installing a chimney through a wall: advantages and disadvantages
Advantages
- Preserving the aesthetics of the interior space of a house or bathhouse (the chimney structure is located behind the walls of the house);
- Possibility of installation without taking into account construction regulations;
- Maintaining the integrity of the roof structure and roofing covering;
- Environmental friendliness;
- High level of fire safety.
Flaws
- Violation of the external style of the building;
- The need for careful insulation and sealing;
- Compliance with configuration conditions (effective operation requires a minimum number of bends and turns);
- Low efficiency (heat escapes into the atmosphere);
- Danger from avalanches from the roof slope;
- Installation of additional fastenings when the structure is high and windage occurs;
- Installation of special flashings to prevent water from entering the chimney;
- Possible difficulty during installation (need for ladders and scaffolding);
- Difficulties in maintenance (related to altitude and weather conditions).
Service life of chimneys with wall passage
The service life depends on the type of heating equipment and fuel, the heating temperature of the gases, the design of the chimney and the materials used.
An important point is high-quality professional installation, the use of safe and effective technologies.
- Brick chimneys made of refractory bricks last 50 years or more, provided that they are externally insulated, use a stainless steel liner or construct an additional internal contour made of stone.
- Ceramic channels are used for 50-100 years. The basics of durability and reliable operation are immunity to temperature changes and acids, smooth surface, and absence of conditions for condensation formation.
- Double-circuit structures made of stainless alloy steel will last about 15 years.
- Sandwich construction – 15-20 years or more, depending on the properties of the liner. An element made of carbon (“black”) steel is good for 15 years, and a stainless steel element with a thickness of 1 mm is about 20.
The chimneys of gas and pellet boilers have a longer service life.
Chimneys of boilers, stoves and fireplaces burning wood, peat, and briquette fuel also last longer, but fireplace structures that can withstand the highest temperatures of combustion products initially fail faster.
Do-it-yourself brick chimney installation
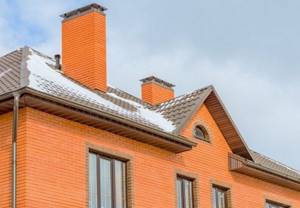
The brick chimney design is an exclusively vertical channel with a square or rectangular cross-section. To lay a brick chimney, solid ceramic bricks are used, which are laid on mortar. The outer section of the channel is laid out with ordinary brick, corresponding in style to house construction, which can be seen in numerous photos of brick chimneys. If the house is lined with stone or plastered, you can decorate the chimney in the same way.
Brick chimneys for gas boilers: installation requirements
Before laying a brick chimney for a boiler, it is necessary to build a foundation, the height of which must be at least 0.3 m. The dimensions of the base around the perimeter must protrude beyond the contour of the channel itself by at least 0.15 m. If the chimney is located in part of the external wall, its foundation should be level with its base. Laying a brick chimney with your own hands (video instructions confirm this) begins at the stage of building the walls of the house.
When constructing a chimney, solid ceramic bricks are used, which are laid on the mortar
Requirements for brick chimneys:
- the smoke channel must be vertical, without ledges, narrowed or widened areas;
- the thickness of the brick pipe for the chimney is taken taking into account the exclusion of freezing;
- the minimum permissible cross-section of smoke exhaust channels is 14 x 14 cm, which corresponds to the size of half a brick, taking into account the seam;
- the size of a brick chimney, the height of which is less than 5 m, should be increased to a channel cross-section of 14 x 20 cm;
- the chimney is constructed in the walls between heated rooms, which will prevent it from cooling and reducing draft;
- tightness - the brick chimney is laid with ligation so that the vertical seam of the previous row overlaps with the brick of the next one;
- the inner surface of the channel must be smooth;
Helpful advice! To achieve a flat and smooth inner surface of the channel, use special templates when building a brick chimney with your own hands.
- the distance between adjacent smoke exhaust ducts should not be less than 5 average outer diameters of the pipe;
An example of a chimney in a brick channel and a diagram of laying a brick chimney pipe
- if ventilation ducts are located near the chimney, their height should be equal to the height of the chimneys.
To reduce construction costs, you should place as many channels as possible in a common chimney. In this case, adjacent chimney and ventilation ducts will heat each other, which will generally improve the functioning of the chimney.
Preparation of mortar for laying a brick chimney
The composition of the mortar for laying a brick chimney is selected taking into account which section of the pipe is being laid: external or internal. To construct the external channel, the same mortar is used as for laying load-bearing walls of house construction. It is prepared from cement, sand, water and can harden in air and water. The mixture is prepared in such a volume that it can be used within an hour, as it sets quickly.
To ensure that the mixture does not deteriorate under the influence of an aggressive environment, it is recommended to add special additives to it that increase its plasticity, strength and acid resistance. Thanks to these additives, you can improve the quality of the masonry itself, increase the speed of construction and the durability of the work performed.
The properties of the chimney mortar can be improved using various additives
The preparation of a solution for a brick chimney running inside a house is based on the use of fireclay and fireclay in its composition in a 1: 1 ratio. Such mixtures cope well with high temperatures, they are durable and do not emit harmful substances. To give the clay mixture strength, you can add table salt to its composition (about 120-150 g per bucket).
Helpful advice! The strength of the chimney mortar can be enhanced by adding Portland cement in a proportion of 1 kg per bucket.
When laying a brick chimney with your own hands, you can purchase ready-made mixtures that are heat-resistant and acid-resistant. Preparing the solution yourself can reduce the cost of building a chimney.
It is quite possible to build a brick chimney with your own hands - the video below will help you familiarize yourself in detail with the stages of constructing the structure, taking into account all the basic requirements.
The feasibility of using a brick chimney for a gas boiler
Taking into account the advantages and disadvantages of brick chimneys, it is possible to draw conclusions regarding their use in combination with gas boilers. Their advantages include:
- the likelihood of using an existing chimney duct, which reduces chimney costs;
- possibility of operation in conjunction with gas equipment with an open combustion chamber;
- reasonable cost of materials for construction and finishing of the structure.
The durability of brick channels is observed only when they are used for fireplaces or stoves. If they are used for gas boilers, due to the low temperature of the combustion products, condensation will form on the channel walls, and harsh operating conditions in an aggressive environment will lead to the gradual destruction of the brickwork and deterioration in performance.
In addition, the requirements for such chimneys are more stringent:
- impeccable masonry - if the skills are not enough, you will need to invite a qualified mason to do the work, which will cost a lot of money. Prices for work: rough brick masonry from 6,000 rubles per 1 m³, facing masonry - 2,500 rubles. for 1 m²;
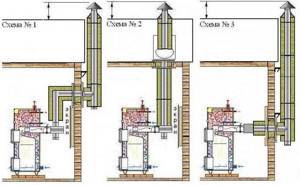
Schemes for connecting a gas boiler to a brick chimney
- inability to perform a complex channel configuration (if you need to bypass, for example, a beam in a ceiling);
- the use of the old channel should be carried out using sleeves;
- the need for thermal insulation.
The disadvantages of such a system include a decrease in traction while the brick is warming up. Thus, the correct chimney for a gas boiler will be a brick channel together with a steel or ceramic liner. The photo of brick chimneys shows that liners are installed during the process of laying the channel. In this case, it is necessary to leave a gap between the liner pipe and the brick surface. This is necessary so that the pipe can move inside the channel.
Preparation for installation work
The preparatory stage of work is the most important. It is necessary to make a drawing and carry out calculations. Then draw up a work plan, prepare equipment and tools, all basic and additional materials, and special clothing.
Selection of tools and materials
To complete the work you will need the following materials and tools:
- support console;
- steel pipe (for connecting the horizontal fragment to the boiler);
- tee and elbow;
- clamps;
- brackets, dowels, corners;
- thermal insulation material;
- protective cap;
- foil construction tape;
- heat-resistant sealant;
- stepladder (scaffolding, ladder);
- hammer drill (when working with thick, dense walls);
- drill;
- knife;
- screwdrivers;
- material cutting equipment;
- level, plumb;
- riveter
Location determination
The chimney duct must be located taking into account the specific features of buildings and regulatory parameters. Has the meaning:
- Safety and inaccessibility for children;
- Aesthetics and ergonomics;
- Materials used to construct a house or structure;
- Possible entry of rainwater and snow avalanches from the roof into the chimney;
- Location of windows and doors.
What to consider when calculating the height of the chimney
Height is the main parameter; the performance of the structure, fuel consumption and traction level depend on it. The calculations take into account the number of floors of buildings, the size of pipe sections, and the power of heating equipment.
According to the standards, the height of the chimney must be at least 5 m. If the structure exceeds the ten-meter line, they are guided by the ridge: the chimney must rise above it by 0.5 m.
What to consider when calculating the pipe diameter
When making calculations, craftsmen take into account the power of stoves, fireplaces, boilers and usually use tabular standard values, achieving full compliance with the diameters of the pipe structure and the nozzle.
| Equipment power, kW | Internal section, cm | Minimum diameter, cm |
| up to 3.5 | 14×14 | 15,8 |
| 3,5-5,2 | 14×20 | 18,9 |
| 5,2-7 | 14×27 | 21,9 |
Features of installing chimneys through a wall
Before carrying out work, the following mandatory conditions must be taken into account:
- A chimney of this type cannot be installed in the presence of communications.
- The passage of the chimney through the wall should not coincide with the joints of the pipe elements.
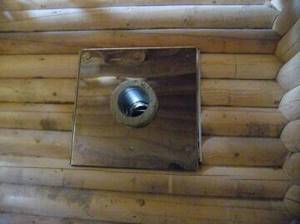
- The hole should be sealed with a heat-protective gasket and covered with a casing.
- Securely fix the pipe where it passes through the wall at a right angle using special fasteners (steps of at least 60 cm).
- The length of the horizontal section when connecting to the wall is no more than a meter.
- The distance from the pipe to the wall built from fire-resistant building materials is at least 25 cm, and from flammable materials - 45 cm.
Difficulties in installing a chimney through a wall in a wooden house
Installing a chimney in a wooden house is initially more responsible than in a stone or brick one, since wood burns well. Before carrying out work, it is necessary to treat the walls of the house with fire retardants.
To bring a chimney through a wall in a wooden house, it is necessary to strictly maintain the distance from the wall to the pipe (at least 260 mm for protected walls), standards for the size of angles, and professionally carry out thermal insulation of the passage area.
When installing a chimney in a wooden building, work must be carried out to insulate the surface of the walls at the location of the outlet pipe. This can be plastering, laying porcelain tiles, stone, sheet materials.
Features of installing a chimney through a wall in brick and stone houses
Stone, brick and concrete are resistant to fire, but, nevertheless, insulation of internal and external walls, insulation and sealing in the area of the pipe passage are mandatory.
The location and installation of chimney ducts in such houses is carried out strictly according to standards and rules. For example, the distance of the structure from the protected walls must be at least 130 mm.
Recommendations for installation in buildings made of wood and brick
Installing a chimney pipe through a wall, as well as laying a chimney through a ceiling, has its own characteristics in each specific case. The materials from which a house or outbuilding is built are of particular importance.
Brick base
The preparatory stage includes the following work:
- Choosing the location of the channel inside and outside the house.
- Unit measurements.
- Marking the wall taking into account SNiP and PPB standards indoors.
Stage 1
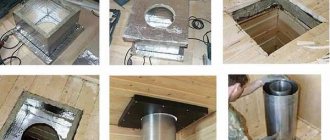
- Making a wall passage (usually with a hammer drill).
- Insulation using polyurethane foam.
- Box insert made of fire-resistant material.
Stage 2
- Fastening the horizontal chimney element:
- Tight connection between pipe and pipe, sealed with fireproof silicone.
- Installation of the element in the central part of the box.
- Seal cracks and holes with foil wool.
- Closing the joints on the external wall (with a frame plate).
Stage 3
- Installing a tee (attaching the condensate collector at the bottom).
- Dowel fastening of the support console holding the vertical structure.
- Connecting pipes, sealing, strengthening with clamps in increments of 1 m (for greater reliability of the structure, a reduction in the spacing is allowed).
Stage 4
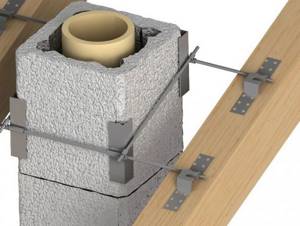
- Fixation of the structure along the length using brackets and special clamps (the seam joints should be bypassed).
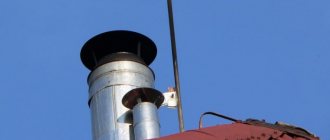
- Installing a deflector or metal umbrella on the top of the chimney to protect against debris and water.
Wooden base

The passage of a chimney through a wooden wall has a number of differences. Increased attention is paid to fire hazards, all work is carried out with the utmost care and precision.
Preparatory stage
- Determining the location of the chimney pipe passage on the external wall.
- Treat the area with an antiseptic and fire-resistant liquid.
- Marking taking into account the distance to heating equipment indoors.
Stage 1
- Install the unit at a distance of 50 cm from the wall (if it is impossible to maintain the distance, do brickwork).
- Installation of protective screen, insulating coatings, etc.
Stage 2
- Making a passage in the wall and inserting a box taking into account the diameter of the chimney pipe.
- Insulation with basalt wool.
Stage 3
- Assembly of the pipe element.
- Installation and fixation in the box, sealing cracks.
- Exit the element to the external wall strictly at a right angle.
Stage 4 (external work)
- Installation and fixation of a protective steel screen on the wall, which reduces the likelihood of smoke and fire.
- Installation of a tee and a condensate collector at the bottom.
- Installation of wall or earth support to support the vertical part of the structure.
- Connecting chimney elements (using a level or plumb line).
- Fixation to the wall in 1 m increments using brackets (the last fastener is placed under the roof).
- Installing a protective metal umbrella on the top of the chimney.
So, the most important points when calculating the design and installation:
- The presence of communications is excluded at the passage point.
- The chimney pipe, regardless of the materials, is installed at a right angle and is installed at a normal distance from the walls of buildings.
- When fastening to the façade, the deflection angles are observed.
- A condensate collector is installed in the lower section.
- Particular attention is paid to sealing and insulation.
- To ensure the reliability of the structure, clamps are used.
- The upper part of the structure is located half a meter above the roof ridge.
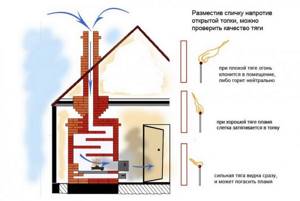
First start of the chimney
First you need to check the traction level. A light breeze should be felt in the firebox.
You can use a lit match: with good draft, the flame will rush towards the pipe.
Types of chimney pipes
The chimney pipe serves to transfer smoke and combustion products into the atmosphere; it starts from the inlet pipe of the heating device in the house and ends above the roof ridge with a protective umbrella. In private construction, the following types are mainly used:
- Made of brick. Brick pipe has been used since people began building fireplaces and stoves. The difference between a modern brick chimney is the use of special stove, fire-resistant bricks. Due to its heat-accumulating properties, this material retains heat inside the pipe, preventing overheating of the house finishing in contact with its walls. The complex structure of a brick pipe and its significant weight force homeowners to abandon this option. Only experienced stove craftsmen can correctly install chimneys of this type, which increases costs due to the wages of the foreman.
- Made of metal. The sale of metal chimneys has made it easier to create a chimney system in a private home. Additional alloy steel pipes with a thickness of 1 mm or more are lighter and cheaper than their brick counterparts. The device of such a chimney consists of separate modules. Straight modules are used for laying vertical and horizontal sections, and bends and tees are used for rotary sections. Installing a galvanized steel chimney has one drawback, which is that its material has better thermal conductivity compared to brick pipes, so it requires additional insulation. However, installing this type of chimney yourself is much easier; to do everything correctly, you just need to follow the instructions.
Internal metal chimney - Made of ceramics . The ceramic chimney system combines the strengths of brick and metal chimneys. It has a modular design and low thermal conductivity. The price for such products is higher than for metal pipes, but significantly lower than the cost of brick ones. It is difficult to make a ceramic chimney curved; it is better suited for a vertical system configuration.
Ceramic chimney pipe
The material from which the chimney is made can be selected correctly based on three factors: compliance with the material of the heating device, low thermal conductivity and tightness of the connections.
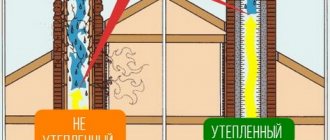
What to consider when insulating
- Insulation is required in those areas of the chimney where the warm surface of the pipe is in contact with the outside air. Otherwise, condensation will not only damage external surfaces, but will also lead to moisture entering the heating device, which will impair traction.
- Additionally, the chimney outlet through the wall, joints, and the area where the pipe intersects with the roof slope are insulated. They use fire-resistant stone and basalt wool, combined cylindrical “sleeves”, options with the addition of a foil layer.
- When installing chimneys, it is prohibited to use fiberglass with a low melting point, as well as basalt wool if a coal boiler is selected as the equipment.
Insulating materials for installing a chimney through a wall
To insulate the outer part of the chimney structure, it is allowed to use only fire-resistant materials.
- Stone wool is the best option for a wooden house. Does not burn or smolder, does not contain harmful substances, and is easy to use.
- Supersil is a good insulation material with insulating properties at an adequate price. Does not burn, reliable and durable.
- Basalt cardboard is an inexpensive, durable insulator that is resistant to high temperatures. The material contains no toxic substances, and its quality is much better than mineral wool.
An insulated chimney may not look aesthetically pleasing, but without insulation, condensation will accumulate inside the structure, leading to system failure.
Manufacturers offer ready-made sandwich structures for installation, and in some cases they also require insulation.
View all photos of the work on installing a chimney on the facade
Documents regulating the manufacture and installation of chimney structures
In order to avoid dangerous situations when designing and installing chimney structures, it is necessary to be guided by specially developed standards and regulations. Owners of private houses, after putting the facility into operation, are issued an inspection report confirming the proper operation of the chimney.
The following documents regulate installation activities:
- Federal Law “Technical Regulations on the Safety of Buildings and Structures” dated September 30, 2009 No. 384-FZ, as amended on July 2, 2013. In Art. 30, in paragraph 11 you can see the new requirements for the safe operation of buildings and structures, including chimneys.
- GOST 21.201-2011 dated October 11, 2011. Paragraph 4.11 concerns the procedure for drawing up diagrams and drawings of chimney structures.
- GOST R 21.1101-2009 dated December 15, 2009 takes into account modern technologies and regulates the rules for testing and putting into operation gas central heating boilers, including chimney and ventilation systems.
- SNiP 41-01-2003 - “Air conditioning, ventilation, heating.”
- GOST 9817–95. “Household appliances running on solid fuel. General technical conditions".
- SNiP 2.04.05-91 and manual 13.91 “Fire requirements for heating, ventilation and air conditioning systems.”
- VDPO "Rules for production work, repair of smoke ducts and furnaces."
- NPB 105-03 “Fire Safety Standards”.
There are also a number of regional standards for design, hygienic requirements for the quality of exhaust air, etc., which also need to be taken into account.
Mistakes when installing chimneys through a wall
The installation of a chimney through a wall in a wooden house or brick building must be correct. Errors can cause emergencies and unplanned repairs. It is necessary to take an extremely responsible approach to the arrangement of systems: carry out timely maintenance, invite a specialist for inspection 2 times a year.
The most serious and common violations include:
- non-compliance with the standard distance from the structure to the wall of the house;
- lack or incorrect insulation;
- insufficient sealing of the wall passage;
- loose insulation of the joints of the structure (leads to heating of the outer part);
- the presence of joints in the passage through the wall and the roof overhang;
- unreliability of the vertical fastening of the structure (dowels must enter the load-bearing structure of the wall to a depth of at least 60 mm);
- no low tide if pipes are placed through the side overhang of the roof (there is a risk of the insulation getting wet);
- getting the insulation wet (the pipe loses its insulation, overheats and heats up the walls of the house, creating a fire hazard; freezing of the liquid leads to damage, and acid in the condensate leads to rapid failure of the stainless steel liner);
- reducing the diameter of the chimney channel opening (deteriorates the level of draft up to its complete blocking).
Installation of a chimney through a wall in
We provide a full range of services, including:
- design of a chimney (heating system);
- selection and installation of a chimney kit;
- post-warranty service.
The company's qualified craftsmen will design and install the structure in a country house, summer cottage, and organize a chimney in a bathhouse through the wall, taking into account all current standards and requirements of supervisory services. At your request, the work will be carried out in stages or on a turnkey basis.
The cost of installation is calculated individually. The payment for services includes the visit of specialists, the cost of all installation and commissioning work.
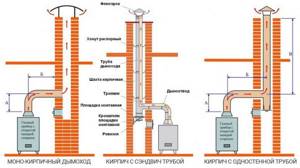
Chimney outlet diagrams
There are 2 main chimney laying schemes:
- Through the ceiling with access to the roof.

- Through the wall.
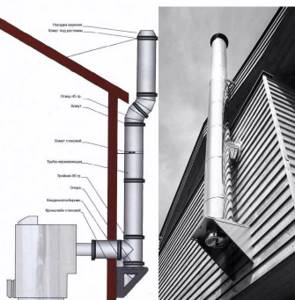
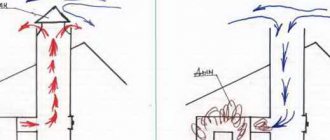
Schematic representation of the chimney outlet options:
Diagrams of chimney outlet options
There is no point in describing them in detail - these are topics for separate articles, which you can read below:
- How to remove a chimney through the roof and ceiling?
- How to bring a chimney through the wall?