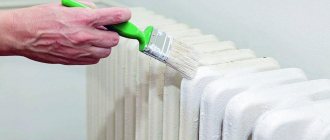
How to make a veranda warm
It often becomes necessary to turn a summer veranda into a heated room, or to insulate the veranda so that it maintains a positive temperature all winter, due to the heat coming from the house.
The latter option, by the way, is very popular, as it allows you to store vegetables and fruits on the veranda at a very low temperature, but not below 0 degrees. Maybe a vegetable storage on the veranda is not the best idea, however, having 20 boxes of radishes and 15 boxes of tomatoes on hand all winter would not be bad... The effect of a low-temperature storage is achieved by insulating the veranda.
But for an insulated veranda to become a reality, quite a lot needs to be done. This room must be comprehensively insulated, protected on all sides from sources of cold without gaps where the cold could easily penetrate.
The main places where the cold comes from on the veranda
Typically, most of the heat leaves the veranda through windows and doors. Often, summer rooms were equipped with windows with single glasses, and thin wooden doors with slots were installed. These structures practically do not prevent the movement of cold, so if you want to insulate the veranda, they need to be changed.
It is necessary to install plastic windows and insulated doors. For mediocre insulation, a single-chamber double-glazed window and doors with an insulation thickness of 5 cm are sufficient. Often this is enough to maintain a positive temperature on the veranda without being very expensive.
For high-quality insulation, double-glazed windows with sprayed glass and double doors are used.
As with old structures in openings
But if there is no way to incur high replacement costs, then you will have to insulate what is available, although this will only be a half-measure. It is necessary to caulk all the cracks in the frames and sluices with sealant. Seal all glass with sealant.
Seal everything that opens around the perimeter using a modern seal. Stretch a film on the outside of the windows at a distance of 15 - 18 mm from the glass, with the obligatory sealing of its perimeter - to make a “homemade double-glazed window”. You can stick high-density polystyrene foam onto the door and cover it with cladding.
Thermal insulation of the ceiling is required
If the insulation of windows and doors is done, the ceiling is next. The peculiarity is that often there is no attic above the veranda, i.e. there is nowhere to go to put insulation on the ceiling.
But it is necessary to insulate the ceiling, since the top is always the warmest zone. The maximum thickness of thermal insulation on the ceiling is needed; for high-quality insulation - 20 cm of polystyrene foam or 25 cm of mineral wool. If this seems excessive for an unheated room, you can reduce the values, but it is not advisable to do so by more than 2 times.
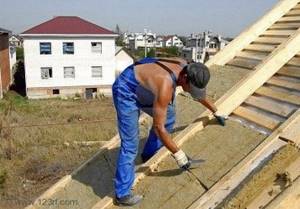
To insulate the veranda ceiling, it is better to remove the roofing and waterproofing. Then make a sheathing along the ceiling - usually they make two mutually perpendicular sheathings with a height sufficient for the insulation layer plus a ventilation gap of 30 mm.
The step between the sheathing is the width of the insulation sheets, usually 600 mm. A small layer of sawdust with lime, felt, and rags is placed between the logs to prevent contact of the foam with the wood and to prevent drafts through the insulation layer. Then the insulation is placed tightly into the spacer. Roofing felt waterproofing is laid on top and a roofing covering is attached.
The whole pie of roofing insulation on the veranda is often easier and better to do from the outside than to try to do it from the inside, besides greatly reducing the height of the room (most likely not high).
It is important that there are no gaps left between the ceiling insulation and the external thermal insulation of the walls.
Concrete floors are insulated with expanded polystyrene
Often verandas, like extensions to a house, are made with concrete floors on the ground. Such a floor can only be insulated by raising it - a layer of insulation is added and a new screed is poured or a dry screed is laid. But is it necessary to do this?
If the veranda is not heated, then insulating the floors is not necessary and even harmful. In this case, the soil will act as a natural heater in winter. It is necessary to thermally insulate a strip of soil around the veranda, since a shallow foundation is usually protected from heaving.
But if you plan to heat the veranda, then you need to fence yourself off from the cold ground. Then the thickness of the extruded polystyrene foam insulation is at least 10 cm. And if you make a heated floor, it is at least 15 cm.
It is necessary to level the existing base by adding sand until a smooth horizontal surface is obtained. Then lay continuous waterproofing with a twist on the walls, thus separating from the steam coming from the underground (ground).
Then simply lay extruded polystyrene foam of sufficient thickness in several layers with overlapping seams in the layers. On top of it, pour a screed with a thickness of 4 cm with reinforcement or erect a dry multi-layer screed of gypsum fiber sheets from 3 cm.
Now we can say that the veranda is 70% insulated.
That leaves 10% leakage through the foundation under the walls. But this insulation is often neglected due to the high labor intensity of digging the foundation for its insulation.
There is also 20 percent of heat leakage through the walls. In most structures, walls play not the first role in insulation.
Walls
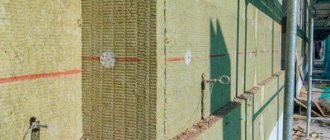
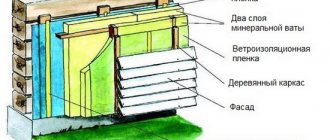
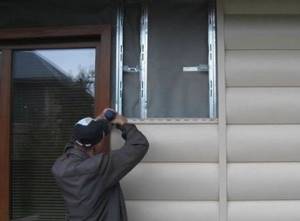
Whatever the design of the wall, for a heated veranda it is necessary to insulate it from the outside in order to avoid many serious problems and disadvantages associated with internal insulation. For example, let's take wooden walls - made of boards and panels, which are often made on summer verandas.
When thermally insulating wooden cladding, you need to use mineral wool (a material that allows steam to pass through better) to avoid rotting and dampening of the wood. Insulating the veranda from the outside is done in several steps. The sheathing is installed on hangers so that the beams are in the same vertical plane.
The height of the sheathing consists of the thickness of the insulation 120 mm plus 30 mm ventilation. a gap that is more convenient to form by attaching additional 30 mm thick strips to the sheathing.
The spacing between the beams is 600 mm along the axes - so that standard mineral wool sheets are inserted flush, as well as for optimal fastening of the external cladding of the panels. The bars themselves are often 40x50 mm or a special metal profile.
Next, you need to install a lower profile that separates the insulation from the ground. This is followed by laying sheets of mineral wool on the walls of the wooden veranda.
Usually the sheets are supported with plastic disc-shaped dowels or cords placed under the beams. A vapor-permeable membrane is fixed to the beams. Next, strips are installed on the beams to form a ventilation gap, then cladding, such as siding, or other panels are attached.
Insulating a veranda with high quality is not as easy as it seems at first glance, nor is it cheap. But the costs incurred for insulating the veranda still pay off in energy savings in the future. And the comfort and usefulness of the room are achieved immediately.
Source
What should you pay attention to when insulating the veranda from the inside?
Insulating an extension in the form of a veranda in a house built of wood is possible if the following conditions are met:
- Installation is only possible if there is good ventilation.
- When it's cool, heating must be turned on in the veranda.
- Additional wall insulation should not be more than 5.5 cm thick.
Now we propose to consider what materials can be used to insulate a building from the inside.
Review of materials that can be used for internal insulation
At the moment, there are a huge number of different materials on the construction market that will help to perform thermal insulation of a room. They differ in cost and performance characteristics. So, let's look at what material to use to insulate the veranda from the inside?
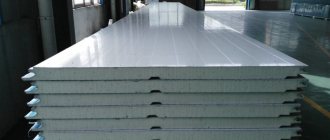
- Polystyrene foam is the most popular insulation material option in most construction applications. It is beautiful because it weighs little, has good rigidity, stable performance characteristics even during long-term use, ease of installation work and the fact that it can be installed with or without a frame. Disadvantages include a high fire hazard and a strange attractiveness to rodents. This is a huge disadvantage if you insulate the veranda of a private home. But what’s also great is that when using polystyrene foam, you don’t need to create another layer of waterproofing.
It is interesting that according to the standard insulation scheme, polyurethane foam, polystyrene foam, lining, a post-frame stand, OSB boards, cladding bars and a block house are laid.
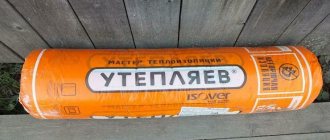
- Penofol is recommended by most experts, since this material is high-quality, modern and can be perfectly combined with other types of insulation (if desired). Penofol is perfect for insulating any building in a country house. It has a low degree of vapor permeability, and the material itself is environmentally friendly. You can install it yourself without any problems.
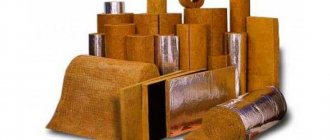
- An equally popular thermal insulation material is mineral wool. It can also be used to insulate any building in the private sector. You can also use it for rooms that are intended for use in winter. To install such a layer of thermal insulation from mineral wool, you will first need to make a frame. Such material will lose its density only 4-5 years after installation, and this can lead to a loss of thermal insulator properties.
- Basalt wool, in fact, is an analogue of mineral wool and it is also ideal for insulating a veranda in a wooden house from the inside. Its difference from mineral wool is only that it is safer from an environmental point of view.
- Expanded polystyrene was able to combine all the advantages of foam insulation at once. It has good strength properties and is easy to work with. Even a beginner can install a layer of thermal insulation with polystyrene foam, but such material has high sound permeability. By the way, it is classified as a type of non-combustible material.
- In terms of elasticity and strength, glass wool was able to surpass all the materials described above. It can be bought in any construction market in the form of a roll, and working with it is quite simple, but you should definitely use means to protect the face, hands and eyes, as well as a respiratory respirator; for this reason, you will have to buy protective equipment along with glass wool. It is not so strong, so over time it may begin to sag. This material is completely fireproof.
When we have decided on the material, let's talk about how to make insulation.
Insulation is part of the heating of the veranda
It is impossible to heat something that does not retain heat - this is the main credo of heating engineering. If you decide to organize heating for the veranda, the first thing you should do is worry about its insulation. Perhaps the thermal insulation of the veranda will already give the desired result, and there will be no need to install a heating device.
Why is this happening? The explanation for everything is heat leakage; they exist even in seemingly “sealed” rooms. In the case of greater heat leaks from the house to the veranda than from the veranda to the street, the temperature will inevitably rise on the veranda, which will create a heating effect.
That is why heating the veranda should begin with thorough insulation of the veranda, which means it is necessary to determine where heat leaks occur.
What is the best way to insulate a veranda - outside or inside?
Advantages of internal insulation:
- Ability to perform work at any time, regardless of season and weather.
- You can carry out the entire range of work on thermal insulation of the floor, ceiling and walls of the room at once.
When installing insulation from inside the veranda, the freezing point shifts to the inside of the wall. As a result, condensation forms, which leads to the slow destruction of the wooden structure. In addition, if the vapor barrier is installed incorrectly, the dew point will move under the insulation, which causes the formation of fungus, mold, and, as a result, wood rotting.
Another disadvantage of internal thermal insulation is the reduction in room area.
As you can see, the disadvantages of this method are much more significant than its advantages.
Now let's look at the advantages and disadvantages of external insulation.
Advantages:
- The dew point is located on the outer boundary of the walls, which eliminates the threat of destruction of the building.
- A facade made of timber or logs becomes protected from the influence of external adverse factors.
- The veranda area is preserved.
- There is an opportunity to update the façade of an old building.
There are practically no disadvantages to external insulation, except for the difficulty of carrying out work in bad weather. But in this case, it is better not to do the thermal insulation of the veranda yourself, but simply turn to professionals who will provide high-quality insulation at any time of the year.
Do-it-yourself choice of heating the veranda
When insulating a veranda, it is necessary to decide in advance on the type of heating, because The choice of combinations is quite large:
1. Water heating of the veranda from a common house boiler is the most labor-intensive method, and very rarely profitable. A special feature of such heating is the laying of heating communications (pipes), for which you will have to drill the walls, look for opportunities to tie into the general heating system, correctly lay and insulate the pipes and fix the radiators.
Despite the convenience of regulating the temperature in the room, there is a negative point - the impossibility of completely stopping the heating due to the need to drain water from the system. Moreover, it will be necessary to make all adjustments to the documents (heating plan).
2. Gas heating heat generators
– quite convenient, economical heating that does not require any communications wiring other than a gas pipe. Convenient, practical, but the need for gasification of the veranda requires official registration with the relevant service, which means that special conditions may arise in the decoration of the room. A big plus of such heating is the possibility of periodic use.
3. Electric heating of the veranda is the simplest option with a wide selection of thermal media:
• The most common heater is an oil radiator
, and there are both stationary and portable devices.
Pros: simple operation, frequency of use, greater reliability and good efficiency.
• Heating elements and heaters
- the heaters are structurally simpler, but the heaters add a noise effect, and the heating elements put a significant load on the electrical network, and the coil often turns out to be of poor quality and burns out.
The reliability of the manufacturer directly affects the service life.
This type of heating includes underfloor heating systems. A high-quality heated floor will last a long time and provide enough heat to the room, with the main heat located below, smoothly warming the room. The main thing is to properly insulate the floor first.
To be honest, there is a lot of advertising, but they provide as much heat as light, i.e. The more powerful heating you need, the more lighting there will be, which is not so convenient.
In addition, part of the energy is spent on lighting, which does not provide sufficient efficiency.
• IR emitters – the future behind them. The property of infrared rays is the absence of glow, which significantly saves energy. Infrared radiation itself does not carry heat, but when it hits any surface (floor, table, chair, human body) it heats it up. It is this effect that allows you to uniformly heat the room with great economic benefits and without noise, light, or laying communications.
There are two options for infrared heating - these are lamps that are suspended as high as possible for greater dispersion of radiation, or an infrared heated floor, which heats up the floor surface and objects standing on it.
When choosing heating for the veranda, do not forget about the principle “It is impossible to heat what does not retain heat.”
Source
Heating a cottage without electricity or gas
In the absence of electricity and gas, the country house will be heated by a system powered by a solar collector . A simple collector can be made independently, but it barely heats the house if the temperature drops below zero . Therefore, brick ovens are most often built for economical heating.
Stove heating
Dacha owners build fireplaces and brick stoves and purchase potbelly stoves. Stores offer owners of private homes dozens of types of cast iron and steel stoves.
Brick stoves and fireplaces are heated with wood and coal. They burn any organic fuel.
- Brick stoves are not only installed in the middle of the room , they are built into the walls to heat several rooms.
- After the fuel burns out, close the valve and the heat does not leave the house.
Bricks heat up slowly and evenly from the fire and retain heat for a long time. The oven remains warm even after 24 hours.
Fireplaces
Fireplaces are good for one room , but are not suitable for heating several adjacent rooms. They burn a lot of fuel compared to regular brick stoves.
Direct thermal radiation emanates from the flame , heating the space in front of the firebox. This creates a convection heat flow going upward from the fireplace.
Potbelly stove
When solid fuel burns, the potbelly stove quickly heats up . One stack of firewood is enough to heat the house .
Photo 1. Metal stove installed in the house. According to fire safety rules, the floor and walls around are covered with non-combustible materials.
This stove does not take up much space , but it cannot be built into openings. It is required to follow fire safety rules and move the structure away from the walls.
When fuel burns, the stove body heats up and the air temperature nearby rises.
Reference. Iron stoves heat up quickly, but also cool down quickly. The exception is long-burning stoves, which give off heat for 6-8 hours .
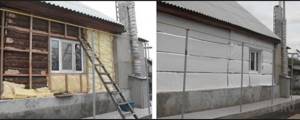
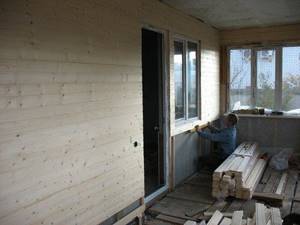
From a seasonal veranda to an all-season terrace: examples of implementation of insulation and glazing
We transform the veranda into a beautiful, comfortable and functional room with the help of insulation and glazing. “Before” and “after”: several examples from FORUMHOUSE
Provide an open terrace at the project stage, rejoice at how beautiful and original it is. For a couple of years you will suffer from the inability to use it one hundred percent due to rain, wind and snow. Glaze the terrace. It takes a long time to get rid of the thought that such a beautiful room is empty most of the year - but you can receive guests there, have dinner, drink coffee and generally do something functional. Insulate the terrace.
Familiar algorithm, right? We have collected several terraces from FORUMHOUSE, which were open in a previous life and offer you to look at their before and after photos.
- How to glaze a terrace with your own hands
- How to properly glaze an unheated terrace
- Insulating the terrace: how to do it right
- What heating devices to use on the terrace
Open-closed terrace. First stage of evolution
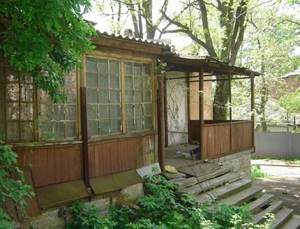
It happens that family members cannot agree on one decision, and then a compromise has to be sought. Member of our portal with the nickname Pavel Again
lived in an old house with an old veranda, the lower part of which was covered with boards, and the upper part consisted of frames with many pieces of glass of different shapes.
When they started modernizing the terrace, some family members insisted on an open version, while others dreamed of a closed one. We agreed on removable windows. Here is the technology used:
We screw threaded rods into the wall and hang sheets of transparent plexiglass on them from the floor to the roof (this is about 2.5 meters).
This is how this terrace lives: in autumn and winter it is closed.
And in the summer it is open.
Unheated terrace. Second stage of evolution
The next stage in the evolution of the terrace is a glazed unheated terrace. At this stage, terrace owners often have doubts about why glazing a non-flammable terrace at all. But it usually turns out that there is a sense in this, and a considerable one.
Member of our portal with the nickname igestor
built a beautiful house with a large open terrace, and in the very first winters he encountered all the disadvantages of such a structure on a hill and in an open place. This room, open to all winds, was uncomfortable even in summer.
But I am mainly tormented by the question of the feasibility of solid glazing of the terrace.
Like all owners of unheated terraces, our user was afraid of condensation and the fact that the double-glazed windows would not withstand frost. But he still decided on glazing: in the far side opening it is solid, and in the rest, including the door, sliding frameless.
Vit070476 came to the same decision
, and after the first winter.
The result exceeded expectations; we essentially got a gazebo, but without the snow and dirt.
His advice: be sure to provide opening doors, otherwise in the heat it will simply be unbearable to stay in such a room.
I was advised to do this at the construction stage, but I’m the smartest. In the end I did it and I’m very happy about it.
The double-glazed window serves without incident, there are no distortions, no condensation forms - apparently, the room is cooled evenly. In winter, the terrace is 10 degrees warmer than outside.
Here is a version of a member of our portal with the nickname Sintetik
. The experience of operating an open terrace quickly showed that it is impossible to live like this any longer, it needs to be glazed.
The unheated terrace will be used only in warm weather; the rest of the time it is just a vestibule in front of the entrance to the house, protection from bad weather.
The terrace area is small, 16 meters, so instead of a simple double door that would eat up space, they decided to install sliding structures.
Aluminum profile with one glass. All three glasses move, height 2.8 m, width 60-85 cm, paired rollers, 4 rollers per sash.
Converting a summer terrace into a dining terrace with transparent walls. Third stage of evolution
Our forum member with the nickname crystalik
at a dacha near Novosibirsk there is a 6x6 meter bath house, but the third part of this room is an open terrace.
This distribution of space seemed non-functional to him, and he decided to expand it into a larger space, which would include a kitchen, a dining room and a solid fuel boiler. The following project was born:
The main types of materials for wall insulation
- Glass wool
. This is an absolutely fire-safe material. Its strength and elasticity exceeds many other mineral wools in these indicators. Available for sale in the form of rolls, slabs or mats. Working with glass wool requires respiratory, eye and skin protection, namely closed clothing, gloves, goggles and a respirator. The material has low density, so over time it sags and loses its properties. This is its disadvantage. - Styrofoam
. This is the most budget option for insulation, since its cost is extremely low. Foam boards are easily attached to walls even with glue due to their low weight. However, this material is flammable and can emit toxic smoke in the event of a fire. This factor should be taken into account when installing such thermal insulation on the veranda. Most often, polystyrene foam is used for external wall insulation. - Mineral basalt wool
. It is affordable, easy to use and fire safe. True, discussions periodically arise about the carcinogenic component of this insulation, but its presence has not been confirmed by facts. Basalt wool is available in the form of slabs, mats and rolls. - Penofol
. This is a new generation heat insulator that has unique properties despite its small thickness. Its fabric is foamed polyethylene covered with a layer of aluminum foil. Thanks to this structure, the insulation combines the insulating properties of trapped air bubbles with the heat reflective ability of 99% pure aluminum. The uniqueness of penofol is manifested in the retention of heat in all paths of its movement: convection, radiation and thermal conductivity. The insulation also has vapor barrier properties. It can be used as the only insulating coating or combined with any of the above-mentioned materials. The range of penofol differs in thickness, the presence of a self-adhesive layer and perforation. The insulation is produced in rolls. - Expanded polystyrene, polyurethane foam
. These are effective, comfortable and expensive insulation materials. They are lightweight and thick, so they are most often used for thermal insulation of ceilings. Working with polyurethane foam requires a special installation, which can be obtained together with an invited master.
Winter veranda: we build and insulate it with our own hands
We have already talked about how to attach a veranda to the house, how to decorate it, but we were talking about a summer veranda, which is comfortable only in the warm season. If you want to have a cozy place in winter where you can admire the beauty of a snow-covered garden without fear of freezing, then you need a winter veranda.
In this article we will tell you how to insulate a terrace, arrange it, heat it and decorate it so that you can relax on it and receive guests both in the off-season and in severe frosts.
Causes of heat loss in a wooden house
As a rule, wooden houses are very comfortable. Such buildings are cool in the warm season and warm in the winter.
A decrease in temperature inside a wooden house is caused by two main factors:
- improper vapor barrier;
- cracks that appeared in an old building due to the drying out of wood over time.
Is it possible to insulate a wooden house from the inside? Of course, and if the house is old, it’s even necessary! In order to perform thermal insulation from the inside, it is necessary to choose the right materials and follow the technology provided for such a task.
Insulation work on both new and old wooden houses is carried out in stages.
How and with what to properly insulate a wooden house from the inside with your own hands? Let's consider the stages of internal wall insulation and select environmentally friendly insulation for internal thermal insulation.
Warming the veranda
To turn a summer room into another warm room, you will have to make some efforts. First of all, it is necessary to cut off the penetration of cold from the ground.
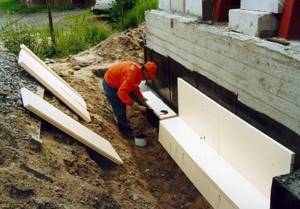
Dressing the foundation
Experts have calculated that up to 20% of the heat escapes through a concrete foundation, so it is necessary to “cover” it in order to reduce this figure to zero.
The following materials are suitable for this:
- Polystyrene foam (expanded polystyrene).
- Mineral or basalt wool.
- Jute mats.
The insulation is attached to the foundation from the outside, the joints between the slabs or layers are foamed, and to protect against the penetration of moisture from the street, the insulator is covered with waterproofing material. Then the reinforcing mesh is fixed to the insulation and plastered; alternatively, you can line the foundation with siding, porcelain stoneware or decorative tiles for the street. These materials are not afraid of moisture, resistant to temperature changes, durable, and simply aesthetically pleasing.
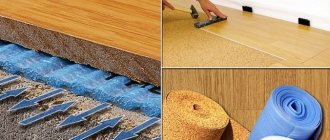
We insulate the floor on the veranda
To reduce heat loss in a room, it is very important to insulate the floor; this is done in several ways:
- Bulk insulation.
This option is used at the construction stage, the space under the proposed floor is leveled and filled with slag or expanded clay, the thickness of the layer depends on the height of the finished floor above the ground. If this was not done in due time and it is possible to dismantle the floor on the existing veranda, then the best option would be to fill the subfloor with such insulation.
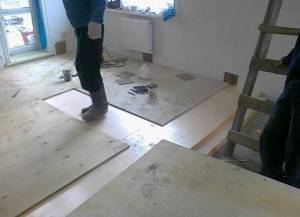
- Raised floor installation.
Logs are laid over the existing floor, between which insulation and a waterproofing membrane are laid and a floor covering is placed on top. For it, it is better to take “warm” materials - floor lath, tongue-and-groove boards, decking.
The disadvantage of such insulation will be the necessary increase in the level of the finished floor by the thickness of the “raised floor”. If this parameter does not matter, then this option is perfect.
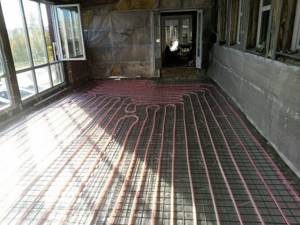
Installation of a "warm floor" system on the veranda.
- Electric "warm floor".
If the base of the floor is rigid, for example, concrete screed, chipboard or OSB, and is not subject to deformation, then it is possible to install a “warm floor” electric heating system. A mortar screed is made over it, and then the selected flooring is laid.
The disadvantage of this option is the considerable consumption of electricity in this case, but if no other heating is planned, then the “warm floor” will perfectly justify the costs.
Important! To avoid the accumulation of condensation under the flooring, it is necessary to make vents in the foundation below the floor level for air circulation, otherwise the floor covering will quickly become unusable, and the insulation will become saturated with water and will no longer perform thermal insulation functions. In addition, the room will constantly have high humidity.
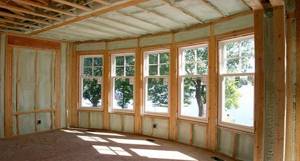
Cutting off the cold from the walls
Insulation of walls is an important factor, one might say, the main one, because the walls have the largest area in comparison with the floor and foundation, and the main heat loss occurs precisely through the cold walls.
The winter veranda to the house is insulated from the penetration of moisture and cold from the street side. For this, the same slab or roll heat-insulating materials are used as for the foundation.
The technology of wall insulation is as follows:
- The surface is leveled: cracks are caulked in a wooden building, bulges and differences between blocks in a brick or foam concrete building are lost. All chips, potholes or large gaps must be foamed; after setting, excess foam is cut off with a paint knife.
- The width of the insulation is filled with a sheathing, between which insulating boards or mats are tightly attached to dowel-umbrellas.
- When installing insulation in two layers, the lower joints between the mats must be overlapped by the upper slabs by at least 10–15 cm.
- A waterproofing membrane is fixed on top with a stapler; it is needed to cut off condensation from the insulation.
- Finishing is carried out with the selected facing material: siding, lining, decorative plaster, facade tiles (see Modern gazebos: finishing and decoration). Ideally, the exterior decoration of the walls should be in harmony with the decoration of the entire building.
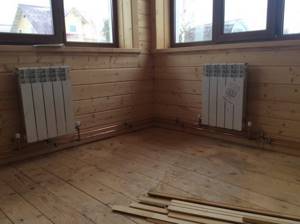
Internal insulation of veranda walls with mineral wool.
Important! If the winter veranda is located in a cold climate zone, then you can additionally insulate the veranda from the inside. The procedure for carrying out the work is the same as for external insulation, only here the hydromembrane is attached to the wall under the insulation, and the frame under the mini-slab is made of an aluminum profile and plasterboard is used for finishing.
We insulate the ceiling
We must not forget about the ceiling, through which a significant amount of warm air also evaporates. Foamed foil polymer is placed between the ceiling beams with the shiny side down; it perfectly reflects heat and retains moisture. In most cases, a layer of this material is sufficient for high-quality thermal insulation of the ceiling.
Installation of thermal insulation
Mineral wool slabs are laid in a wooden frame and additionally secured to the walls.
Insulating a veranda in a brick or wooden house for the winter involves installing thermal insulation on the floor, ceiling and walls. It should be borne in mind that not all types of materials are suitable for this purpose. You need to study their features in advance and make the right choice. Most often, insulation materials based on natural components with good air and vapor permeability are used.
Walls
Wall insulation is carried out by fixing vertical bars along the entire perimeter of the floor and fixing them with the help of vertical and transverse inserts located horizontally. On the outside, you will need to cover the walls with the selected finishing material, having previously laid a layer of vapor insulation on them. The insulation is mounted in two layers between transverse vertical inserts. Depending on the thickness of the material, it must be additionally fixed; if we are talking about mineral wool, you can do without such fixation. After insulating the vertical surfaces, a final layer of vapor insulation is applied and the interior walls are finished.
Floor
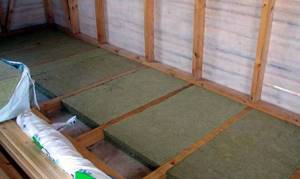
2 layers of insulation on the floor of the veranda
You need to work on the floor after building the foundation. A frame made of timber is installed on the floor supports, preferably its cross-section is 150x150 mm, and the installation of the sheathing begins. Before insulating the floor, wooden elements are treated with a protective compound. Afterwards, a subfloor made of edged or unedged boards with a thickness of at least 25 mm is fixed to the beams. On top it is necessary to install the selected insulation material and an additional layer of vapor insulation. Since the main heat loss occurs through the floor, several layers of insulation are placed on the lower floors and their directions alternate at angles of 90 degrees.
Ceiling
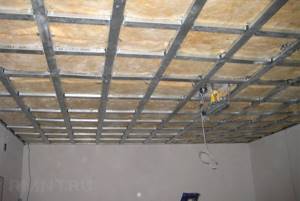
The greatest heat loss occurs through the ceiling, so mineral wool is laid in a double layer.
The ceiling in the attached veranda is assembled using a frame scheme, similar to the principle of assembling a floor using wooden beams.
According to the rules, the ceiling must be insulated even before installing the roof; for this purpose, a final surface sheathing is done on the underside of the bars, having previously installed a vapor barrier.
The insulation is installed on the finish in one or two layers, then it is covered with a rough ceiling. If the veranda does not have a separate roof with an attic, the sheathing should lie on top of the sheathing, and then you will need to install the roof.
Foundation
Expanded polystyrene is a water-repellent material suitable for contact with the ground.
The reliability and durability of the veranda directly depends on the foundation; it is advisable to install it if the extension is being built from scratch. Most often, the veranda is built together with the house, making a common foundation to avoid distortion of the entire structure, as well as damage to the main load-bearing elements of the building. When the veranda is placed separately, care should be taken to create a solid foundation. There are several foundation options that differ in design, installation method and load-bearing capacity.
If the extension is being built from brick, a strip foundation would be the ideal choice. This is a monolithic structure, which is created using concrete or cement mortar, sand, reinforcement and auxiliary materials. It is built according to the instructions and left for several weeks, after which the walls and roof of the veranda itself are erected. Those who are planning to build a lightweight veranda should choose a pile foundation. A simple option is bored piles. It does not require large expenditures; such a foundation will require the installation of a grillage and a concrete structure.
Another popular option is a columnar foundation, suitable for lightweight extensions made of wood and structures made of blocks. It is mounted on several supports that are not connected to each other; their depth level must correspond to the level of the foundation of the house. A more modern and durable option is a screw base on piles, complemented by special blades. They are easily screwed into any type of soil; their diameter is determined depending on the weight of the veranda itself.
When choosing the type of base for an extension, you should focus on its design and materials.
Which heating to choose for a winter veranda
There are several ways to effectively heat a veranda:
If the house has a boiler room with water heating, then additional pipes are installed on the terrace and connected to the central system. In this case, this is the most profitable option when the veranda is used year-round, but if you still do not periodically need heat on the terrace, then it is problematic and sometimes impossible to turn off such heating in a separate room.
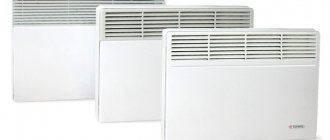
Manufacturers offer an incredible variety of different hanging and floor heaters, this includes heating elements, air heaters, radiators, oil heaters, UV and IR emitters, and a “warm floor” system.
If the winter veranda is well insulated, then one or two devices can create a comfortable temperature in the room. In addition, if necessary, you can always set them to a minimum to maintain the temperature just above 0 degrees, adjust the thermostat to turn off when certain parameters are reached, or simply disconnect them from the network.
The function of maintaining a minimum positive temperature is very convenient in cases where the owners need to leave for a while or the veranda does not need high temperature. At the same time, electricity consumption is noticeably reduced.
- Gas generating devices.
Heating of the veranda with liquefied gas.
These are autonomous and economical devices that take up little space, operate silently and efficiently. To heat a room, you just need to stretch a gas pipe along the walls of the room. But so far not everyone can afford them; boilers are quite expensive, and installation instructions require permission and registration from special services.
If you don’t want to bother with the additional work of laying heating pipes or are not happy with the extra electricity costs, then installing a small wood-burning stove may be the best and most profitable option. Manufacturers offer various types of heating devices, which are made in an original and even unusual style.
An excellent and harmonious option would be to install a real fireplace on the veranda: neither guests nor owners will refuse to sit by an open fire on a frosty winter evening. The warm warmth of a hot fire will add coziness and comfort to the family atmosphere.
Important! For all its attractiveness, sitting by the fireplace must be remembered that this is the most fire-hazardous type of heating, so it is necessary to take some measures to protect the floor from contact with open fire.
Selection of boilers from various manufacturers
Many domestic and foreign brands sell electric heating boilers that are suitable for integration into the veranda heating system. It is important to choose the optimal boiler that is suitable in terms of power and will suit the owner in terms of resource consumption, operating efficiency, functionality and practicality. Let's consider popular boilers from various Russian, Ukrainian and European brands.
EVPM boilers
The Russian electric boiler EVPM compares favorably with competitive models at an affordable price. It is designed for heating coolant in hydraulic heating systems and can be used as a basic device used for heating a house and veranda. The boiler is distinguished by the presence of a durable steel body, which hides a tank with tubular electric heaters. The device has a sufficient degree of automation. The package includes a control panel and a thermostat, which allow you to regulate the power of the device and the level of heating of the coolant.
It is important to pay attention to choosing a boiler that is suitable in terms of power. So, for a house with a veranda with a total area of about 60 sq.m. suitable electric boiler EVPM 6, which has a long service life and is designed for use in a system with an operating pressure of no more than 0.15 MPa. If the area of the heated room (including the veranda) is 90 square meters, then it is better to choose an EVPM 12 kW electric boiler, which will have more power and can provide effective heating of the house.
Boiler Galant
The Galant electric boiler is produced in Ukraine, the technical characteristics and price of which are indicated on the company’s official website. The initial cost of boilers with a minimum power in the manufacturer's line is about $300 and can vary for models with higher power and wider functionality. In a house with a veranda, the Galant electric boiler, the technical characteristics of which require the presence of a heat exchanger, a tank with heating elements and control units, will help maintain a comfortable temperature throughout the winter period.
The principle of operation of the boiler is similar to other electric heaters - the coolant heated by a generator is distributed along the circuit using a circulation pump and transfers heat to the environment. In addition to water, antifreeze, which is recommended by the boiler manufacturer, can be used as a coolant.
Scorpio boilers
One of the latest Russian developments is the innovative Scorpion electric boilers, designed for water heating systems. Boilers are optimally suited for heating country houses with verandas that do not have access to gas. The boiler is easy to install and economical, achieved through the use of an electrode method for heating the coolant.
Characteristic differences of the boiler of this brand:
- ease of maintenance;
- long service life;
- economical consumption of energy resources;
- high conversion rate of electricity into thermal energy.
Vaillant boilers
The modern and functional electric boiler Vailant is produced in Germany, so the device meets European quality standards. The boiler can be used to heat the veranda and the house. It is designed to heat rooms up to 400 square meters, so owners of small country houses and huge private mansions will be able to choose heaters suitable in terms of power from the brand’s line.
The wide functionality of the boiler allows you to use the device as simply, safely and efficiently as possible.
There are different device formats. In particular, the manufacturer offers wall-mounted and floor-standing models, characterized by a compact body, simple installation and an easy process of adjusting settings.
Boilers Evan Warmos
The Warmos electric boiler is produced in the Russian Federation, which can be adapted for heating a house and veranda. The boiler is designed to heat water and non-freezing liquids. It is distinguished by the sensitivity of its settings - the user can set the desired coolant temperature with an accuracy of 1 degree Celsius. In this case, water is heated in the range from 5 to 85 degrees.
The boiler has a number of specific options:
- possibility of power limitation;
- indicator lights displaying information messages for users;
- indication of emergency codes;
- Possibility of emergency shutdown.
Alvin boilers
The Elvin EVP 6 electric boiler, produced in Russia, is distinguished by its inexpensive price and acceptable consumer characteristics. A boiler integrated into the veranda heating system will allow you to achieve uniform heating of the coolant and quickly achieve the desired temperature values. Boilers of this brand are characterized by a high degree of automation, environmental friendliness and ease of operation.
Consumer properties of boilers:
- inexpensive price;
- simple and quick installation;
- oversized lightweight body;
- no need for a chimney pipe;
- silent operation.
Boilers Rusnit
A high-quality electric boiler Rusnit 203 with a steel heat exchanger is also assembled in Russia. This device has a long service life and high reliability. In a house with a veranda, it can be used as a basic and auxiliary heat source. Boilers have been known on the heating equipment market for fifteen years and have already gained a certain reputation in the eyes of consumers.
Various models of Rusnit boilers produced in Ryazan can be equipped with the following functions:
- thermal switch;
- temperature control sensor;
- external indication of the current boiler operating mode;
- integrated circulation pump, etc.
Recommendations for arranging the interior of a veranda
Insulating and heating the veranda is half the battle; to make it pleasant and comfortable to be on, you need to decorate it in accordance with your tastes and preferences.
Interior design is a creative process; it is, as it were, the most pleasant and interesting stage of work. In order for the winter terrace to become a favorite vacation spot for all household members and guests, you need to decide in what style you want to see the fruits of your hands.
The design of the veranda can be made in the same style as the interior of the entire house, then simply decorate it with the same materials as other rooms, install similar furniture, hang curtains that echo the overall composition and decorate with suitable elements. But if you decide to take the interior of your veranda in a completely different direction, then we can offer some options for a winter veranda, finished in various styles.
Provence
This style is perfect for a country house or cottage; soft pastel colors with rare contrasting splashes harmoniously intertwine with the emerald greenery of the garden outside the windows in the summer, and surround you with warmth and comfort on frosty days.
Provence involves finishing with natural materials. For the walls I use wallpaper with small floral patterns, wooden lining, painting with “breathing” acrylic paints, and rough plaster.
The floors are covered with tongue-and-groove boards, floor slats or laminate with a pronounced wood texture, covered with colorless varnish or impregnation that does not hide the pattern. The furniture used is preferably wooden, made of solid wood; wicker or forged furniture with many cushions, little thoughts, frills and frills is also welcome.
The individuality of the style is emphasized by light curtains with floral patterns, wooden blinds, soft colorful homespun rugs, as well as many potted plants. Do-it-yourself room decoration elements are especially welcome.
Modern style
If you are a supporter of this direction, then there are no restrictions. You can use any modern materials in decoration, from plastic to glass and metal. All the latest technical advances in the production of furniture, lighting fixtures, and decorative elements will be appropriate on such a veranda.
The interior can harmoniously coexist with plastic chairs, a table with a glass or mirror top, a large TV on the wall, porcelain tiles with an incredible pattern on the floor, a huge soft transformable sofa, and an electric fireplace against the wall.
The rule of modern style is comfort and coziness for the owners, and it doesn’t matter whether the guests like it or not, the main thing is how you feel in such an environment. The photos we present will help you get a more complete idea of the styles.
How to quickly warm a room if there is electricity
Many holiday villages have electricity all year round . To quickly heat a house, electric heaters, infrared heaters are used, and a “Warm Floor” system is installed.
Electric heaters
There are several types of household electric heaters: electric fireplaces, fan heaters, convectors, oil radiators. Such devices quickly heat the room in winter.
An electric current passing through high-resistance working elements heats them up . As a result of heat exchange with air, the house is heated.
Heating features are related to their design . The heating speed depends on this.
- Electric fireplaces have a built-in incandescent coil or heating element. A hot heater transfers heat to the surrounding air.
- The fan heater is equipped with a built-in fan that draws air into the device. After heating from the coil (heating element), the air is blown back into the room.
- Convectors have a vertical casing. Air enters the lower slots of the housing, heats up and exits through the upper slots.
- Oil heaters are filled with special oil, and there are heating elements inside the device. Heating occurs when heat is transferred from the hot body of the device.