Major renovations should start with a good plan. At the same time, the plumbing in the apartment requires the closest attention. How to design it correctly, which option to give preference to? Those who decide to repair or replace water supply pipes will have to think about this question.
Poorly designed water pipes can cause many problems. And if problems in the water supply system were observed before the repair, it’s time to study the existing wiring in order to identify and eliminate deficiencies. To do this, you need to thoroughly understand all the intricacies.
We will tell you about the options for plumbing and help you decide on the optimal type. And to make it easier to understand, the material is accompanied by schematic pictures and useful videos on the topic.
Range of materials
The question of how to install pipes in the bathroom worries many owners. After all, its proper implementation will be the key to long-term and successful operation of the bathroom. To carry out this work correctly, you need to decide on the material from which the pipes are made.
You should know that sewer and water supply lines have different purposes, so they are made from materials that have some differences.
Polypropylene pipes will be the best choice, as they are universal
It is advisable to install drainage structures from cast iron, polypropylene, polyvinyl chloride and PET materials. Ecoplast will be the best choice for plumbing. However, such structures can also be made of metal-plastic and PVC. To find out which pipes are best for wiring in the bathroom, you need to consider in detail the properties of each material and their features.
Conclusion 1
I do not want to say that collector water supply is not suitable for a private home. You just need to prepare for high costs of work and take into account the features in the calculations. It is also worth considering one more minus.
With hidden collector pipe routing, you will not be able to make joints on the water supply routes from collectors to consumers. This means that you are limited in the choice of pipes for your water supply. Polypropylene will not work (joints). Copper will not work - welding. Polyethylene in the house is unsightly. All that remains is metal-plastic pipes.
Metal-plastic pipes are connected using collet-type compression joints, and a collet connection can only be used in open areas. In addition, the collet connection can be tightened no more than 4 times during its entire service life, and reconnection is possible only after replacing all seal rings.
We are planning upcoming works
Repairs should begin with careful planning of upcoming events. Pipe routing is one of the most important elements that form the sewerage and water supply system. The functionality of the structure largely depends on how well it is planned and executed. During the planning stage, several important factors need to be determined.
Selecting a pipeline installation method
Pipe laying can be done in a closed or open way. Both of these schemes are, in principle, equally reliable. They differ in the features of operation and maintenance. Open installation involves installing pipes on top of walls or floors. If desired, they can be hidden with various decorative structures. The main advantage is the easy accessibility of communications. If it is necessary to connect new elements, service or repair, there is no need to destroy the decorative coating that hides the pipes. In addition, the slightest leak or other problem will immediately become obvious and promptly eliminated.
When laying hidden, pipes are mounted directly into the wall, which is certainly more aesthetically pleasing. However, maintenance and repair of communications is very difficult. As well as inspecting parts for leaks or other problems. For hidden installation, it is advisable to install sensors that will report water leaks. In any case, in order to gain access to the pipeline, you will have to open the wall, which is the biggest disadvantage of this type of installation.
The open version of pipe routing is the easiest to implement, maintain and repair. If desired, the unsightly appearance can be covered with decorative accessories.
The importance of pipe material
Experience shows that the easiest way to install plumbing yourself is using polypropylene or metal-plastic pipes. These are reliable, lightweight parts that can be easily processed and are quite easy to install. To make connections between metal-plastic structures, different types of fittings or crimp couplings are used, installed using special pliers. Due to the fact that special installation equipment is not required, metal-plastic can be installed even in the most inaccessible places.
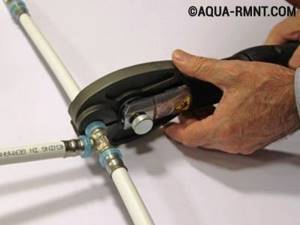
Metal-plastic pipes can be connected using fittings or crimp couplings. In the second case, special pliers will be needed for installation.
The connection of polypropylene pipes is made in the form of a welding seam. To work, you will need a special device, which is best rented or borrowed from friends. This point must be taken into account when choosing pipes, since in hard-to-reach places it will be almost impossible to connect polypropylene elements. An additional argument for choosing polypropylene will be the ability to easily fix an unsuccessful joint, which is very valuable for a novice plumber.
Wiring diagram design
You can choose a water pipe routing scheme from two options: tee or manifold. The second is considered the most practical and convenient. He assumes that when installing plumbing in a bathroom or toilet room, each device will be connected separately, which significantly reduces pressure drops in the system and allows repairs to be carried out without disconnecting the pipeline. The option is characterized by extreme ease of installation and a minimum of connections, but is more expensive than a tee circuit. It is somewhat more difficult to implement. When assembling it, experts recommend installing a shut-off valve on each of the branches from the main system so as not to shut off the entire structure in the event of a breakdown.
The result of the planning will be a layout of plumbing equipment and pipe routing. It is carried out after accurate measurements of the room and the devices that will be installed in it. With the help of such a plan, it will be much easier to determine all the necessary parts and their quantity, as well as to prevent possible misunderstandings with the output of installation angles during the installation of equipment. It is a good idea to number each part of the wiring in the order in which the assembly will be carried out. You can also make a list of all elements indicating the type of connections and the length of the fragments.
An example of a pipe layout diagram. When making a similar drawing yourself, for ease of installation, it is best to number all the elements and indicate their dimensions
How to install a plumbing system
Do-it-yourself water supply installation is carried out by the consumer. A pipe is laid to it and a ball valve is installed. Its purpose is to shut off water in emergency situations. Then the wiring goes towards the collector.
The following rules are observed:
- To facilitate repairs, the distance from the wall is 20 mm.
- If the system runs inside a wall, it must be enclosed in special boxes.
- The connection to the wall is made with clips. The step between them is 1-2 m. Their presence in corner areas is mandatory.
- When installing drain valves, the pipe is laid at an angle towards these devices.
- If you need to go around an internal corner, the distance from the wall is 30-40 mm. When going around the outer corner, 15 mm is enough.
In the event of an emergency, private water supply must be quickly disconnected from the system. To do this, a shut-off valve is installed on the pipe that is connected to the collector.
Sequence of water supply scheme
When installing water supply in a private house, the diagram helps to avoid many mistakes. When developing it, factors such as:
- type of pipes to be laid;
- number of collectors;
- number of filters and pumps;
- number of water points;
- volume of installed water heater;
- the places where the system nodes are located, and measuring the distance between them.
When developing a diagram, the required scale is selected. A drawing of the premises is made, and a layout of the adjacent area is made. The places where the highway will pass indoors and outdoors are marked.
Plumbing is carried out in two ways:
- Sequential bookmark. Branches depart from the central highway to each point of consumption. It should be taken into account that with an increase in the number of outlets, the pressure at the final points of consumption drops. Uneven pressure is the main disadvantage of this method. The advantage is low pipe consumption. The scheme is economical, so installation costs are low.
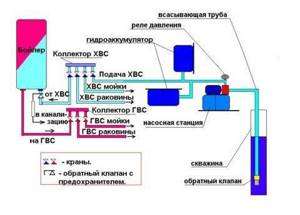
- Collector wiring. The main unit is the collector. Highways depart from it to points of consumption. The pressure is distributed evenly throughout the system, but the pipe flow is high. The insertion is carried out into the central water supply or at the water supply site from the well. A tee is installed here. One flow is directed to technical needs, and the second to the premises. A coarse filter is required to remove impurities. There is also a tee for cold and hot water in the house. Both streams are connected to collectors through which water is supplied to sources of consumption.
When laying pipes, their length should be reduced as much as possible and the number of joints should be reduced. Leaks most often form in these places. It is necessary to avoid turning the line at an angle of 90°. Such places reduce the pressure in the line. Pipes are laid openly or embedded in walls. For this purpose, boxes are made from a material that is not subject to corrosion.
Some tips
- In addition to the locks on the water pipes immediately from the riser, it is necessary to provide a valve on the branch to the washing machine.
- Even at the planning stage, intersections should be excluded. They can be allowed only when there is no way to do without it.
- Fittings must be selected from the same materials as the tubes. Otherwise, leaks and accidents will be guaranteed. The only exception is brass products. You can install brass pipe if you need a boiler.
- Copper is incompatible with aluminum and steel. In case of urgent need, such tubes can be connected only on the condition that the water flows towards the copper, and not away from it.
- The sewer line must be made with a slope from the extreme point of connection to the riser. Which in height should be about 3-5 cm per meter of its length.
- Basic locks and meters must be accessible under all circumstances. In case of accidents, there will be no time to remove the decor. Yes, and it is necessary to constantly take readings from the meters.
Summarizing
Accurate calculations, thoughtful preparation and selection of materials, plus careful laying of pipes with your own hands allow you to provide your bathroom with reliable water supply and sewerage. All that remains is to calculate the various options and start wiring.
https://youtube.com/watch?v=8jOI8k-KkUk
https://youtube.com/watch?v=8jOI8k-KkUk
Proper layout and design
The task of organizing water supply in a residential area is quite simple. It is necessary to transport water from the centralized system to the point where water is collected by consumers. The list of such places in different residential premises may be different. A simple option includes two washbasins located in the bathroom and in the kitchen, a faucet in the bathroom, and a toilet cistern.
Modern apartments require more complex systems. Almost every home today has auxiliary household appliances, the functioning of which requires water from the tap. Every family has an automatic washing machine; most housewives want to install a dishwasher in the kitchen.
In the bathroom, in addition to the bathtub itself, shower cabins are often installed, equipped with auxiliary functions, for example, hydromassage. It has become fashionable to install a bidet near the toilet. In spacious apartments there may be several sanitary facilities. Two auxiliary toilets and an additional shower increase the comfort of living quarters and, accordingly, the load on the system.
Design Features
As a result, the requirements for the quality and performance of the water supply network are increasing. Many household appliances react sensitively to changes in water pressure, which depends on the correct design of the pipeline layout. A professional water supply project for an apartment will increase the parameters of the water supply network, reduce the consumption of materials for its installation and operation, and also simplify the repair and maintenance of the water supply system.
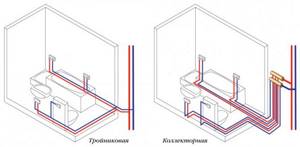
There are two options for laying water pipes in an apartment:
- A sequential circuit, also called a tee circuit.
- Collector circuit.
Each of them has its own advantages and disadvantages. Therefore, they are used for various cases and in certain conditions. Sometimes these two schemes are combined and a combined water supply is obtained.
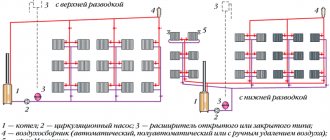
Examples of wiring diagrams, their types
The main difference between the layout of plumbing pipes is the location in the bathroom, methods of distributing water flows and laying methods. The classic circuit is a serial connection to plumbing fixtures. When drawing up, you need to take into account the location of the water supply units. In a standard bathroom layout, they are located at the central riser, next to the toilet.
An example of a highway routing diagram
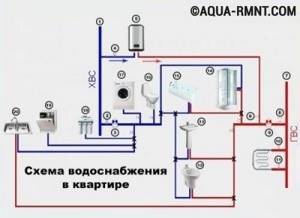
An example of a connection diagram for cold water supply with an electric water heater.
- Cold water meter.
- Connection to toilet, bidet.
- Filtration system with coarse and fine cleaning elements.
- Washing machine.
- Electric water heater. A common branch from it leads to the kitchen. A bathroom (shower) and sink are connected to it.
- Sink, bathroom.
If the house has a central hot water supply system, a heated towel rail is added to the circuit. When heating water using an instantaneous gas heater, which is usually installed in the kitchen, the hot water supply pipe leads from this room to the bathroom.
Advice: when choosing a location for installing a filtration system, take into account accessibility and the ability to quickly change filters. A special case is that the autonomous water supply is purified immediately after the pumping station.
In what cases is a collector heating system acceptable?
There is no standard solution when drawing up a diagram of a collector system, and there are also no generally accepted planning standards. The selection of equipment should be carried out by specialists, taking into account the specific tasks that need to be solved.
The opinion of experts should not be ignored: such a system cannot be recommended for heating in multi-storey buildings.
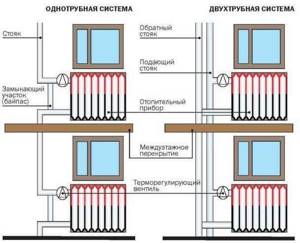
Heating system options in multi-storey buildings
The problem is that heating in the apartment is provided by the supply of coolant to at least two risers. A prerequisite for the system under consideration is the connection of all radiators to one riser.
Having left one source of heat, you will need to shut off the others, i.e. brew them. The entire load will be concentrated on the left riser, and a closed hydraulic circuit will be formed within a particular apartment.
All radiators located on the upper floors will be cut off from the centralized heating system and no coolant will flow into them. Naturally, residents of the upper floors will express dissatisfaction and will demand the forced restoration of the previous communications.
Accessories for installation of sewer pipes
Let's look at the various corners and joints for plastic sewer pipes used for installation.
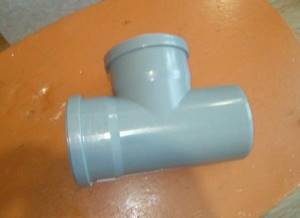
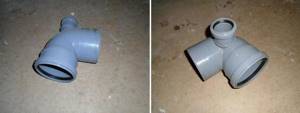
Tee 90 degrees, diameters: 32, 40, 50, 110 mm. One of the main and frequently found spare parts. Used to organize drainage to the toilet and in other solutions. You often hear from “very experienced” plumbers that the toilet outlet should not enter a horizontal bench (pipe) at an angle of 90, otherwise there will be constant blockages. I can say with full responsibility: this is not so - in my practice there are a great many toilet connections with such a tee and during operation there is no hint of blockages.
In general, plumbers have a rule: if possible, do not make 90 angles on the “ditch”, it is better to put two 45 angles
. This is indeed true and it is worth adhering to this rule, however, in the case of a toilet, in 9 out of 10 cases it is technically more convenient to make the connection with a 90-degree tee. And there’s nothing wrong with that!
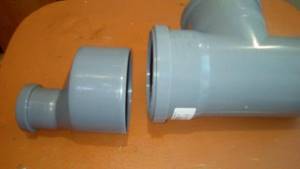
Transitional eccentric coupling 110-50 mm.
, popularly called “bottle”. Designed for transition from the 110th pipe to the 50th. In the bathroom sewer, it is used, as a rule, after organizing the outlet to the toilet - then the 110th diameter is unnecessary and installation continues with the fiftieth.
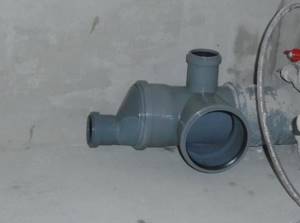
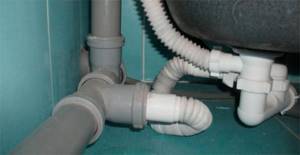
In the photo above we see the assembly: cross 110-110-110-50
and "bottle". This is how the outlet to the toilet is organized, the continuation of the D50 lounger to the left and the D50 outlet up. The upper outlet in the example above is used for the drain of the washing machine.
When purchasing crosspieces, you need to be careful: they differ in left and right.
In addition to the cross and bottle, there are many variations of transitions with 110 mm. by 50 mm. Most of these connectors are differentiated into left and right
. Some examples below:
Unlike tees 110 mm, for a diameter of 50 mm. and smaller is better to use smooth 45 degree angles - technically there is no obstacle to using two 45 angles instead of one 90.
Regardless of the pipe diameter (32, 40, 50 or 110 mm), 45 and 90 degree angles are not the only ones. There are angles of 30, 67, 87 degrees. Thanks to them, various installation problems are solved when the idea is to turn the pipes at an angle other than straight.

It is worth noting that recently a great many variations of angles and transitions have appeared; it is practically impossible to show all the existing ones.
White sewer pipes and fittings are increasingly common
colors. They fit perfectly with gray ones and differ only in color and wall thickness. The walls of these pipes are thicker, so the movement of wastewater is more silent.
Now let's discuss pipe fastening. Standardly, there are two types of brackets for fastening sewer pipes - adjustable and non-adjustable.
Non-adjustable plastic clips are used primarily for mounting on walls, since there is no possibility of creating a slope when mounting to the floor. Although a “savvy” master will find a way to attach the clips to the floor at different heights, if you have no choice, you can attach the clips to bars of different thicknesses.
The clamp sizes are standard, for pipes D32, D40, D50 and D110.
A pipe clamp with a pin gives more room for action: diameter adjustable within small limits, adjustable height of mounting on the floor or mounting on walls. These fasteners are very versatile and are suitable for any pipes, not just sewer ones. Dimensions suitable for plastic sewer: «1»
(adjustable diameter 32-36 mm for mounting D32)
“1¼”
(38-43 mm for mounting D32 in socket and for D40)
“1½”
(47-51 mm for socket D40 and for D50)
“2”
( 57-61 mm for socket D50)
“4”
(110-116 mm for D110)
The studs for these clamps come in different lengths, with M6-M10 threads. Sometimes it is convenient to purchase a long hairpin separately and make the desired length yourself.
The fasteners should be placed near the sockets (or on the sockets directly). Usually one fastening per horizontal elbow is sufficient. When secured to a socket (as in the first photo of the publication), the assembled pipes will be difficult to disassemble without loosening the clamps, this must be taken into account.
Step-by-step instructions for installing a water supply system
Do-it-yourself water supply in an apartment always begins with drawing up a detailed water supply diagram on paper. It should provide for the smallest nuances, since it will be the basis not only for carrying out work, but also for purchasing the required amount of materials.
Attention! The diagram should be drawn up with a minimum number of joints, connections and bends - this will significantly increase its operational reliability. If the space of the room allows, then the best option is the collector distribution of water supply pipes, an example of which is presented in the figure below
If the space of the room allows, then the best option is the collector distribution of water supply pipes, an example of which is shown in the figure below.
The indicated positions indicate the following elements:
- 1,2,3 - ball valves at the inlet of the washing machine, sink and bathtub mixer;
- 4.5 - collectors for cold and hot water;
- 6 - check valves;
- 7.8 - hot and cold water meters;
- 9 — reducers for normalizing pressure;
- 10 - filters providing rough cleaning.
- 11 - emergency valves.
- 12 - cold and hot water risers.
The most acceptable option for organizing a water supply system with your own hands is to use plastic pipes. They are easy to install and can be used for a long time. The optimal pipe diameter is selected in accordance with the total length of the pipeline in order to ensure the required pressure. To do this, you can use special tables that can be found on the Internet or consult with specialists.
Attention! If water supply pipes are installed in an old house, then you should pay attention to the condition of the main riser. It may need to be replaced first and this should only be carried out by specialists
Installation of ball valves
Installation of emergency ball valves at the inlet from main risers and installation of filters. The taps at the entrance to the water supply system have been repurposed to quickly shut off the water supply when a leak is detected.
Before installation, be sure to turn off the water. It is recommended to use ball valves that operate at pressures up to 60 atmospheres and temperatures up to +150˚С. Coarse filters are connected to the installed ball valves.
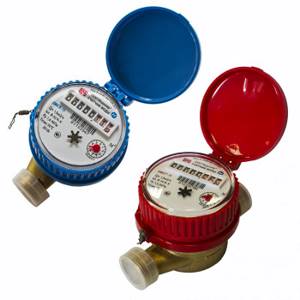
Installation of meters for hot and cold water
As a rule, the meter comes with union nuts, which allow you to disconnect the meter if necessary without compromising the integrity of the system.
Important! When installing the meter yourself, you must pay attention to the guide arrows that are placed on the device by the manufacturer. They indicate the direction of water movement
Remember! After starting the system, the installed devices must be registered with the water supply organization.
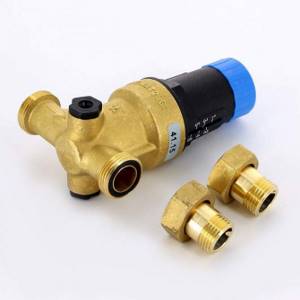
Gearbox installation
Installation of reducers in the water supply system that will prevent damage to pipelines in the event of pressure changes. It is imperative to install these devices if the water pressure in the riser significantly exceeds the capacity of the plumbing fixtures. It is good if, with excess pressure, excess water will be drained into the sewer, so if possible, a special drain should be provided.
Basic rules for installing the gearbox:
- The pressure regulator pressure gauge must be installed vertically;
- During installation, shut-off valves must be provided;
- It is imperative to take into account the direction of the water in accordance with the indicated arrow on the device body.
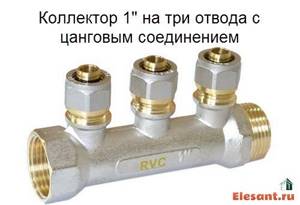
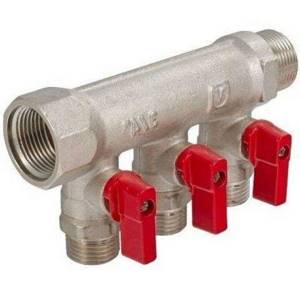
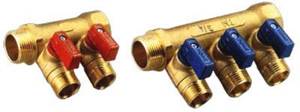
Collector installation
As a rule, these devices are equipped with a maximum of four pins. Therefore, to connect more consumers it is necessary to install several collectors.
Important! Ball valves should be installed at the inputs of all consumers to be able to turn off specific devices in the event of an emergency
Installation of water pipes
Direct installation of water pipes. To do this, purchased plastic pipes must be cut to size in accordance with the wiring diagram. The connections are welded using a special apparatus, which is quite easy to use. This technology is described in detail in the article Polypropylene pipes - DIY installation.
You can begin operating a self-installed water supply system only after checking it, which is best done with an assistant. This will allow you to quickly shut off the water supply if a leak is detected due to poor assembly.
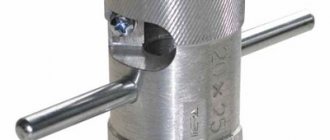
How to choose a nozzle
The choice of a casing for an angle grinder for a vacuum cleaner comes down, first of all, to taking into account the size of the working disk. A casing larger than the working body itself will bring little benefit - it will be more difficult for the vacuum cleaner to collect all the dust. A good solution would be to make three sizes of nozzle, suitable for three main sizes of disks or plates
The next criterion for choosing a casing will be the type and quality of the work to be done.
- Sanding a surface treated with putty creates a cloud of fine dust. For such work, you need a casing with a tight fit of its edge to the surface being treated and a vacuum cleaner with high suction speed.
- When cleaning metal from rust, it makes sense to use a casing of a small size or with a transparent body for better control.
- Working with wood or removing old paintwork requires a casing of small diameter, but with a large outlet pipe - sawdust is larger than dust, a smaller diameter will clog faster.
- Sawing stones or cutting tiles also require high suction speed, since in this case the draft of the vacuum cleaner creates additional cooling of the space covered by the casing.
A comprehensive answer to the question about choosing the size of the casing will be the formula: “casing diameter = diameter of the working body (disk or plate) + 1-2 cm.”
The seat size of the casing is taken to be the diameter of the angle grinder body at the point of attachment of the standard protective structure, or the outer diameter of the support bearing seat.
The depth of the casing body is selected in such a way that its soft parts, fixed to the base, are no more than 0.5-1 cm long. The long soft edge can turn inward and get under the working element - the operator will feel a strong unpleasant tug, and the structure will come out of building.
Pipe selection
Wiring made of metal-plastic pipes
In order to correctly install the water supply system in your apartment with your own hands, it is recommended to use either metal-plastic pipes or purely plastic ones.
As for the use of steel or copper options, it is better to avoid them, because working with them requires not only skill, but also additional traumatic tools for cutting, welding and bending.
However, they remain the best option for creating a water supply system. No deposits appear on their walls during use, and the fairly low thermal conductivity makes it possible to use such pipes to provide hot water supply.
Of the variety of plastic pipes, polypropylene pipes are considered the best in terms of price/quality ratio. To solder polypropylene pipes, a special “soldering iron” is used, which is very easy to learn how to use.
Water communications
If you set out to install pipework using polypropylene pipes, you need a tool, which in simple language is called a “soldering iron”. Purchasing it for a one-time use is impractical; the best solution is to simply rent it from a specialized store while the pipes are being installed.
This tool is convenient to use, but if it gets very hot, you need to be careful with it so as not to get injured. Before starting work, read the manual for using the soldering iron.
If this is your first time doing such work, it is better to do it together with a partner who will hold the tool while you heat the pipes and fittings, and put it away so that you can avoid burns. To connect the pipes to each other, and to rotate the pipe in the desired direction, you will need polyvinyl chloride fittings.
You need to buy fittings with exactly the same diameter as the pipes. They are not expensive, so we recommend taking a few more (1-2) as a last resort if you can’t solder them evenly the first time. In order to finish working on the pipework in the bathroom, you need to take one more action. Attach special fittings to the remaining outlets at the ends of the pipes by soldering, they are called “American” fittings, into which flexible hoses will be connected through threads.
Piping can be laid out manually in the following ways:
- install pipes from the distant plumbing fixture, gradually moving towards the riser;
- start installing pipes from the riser, moving towards other devices.
Advantages and disadvantages of a combined and separate bathroom
The bathroom is the territory of plumbing. Of course, this is where the predominant amount of it is concentrated, helping us cope with the natural physiological needs of the body and carry out hygienic or housekeeping procedures. All these processes occur with the direct use of water, followed by its removal. Therefore, understanding the principles of constructing bathroom configurations will be an integral part of the successful implementation of residential water supply wiring.
The structure of the average housing includes two types of bathrooms - combined or separate. By giving preference to the combined type, you get one target room equipped with, at a minimum, a toilet, washbasin, bathtub or shower. If the bathroom is separate, then the toilet and bathroom are separated, having their own separate entrances.
The choice of the configuration of the room (rooms) is influenced by a number of factors, and first of all – subjective. However, you should know that from the point of view of basic sanitation, the proximity of the latrine to the area where hygiene procedures are carried out in combined bathrooms is not a correct planning decision. Imagine that microscopic dust in the process of draining sewage, scattering many meters around, settles on your washcloths, toothbrushes, and towels. This is not a very optimistic picture.
“Combined” is logically justified in several cases:
- when combining a bathroom and toilet that are too cramped to create at least some free space. With this solution, sometimes it is even possible to install additional equipment, such as a bidet or washing machine;
- if the area of the common room is initially rather large (about 10 m2 or more);
- when the bathroom is used by a limited number of people. For example, an apartment accommodates 1-2 people or there is a second guest control room, and the first serves only the master bedroom.
Communications layout: main types
There are two types of pipe routing: serial or tee and manifold. The serial connection method is popular in old houses and apartments. All two options have advantages and disadvantages, so let's analyze them in more detail.
Serial wiring type
The sequential pipe routing scheme is simple and economical. A tee is installed near each consumer, to which the next plumbing fixture is connected. It is rational to use such a scheme if there are a small number of consumers installed in the bathroom (toilet, bathtub and washbasin).
The disadvantage of such a pipe layout in the bathroom is that the pressure decreases when the taps are opened at each consumer. If several people live in a house, then such a scheme would be the best option. If the house is two-story, then such a scheme will not be able to ensure the normal functioning of the water supply system.
Otherwise, this method is easy to install, economical and does not require the purchase of additional equipment.
Collector wiring option
Water supply can be installed using a collector method if there are a large number of consumers in the house. This scheme is implemented by placing a special device called a collector. With its help, there is an even distribution of water flow to each consumer.
Installation of pipes using a collector-type system has the following advantages:
- There are no differences in water pressure, even if you open all the taps in the house.
- The ability to increase water pressure by limiting its supply to other consumers.
- Disconnection of one consumer from the water supply for repair work, while the rest will be supplied with water as normal.
- Reliability of the system, since each consumer has its own separate pipeline.
Among the disadvantages of the collector system, it should be noted only that it requires high costs and also increases the volume of work. However, all these expenses pay off, so given the appropriate factors, it is recommended to choose this option.
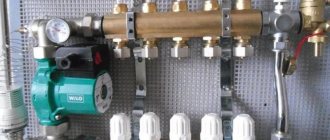
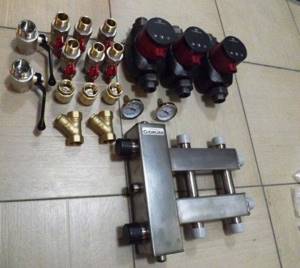
Distribution manifold
Now let's find out why distribution manifolds are needed for water supply. We already know that they allow you to power several water points independently of each other; but how is this useful?
Advantages
Unlike a sequential (tee) system, the scheme of a collector water supply system allows you to avoid a drop in pressure when water flows through an arbitrary device. Simply put, when you turn on the tap in the kitchen, you don’t hear the pained and bitter cries of a family member taking a shower from the bathroom.
Collector water supply scheme for a private house: each device is connected to the collector with its own connection
In addition, a manifold-fed water supply with taps in the manifold cabinet allows you to turn off any plumbing fixture from one point. This is very convenient in public buildings, shopping centers or mini-hotels: if there is a water leak, you can turn it off without even having access to the relevant premises.
Flaws
Alas, the collector water supply scheme has several unpleasant features:
- Material consumption. Obviously, the total length of the water supply connections will be several times greater than with a tee circuit;
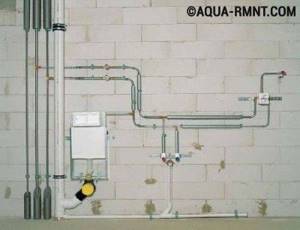
- If you install a collector for the water supply, the lines have to be laid hidden (in grooves or screed). Agree that a dozen parallel pipes on the walls of the bathroom and kitchen are a bit of an excess;
Cold water and hot water supply lines are laid in screeds, grooves or routed throughout the basement
Concealed installation entails the difficulty of localizing and eliminating leaks. If the neighbors below begin to get their ceiling wet, it will cost you a lot of work to find a fistula in the water pipe laid in the screed;
Openly laid water supply lines can be changed without damaging the finish
Installation
How to install a collector for the water supply of an apartment with your own hands and route the pipes to the faucets, toilet cistern and other appliances?
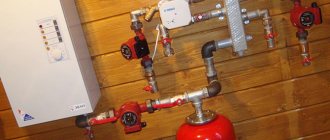
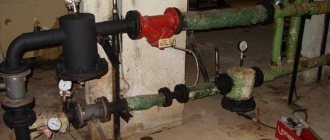
A cut-off ball valve, a coarse filter and a water meter are sequentially mounted in the riser (see Water supply meter: everything you need to know about these devices). If necessary, they can be supplemented with pressure reducers and pressure gauges;
In this water supply system, the installation of the collector was accompanied by the installation of a pressure gauge
Collector water supply system: size of taps into the riser - DN 20
Distribution manifolds for water supply (cold and hot) are attached to permanent structures with clamps;
Assembling the water supply manifold: ball valves need to be installed on the terminals
Distribution manifold - Valtec water supply manifold is equipped with ball valves at all outlets
- The tap threads or manifold outlets are equipped with adapter fittings to which connections to plumbing fixtures are connected;
- When installed hidden, the connections are thermally insulated. Insulation will avoid the appearance of cracks in the screed or sealing of grooves due to cyclic heating by hot water pipes, and will also reduce heat loss.
Please note: all connections are thermally insulated
What pipes should be used for water distribution?
As we have already mentioned, the water supply scheme we are interested in—collector—implies hidden installation of connections. However, for reasons of fault tolerance, all serviced fitting connections must be installed openly.
The list includes:
- Cross-linked and heat-resistant polyethylene;
- Metal-plastic;
The collector water supply system in the apartment is mounted with metal-plastic on press fittings
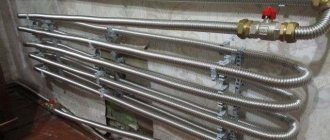
Corrugated stainless steel pipe (see Corrugation for water supply pipes: one step away from perfection).
Corrugated stainless steel for water supply
The metal-plastic pipe in the photo collapsed due to water hammer
The only exception to the general rule is polypropylene. Polypropylene pipes are supplied in straight sections, but their connections are maintenance-free and are as strong as a solid section of water supply, so they can be safely laid in screeds or grooves.
Polypropylene manifolds for water supply can be connected directly to polypropylene connections, without additional fittings
Alternative options
If the first option of how to hide pipes in the bathroom does not suit you for some reason, we will tell you about other, more convenient methods.
- Due to the fact that this technique is very simple, it is becoming increasingly popular. The method is to hide the pipeline using drywall. It’s quite easy to hide everything unnecessary using this material. In addition, this finish will make your bathroom modern and stylish. There will be no hint that pipeline systems are hidden somewhere. But the downside to this option is that if in the first method we save space, here, on the contrary, we slightly reduce the usable area of the bathroom. The above method of hiding pipes in the bathroom can also be used for sewer systems. Professionals recommend using it in new buildings or private homes. This is due to the fact that in a panel house it is quite difficult to change the placement of partitions, which means that the owner will lose a lot of free space if he decides to hide something.
- If you prefer a tiled bathroom, the following method will help you hide the pipes aesthetically. As you already know, access to the pipeline cannot be blocked. That is why professionals recommend hiding them using special collapsible structures. It is almost impossible to notice such a structure with the naked eye, but in the event of an emergency or the need for repair work, you can easily get to the hidden pipes. Before hiding the pipes in the bathroom under the tiles, prepare the necessary materials and tools. You will need several metal profiles (depending on the area), a drill, feather drills, tiles (tiles remaining after finishing the walls are best), plastic corners, self-tapping screws, a tile cutter, and a hacksaw. Now let's proceed directly to the procedure that will help hide the piping systems in the bathroom. First, mount the base from prepared metal profiles, and then cut the tiles for it. Using feather drill bits, drill neat holes into the tile where it meets the metal frame. In the end, all you have to do is attach the tiles with self-tapping screws and install plastic corners. Thanks to this design, you will hide unsightly pipes, provide your bathroom with a beautifully well-maintained appearance and always have access to the piping systems.
- Also, the question of how to hide pipes in the bathroom with plastic panels is becoming increasingly relevant. This is not strange, because plastic materials are considered one of the best for the wet environment of the bathroom. Increasingly, this coating is used for cladding the walls and ceiling of the bathroom, because it does not change shape, is easy to clean, and looks stylish and modern. In addition, the range of models and colors for the bathroom will pleasantly surprise you. But the biggest advantage of such structures is easy installation and long service life. So let's get started. Prepare a simple pencil, a measuring tape, a hacksaw with a 1 mm saw, a package of nails, self-tapping screws (can be replaced with a construction stapler), a hammer, several plastic guide bars for the base, plastic of the desired color and silicone glue. If there is a lack of funds, the crate can be made of wood, but metal is better suited for use in conditions of high humidity in the bathroom. The whole procedure can be roughly divided into several stages, after which you can hide everything unnecessary in the interior. First, you should secure the guide bars to the wall. This should be done perpendicular to the future panels, using a building level. Next, using a hacksaw, we cut out the plastic parts to finish the frame. Here you need to be extremely careful so that the decorative pattern is even and matches at the joints. Now all you have to do is attach the cut parts to the frame using nails (screws) or staples. For greater reliability, experts recommend lubricating the fastening areas with a special sealant. Thanks to this, moisture will definitely not penetrate the joints and damage the structure. After such manipulations, your pipes will be securely hidden without affecting the appearance of the bathroom.
Making a diagram
Having decided on the type of communication connections (collector or serial) with those instruments and devices that will be included in it, we proceed to the immediate development of the water supply wiring diagram in the apartment. It will help to correctly calculate the footage of pipes, the number and types of fittings, auxiliary parts at the procurement stage, and will simplify and reduce the time of installation operations. On the contrary, starting to assemble communications without their detailed description significantly increases the chances of making mistakes that lead to rework, as well as overexpenditure of expensive materials.
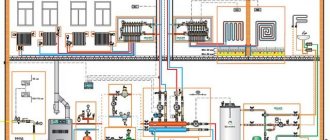
Figure 1. Plumbing diagram (click to enlarge).
Professionals, when developing installation diagrams (Figure 1), use a certain regulatory procedure and special calculations. If you have the opportunity to order and pay for such work, then this will only be a plus for you. The diagram, which is part of the design documentation for a major renovation or reconstruction of a bathroom, will contain important information for you:
- water points with names of connection devices;
- pipelines (HV, GV) indicating their diameters, type of material, direction of water flow;
- distribution and shut-off and control devices;
- emergency automation;
- water measuring devices.
However, you can create a completely workable scheme with your own efforts. At the same time, you should still focus on the basic rules for constructing apartment wiring, described in this article, and think carefully about not only the location of plumbing, but also the installation of important auxiliary devices.
Photo of wiring in the bathroom
What will you need besides pipes and fittings?
An effective system cannot operate safely without:
- main valve of inlet shut-off valves;
- multi-stage purification filtration station;
- devices for adjusting and setting operating parameters;
- flow control instruments;
- devices for protection against the consequences of accidents;
- other additional equipment.
Each of these elements is necessary for the system to operate smoothly, be monitored, configured, and protected.
Main valve, inlet shut-off valves
This is a device that operates in two positions (open, closed). The task is to cut off the water supply from the riser if it is necessary to carry out repairs or in the event of a long absence of apartment residents. An alternative is valves that smoothly regulate water pressure and operate in an intermediate position. But such valves are more expensive than conventional ball valves.
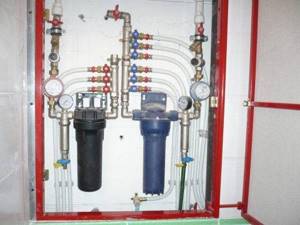
Filtering devices
The minimum set consists of two types of filters:
Coarse cleaning
Installed at the inlet after the ball shut-off valve. The purpose of the filter is to catch large solid contaminants (rust, scale, etc.).
Fine cleaning
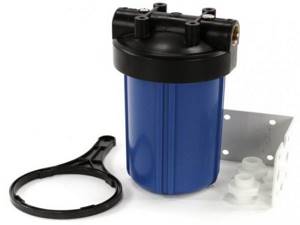
Absorbs small solid suspended particles. Special cartridges with fiber filler are used as filter elements.
Each filter requires periodic maintenance. During rough cleaning, the particles are retained by a metal mesh, which must be removed and washed. There are filter models equipped with a self-cleaning system. You have to buy new fine cleaning cartridges.
Regulating devices
The task of the stabilizing reducer is to maintain a comfortable pressure in the distribution pipes - this is from 3 to 4 bar. You can also use an electronic version - this is a pressure switch, which will eliminate the possibility of water hammer. A sharp surge in pressure can damage washing plumbing fixtures and wiring elements.
Check valves also fall into the category of control devices. They are needed if boilers are to be connected, and they protect the system from spontaneous drainage of water from the tank into the riser when the water supply is turned off.
Metering devices
The use of meter models is regulated by GOST. Installing it is not enough; flow metering devices must be calibrated and sealed. This is done by special water utility services. The device is equipped with a strainer and a check valve. When installing, there must be straight pipes on both sides. This will eliminate measurement error.
Emergency devices
This is a “smart electric valve” - this device protects the wiring from breaks and leaks, and the apartment from flooding. If a hose or pipe bursts, the pressure will drop sharply, and the device will immediately cut off the water supply.
Other auxiliary devices of sanitary cabinet
Properly organized plumbing in an apartment allows you to control operating parameters during operation of the water supply system. For this purpose, pressure gauges are used that measure the water pressure in the pipes. When there are several of them, the presence of a difference indicates a blockage that can be eliminated.
The manifold-distributor is a separate element that is involved in flow distribution. The number of outputs depends on the number of consumer devices. Ideally, each outgoing branch is equipped with a ball shut-off or check valve, depending on the need. Pressure gauges and emergency protection devices are also installed here.
Common installation mistakes
Before distributing water in the walls of a room or in floor coverings, you should consider a thermal insulation scheme. The water passing through the pipes is cooled, giving off heat to the materials of the walls of the house and increasing the load on the autonomous heaters. Metal lines lacking an insulating layer are covered with a layer of condensation, which causes corrosion. Drops of water are absorbed into the wall material, causing mold or mildew to form.
During operation, plastic pipes expand. When laying highways in channels made in the walls, a reserve of space is provided. A padding polyester cover is placed on the outer part of the pipe. If the pipe is laid in a groove without a gap and covered with cement, then when heated, the surface of the wall cracks, which leads to shedding of the tiles or damage to the paintwork.
During installation work, it is necessary to cover the end edges of the pipes to protect them from foreign objects. Before soldering or welding, it is recommended to check the inside of the pipe for foreign objects. When dirt gets in, the water supply line becomes clogged or the water supply equipment gets clogged. To remove blockages, you will have to disassemble part of the water supply or repair taps or radiators of heating installations.
Soldering of plastic pipes is carried out using a special induction unit. Traces of dirt and oil are removed from the surface of the elements being connected, and water is not allowed to enter the joint. Foreign objects or liquid entering the weld joint will reduce the strength of the joint. If pipes are laid through the ceiling between floors, then individual holes are drilled in the slabs. It is not recommended to stretch pipelines in a bundle through a single channel, since the operating conditions of water mains deteriorate.
The design of the mains includes shut-off valves located in front of the water tap or at the outlet of the collector. The levers and wings of the valves should be located at a distance from each other, allowing for rotation.
When installing a water supply system, it is necessary to design sewer drains. The clean water supply and waste liquid drain lines should not overlap each other, making maintenance or repair work difficult.
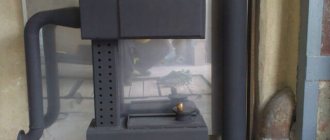
Do-it-yourself plumbing in an apartment: soldering propylene
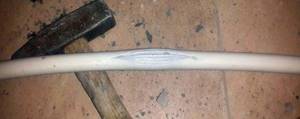
Under no circumstances should propylene be soldered using a handicraft method using a soldering iron-iron end-to-end, because:
- dirt and dust will accumulate on the “sausage” inside, such a pipeline will become clogged even more than one made of steel;
- The water pressure bursting the pipes can rupture the joint. If the water temperature is 16 °C and the ambient temperature is 20°-25°C, then the fatigue threshold of the material will be exceeded sooner than after 3 months, and a leak will form at the joint.
The diagram may look like this: we use fittings for soldering: straight (to connect pipe sections), angular, as well as tees or crosses. Heat the pipe until it becomes soft. We insert it into the cage of the heated fitting, and then wait until the joint hardens. The water pressure will press the pipe from the inside to the holder, thanks to which the joint will be reliable and the fused area will be sealed. Since propylene is a rigid material, the clip that covers the pipe will not be able to expand elastically. Thanks to this connection, as well as the properties of the material, a propylene pipeline can be hidden in the wall for many years.
The soldering process itself is simple: we insert the soldering iron tips - internal and external - into the fitting and onto the pipe. Turn on the soldering iron, wait until its temperature reaches 250 °C (look at the indicator and wait for the signal). We take out the pipe with the fitting, insert them into each other and give the joint time to cool. Ready! You can continue soldering.
A soldering iron designed to work with propylene will cost at least 2,000 rubles. It cannot be used to work with other materials, so it is recommended not to purchase it specifically, but to rent it.