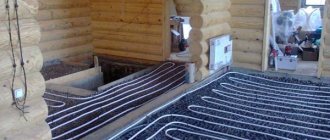
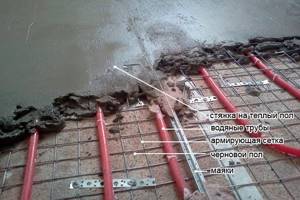
In order to economically and effectively warm the base of the floor in the room, you should install a high-quality warm water floor. It will not require labor and costs during operation. At the same time, the required temperature will be constantly maintained in each room. The heating elements must be placed in a heated floor cement screed, which must be poured from a well-prepared mortar. Here you can do everything yourself, observing the proportions, or buy a ready-made mixture for pouring a warm water floor. In any case, the composition of the solution for screeding a water-heated floor will be slightly different.
Tasks of screeding heated floors
To figure out how to make a screed for a heated floor, let’s define its tasks more precisely. First of all, remember that ties are fundamentally divided into tied and floating. The floating screed is not connected either to the base of the floor or to the walls of the room. If, relatively speaking, you look at a floating screed, then it is a separate, often concrete slab in the room that performs its tasks.
It is worth noting that a floating screed is the priority type of screed in the construction of a concrete heated floor.
The tasks of a floating heated floor screed include:
- Holding pipes or underfloor heating cables;
- Be a heat exchanger between the floor heating system and the room, ensuring uniform heating of the floor surface;
- Take on the power load of operating the premises.
It is to solve these problems that specific requirements for installing heated floor screed are aimed.
Organization of expansion joints
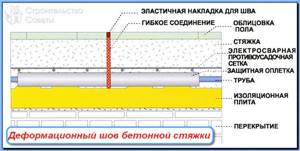
It is necessary to make expansion joints only in the finishing screed. And then, they need to be made if the area of the heated floor being poured is large. For example, an area of 40 m2 can be divided into two parts.
An expansion joint is necessary to avoid cracking of the screed during thermal expansion. Such seams in the rough screed are not necessary, since thermal energy will be reflected upward.
How to make an expansion joint? For this purpose, you can use damper tape. The pipe passing through it must be corrugated. If a Ø16 mm pipe is used for a warm floor, then it is important to choose the right corrugation that fits freely on the pipe. In practice, there are cases when the corrugation is very difficult to put on. Therefore, the diameter of the corrugation should be slightly larger.
Requirements for a heated floor screed
This is the time to remember about the types of heated floors. Fundamentally, there are two types of underfloor heating: water and electric. In a water heated floor, heat is transferred to the screed from the water circulating through the system. In an electric heated floor, heat is obtained from heating special heating cables laid in the floor.
Note: When we talk about heated floor screed, we mean only water heated floors and cable electric heated floors.
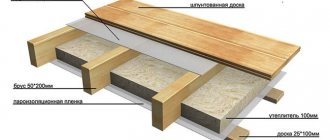
Covering electric heated mats with screed is not required. Also, a screed is not required for TP (warm floor) flooring systems used in wooden houses and in houses with floors on joists.
How to connect the system
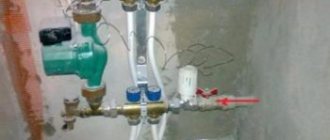
If you want to connect the system to the hot water pipeline yourself, use the following recommendations. You will need to place distribution units in such a way that they do not interfere with free movement around the room and arranging the necessary furniture.
The best option would be if you hide them in the wall. To do this, make a special niche in the wall surface in which you can place the manifold and manifold cabinet. You need to connect all the circuits that are required to heat the room into it. In addition, you also need to place combs with installed taps in the cabinet. With their help, you can regulate the degree of heating and, accordingly, the supply of hot water, as well as completely shut off certain circuits of the system if necessary.
This instruction will help you install a warm water floor yourself, without the help of specialists. As you can see, it is not at all difficult if you know certain features. In addition, this will significantly save money on the family budget.
Total screed thickness
So, two tasks of the TP screed, distribution of operating load and uniform distribution of heat, are a priority. It is to accomplish these tasks that all further discussions about the thickness of the screed will be directed.
Two parameters are important in screed thickness. The first is the overall thickness of the screed, which is usually left out of brackets. The second parameter is the thickness of the screed layer above the pipes. First things first.
The total thickness of the heated floor screed, namely the screed, and not the entire heated floor structure, should be as follows:
- If the heated floor is installed above an unheated room, basement, or ground, the minimum thickness of the screed is 85 mm. This standard value is very controversial (more on this below);
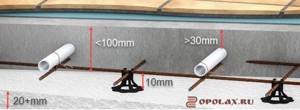
- If the TP is done on a concrete slab, the total minimum thickness is the sum of 10 mm of screed under the pipe (cable), the diameter of the pipe (cable) and the permissible technological thickness of the screed above the pipe.
- It is recommended NOT to make the maximum thickness of the screed more than 100 mm, due to the large inertia of the system. Thick screeds will take a long time to heat up and spend heat not on warming up the room, but on heating the screed itself.
Note: if you need to raise the overall floor level, you do not need to do this with a heated floor screed. You need to first make a leveling screed, and then install a warm floor, and not try to solve all the problems in one screed.
How to install a finished screed
If the need to lay a heated floor arose after pouring, then you will need to do the following:
- Mill the channels for the pipes (using a grinder, milling cutter or wall chaser);
- Install thermal design elements - electrical cable or water pipes;
- Cover them with solution.
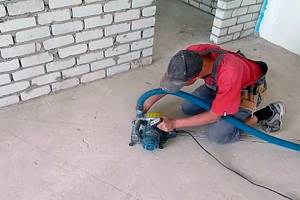
Scoring
The canals prepared at the first stage should have the shape of a snail or snake.
Unfortunately, this technology is very labor-intensive. In addition, there is no possibility of providing heat and sound insulation, and the drying solution may be squeezed out of the channels, which will damage the appearance of the floor.
Screed thickness over pipes
This is an important parameter on which, first of all, the uniform heating of the floor depends, and secondly, the load perception (strength).
I’ll tell you right away about durability. The following rule works here: the thicker the underlying insulation in the TP structure, the greater the thickness of the screed above the pipes should be. For a central climate, a sufficient insulation thickness is 2, maximum 3 cm.
To answer the question about the relationship between the thickness of the screed over the pipes and uniform heating, let’s look at the thermal diagram of the heated floor.
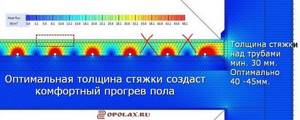
As you can see, the heat from the pipes rises along the screed along peculiar cones. Optimal heating of the floor will occur if these cones “end” on the surface of the screed. If the screed is made thinner, then not so much the screed will heat up as the finishing coating, which is bad. If the screed above the pipes (cable) is made thicker, then the heat will not reach the surface of the screed. On the surface we get the so-called strip, uncomfortable heating of the floor, otherwise “zebra”. Walking along the floor you will feel the change of warm and cold stripes. This is also bad.

As you can see, it is the thickness of the screed above the pipes that is the most important technological parameter of the TP screed. The load on the floor in residential premises is moderate and the thickness parameter is not affected by the load on the floor.
So, the thickness of the screed over the pipes. Without further ado, let’s look at the recommendations on this parameter from the main manufacturers of water heated floor elements, namely Oventop, Uponor, Valtac, Thermotech, KAN. Summarizing their recommendations, I can draw the following conclusion:
When installing a heated floor on a concrete base, with a layer of insulation no more than 20 mm, the thickness of the screed above the pipes should be:
- At least 30 mm for a wet solution with the addition of plasticizer and fiber;
- At least 50 mm for wet mortar (concrete or cementitious mixture);
- At least 45 mm for machine-made semi-dry mortar.
Finish filling on TP
If the rough screed has dried, it’s time to move on to the next steps:
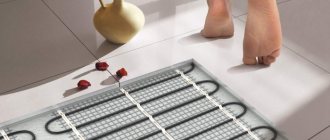
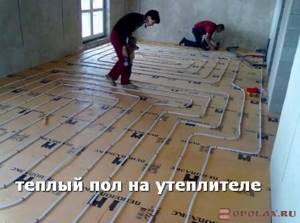
- installation of heat insulator . Thermal insulating material is mounted only on a clean base (it is best to vacuum it). The heat insulator can be cork, foam, polypropylene, aluminum foil or metallized Mylar film. To secure it, tape, dowels and glue are used.
- Laying damper tape . The damper tape protects concrete from cracking associated with temperature fluctuations. Mounting area: along the perimeter of the room and between the contours of heated floors.
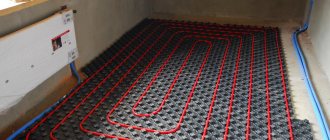
- Laying heated floor elements . Pipes need to be checked for breaks (especially at bends), and when running cables, grounding must be ensured.
- Reinforcement . Reinforcing mesh can be placed under the pipes, above them, or in both places at once. Pipes are easily attached to the lower metal mesh during installation, however, unlike the upper one, it does not provide reinforcement for the screed. If the concrete is of high quality, then this part of the work can be abandoned.
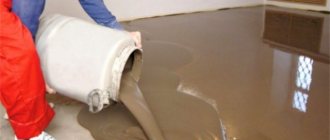
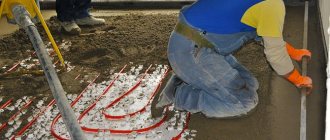
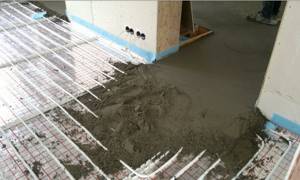
- Pouring finishing screed . Before proceeding to the last stage, you must check how well the heating system is functioning. The screeding solution is poured at above-zero temperatures and in one go. Partial filling is allowed only in rooms with a multi-level floor. The concreting process begins from the far side of the room and ends next to the door.
Pie TP
After finishing the pouring, it is recommended to make several punctures in the coating with a metal knitting needle or similar object. This will prevent the formation of voids.
In the next week, the concrete surface should be moistened with water 2-3 times a day. This will prevent it from drying out while it hardens.
The thickness of the finishing layer can be from 3 to 7 cm in a private house, and in an industrial area - 10 cm.
If a water heated floor is installed, the height of the screed above the pipes should be 3.2-7 cm.
Attention! If it is impossible to make a fill thicker than 3 cm, then it is better to use a self-leveling mixture, or mix cement mortar with a plasticizer.
Read more about the thickness of the screed and the design of heated floors in the article.
Option 1. Concrete screed for heated floors
Wet concrete screed for heated floors is made using floating floor technology, based on a solution of cement, sand, crushed stone and water. To make your own solution, you need to make a B22.5 (M300) solution with the obligatory (!) addition of crushed stone or gravel of 5-15 mm fractions to the solution.
The classic concrete mortar M300 (concrete B22.5) is made on the basis of M400 cement. Concrete proportions (Cement: Sand: Crushed stone) - 1: 1.9: 3.7.
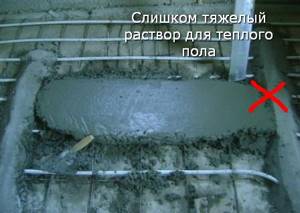
It is important to note that this brand of concrete is heavy concrete and is difficult to install. The load of such a screed per 1 m² of flooring will be 125 kg, with a screed thickness of 50 mm. And this does not take into account the weight of the heated floor “pie”.
All this reveals the disadvantages of the “concrete” option:
- When laying concrete, damage to the pipes (cables) of the heated floor is possible;
- Not possible to compact, may lead to the formation of air bubbles;
- The difficulty of leveling concrete will require an additional layer of leveling screed.
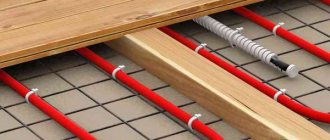
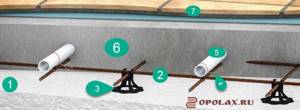
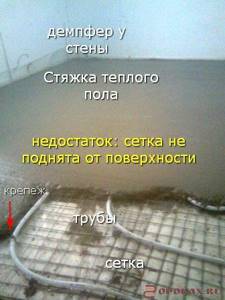
The floating concrete screed (6) is necessarily reinforced with a mesh (2), welded in knots, with cells of 10 by 10 cm. The reinforcing mesh not only holds the screed together, preventing it from cracking when the floor dries and is in use, but also serves as a base for fastening ( 4) pipes (5) water floor and electric floor cable. It is important (!) to ensure that the mesh (3) rises 10 mm from the insulation (film) (1).
The concrete screed must be insulated from the walls with a damper. This is a special tape or any dense insulation no thicker than 1 cm.
Laying reinforcement mesh and pipeline
It is advisable to use reinforcing mesh, the cell dimensions of which are 15x15 centimeters, and the cross-section of the rod is about five millimeters. If necessary, double reinforcement is performed when the next layer is applied to the pipeline.
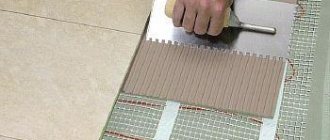
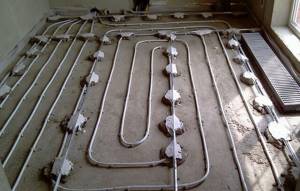
The installation of the pipeline is carried out with a distance of up to 30 centimeters, and you need to select a scheme for installing the circuits in advance. It can be a double snake, a spiral and a spiral with an offset center, as well as a simple snake.
The pipeline should be secured to the reinforcing mesh with plastic clamps. To avoid possible damage, a corrugated pipe is used. When the warm water floor has been poured and the solution has completely dried, proceed to the next work, that is, laying the floor covering. For this, linoleum, ceramic tiles, and laminate are most often used, since these materials have sufficient thermal conductivity.
Option 2. DSP
Cement-sand screed for heated floors is made using floating floor technology, based on a solution of cement, sand and water with the addition of plasticizer and fiber, or based on ready-made dry mixtures.
Important! Plasticizer and/or fiber are mandatory in underfloor heating screed.
- If you are doing TP at home, M200 grade cement is sufficient to prepare the DSP solution. The sand needs to be clean. Sand/cement proportions, 3/1 (three sand - one cement).
- If the heated floor is made in a garage, then the grade of cement is taken higher from M300 to M500, optimally M400.
An obligatory element in the DSP TP solution is reinforcing fiber and plasticizer fibers. Fiber fiber is added in a volume of 900 g. per cube of solution. Fiber plays a reinforcing role.
Important! A plasticizer (this is not fiber) is added to any type of DSP underfloor heating. It (plasticizer) compensates for the thermal expansion of the heated floor, protecting the central fiber board from cracking.
The TsPS TP screed is separated from the base of the floor. For this purpose, a layer of polyethylene with a thickness of 200 microns is laid on the base. For better heat transfer, a layer of heat insulation with a thickness of 20 mm or more is placed under the screed. Important! The foil backing is not insulation.
Important! For trouble-free operation of the heated floor, the heated floor screed must be laid only on a flat, solid base. Unevenness of the base can lead to the formation of air cavities, which can shrink under load. If the base of the floor is uneven, under the heated floor screed, you need to make an additional leveling bonded screed.
The DSP screed will be separated from the walls of the room, for which a damper tape or strips of any solid insulating material 5-10 mm thick are fixed around the perimeter of the room.
A floating DSP screed must be reinforced with a mesh with 10 by 10 cm cells. The reinforcing mesh not only holds the screed together, preventing it from cracking when the floor dries and the heated floor is in use, but also serves as a base for fastening water floor pipes and electric floor cables. It is important to ensure that the mesh rises 10 mm from the film.
The thickness of the screed layer, in the version of a cement-sand screed without fiber with a reinforcing mesh, cannot be less than 10 cm. It is this layer that will ensure the creation of a durable floating slab. In this case, the thickness of the screed must ensure that the pipes (cables) are covered with a layer of at least 30 mm, otherwise there will be strip heating of the floor.
Ready-made mixtures will simplify the work
There are a lot of manufacturers producing ready-made mixtures (levelers), including those suitable for installing heated floor screeds. A solution from this mixture is made by adding water in the proportion indicated on the package. The leveler is laid with or without beacons, depending on the brand and manufacturer.
The use of ready-made mixtures is the best option for installing screeds for heated floors yourself.
Useful tips for making screeds

So, in order to consolidate all the material, we can highlight several main points that are important to consider when performing such work:
- The screed is poured after plastering work.
- It is mandatory to glue damper tape to the wall.
- All beacons are installed strictly according to level.
- If the pouring area is too large, expansion joints are made.
- The drying temperature of the concrete should be at room temperature, and heating should not be turned on.
- Before pouring into the pipe system, it is necessary to run the coolant under a pressure of 1.5-2 atm.
- You can turn on the heating only after the concrete has completely dried.
Option 3. Semi-dry screed on heat-reflecting boards
To simplify the installation of heated floors, companies began to produce special slabs of remarkable designs. These slabs, on the one hand, are ready-made channels for laying cables or underfloor heating pipes, on the other hand, they take on part of the operational load and create a layer of heat insulation.

In this version of underfloor heating, a semi-dry screed is usually made, based on cement-binding mixtures with the addition of plasticizers. The best quality of such a screed can be achieved by using ready-made mixtures of levelers for heated floors or by purchasing ready-made semi-dry factory-made mixtures.
Pros and features of semi-dry screed
- A semi-dry screed does not require reinforcement and dries much faster than wet screeds.
- The semi-dry screed is laid with a damper tape.
- The thickness of the screed should ensure that the pipes (cables) of the heated floor are covered with a layer of 40-60 mm.
Minuses
- However, a semi-dry screed, porous and in the construction of a heated floor, will significantly increase its inertia;
- In addition, semi-dry screed requires serious professional skills, which makes it difficult to recommend it for independent use.
Semi-dry pouring method
In order not to wait a long time for the final coating to dry, it is performed using semi-dry mixtures. The screed sets within 24 hours. The floor covering can be installed after just 7 days. The surface is durable and can withstand high loads and temperature changes.
The disadvantage is the high hygroscopicity of the material. It must be carefully protected with waterproofing. It is recommended to form the rough coating under a warm floor using the wet method.
Semi-dry mixtures are purchased from the manufacturer, but you can prepare them yourself. For this, the following components are used:
- 1 hour – cement M400;
- 3 hours – sand;
- 500 g fiber;
- water is added gradually, thoroughly mixing the solution; When compressed, the mixture should hold its shape, not spread or stick to your hands.
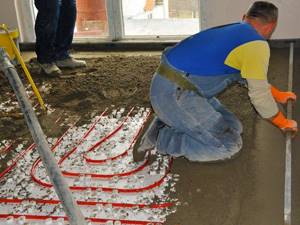
How to fill a heated floor with your own hands? Strengthen the damper tape. Beacons made of semi-dry solution are installed on the surface. They are leveled. I prepare the mixture and fill the line with a shovel. The surface is leveled. Wait 30-60 minutes and grout.
Special equipment is used for grouting. It is recommended to put boards on your feet so as not to leave marks on the coating and not sink into it. When rubbing, the surface is leveled and the screed is compacted.
conclusions
The article discusses several options for screeding heated floors:
- TP screed in a high-load room. It is made with B22.5 concrete, possibly on soil with a thickness of 85 mm or more, with obligatory mesh reinforcement. Concrete underfloor heating system.
- TP screed in a house (apartment) is made with a cement-sand mixture reinforced with mesh or plastic fiber on a 2-3 cm insulating substrate with the obligatory addition of a plasticizer.
- The semi-dry screed technology is NOT recommended for independent use , excluding small rooms (bathroom, toilet) due to the complexity of the technological processes in the production of the solution and its installation.
Beginning of work
All preparatory work includes several stages:
- Surface cleaning;
- Laying waterproofing;
- Wall preparation;
- Displaying beacons.
First of all, you need to carefully get rid of all debris and dust on the surface. All existing cracks must be sealed with cement-sand mortar.
After this, waterproofing is laid, for which thick polyethylene film is most often used, thanks to which the floor will be protected from moisture and will also provide sound and heat insulation.
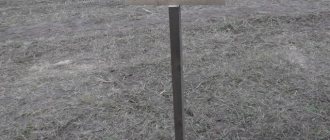
The film must be used in roll form; it will be more convenient to lay it on the floor. All joints must be secured with ordinary construction tape. The film should extend onto the wall surface from all sides. Next, you need to find the highest point on the floor surface, and at this level place beacons with T-shaped slots.
Technology of pouring self-leveling mixture
Laying solutions of this type in rooms with heated floors is extremely simple. This type of screed is usually poured using the following technology:
- underfloor heating elements are leveled and visually inspected;
- check the pressure in the system;
- the purchased mixture is mixed with water in the proportions recommended by the manufacturer;
- The screed solution is poured in portions onto the floor and everything is carefully leveled.
It is most convenient to mix the self-leveling compound in a large bucket. When performing this procedure, of course, among other things, you should use a construction mixer. Using such a tool, the mixture can be made as homogeneous as possible.
Features of pouring heated floors
Before pouring, hydraulic tests are carried out. Inside the pipes, during the installation of the screed, a pressure of 0.3 MPa must be maintained.
In order for the concrete base to turn out to be of high quality, you should know which solution is best to fill the heated floor. It is recommended to use M400 cement and plasticizer for mixing.
Only one month after pouring is it permissible to begin thermal testing of the pipeline. At first, the heating of the coolant cannot exceed 25 degrees. Then the temperature is increased daily by 5 degrees until this parameter is the desired value.
Mixtures for self-leveling floors
How to make a warm floor from heating Warm water floor.
Installation of a heated floor Let's consider what can be used to fill the heating elements and the floor underneath them.
Cement-sand mortar. Due to the presence of sand, the mixture has good plasticity and is easy to work with. The most suitable brand is M200. For heavy loads, stronger solutions are used: M250, M300. If the room is damp, then M400 cement is suitable. To strengthen the cement mixture, fiber can be added to the composition.
Proportions of mortar for screed (by weight):
- M200 - water/cement/sand - 0.48/1/2.8;
- M300 - water/cement/sand - 0.4/1/2.4.
Concrete from ASG. Cement mortar on a sand-gravel mixture is classic concrete. When installing heated floors, it can be used to fill the rough screed. The result is a strong and inexpensive base.
The consumption of materials for concrete grade M300 will be: 1/5.6 - for one kg of M400 cement take 5.6 kg of ASG (group 4 with a gravel content of 60-65%).
Concrete from screenings. Screening is fine-grained crushed stone that has been passed through a sieve (particle size up to 10 mm). It is added to the mixture instead of sand. Irregularities characteristic of screening particles help strengthen the screed. However, this also makes placing and grouting the concrete more difficult.
Foam concrete. A distinctive feature of foam concrete is the presence of a foaming agent in its composition. This makes the material cellular (it has a large number of closed pores). It has increased sound and heat insulation properties, weighs less than conventional concrete and demonstrates greater strength. If necessary, it can be easily drilled.
Expanded clay concrete. Expanded clay concrete is similar to a regular cement mixture, but instead of heavy crushed stone, expanded clay granules are added to it. Thanks to this, the material is warmer and lighter. But expanded clay concrete is fragile, and it cannot be used for pouring surfaces that will be actively used. Those. Expanded clay concrete is used for screeding under heated floors.
Self-leveling mixtures (self-levelers). Self-leveling allows you to get a flat surface with less labor. Can be used both for pouring the base under heated floors and for the top screed on which the flooring will lie. This material costs a little more than others. You can use, for example, Ceresit CN 176, cement leveler Unis Horizon.
Gypsum solution. Not suitable for pouring floors!
How to pour a floor when using concrete
This procedure is carried out using a very simple technology. At the initial stage, a damper tape is attached around the perimeter of the room. Concrete is taken from the mixer in buckets and poured onto the floor. Guide beacons are first installed in the room using special stands.
The concrete poured onto the floor is carefully leveled using a long rule. When using this technology, the coating ultimately turns out to be as smooth and neat as possible.
Beacons when pouring such a coating are usually installed in increments of 1.5 m. The thickness of the concrete screed itself should not be less than 3 cm. Otherwise, the coating will subsequently crack very quickly.
Two hours after pouring, the beacons should be carefully removed from the coating. At the final stage, the remaining cracks are sealed with a solution and rubbed with a paint float.