Today, few people doubt that a heat pump for heating a home is the most effective means of all existing ones. It is also the most expensive and difficult to implement. For this reason, many home craftsmen have taken to solving this problem on their own. But due to its high complexity, achieving positive results is very difficult; you need to have enthusiasm, patience and, in addition, study the theory well. Our article is for those who are taking the first step towards introducing such an alternative energy source as a homemade heat pump into their home.
Design and principle of operation
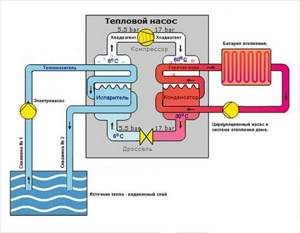
To assemble a working model of a heat pump, you cannot do without knowledge of the theory, or rather, the operating principle of this device. I would like to initially note that statements about efficiency of 300, 500 and 1000% are a myth or simply a marketing ploy designed for the average user’s ignorance of the laws of physics. So, a heat pump is a device that takes thermal energy in one place and moves it to another with a certain efficiency not exceeding 100%. Unlike boiler systems, it does not produce heat on its own.
An example is home refrigerators and air conditioners, whose design is based on the so-called Carnot cycle, which also uses the principle of operation of a heat pump for heating or domestic hot water. The essence of this cycle is the movement of a substance (working fluid) through a closed system and changing its state of aggregation from liquid to gaseous and vice versa. At the moment of transition, a huge amount of energy is released or absorbed.
To explain in a more accessible language, we list the main elements that a heat pump device includes:
- compressor;
- heat exchanger, where the working fluid passes into a gaseous state (evaporator);
- a heat exchanger in which the working fluid is condensed (condenser);
- expansion (reducing) valve;
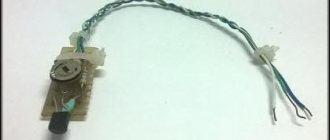
- control and automation equipment;
- lines made of copper pipes.
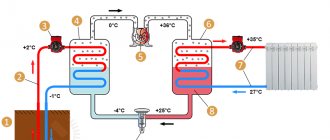
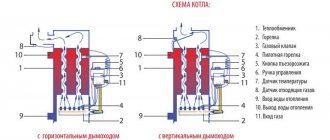
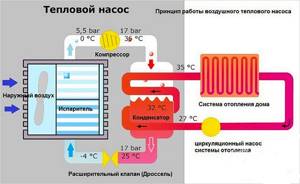
The working fluid is a substance that boils at low temperatures - freon. Circulating through the tube as a liquid, it first enters the evaporator. After interaction with the coolant from an external source (air, water, soil), the working fluid evaporates and continues its movement in the form of gas. In this area, the pressure in the system is low. The entire cycle chain is reflected in the schematic diagram of the heat pump:
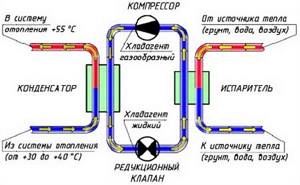
Having passed the compressor, the freon moves under pressure to the second heat exchanger, where it will condense and transfer the resulting heat to the water, again taking on a liquid state. Next, the working fluid enters the expansion valve, the pressure drops again and it continues on its way to evaporation. The cycle is complete.
Factory-made heat pumps for residential buildings are capable of delivering coolant with a temperature of 55-60 ºС, this is enough to heat rooms with radiators or heated floors. At the same time, the entire heating system spends electricity for the following purposes:
- compressor power supply;
- rotation of the rotors of the circulation pumps of the external and internal circuits;
- power supply for automation and control equipment.
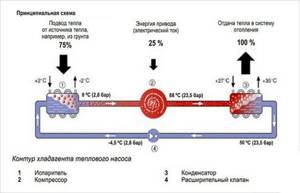
It turns out that when 1 kW of electricity is consumed, the action of a heat pump can move up to 5 kW of thermal energy from outside into the house, hence the fables about 500% efficiency.
Manufacturing of geothermal installation
It is quite possible to make a geothermal installation with your own hands. In this case, the thermal energy of the earth is used to heat the home. Of course, this is a labor-intensive process, but the benefits are significant.
Calculation of the pump circuit and heat exchangers
The circuit area for HP is calculated at the rate of 30 m² per kilowatt. A living space of 100 m² requires about 8 kilowatt/hour of energy. This means the contour area will be 240 m².
The heat exchanger can be made from a copper tube. Inlet temperature 60 degrees, outlet 30 degrees, thermal power 8 kilowatt/hour. The heat exchange area should be 1.1 m². Copper tube with a diameter of 10 millimeters, safety factor 1.2.
Circumference in meters: l = 10 × 3.14 / 1000 = 0.0314 m.
Quantity of copper tube in meters: L = 1.1 × 1.2 / 0.0314 = 42 m.
Necessary equipment and materials
In many ways, success in the manufacture of heat pumps depends on the level of preparedness and knowledge of the contractor himself, as well as on the availability and quality of everything necessary for installing a heat pump.
Before starting work, you need to purchase equipment and materials:
- compressor;
- capacitor;
- controller;
- polyethylene fittings intended for assembling manifolds;
- pipe to the earth circuit;
- circulation pumps;
- water hose or HDPE pipe;
- pressure gauges, thermometers;
- copper tube with a diameter of 10 millimeters;
- insulation for pipelines;
- set of seals for sealing.
How to assemble a heat exchange block
The heat exchange block consists of two components. The evaporator must be assembled according to the “pipe-in-pipe” principle. The inner copper tube is filled with freon or other rapidly boiling liquid. Water from the well circulates through the outside.
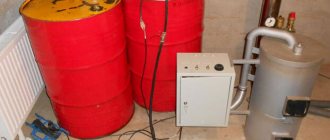
Before assembling the capacitor, it is necessary to wind the copper tube in the form of a spiral and place it in a metal barrel with a capacity of at least 0.2 m³. The copper tube is filled with freon, and the barrel of water is connected to the home heating system.
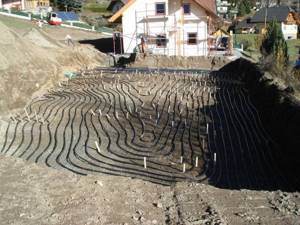
Construction of the soil contour
In order to prepare the required area for the soil contour, a large amount of excavation work is required, which should preferably be carried out mechanized.
You can use 2 methods:
1. In the first method, it is necessary to remove the top layer of soil to a depth below its freezing. At the bottom of the resulting pit, lay the free part of the outer pipe of the evaporator in a snake and reclaim the soil.
2. In the second method, you first need to dig a trench across the entire planned area. The pipe is laid in it.
Then you need to check the tightness of all connections and fill the pipe with water. If there are no leaks, you can fill the structure with earth.
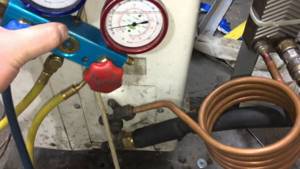
Refueling and first start
After installation is completed, the system must be filled with refrigerant. It is best to entrust this work to a specialist, because special devices are used to fill the internal circuit with freon. When filling, you need to measure the pressure and temperature at the compressor inlet and outlet.
After refueling is completed, you need to turn on both circulation pumps at the lowest speed, then start the compressor and monitor the operation of the entire system using thermometers. When the line warms up, frosting is possible, but after the system is completely warmed up, the frosting should melt. Grundfos circulation pump you will find the answer in the link.
Air-to-air heat pump
Theoretically, any environment with a temperature above absolute zero (minus 273 ºС) has a reserve of thermal energy. This means that it can be removed, especially at an ambient temperature of minus 10-30 ºС.
An air-to-air heat pump is used for this purpose, removing heat from the outside environment and moving it inside a private home. This is the most affordable method in terms of equipment and installation costs, but it is also the least effective. The stronger the frost outside, the less heat you can get. The operating principle of the system is shown in the figure:
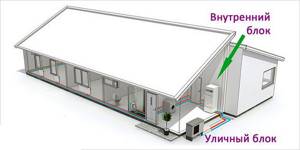
The outdoor unit of an air source heat pump is similar in appearance to the same unit of a split system, only it does not have a compressor inside. All that remains is a plate heat exchanger and a fan, whose task is to increase the intensity of the process by forcing a large amount of air through the plates.
Do-it-yourself heating from the thermal energy of the earth
Many of our compatriots do not understand what exactly we are talking about when they talk about heating a home thanks to the warmth of the earth. At this time, Western countries have long been practicing this type of home heating, and its popularity is increasingly growing. Heating with gas and electric heating is still the most popular in our country.
Heating a house with earth's heat
The riches of the earth we walk on lie not only in the precious stones and metals stored in it, nor in the fertile soil, but also in the fact that its depths contain enormous reserves of geothermal energy. Volcanic eruptions and geysers are proof of this. The core of our planet has an incredibly high temperature. Although the soil cools as it approaches the surface of the earth, it still has geothermal heat, which it can release further.
Do-it-yourself heating in a private house
The heating system of a country house must be properly prepared so that its design becomes economically profitable, easy to implement and technologically modern. The heating options we have long used, where warm air is generated by the combustion of fuel, are quite expensive today, and all due to the constant rise in prices for gas and electricity. In addition, traditional methods of heating a room are bad for the environment. Therefore, the issue of geothermal heating at home is relevant.
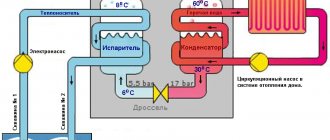
An excellent device for heating buildings from the ground is a heat pump and the system that works with it. You can do its installation and the entire process of installing the heating system yourself. This device can process energy from air, water and earth. To obtain heat, a refrigerant is used, which, being in a liquid state, flows through pipe systems installed in the soil.
At a depth of one and a half meters, the temperature of the earth is the same both in summer and in winter - 8 degrees. This is enough to “boil” the refrigerant and turn it into gas. The resulting composition is sucked in by a special compressor-type pump - its volume is reduced and heat is released. Thermal energy enters the device, heating the coolant of the home heating system. Due to the fact that the coolant gives off heat, it lowers its temperature and, thanks to a special valve, becomes liquid again. This is how the cycle closes.
Heating a house using thermal energy from the earth
Of course, the phrase “do it yourself” does not completely refer to the supply of heat from geothermal sources, but only to the installation of a heating device and heating system in the house itself. Only two of the existing types of this kind of room heating are quite feasible to do with your own hands.
The main principle of operation of a heat pump for heating a house is to transfer thermal energy, air and groundwater to a heating system with high temperatures. Thanks to this method, heating costs become 4-10 times lower. Benefits of geothermal home heating include
- long service period;
- operation is carried out automatically.
Alternative home heating scheme
A pump that pumps heat can operate without breakdowns for approximately 15-25 years.
The indicators for receiving energy from the ground look like this: thanks to 1 kW of electricity, you can get 5 kW of power. If you decide to install a ground heating system in your home yourself, you need to know some of the nuances of its arrangement.
Principles for installing systems:
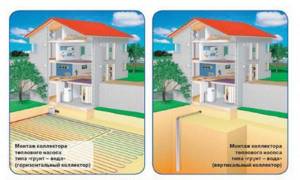
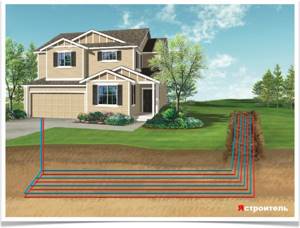
- With a vertical type heat exchanger and a well pump. Such devices are immersed in the ground to a depth of 50 to 200 m. This is the most effective method of generating heat, and it is convenient to install such a system into the house. Here you need to drill a well to the required depth level.
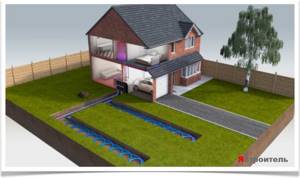
- Horizontal type heat exchanger for heating a house. In this case, the collector systems are located at the level where the soil can freeze. Its disadvantage is the significant use of the territory: about 500 square meters for heating a house whose area is approximately 200 square meters. There is also a distinctive feature here: it is prohibited to install collector systems near trees, at a distance of less than one and a half meters from the trunk.
- Heat exchanger for heating a house, placed in a reservoir. Of all, it is considered relatively inexpensive because it does not require a significant amount of soil work. This option is only suitable if there is a body of water near the house, at a distance of 100 m or closer. In turn, it is necessary that the water source be of the required depth and not freeze during the cold period.
Features of choosing a heat pump
When choosing a heat pump, it is important to consider the energy status of the home. What matters is not what kind of heating system you have, but what kind of thermal insulation the room has. The cost of heating the house will be lower if this indicator is at the highest level. In this case, it will not necessarily be necessary to take a high-power pump, which will make it possible to reduce financial costs.
Unlike alternative energy devices such as solar panels and wind generators, the heat pump is less well known. And in vain. The most common “ground-water” scheme works stably and does not depend on weather or climatic conditions. And you can make it yourself.
Water-to-water heat pump
A more efficient option is a water-to-water heat pump. It extracts thermal energy from the nearest body of water, if there is one at a distance of up to 100 m from the house. Another, more common method is to extract heat from groundwater through a well. In fact, you need 2 wells: one for pumping out water, the other for discharging it. Below are diagrams of heat pumps operating on this principle:
There are some nuances here. Water from the well must be treated before entering the heat exchanger, and pipes must be laid below the freezing depth of the soil. Another thing is the circuit at the bottom of the reservoir; it is filled with a non-freezing liquid (propylene glycol), which serves as an intermediary between water and refrigerant.
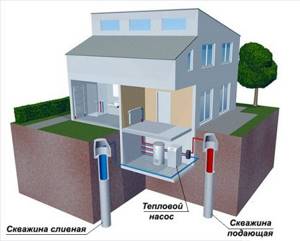
Important. The ability to provide a private home with thermal energy in this case depends on the productivity of the well and the volume of water in the pond. There are also options for immersing the external circuit in running water of a river or a sewer septic tank.
There are also geothermal heat pumps, whose operating principle is no different from previous types of devices, only heat is extracted from the soil at a depth where the temperature is always the same - plus 7 ºС. To do this, a horizontal circuit of pipes is buried in the ground, occupying a large area, or geothermal probes are lowered into wells 25 m deep. In both cases, antifreeze is used as a coolant.
It is believed that the operation of a heat pump that extracts heat from the ground is the most stable and efficient. But the purchase and installation of such equipment is very expensive, and home craftsmen rarely resort to implementing this option.
Part of the equipment
External contour
For the external circuit of the home heating unit you will need pipes. Metal products (but not stainless steel) have the greatest thermal conductivity, so it is better to use them for a heat collection system.
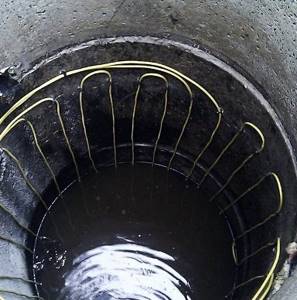
Figure 2 shows a DIY geothermal heat pump using parts from an old air conditioner and refrigerator. The depth of the well for collecting heat from geothermal waters is about 60 - 120 meters. The diagram above does not show casing, but its use is mandatory, since casing protects the well walls from destruction. The external heat collection register must be located inside the casing.
The collection of spatial energy for heating a house can be done not only through a deep well, but also using a horizontal pipe system buried no less than the amount of soil freezing.
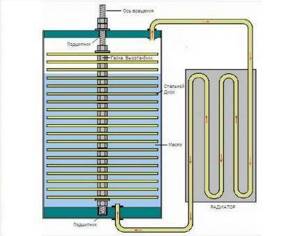
Collecting heat from a reservoir gives a sufficient result, since at the bottom the water temperature is always 4 degrees Celsius, since it is in this state that it has the greatest density. The attractive side is the significantly smaller volume of excavation work.
Systems that heat up under the influence of the sun are also used to collect heat. Such units are most often installed on the roof of a house and are intended to heat water or air. They significantly increase the temperature in the heat pump's evaporator, increasing the efficiency of the home's heating system.
Evaporator
This unit is a container in which a heat exchanger is located, carrying the heat carrier collected by the external circuit. The design of this part can be different, but most often it is made of copper pipes.
Rice. 5. The shape of the evaporator heat element should ensure maximum contact with the refrigerant
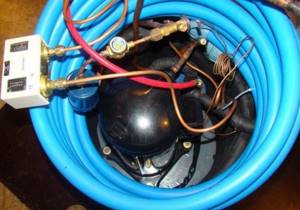
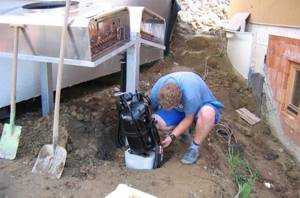
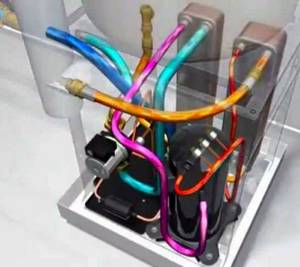
When making a heat pump with your own hands, they often use serviceable components and parts from an old refrigerator or air conditioner, as well as a failed split system.
Compressor
On homemade heat pumps, compressors from existing old equipment are most often used. When the unit system is assembled and tested, you can think about replacing the compressor from the old refrigerator with another, more or less powerful one. When choosing a compressor, it is best to pay attention to components from split systems, characterized by increased power and reliability. Modern units, as a rule, are equipped with automatic control and adjustment units, which greatly simplifies the management of these units.
Fig.6. Compressor for heat pump
Capacitor
The choice of this element of the system must be approached especially carefully, since it is a vessel operating under pressure. It is preferable to use an old gas cylinder. It will have to be cut to accommodate the heat exchanger and then welded back together.
Chokes
In heat pumps, these are devices for relieving pressure from the condenser to the evaporator. The part is easy to find in stores or hardware repair shops, as they are very durable in operation.
Fig.7. Throttle for heat pump
How to assemble a heat pump at home?
Since the thermodynamic calculation of a heat pump is quite difficult for most DIYers, we will not present it here. Our task is to present several working models so that any enthusiast can take any of them as a basis for creating their own brainchild.
It should be noted that a heat pump, invented and assembled with your own hands, will remain an unattainable dream for the vast majority of ordinary users if you do not put a lot of effort and time into its manufacture.
The simplest heat pump from an old refrigerator was described in an article in Engineer magazine in 2006. It is positioned as an air-to-air heater for a small room or greenhouse. By the way, no matter how powerful a household refrigerator is, it will not be enough to heat even a small house, but it will be enough for 1 room. The solution is implemented in 2 ways, with the internal automatic shutdown being dismantled and all units connected directly for continuous operation. In the first case, the old refrigerator is located indoors; the pump design is shown in the diagram:
From the outside, 2 air ducts are laid to it and cut into the front door. The air enters the freezer through the upper channel, cools and falls to the lower air duct due to an increase in density. It then leaves the refrigerator body, displaced by the upper flow. The room is heated by a heat exchanger located on the rear wall of the unit. According to the second method, making a heat pump with your own hands is just as simple; you just need to build the refrigerator into the outer wall, as shown in the diagram:
A homemade heater from a refrigerator can function up to an outside temperature of minus 5 ºС, not lower.
Self-production of the device
A review of the design options for the Frenette pump allows us to understand that the principles of its operation can be used with varying degrees of efficiency in structures of various types and types. The basic idea remains the same: a narrow space between metal elements, filled with oil, and rotated by an electric motor.
The diagram shows a version of the Frenette heat pump, which is usually used for self-manufacturing of the device. The basis of the design is metal discs separated by nuts (+)
To make such a device, you need to prepare the necessary materials:
- hollow metal cylinder;
- a set of identical steel disks with a hole in the center;
- set of nuts 6 mm high;
- threaded steel rod:
- electric motor with extended shaft;
- bearing;
- Radiator;
- connecting pipes.
Pump dimensions may be larger or smaller. But the distance between the disks should be maintained exactly - 6 mm. Standard nuts are used as spacers, and a steel rod is the center of the structure.
Its thickness should correspond to the diameter of the nut. If you don’t have a threaded rod at hand, you’ll just have to cut it.
Metal disks for a Frenette heat pump should be slightly smaller than the diameter of the cylindrical body to ensure free rotation and more efficient heating of the coolant
Obviously, the hole in the disks must be such that they can be freely put on the axial rod. The outer diameter of the disks should be several millimeters smaller than the housing. If there are no ready-made elements at hand, the discs are cut out of sheet metal yourself or the work is entrusted to a turner.
Steel discs for a Frenette heat pump can be cut at home if you have the right equipment
The cylindrical body can be made from an old metal container of a suitable configuration or welded from metal. A piece of wide metal pipe will also work.
The walls are welded to the ends of the cylinder. The housing must be sealed so that oil does not leak. Additional holes should be made in the upper and lower ends of the housing: for the entrance and exit of heating pipes leading to the radiator.
Of course, all pipe connections should be sealed. For threaded connections, special sealants are used: FUM tape, flax, etc. If you decide to use polypropylene pipes, you will need special fittings and, possibly, a soldering iron to install such pipes.
A high-performance electric motor is not required to operate the Frenette pump. A device removed from an old or broken household appliance, such as a regular fan, is suitable.
In order for the rod to rotate freely, you need a suitable bearing of standard sizes. When all the elements are prepared, you can begin assembling the device. First, a central axis with a bearing is installed on the lower part inside the housing. Then the spacer nut is screwed onto the axle, then the disk is put on, the nut again, the disk again, etc.
Discs with nuts are alternated until the housing is filled to the top. Even at the preparation stage, you can make preliminary calculations on the number of required disks and nuts.
It is necessary to add the thickness of the disk to the thickness of the nut (6 mm). Divide the height of the body by this figure. The resulting number will give information about the required number of “nut + disk” pairs. The nut is installed last.
Once the housing is filled with these moving parts, it is filled with liquid oil. The type of oil does not matter; you can take mineral, cottonseed, rapeseed or any other oil that tolerates heat well and does not harden. After this, the structure is covered with a top lid and carefully welded.
At this point, the radiator pipes are usually already attached to the caps. For convenience during further installation and maintenance of the device, two shut-off valves can be installed on the pipes. Now you need to attach the heat pump axis to the motor shaft.
The system is connected to the network, the presence of leaks is checked, and the operating characteristics of the device are assessed.
A self-made Frenette heat pump can be connected to a conventional cast iron or bimetallic radiator, which will provide the necessary heating effect
If everything is done correctly, the axle with discs will begin to spin, heating the oil inside the device. The hot coolant will move through the upper hole through the pipe into the heating radiator. The cooled oil will return to the heat pump housing through the down pipe to be reheated.
Heat pump from air conditioner
Modern split systems, especially the inverter type, successfully perform the functions of the same air-to-air heat pump. Their problem is that their operating efficiency drops along with the outside temperature; even the so-called winter kit cannot help.
Home craftsmen approached the issue differently: they assembled a homemade heat pump from an air conditioner, which takes the heat of running water from a well. In fact, only a compressor is used from the air conditioner, sometimes an internal unit that plays the role of a fan coil unit.
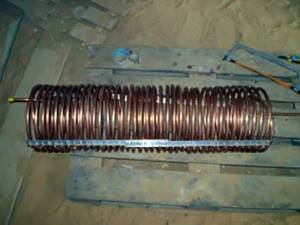
By and large, the compressor can be purchased separately. You will need to make a heat exchanger for heating water (condenser) for it. A copper tube with a wall thickness of 1-1.2 mm, 35 m long, is wound to give the shape of a coil onto a pipe with a diameter of 350-400 mm or a cylinder. After which the coils are fixed with a perforated angle, and then the entire structure is placed in a steel container with water pipes.
The compressor from the split system is connected to the lower inlet to the condenser, and the control valve is connected to the upper inlet. The evaporator is made in the same way; an ordinary plastic barrel will do for it. By the way, instead of homemade capacitive heat exchangers, you can use factory plate heat exchangers, but this will not be cheap.
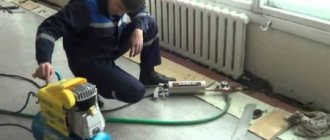
Assembling the pump itself is not too complicated, but it is important to be able to solder the connections of copper pipes correctly and efficiently. Also, to fill the system with freon, you will need the services of a specialist; you will not specifically buy additional equipment. Next is the stage of setting up and starting up the heat pump, which does not always go well. You may have to tinker a lot to achieve results.
Conclusions and useful video on the topic
In our country, heat pumps are not yet particularly common, but you can already find craftsmen who can share their experience in independently manufacturing such systems. We offer a selection of useful videos.
Heat pump design, system assembly features:
Features of connection and operation of a homemade heat pump:
Video review of the operation of a homemade heating system from an air conditioner:
Heating schemes with heat pumps are not always cost-effective or convenient, so be sure to weigh the pros and cons of this type of heating.
If you come to the conclusion that such a system is suitable for your home, do not rush to spend huge sums on a ready-made installation and assemble the structure yourself. This is not so difficult, requires much less investment, and the effect can exceed all expectations.
Are you planning to assemble a heat pump yourself, but don’t know where to start? Or maybe you have already assembled a similar design and have the necessary knowledge that you can share with our readers? Please leave comments and ask questions in the block below.
In the current realities, energy prices are rapidly rising and heating a private home is becoming more and more expensive. In some areas it is not even possible to connect to the gas distribution pipeline. Heating a house using electricity is very expensive.
In such cases, heat pumps are increasingly being used. The equipment for such heating systems is quite expensive, but over the years of use the investment pays off and savings appear. If you wish, you can make your own heat pump yourself. For such systems, the raw material is the energy contained in the earth, air and water.
How to calculate equipment power
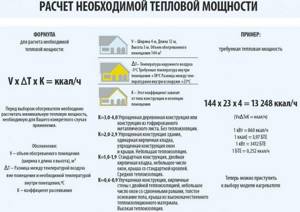
In order to independently calculate a heat pump, you need to determine all the heat losses for each room. The main heat losses occur:
- Due to the temperature difference between indoors and outdoors through the walls.
- Through natural leaks in windows and doors.
- Through the ventilation system.
In order not to bore you with complex calculations and unnecessary calculations, on average, the heat loss of a residential premises ranges from 60 to 100 W. As an example, you can take a small private house, the total area of the premises will be equal to 150 square meters. Then, with heat losses of 60 W, the device’s power of 9 kW will be required to cover them. But you need to add about 700 W here to heat the water in the heating system. As a result, it turns out that for a cottage with a total area of 150 sq. m. you will need a device with a power of 9.7 kW.
We make the device with our own hands
After reading this article, many people having already decided to “buy an occasional” heat pump and reduce their heating and air conditioning costs to zero, were surprised to discover that the cost of this equipment is at least six figures. That is why those who, after such information, have not lost enthusiasm and are trying to make such a device on their own.
For manufacturing you will need basic components, including:
- Compressor for heat pump.
- Evaporative heat exchanger.
- Condenser heat exchanger.
- Throttling device.
- Copper pipeline.
First of all, you should choose the location of the compressor and the device itself. It is best to take it from the air conditioner. The compressor must be fixed to the wall using brackets.
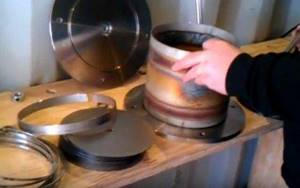
- A condenser heat exchanger should be manufactured. To make it you will need a tank made of stainless steel. Tank volume is approximately 100-130l. You should insert a coil into it and weld the neck. Remove the coil outlets from the tank using threaded connections. Anyone who has ever made their own coil for a moonshine still will find it easier, the design is almost the same.
You need to wind a copper pipe around the finished capacitor and secure it carefully. Bring out the ends of the pipe using squeegees.
- A 100 liter plastic barrel is suitable as an evaporator. It must be fixed to the wall using brackets.
- A throttling device should be purchased taking into account the design features and diameters of the pipeline.
- As connecting pipes for the water circuit, you can use ordinary PVC plumbing pipes with seals.
- Soldering the freon circuit and filling it with gas should be carried out by professionals.