Most residential apartment buildings and private houses are equipped with a water heating system. In order for it to function without failures, it is necessary to carefully consider the layout and operation of it. It is known that when water heats up, it tends to expand, and to prevent overloading the system, an expansion tank is used. We will tell you how to make a high-quality pressure stabilizer with your own hands - an open/closed expansion tank. We also suggest that you familiarize yourself with the photo selection presented in the material.
Expansion tanks in various heating systems
In any building, be it administrative or residential, the heating system can be represented by one of the following options: centralized, autonomous open/closed type.
Let's take a closer look at the design features of the expansion tank for the most common systems, as well as the functions it performs.
Centralized system . The expansion tank is a sealed container, at the top of which there is a valve designed to release excess air.
Attention. The Mayevsky valve should not be used due to its small bore diameter, which can lead to excessively long bleeding of air from the heating system.
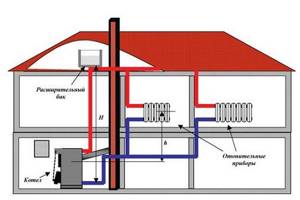
The tank is mounted at the highest point of the upper spill of the heating system. During its operation, air tends precisely there, displaced by a heat source moving downwards. The system is started in the basement by opening the circuit valves and bleeding air from the tank.
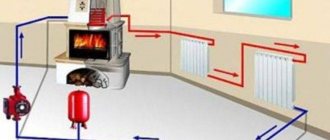
Autonomous open system. Everything in this system is quite simple. The expansion tank is a non-hermetic structure, closed with a lid to prevent dust, etc. from getting inside. The movement of coolant through an open heating system is possible due to convection. In this case, the heat source comes into contact with the air directly in the expansion tank, which, in turn, performs 2 functions: it compensates for the expansion of the coolant and at the same time is the highest point of the circuit into which the bleed air enters.
Autonomous open system
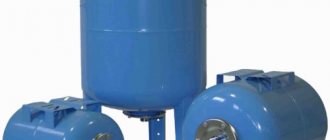
Autonomous closed system. In such a system, the tank is represented by a container divided into two parts by a special rubber membrane. One part of the tank contains air. In the other - liquid from the system. This design prevents the accumulation of air (enriched with oxygen) in the heating system, which destroys pipes and radiators.
The coolant circulates through the heating system under the action of a circulation pump. The heating circuit in this case has no contact with the environment, and the tank is just a container with a reserve volume, thanks to which the coolant is able to expand during operation of the heating system.
Autonomous closed system
Where is the tank installed?
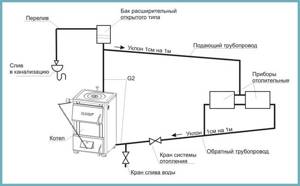
For both a top-fill central heating system and an open autonomous heating system, the instructions are extremely simple: the tank is installed at the highest point of the heating system. At the same time, the slope of filling and distribution should, we recall, ensure the displacement of air into it.
Scheme with natural circulation. The tank is mounted in the attic.
If for some reason it is impossible to provide a slope along the entire length of the heating circuit, another expansion tank is simply mounted in the pocket where the air will accumulate at the same level as the main one . If the pocket volume is small (typically one to three radiators), you can get by with conventional air vents.
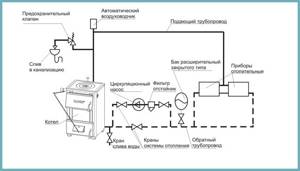
What about a closed system in which circulation is provided by a pump? She's not afraid of air traffic jams, is she?
Air vents in it, of course, are still necessary. Air in radiators and pipes will accelerate their corrosion, and constant murmur is unlikely to please you. But the expansion tank really doesn’t have to be installed at the top point of the circuit: it can be mounted anywhere with a minimum amount of turbulence in the water flow.
Read the article Circulation pump for heating: selection according to an engineering diagram.
A typical installation location is a straight section of pipe in front of the circulation pump. It is in it that the water flow is closest to laminar and, therefore, will not provide constant pressure surges in the tank.
Making an expansion tank with your own hands
It is quite possible to make an expansion tank yourself. To do this, you only need a set of certain tools and materials, diligence and care.
List of required materials and tools
To create an expansion tank, the following tools and working materials are required:
- welding machine;
- locksmith tools;
- electrodes;
- Oil paint;
- metal to create a tank capacity;
- brass stopper;
- welding mask;
- rubber gaskets;
- pipes with a cross section of 200-300 mm.
Design creation process
First of all, it is worth mentioning one point. At home, it is advisable to manufacture an expansion tank only for an open-type heating system. This is due, first of all, to the fact that for a tank with a membrane, just choosing the optimally suitable membrane and inserting a nipple will take a lot of effort, time and money.
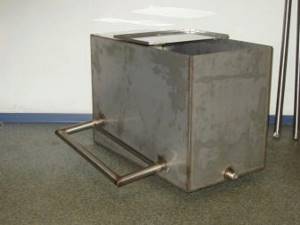
So, to create the structure we need sheet metal and pipe cuttings. Then we cook a regular rectangular/square box.
Advice. Many experts advise using stainless steel as a working material for an expansion tank for heating. This is good advice, but only if the entire heating system (pipes) is made of stainless steel or polymers. In other cases, ordinary “black” steel with a thickness of at least 3 mm is quite suitable.
First you need to decide on the volume of the future expansion tank. The standard indicator is 10% of the total amount of coolant in the heating system.
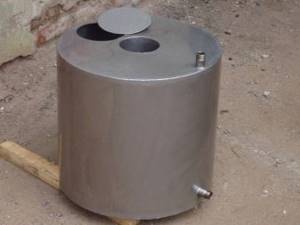
Let's get to work. Using a grinder, we make five steel blanks for the future container. Then we weld them vertically to each other with a continuous seam. Then all that remains is to cut a hole in the bottom of the tank and the rough structure is ready.
Advice. A varnish/paint container or a truck fuel tank is also perfect for making a tank (do not consider a tank from a car, as it is usually too thin.
Let's start cleaning the inner surface of any remaining flammable mixture: hot water and a brush are suitable for this purpose. After cleaning is complete, leave the container to dry. We prepare a lid for the tank and fasten it with bolts or make a hatch.
After completing work with the lid, we make a steel blank for the fitting and weld it into the tank. Be sure to use a brass plug (do not forget to line it with a rubber gasket about 0.5 cm thick). Be sure to lubricate the fitting thread with a layer of fat or oil to facilitate the process of unscrewing it in the future.

Making a Tank
We cover the finished tank with oil paint on all sides (inside if possible).
Since the expansion tank will be located in the attic of the house, it must be properly insulated to prevent the possibility of freezing of the liquid inside it.
Self-production
Do-it-yourself expansion tanks for heating systems are often made in cases where an open heating system with natural circulation is created.
The process itself will require you to have welding skills; it is, in general, simple.
- 5 rectangular or square blanks are cut from a two- to three-millimeter steel sheet. Size - approximately 30*30 or 30*40 centimeters. They will become the bottom and walls of the tank.
- The workpieces are placed at right angles and boiled. It doesn’t matter what to cook with; two-millimeter steel sheets are easily welded with gas, three and even more so four are easier to cook with electric welding.
You can also cut, of course, with a grinder or an acetylene cutter. The appearance of the product will not affect its functionality at all, so there’s really no point in looking for guillotine shears and trying to make the tank perfect.
An open tank can be like that. True, temperature resistance leaves much to be desired.
It’s not that it’s impossible to make a membrane-type tank yourself - it’s unprofitable. The price of these products starts from three to four hundred rubles. Really, just searching for sufficiently elastic rubber for the membrane will take you an incongruously long time.
Useful tips from professionals
Finally, we suggest you familiarize yourself with some practical tips that may help prevent certain errors from occurring in your workflow:
- As you might have guessed, the actual volume of the expansion tank is calculated according to a complex formula and, if you are not an expert, then you should not be too zealous and delve into the numbers - take as a basis the standard indicator of 10% of the total coolant volume.
- If, during the operation of a self-made expansion tank in the heating system, the safety valve is triggered too often, this indicates that the volume of the tank was calculated incorrectly. And this, in turn, means that you made a mistake in calculating the total volume of coolant in the system. The solution in this situation is very simple: add another expansion tank to the system, which will compensate for the missing volume.
- In order for the piping to be installed correctly, special attention should be paid to only two places in the system: the place where the coolant enters the expansion tank (should be done at the top point) and the place where it leaves (carried out from the bottom).
- To avoid boiling of the liquid in the expansion tank, take care of two things: the correctly selected diameter of the circuit pipes and the presence of a slope of the circuits.
We have provided you with general information about expansion tanks in the heating system, and also provided instructions for making an effective design with your own hands. We wish you good luck!
Tank Installation Guide
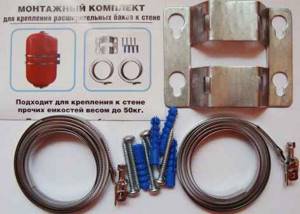
Fastening the expansion tank

Fastening the expansion tank
The first stage is preparation for work. In accordance with the general scheme, first, to install the tank, you need to disconnect the heating boiler from the power supply, shut off the water supply to the boiler, and then drain the liquid from the radiators. Additionally, you can open the so-called. Mayevsky taps, thanks to this, more efficient and faster drainage of water will be ensured.
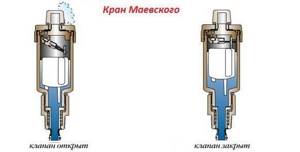
Mayevsky crane
Prepare your expansion tank for installation and further use. If you plan to use polypropylene pipes to connect system elements, prepare a special soldering iron to fasten them together. You will also need standard elements such as corners, couplings, etc. As for fittings, it is best to use “American”. Such a fitting will allow you to easily remove the container in the future for maintenance and repair work.
American fitting with internal thread
The American fitting consists of 2 main elements. The first part of such a fitting must be attached to the thread on the expansion tank. The second part is attached to the first. A polypropylene pipe is soldered to the second part. Before screwing the fitting to the expansion tank, wrap a sealant around the threaded connection (flax is usually used) and additionally apply a little special sealing paste. Screw on the first part of the American fitting using a regular gas wrench.
The second stage is laying polypropylene pipes. Make sure that all water has been drained from the system and proceed to install the pipes. Where the tee will be installed, the pipe is cut using special scissors. Solder the tee and a pipe to it. Next you need to solder the stopcock. Thanks to it, it will be possible to repair the tank in the future without the need to remove water from the system. Solder the polypropylene pipes so that the last of them can later be connected to the expansion tank.
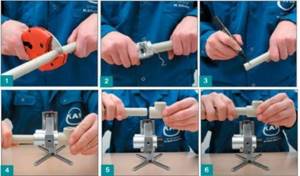
Installation of polypropylene pipes
The third stage is connecting the expansion tank. You need to screw the American to the container. After this, feel free to proceed with placing the tank in the location chosen for it. It is best to install the tank in a corner, on a flat floor, in such a place that you can freely access the tank in the future for repairs, etc.
The fourth stage is checking and replacing filters and cartridges. Before you run coolant into the pipes, thoroughly rinse the cleaning filter with water. Remove it first. At the same time, replace the main filter cartridge. It is installed directly after the pump.
The fifth stage is preparing and launching the system. Once all the elements are in place and the required connections have been made, you can begin preparing the tank for use. Restore water supply. Let the batteries fill with liquid until the pressure level in them increases to approximately 1.3 kPa. Next, you need to bleed the air from the pipelines, turn off the Mayevsky taps and start the heating equipment to warm up the rooms.
Tank installation
Recommendations for bleeding air and optimal pressure values were given earlier. If the pressure level rises above 1.1 kPa (this is the value that was set when setting up the tank), excess water will flow into the tank. When the pressure level decreases, the coolant will flow into the batteries. This will ensure normal operation of the heating system.
Thus, there is nothing super complicated about installing an element called an expansion tank. Follow the instructions in everything, remember the main recommendations and everything will be at its best. Happy work!
Expansion tank for heating: photo
Water heating options
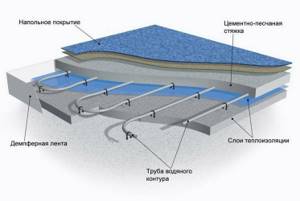
Figure 2. Diagram of a water heated floor.
Most often, the house is equipped with water heating. The options are as follows: connect to the water supply and sewerage system, if possible, and create autonomous heating. To connect to the centralized system, you need to complete some documents and obtain the appropriate permissions. Autonomous heating systems have a number of completely solvable problems that require financial investments, a little calculation and a lot of work.
Water heating equipment requires some preliminary work. More often, a system of natural circulation of coolant is used, which is usually ordinary water. No additional pumps are required here. Cooled water flows from the batteries into the boiler and displaces hot water, which enters the heating radiators. This circulation occurs continuously. To do this, the temperature difference between hot and cooled water should be approximately 25 degrees.
This result can be achieved by placing a heating boiler in the basement of the house. If this is not possible, then the boiler is placed in the basement no higher than the radiators. This system is called two-pipe, since hot and cooled water are supplied through different pipes.
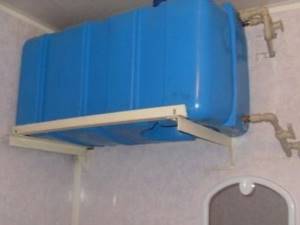
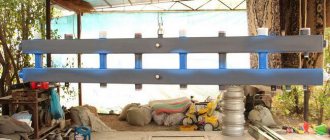
Homemade tank made of steel sheet
Taking the above calculations of the tank capacity as a basis, you can begin to manufacture it.
Heating systems with a capacity of over two hundred, and even more so three hundred, liters of water are extremely rare. Therefore, for an expansion tank, a volume of about 10-15 liters will be a completely acceptable value. For its manufacture, a steel sheet measuring 500×756 mm with a thickness of 2 mm and above is taken.
The manufacturing process begins with cutting the steel sheet. If possible and for greater accuracy, it is better to do this in the factory using guillotine shears. Otherwise, the sheet is cut with a grinder into two fragments measuring 250x756 mm. Next, these blanks are dissolved into 6 squares of 250 × 250 mm.
A hole is burned in one of them with a gas cutter. A fitting is welded into it. You can do this with a welding electrode. Its threaded taper should be about one or half an inch.
Two workpieces are welded at 90 degrees. The same right angle welding procedure is performed with two other workpieces. From the corners obtained in this way, a square is welded, and the seams are welded until sealed. Then the joints are tested using chalk and kerosene.
In this case, chalk is applied to the outer part of the weld, and kerosene is applied to the inner part. If after a certain period of time no greasy stains appear on the chalk strip, then the seam is sealed.
The bottom of the product is a part with a pipe welded into it. Next, the seams will be checked again for tightness using the method described above.
A gas cutter or welding electrode is used to burn a hole Ø 50 mm in the remaining workpiece. This blank with a hole made in it is welded as a lid for a cubic tank.
At the last moment, checking the tightness of the seams can be neglected. The result of the work done should be a container with a volume of 15.6 liters. During its manufacturing process, all metal is consumed using waste-free technology, and a tank of such capacity is quite sufficient for use in a three-hundred-liter system.
The process of manufacturing a tank in this way is very labor-intensive and requires the participation of an experienced welder. Therefore, if there is no such qualification or the opportunity to hire an appropriate specialist, then it is better to use another method, making a tank from a ready-made container.
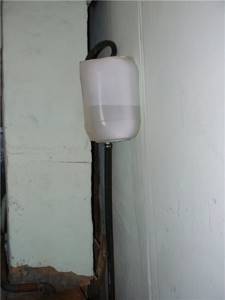
Plastic tank
Here you just take a plastic container. A 10-40 liter canister or a regular 10 or 12 liter bucket can serve as a tank. A more preferable option would be a rectangular base.
For it you should purchase a threaded fitting with a thread for two bends and a rubber washer according to the diameter of the fitting, as well as two nuts for the diameter and pitch of the thread of the bends.
Then one of the ends of the fitting is heated over an open fire with a blowtorch, gas cutter or gas stove, and with this heated fitting, the bottom of the canister, bucket or some other container intended for the expansion tank is burned. After this, you should cut off the top of the product and burn three holes using a nail heated over an open fire. These holes are made in a triangle and serve to attach the tank to the wall.
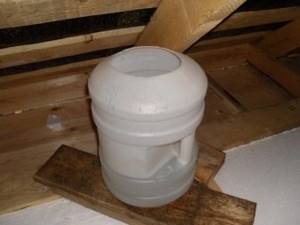
Now you should equip the bottom of the product with a fitting. For this purpose, a nut is screwed onto the drive, and it itself is inserted into the hole. From the inside of the tank container, put a rubber sealing washer on the thread of the outlet and screw on the second nut, tightening it tightly. The purpose of this second nut is to tightly fix the rubber to the bottom part with emphasis on the second nut located on the outside.
The last stage of work is to mount the container higher, somewhere under the ceiling. For this, dowels or self-tapping screws are used. They are inserted into holes pre-burnt with a hot nail or drilled in plastic. This mounting method is suitable for mounting a 5-liter container, but for its 10-liter sample, you will need to build a shelf.