To heat a small living space or a two-story private house, it is not necessary to use complex, expensive technologies. The Leningradka heating system, known since the times of the Soviet Union, is now effectively used to provide heat to small residential buildings.
It remains popular due to its ease of design and economical consumption of materials. After all, you see, more expensive and more complicated does not always mean better.
You can equip the single-pipe Leningradka yourself. We will help you understand the operating principle of the system, provide basic technological diagrams and describe step by step the technology for installing the heating system. Visual photo and video material will help plan the implementation of the project.
The best qualities of the Leningradka
A single-pipe heating system in a private house in Leningrad is convenient, first of all, because it is very easy to select the operating mode of any radiator.
Heating radiators are connected in parallel to one pipe, so you can even turn off or dismantle any radiator without disturbing the operation of the system. For small houses and cottages, a system with gravitational (natural) water circulation is popular. In one-story houses, horizontal routing of risers is chosen. For multi-storey buildings, a combined scheme is used - vertical and horizontal installation of risers. As already mentioned, you can organize a “gravity” system or create a Leningrad heating system with a pump, which will significantly improve the dynamics of heating the premises.
"Leningradka" with natural circulation
A heating system of this type involves sequential installation of heating devices around the perimeter of the room. If a Leningrad heating system is used, the pipe diameters for “gravity” circulation must be used with a larger diameter. The basis of the system is that the boiler is connected to the first radiator, the output of the first radiator is connected to the input of the second, etc. From the last battery, the water that has given up its heat is returned through the return pipe to the boiler to repeat the cycle.
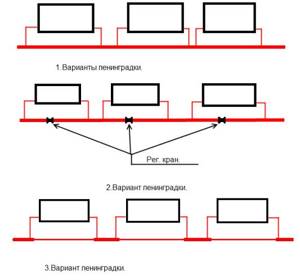
The popular and unpretentious Leningrad heating system can be installed with your own hands in two ways.
The first option is to connect heating batteries in series, and the second method is to use a diagonal connection of radiators to heat the batteries evenly. You can install any radiators, but when using traditional cast-iron radiators, the use of a Mayevsky tap is mandatory. It serves to bleed air from the batteries.
Parallel connection of batteries in the Leningradka heating circuit
The Leningrad heating system layout described above has one significant drawback. With this connection method, it is impossible to adjust the heat transfer of each battery and it is impossible to turn them off without stopping the operation of the entire system. To eliminate this drawback, a version of the Leningradka with parallel connection of batteries was invented.
With this connection, the input and output of the battery is regulated by a ball valve, and a valve is installed on a section of the riser parallel to the battery, acting as a shunt. The taps that shunt each radiator play a big role in setting up the entire system. With their help, the Leningrad heating system of a private house ensures uniform heating of heating devices.
"Leningradka" with an additional contour
If, when creating a project, the system length is too long or the configuration is complex, then in such cases an additional circuit is used. The additional circuit is connected in parallel to the main one. In order for the system to work correctly, a needle-type valve is installed on the “return” of the additional circuit to debug the heating system
The second important requirement is that the “return” of the second circuit, if a Leningrad heating system with a pump is used, must be connected to the return pipe of the main circuit to the pump
Leningradka version - closed system
Any heating scheme in a private house in Leningrad easily turns into a closed system. It is clear that in such cases it is necessary to install a membrane-type expansion tank, a pressure gauge, a circulation pump and safety valves for safety. When installing a wall-mounted boiler that has a built-in circulation pump, installation of a separate pump is not necessary.
This heating system for a private house in Leningrad is most often used in two-story houses.
What are the features of Leningradka?
As a rule, any version of the “Leningradka” is installed in buildings with one or two floors and a small area. The standard design is a chain of radiators connected by a single pipeline through which the coolant circulates. It is usually water or an antifreeze mixture. The heating device in this heating system of a private house is a boiler.
Despite the simplicity of the design, the Leningradka has a number of advantages over its analogues, especially when it comes to building it yourself:
- ease of installation;
- reliability during operation;
- availability of the equipment used;
- the ability to regulate the temperature on each radiator;
- economical use of coolant.
In addition to the advantages of installation, there are also negative aspects when using this heating system. The main ones are considered to be uneven heating of the initial and final radiators in the circuit, as well as the inability to connect additional equipment.
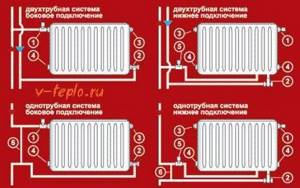
Horizontal and vertical wiring: diagrams and description, which is better
There are various options for organizing single-pipe heating:
- The heating circuit can be installed on one floor. This circuit layout is called horizontal.
- The heating circuit can be arranged on two floors. This scheme is called vertical.

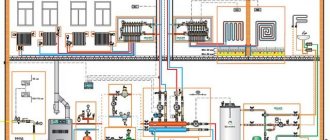
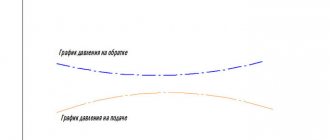
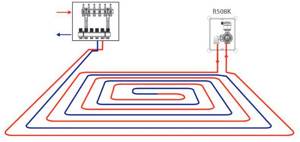
Photo 1. Diagram of the Leningradka heating system. The red color shows the movement of the coolant from the boiler to the radiators, and the blue color shows the movement back.
For a vertical single-pipe scheme, the following options are possible:
- Water can be supplied to the circuit from a distribution manifold located at the top - the so-called top spill.
- Water can enter the circuit from below and move along the loop “first floor - second - first” - the so-called lower spill.
Radiator connection options:
- Insertion directly into the main pipe.
- Connection via pipes.
This option represents a distant model of a two-pipe circuit. In it, radiators are connected to the main pipe through connecting pipes - pipes. The main coolant flow passes along the radiators, only part of the hot water is directed into each of them. The main flow moves on without entering the radiator. This scheme allows you to evenly distribute heat between rooms.
In addition, it is more technologically advanced and convenient for repairs. If replacement is necessary, one of the batteries is removed, while the system continues to function. In contrast to the scheme in which the batteries are embedded directly into the main line, without pipes, and the entire volume of the coolant passes through each battery.
Device Features
The operating principle of all single-pipe types of heating is the movement of the coolant through a closed chain of heating devices connected in series. Batteries in such schemes have two outlets through which a through flow of water circulates, and the main simultaneously serves as a supply and return pipeline.
Passing through the heating boiler, the liquid supplies the radiators with heat at each turn, carrying with it the masses that have already cooled down. The heating temperature depends on the heating level of the coolant and the intensity of its movement along the circuit.
However, achieving the same temperature in all batteries is problematic. The highest degree of water will always be present in the devices closer to the outlet of the boiler and decrease with distance from the heating source. To achieve uniform heat in all rooms, the number of sections in radiators is gradually increased from room to room, the last of which has the largest dimensions.
“Leningradka” differs from its constructive counterparts:
- horizontal bottom wiring;
- connecting heating devices on both sides of the pipeline.
The Leningrad system is effective for one- and two-story houses when using 5 radiators. A larger number - from 6 to 8 devices - requires careful calculation of the power of the leading elements of the system. A further increase in the number of batteries and sections with a more complex circuit does not justify itself.
Installation technology of the Leningrad system in a private house
Now let's figure out how heating is done in a private house in Leningradka. If you plan to install hidden pipelines, you need to prepare grooves in the walls in advance. To protect against heat loss, the pipeline must be insulated. If visible wiring is done, then the pipes do not need to be insulated.
Scheme of a single-pipe heating system for a private house
Selection of radiators and pipelines
Leningradka heating distribution in a private house can be made of steel or polypropylene pipes. The latter variety is quick and easy to install, but is not suitable for northern latitudes. This is due to the fact that here the coolant is heated to a higher temperature, which can lead to pipe rupture. In the northern regions, only steel pipelines are used.
Depending on the number of heating devices, the pipe diameter is selected:
- If the number of radiators does not exceed 5 pieces, then pipes with a diameter of 2.5 cm are sufficient. For bypass, pipes with a cross-section of 20 mm are used.
- When the number of heating devices is within 6-8 pieces, pipelines with a cross-section of 32 mm are used, and the bypass is made from elements with a diameter of 25 mm.
Since the coolant temperature at the inlet to the battery differs by 20°C from its outlet temperature, it is important to accurately calculate the number of sections. The water from the radiator is then mixed again with the coolant at a temperature of 70°C, but one will still be several degrees cooler when it enters the next heating device
Thus, with each passage of the battery, the temperature of the coolant decreases.
To compensate for the described heat losses, the number of sections in each subsequent heating unit is increased in order to increase the heat transfer of the device. When calculating, 100 percent of the power is assigned to the first device. The second device requires 110% power, the third - 120, etc. In other words, with each subsequent unit the required power is increased by 10%.
How to even out uneven heating of radiators?
The usual way to equalize their heat transfer during unequal heating is to gradually increase the thermal power (or, equivalently, the number of sections) of the radiators as the coolant moves in the circuit. If the power of the first heating device in the circuit is taken as 100%, then the next one has it 110%, and so on up to 150-200% of the power of the last one (depending on the number of serial radiators).
When implementing a single-pipe heating system for a two-story house, the diagram of which includes a main pipe, the diameter of the latter is taken to be large. So, when making connections to radiators with a DN16 metal-plastic pipe, for eight or nine heating devices in a floor circuit, you should take a “main line” with DN40. The DN32 pipe will work, but the stability of the system will decrease. This means that any change in coolant temperature will lead to its imbalance, i.e. a noticeable change in the heating temperature difference between adjacent radiators in the circuit.
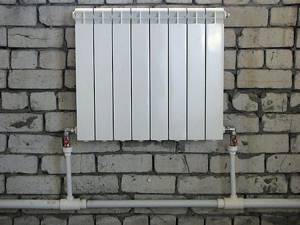
“Single-pipe” schemes with so-called radiator piping are common. "bypasses", as shown in the photo below.
Connecting a radiator in the “Leningrad” circuit with a bypass.
These are sections of smaller diameter included in the breaks in the line under the radiators, sometimes with a flow control device installed (needle valve or others). Control valves are also installed in one (or both!) connections to the radiators. It turns out that instead of a continuous line of one diameter, there is a pipe of variable diameter. At the same time, practical installers mistakenly believe that in order to branch the coolant flow into two components in the tee for supplying the radiator, it is necessary to narrow the main passage for it. This is incorrect because a liquid under pressure will fill any free volume encountered in its flow path.
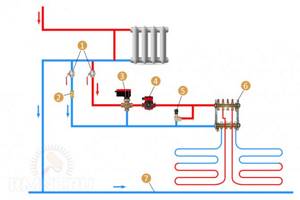
How to properly connect a heated floor to a heating system
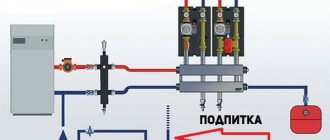
Connecting a heated floor to a radiator-type heating system can be organized using the so-called “local heated floor connection module”. The required module is available either to be purchased in a ready-made, assembled form by visiting a specialized store, or to be manufactured independently.
- Connection to a two-pipe radiator heating system. The easiest option to implement is to install floor pipes and cut them into the contour. You can cut in using either a module or simply using two ball valves. The main thing is not to get confused and follow the order of connecting the supply and return.
- An insert into a single-pipe circuit, popularly called “Leningradka”. The implementation is as simple as in a two-pipe circuit. The heated floor supply is powered after the circulation pump, and the return flow is fed into the pipe in front of the pump. The temperature of the floor covering is regulated using a valve in the heated floor supply circuit.
- Warm floor heating system is gravitational. Quite a complicated option due to the lack of forced pumping of the coolant. The slope of the pipelines involves cutting into the floor at the beginning of the room, where the horizontal level is higher, and leaving the return at the end of the room - there is a lower absolute level. The labor intensity of the process is very high and it is not a fact that the effort expended will lead to the desired result. In eighty percent of cases, it becomes necessary to use an additional pump to pump liquid into the heated floor. And since you still need to buy additional equipment, it would be much more efficient to switch the entire system to forced circulation.
Characteristics of Leningradka
When choosing an installation, you should pay attention that it differs in the method of coolant circulation:
- Water is forced to move. Leningradka with a pump increases circulation, but at the same time consumes electricity.
- Water moves by gravity. The process is carried out thanks to physical laws. Cyclicity is ensured by temperature differences and gravity.
The technical characteristics of Leningradka without a pump are inferior to forced ones in terms of the speed of movement of the coolant and the speed of heating.
To improve the properties of the equipment, it is equipped with various devices:
- Ball valves - thanks to them you can regulate the temperature level to heat the room.
- Thermostats direct the coolant to the desired zones.
- Valves are used to regulate water circulation.
The listed additions allow you to upgrade even a previously installed system.
Advantages and disadvantages
The advantages of use include:
- Cost-effective – the cost of the elements is low, installation can be done independently. During operation, energy is saved.
- Availability - parts for assembly are available in any hardware store.
- The heating system of a private house in Leningradka can be easily repaired if it breaks down.
Among the shortcomings are noted:
- Installation features. To equalize heat transfer, it is necessary to add several sections to each radiator located far from the boiler.
- Inability to connect to horizontal installation of heated floors or heated towel rails.
- Since pipes with a large cross-section are used when forming an external network, the equipment looks unaesthetic.
How to install correctly?
Installing Leningradka is quite feasible with your own hands; for this, choose one of the methods:
1. Horizontal. A prerequisite is the installation of a floor covering in the structure or on top of it; this must be chosen at the design stage.
The supply network is installed at a slope to ensure free movement of water. All radiators must be located at the same level.
2. Vertical is used when using forced-type equipment. The advantage of this method is the rapid heating of the coolant, even when installing pipes with a small cross-section. Operation occurs due to the installation of a circulation pump. If you want to do without it, then you should purchase pipes with a large diameter and place them at an angle. The Leningradka vertical water heating system is installed with bypasses, allowing repair of individual equipment elements without shutting it down. The length should not exceed 30 m.
Features of installing the Leningradka heating system come down to following the sequence of work:
- Install the boiler and connect it to the common line. The pipeline must run along the entire perimeter of the building.
- The expansion tank is a mandatory element. To connect it, a vertical pipe is cut in. It should be located close to the heating boiler. The tank is installed above all other elements.
- Radiators are installed into the supply network. They are equipped with bypasses and ball valves.
- The equipment is connected to the heating boiler.
A video review of the Leningradka heating distribution system will help you understand the order of work and follow their sequence.
“Several years ago we moved to live outside the city. We have a single-pipe heating system installed in a two-story house similar to Leningradka. For normal circulation, I connected the equipment to the pump. There is enough pressure to heat the 2nd floor, it is not cold. All rooms are well heated. Easy to install, no expensive materials required.”
Grigory Astapov, Moscow.
“When choosing heating, I studied a lot of information. According to reviews, Leningradka suited us due to the savings in materials. We chose bimetallic radiators. It works uninterruptedly, completely copes with heating a two-story house, but the equipment should be cleaned periodically. After 3 years, our radiators stopped working at full capacity. It turns out that there was debris on the approaches to them. After cleaning, operation resumed.”
Oleg Egorov, St. Petersburg.
“The Leningradka heating distribution system has been working with us for several years now. Overall satisfied, easy installation and easy maintenance. The pipes were polypropylene, 32 mm in diameter, the boiler runs on solid fuel. We use antifreeze diluted with water as a coolant. The equipment completely copes with heating a house of 120 m2.”
Alexey Chizhov, Ekaterinburg.
Heating systems
Despite the variety of options, the operating principle of the system comes down to two types. You can implement them both in your own home and in a city apartment.
- Natural circulation - the coolant, usually water, moves under the influence of gravitational forces and due to the difference in temperatures of heated and cooled water. It will function effectively subject to certain conditions: the total horizontal area of the system should not exceed 3500 sq. m, and the heating boiler should be located at least 3 m below the radiators. If in a private house or apartment on the ground floor it is possible to place the boiler in the basement, then This is the best option, judging by consumer reviews.
- Forced circulation - the coolant moves through the pipes due to the operation of pumps.
Scheme of Leningrad
There are two different schemes for connecting pipes to a heating boiler.
- Single-pipe - the coolant moves through one pipe to the radiator, is partially cooled in it and moves to the next one. This option requires a shorter pipeline length - approximately 30%, and is easier to install. Installing the system is quite feasible with your own hands. The most common heating option is Leningradka.
- Two-pipe - coolant of the same temperature is supplied to all radiators in parallel through one pipe, and returns through another pipe from each radiator to the boiler. In such a system, all radiators heat up equally, and the heating in the house will be more uniform. The system also allows you to regulate the heat output of each radiator individually.
There are two possible types of wiring, each with its pros and cons.
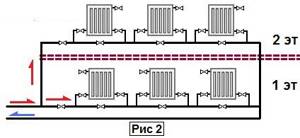
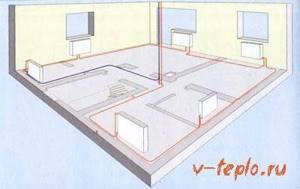
- Vertical - supply and discharge pipes are located vertically to each radiator. The scheme is recommended for systems with forced circulation: a less powerful pump will be required, since circulation is partially ensured by the natural drainage of water from the highest point. This heating method is most often implemented in multi-storey buildings, where main pipes are located in attics or technical floors.
- Horizontal - pipes are located horizontally within the floor. The advantage of the system is the ease of adjustment and overlap. In Leningradka horizontal wiring has been implemented. The photo shows a diagram with a horizontal scan.
As a rule, for a private house, they choose the options of a single-pipe or two-pipe system with horizontal scanning, being quite effective, the systems are quite easy to install and quickly repaired.

Drawing of the Leningrad heating system
Where to start installation?
Typically, all construction activities begin with thoughtful design. Typically, a drawing is created first. To design a radiant heating system, it is necessary to make a similar drawing with all elements and dimensions. If this drawing cannot be made by hand, then it can be ordered from a design organization.
The beginning of the design always begins with an assessment of the room in which the radiant heating system will be installed. It is advisable to do this in the early stages of construction, before finishing work has yet been carried out on the premises. It is better to immediately hide the elements of the heating system in the walls or under the screed. The drawing must detail all elements of the heating system and where they will be located. It is also advisable to provide more detailed information about the heating devices, since the system as a whole will be designed on the basis of this data. It is advisable to indicate the exact volume of heating devices and what materials they are made of. Using this information, you can accurately calculate how much coolant will be used in the heating system.
A very important point to pay attention to is additional heat loss
In a radiant heating system, the length of the pipes is slightly higher than in a conventional two-pipe system, and this factor is also important to take into account when designing and calculating a radiant heating system
The drawing must also include a plan for laying communications for the heating system. It must also indicate all measuring instruments, as well as adjusting and locking elements. The drawing also indicates all additional elements that can be used in the installation of the heating system. Detailed information about this additional equipment and its installation is also described step by step.
Scheme of a single-pipe horizontal Leningrad system
For a heating system such as Leningradka, installed in a private house, a horizontal scheme is usually used. When installing horizontally
it is necessary to take into account the fact that all heating elements (batteries) are placed on the same level, and they are installed along the walls along the perimeter of the room being equipped
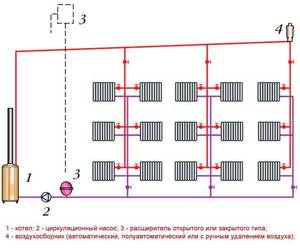
As an example, let's consider the simplest classical open-type horizontal circuit with forced circulation.
Horizontal diagram of an open type heating system with forced circulation
The arrows indicate the direction of movement of the coolant.
Looking at the diagram presented in the figure, you will see that the components of the system are:
- A heating boiler that is connected to the water supply system and to the sewerage networks (marked 1).
- Expansion tank (3) with pipe (2) - it is thanks to this tank that the system is called open. A pipe is installed together with the expansion tank, from which excess liquid flows out when the circuit is filled, and air, which is formed when the liquid boils in the boiler.
- The circulation pump (4), it is located on the return pipeline. This device is responsible for circulating water along the circuit.
- Hot water supply pipeline (14) and cooled coolant discharge pipeline (9).
- Radiators (8) with installed Mayevsky taps (7), air is discharged directly through them.
- Filter (12), water flows through it before entering the boiler.
- Two ball valves (11) - when one of them opens, the system is filled with coolant-water up to the nozzle. The second is secret; it is responsible for draining water from the system into the sewer (10).
The batteries in the diagram are connected via a pipeline from below, but a diagonal connection can also be made; it is characterized by higher efficiency and heat dissipation.
Now he will move on to a horizontal closed-type scheme, where the movement of the coolant is forced.
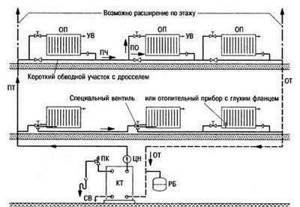
Horizontal diagram of a closed type heating system with forced circulation
If we compare a closed system with an open one, the first is under pressure, this is due to the fact that the expansion tank here is closed. The system also includes a control panel. It is made of a housing on which the following elements are mounted:
- safety valve: when choosing this part, it is necessary to take into account the technical characteristics of the boiler. If the thermostat becomes deformed or fails altogether, excess water will escape through the valve, thereby reducing the pressure in the system;
- air vent, this element is responsible for removing unnecessary air from the system. If the thermoregulation system is broken, then when the liquid boils in the boiler, an excess amount of air will form, which will automatically be removed through the air vent;
- pressure gauge, this device is responsible for monitoring and changing the pressure in the system. The optimal pressure indicators are 1.5 Atm., however, the indicator may be different - most often it depends on the parameters of the boiler.
Comparison by installation price
Supporters of single-pipe heating networks like to remind people of the low cost of this type of wiring. The reduction in costs compared to a two-pipe scheme is justified by half the number of pipes. We claim the following: “Leningradka” will cost less than a dead-end system in one case - if you solder the heating from polypropylene.
Let's prove our statement with calculations - let's take as an example a one-story dwelling measuring 10 x 10 m = 100 m² (in plan). Let's put the "Leningrad" layout on the drawing, count the fittings with pipes, then make a similar estimate for the dead-end wiring.
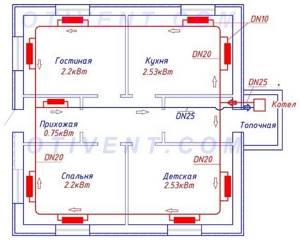
So, to install one-pipe heating you will need:
- pipe DN20 to the collector (outside Ø25 mm) – 40 m;
- tr. DN25 Ø32 mm for return – 10 m;
- tr. DN10 Ø16 mm for connections – 8 m;
- tee 25 x 25 x 16 (outer size) – 16 pieces;
- tee 25 x 25 x 20 – 1 pc.
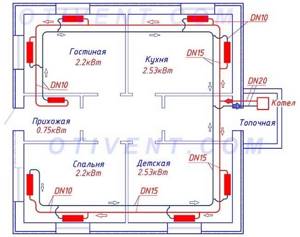
Based on the following layout, we will find out the need for pipes and fittings for a two-pipe network:
- tr. DN15 Ø20 mm – 68 meters (mains);
- tr. DN10 Ø16 mm – 22 m (radiator connections);
- tee 20 x 20 x 16 mm – 16 pcs.
Now we will find current prices for plumbing fittings and pipes made of 3 materials: reinforced polypropylene PP-R, metal-plastic PEX-AL-PEX and cross-linked polyethylene PEX from well-known manufacturers. Let's put the calculation results in the table:

As you can see, the costs for polypropylene tees and pipes are almost the same for both schemes - the shoulder scheme turned out to be only 330 rubles more expensive. For other materials, two-pipe wiring definitely wins. The reason lies in the diameters - the prices of larger cross-section pipes increase sharply compared to the “running” sizes of 16 and 20 mm.
You can take cheaper plumbing fixtures from other manufacturers and perform the calculation - the ratio is unlikely to change. Note that we skipped the 90° elbows for pipe turns and other small items, since we do not know the exact quantity. If you carefully calculate all the materials, the cost of the Leningradka will increase even more. An expert demonstrating calculations on video came to similar conclusions:
Installation of the heating structure "Leningradka"
Before you start building a heating system for a private house with your own hands, you need to perform a competent and accurate calculation. It will be problematic to do this on your own, so it is better to turn to professionals in this industry. Using calculations, you can determine the list of equipment and materials needed for the work.
The main elements of the “Leningradka” include the following:
- boiler for heating the coolant;
- metal or polypropylene pipeline;
- radiators (batteries);
- expansion tank or tank with valve (for an open system);
- tees;
- a pump to ensure coolant circulation (in the case of a forced design);
- Ball Valves;
- bypasses with needle valve.
In addition to calculations and purchasing materials, you should also take into account the location of the pipeline. If you plan to install it in a wall or floor, you will need to prepare special niches - grooves, which should be located along the entire perimeter of the contours. In addition, all pipes must be wrapped in thermal insulation material in order to prevent the temperature of the liquid from dropping before entering the radiators.
What is the best material to choose for the pipeline?
Most often, polypropylene is used as a pipeline for installing Leningradka in a private house. This material is quite simple to install and inexpensive. However, experts do not recommend installing polypropylene pipes in regions where the air temperature drops too low, meaning the Northern Territories.
Polypropylene begins to melt if the coolant temperature rises above 95 degrees, which can lead to pipe ruptures. In such cases, it is more advisable to use metal analogues, which are rightfully considered the most reliable and durable.
In addition to the material, when choosing a pipeline, it is important to choose the correct cross-section. In this case, the number of radiators used in the circuit is of no small importance. For example, if the circuit is supposed to have 4–5 elements, then the diameter of the pipes for the main should be 25 mm, and for the bypass this value changes to 20 mm
Thus, the more radiators in the system, the larger the cross-section of the pipes. This will make it easier to carry out balancing when starting the heating structure
For example, if there are supposed to be 4-5 elements in the circuit, then the diameter of the pipes for the main should be 25 mm, and for the bypass this value changes to 20 mm. Thus, the more radiators in the system, the larger the cross-section of the pipes. This will make it easier to carry out balancing when starting up the heating structure.
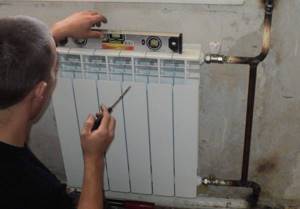
Connection of radiators and pipes
Installation of Mayevsky crane.

Bypasses are manufactured together with bends and then installed into the main line. In this case, the distance maintained when installing the taps must have an error of 2 mm so that the battery fits when connecting the structural elements.
The play that is allowed when pulling up an American woman is usually 1–2 mm. The main thing is to stick to this value and not exceed it, otherwise it may go downhill and a leak will appear. To obtain more accurate dimensions, you will need to unscrew the valves located in the corners of the radiator and measure the distance between the couplings.
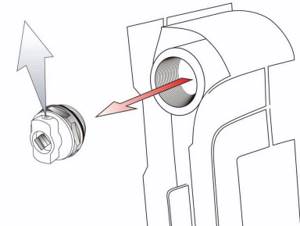
Starting a heating structure
Before starting the Leningradka heating system, it is necessary to open the Mayevsky taps installed on the radiators and release the air. After which a control inspection of the structure is carried out for the presence of flaws. If they are found, they should be eliminated.
After starting the equipment, all connections and components are checked, and then the system is balanced. This procedure means equalizing the temperature in all radiators, which is regulated using needle valves. If there are no leaks in the structure, no unnecessary noise and the rooms heat up quickly enough, the equipment is installed correctly.
The Leningrad heating system for a private house, although outdated over time, has changed, but is still widespread, especially in buildings with small dimensions. It is easy to install it yourself, while saving money on hiring specialists and the equipment necessary for construction.
We lay pipes with our own hands
Before carrying out work, it is necessary to draw up a detailed design of the heating system. At this stage, you should choose one of the two schemes described earlier: vertical or horizontal. You should be guided by your preferences and characteristics of the premises.
Then you need to choose the most suitable type of coolant: antifreeze or water. The first, diluted with water, is best used with vertical decoupling so that it does not freeze in the attic during the cold season. The second one can be safely poured into a highway with a horizontal junction.
Let's get started
First, you need to determine what the heating boiler for the Leningrad heating system will be like and where it is best to locate it. Most often, a gas floor heating unit is installed, which is placed in the basement. It is necessary to take care of safety by reliably protecting the surfaces around and covering the floor with sheet iron.
Then you have to think about the chimney. Its type and design features will depend on the type of boiler selected
It is very important that it provides a sufficient level of draft and at the same time does not let smoke in, removing it out
You should start connecting the main main pipe, which has the largest diameter. Experts recommend choosing one of the following options:
- Metal-plastic (26 mm or more)
- Galvanized (22 mm or more)
- Steel (22 mm or more)
You can use polypropylene pipes. However, they have a significantly higher heat exchange with the environment, so they are not suitable in systems with 3 or more radiators. Distributing branches are made from pipes of smaller diameter.
The expansion tank must be securely fixed above the heating boiler. Its height must be at least 3 m from the heating device.
Next, a pipe creeps throughout the house and each of the heating radiators is cut parallel to it. You should try to make as few bends as possible when laying the highway. It is recommended to place batteries under window openings.
The Leningrad heating system must close at the boiler. At the end, it is recommended to place a filter element that will remove various impurities from the coolant. A node is also provided through which the system will be filled with water or emptied.
Despite the simplicity of Leningradka, no one forbids making some modifications to it to simplify operation and maintenance. By installing taps in front of each heating device and thermostats, the following advantages can be achieved:
- The heating will be controlled, allowing the room temperature to be set, and each radiator will be regulated separately
- It becomes possible to heat only living rooms and block the circulation of coolant through radiators in non-residential premises
Features of Leningradka with vertical trim
Having settled on a vertical scheme, you need to choose a coolant circulation method:
- Forced
- Natural
Forced circulation is more common, since it does not depend on the characteristics of the pipe used. The coolant rises to the top using an installed pump.
If the circulation of liquid is natural, the diameter of the pipes will need to be increased. It is recommended to use products with an internal cross-section of more than 25 mm. As for the material of manufacture, it is worth abandoning steel pipes to reduce internal resistance.
Let's sum it up
Of course, the Leningrad heating system will be popular for many years to come. It is simple and extremely effective, easy to build, operate and repair in case of breakdowns. However, feeling unsure of your efforts, it is recommended to seek help from specialists.
Heating "Leningradka" - open wiring diagram
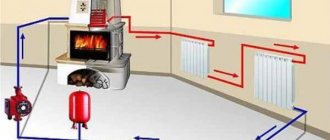
The open scheme of water heating "Leningradka" has an interesting feature - the sequential placement of all structural elements along the outer contour of the walls. The central unit of such a single-pipe system is the heating boiler, which is connected to the first battery through a supply riser. Then, from the first radiator, hot water flows into the next element and so on until it passes through all the heating units in the entire house. Having passed through all the batteries, the cooled water returns through the return pipe to the boiler for reheating and everything repeats again, forming a closed cycle.
Due to the heating of water in the heating system, according to the laws of physics, it expands in volume. Therefore, to remove its excess, an expansion tank is installed in the circuit. Moreover, in an open heating system, such a structural element is connected to the air in the room through a special pipe. After the coolant has cooled, it enters the system again from the expansion tank.
Very often, to increase heating efficiency, a single-pipe system is equipped with a circulation pump. which is installed in front of the boiler on the return pipe. Thanks to this addition, the heating rate of a private house, both one-story and two-story, increases significantly, since the coolant begins to circulate according to the forced principle.
To make it easier to fill the heating system with water, a cold water supply pipeline is connected where the return pipe passes through a locking mechanism and a cleaning filter. Also, a drain pipe with a tap at the end is mounted at the lowest point of the system. This device allows, if necessary, to drain all the coolant from the system.
In private housing construction, standard radiators with a lower connection diagram are usually used. Moreover, each battery is equipped with a Mayevsky tap to remove air locks. In addition, in private houses for Leningradka they often use a sequential diagonal method of connecting batteries.
But, despite the popularity of such heating distribution schemes, they have a common significant drawback - they do not provide for adjustment of the heat transfer level of each individual battery. To solve this problem, there is a radically different way to connect radiators.
To improve the operation of the heating system by adjusting the heat of each radiator, a parallel connection of all batteries to the riser is used. In this case, each heating device at the inlet and outlet pipes is equipped with shut-off valves. Also, in a section of the riser parallel to the battery, which in such a situation acts as a bypass, a needle valve is mounted to regulate the intensity of the water flow through the heating battery. This was achieved thanks to the laws of physics, because when the locking mechanism is fully opened, the coolant will not flow up the battery, overcoming the force of gravity. This leads to the fact that as the valve opening degree increases, the temperature in the battery decreases.
Generalization on the topic
Today we can talk about a boom in the construction of individual housing. Many people prefer to solve the problems that owners of a private home have on their own. Practice shows that by doing heating installation yourself, you can save significantly. To avoid mistakes, simpler schemes are chosen. And the easiest system to assemble is a single-pipe heating option for a private home. Leningradka is an effective and economical heating scheme that is easy to assemble and maintain.
In such a system there are absolutely no risers for return flow or intake of water as waste coolant.
In addition, single-pipe systems are much easier to install and require much less materials.
Due to the special design of a single-pipe system, namely the serial connection of radiators, during its operation it is impossible to adjust the heating intensity of each of them without negative consequences for subsequent ones. Thus, if it is hot in the bedroom and it is necessary to reduce the temperature by pressing down the valve on the radiator, the water in the other rooms will also begin to cool.
This heating system requires increased coolant pressure during operation.
If we are talking about installing a single-pipe heating system in a one-story house, then it should have a vertical outlet.
The expansion tank must be installed in the attic, which in this case serves as a technical floor.
When such a system is installed in a multi-storey building, additional tricks are resorted to to ensure the same coolant temperature on all floors. With a vertical spout, water flows down through a single-pipe system and passes sequentially through radiators on all floors, in each of which it releases part of the heat. Therefore, with such a system, additional jumpers are installed on each floor; a larger number of radiator sections are installed on the lower floors than on the upper ones.
Advantages
Today, the single-pipe system is one of the most common, especially in the construction of private houses. Its main shortcomings, characteristic of the Soviet era, were eliminated.
Secondly, a significant advantage of such a system is the saving of materials and a more aesthetic appearance of the finished structure.
Thirdly, there are many technological techniques that will eliminate the problems that occurred ten years ago. When using modern single-pipe heating systems, thermostatic valves, special air vents, radiator regulators, balancing valves, and ball valves are installed. All this makes it possible to achieve a decrease in temperature in previous radiators without lowering it in subsequent ones.
Wiring diagram
In a private house, when installing a single-pipe heating system, the coolant enters the radiators installed in the house sequentially.
Hot water or antifreeze, moving in the direction of movement, entering the first radiator, transfers some heat to it and cools down somewhat, thus, the second and subsequent batteries that are in the chain do not receive such hot water.
The temperature in the room where the last radiator is located will be lower than in the room where the first radiator is located.
To ensure a comfortable, uniform temperature in all rooms, it is necessary to install additional sections in those rooms where the coolant will arrive last.
For balanced operation of the system, additional mechanisms are used on radiators - ball valves, balancing valves, thermostats, etc. These devices allow you to control the temperature in heating appliances.
Features and device
With a horizontal system, there is a need to maintain the movement of coolants forcibly, using a pump. A horizontal system in a one-story building is laid above the floor or hidden in the floor structure. In this case, to prevent heat loss, the pipes must be insulated. In addition, radiators must be installed at one level, the horizontal line is made with a slope towards the movement of the coolant.
In a two-story building, the horizontal system has a vertical riser through which the coolant is supplied to the upper floor.
It cuts in on the ground floor up to the first radiator, if possible. In the gap formed by the riser and the first battery, taps are installed. Thanks to them, you can supply heat and regulate the temperature floor by floor.
Pros and cons of the Leningradka heating scheme
The main advantages provided by the Leningradka heating system when organizing water heating of a room are: high efficiency, simple installation and maintenance. But unfortunately, such single-pipe heating systems are not without their disadvantages:
- the heating batteries most distant from the boiler in the sequential pipeline circuit should have the maximum number of sections, since the water reaching them through the pipe will be cooled;
- The Leningradka heating system does not provide for the connection of a heated floor or heated towel rail;
- The coolant circulates through the circuit under fairly high pressure.
But this kind of disadvantage is inherent in the traditional single-pipe heating scheme, which does not use elements to regulate the supply of coolant to the radiators. Therefore, installing a bypass with a needle valve on each battery allows you to manually set the temperature of each individual radiator. This made it possible to achieve flexibility and efficiency in adjusting the water heating system.
The improved and modified Leningradka heating system is considered an excellent choice for heating various types of premises. Therefore, its use will help create simple and at the same time effective and inexpensive heating of both a country cottage, a city apartment or a private house.
All the pros and cons
Among the advantages that the Leningradka heating system has, the following should be highlighted:
- Ease of installation and restoration work in case of unexpected breakdown
- Anyone who gets acquainted with the scheme will be able to implement it without the involvement of a professional master
- Availability of equipment and materials required for work
- Economic benefits not only at the installation stage, but also during the operational period
However, in addition to the many advantages, it is necessary to mention several disadvantages:
- To increase the efficiency of the system, it is necessary to create the maximum operating pressure by installing a circulation pump and increasing the coolant temperature
- When choosing a horizontal scheme, it will be very difficult to connect a second “warm floor” circuit
- If you use a natural circulation scheme, each subsequent radiator of the heating network will give off significantly less heat, since the coolant gradually cools down
Suitable pipes
It is worth approaching the solution of the issue as responsibly as possible. It’s better to take your time and take into account important points:
- Installation method
- Maximum pressure indicator
- Presence or absence of a pump in the system
- Number of pipes in the system design
Steel pipes. Popular in markets until recently. They are often used in communications where a large cross-sectional diameter is required. Steel pipes conduct heat well, do not expand when heated strongly, and can easily withstand high pressure.
Pipes retain strength even when bending. Able to withstand temperature changes without consequences. Optimal balance between price and quality. The difficulty lies in installation, which requires the use of expensive equipment.
Alloy steel. Quite strong material. The composition of the material contains impurities, which improves the efficiency of the system. Advanced metal pipes are corrosion resistant and easy to maintain. The weight of the structure is significantly reduced. Pipes are used in a system with abnormal pressure and temperature conditions. It is permissible to use hot steam as a coolant.
Advantages and disadvantages of the system
The main advantages of “Leningradka” are ease of installation, high efficiency, savings on consumables and installation (the groove is formed for one pipe or is not done at all if an open type of installation is chosen).
Thanks to the introduction of bypasses, ball valves, and a control panel, it became possible to regulate the temperature in rooms without reducing the heat level in other rooms; replace or repair radiators without stopping the system.
The main disadvantage of the system is the complexity of calculations, the need for balancing, which often results in additional costs - installation of additional equipment, repair work, etc.
How does underfloor heating from a heating boiler work?
The range of work that needs to be done to power a heated floor from a heating boiler is no different from that when cutting into a centralized route
You just need to pay attention to the following factors:
- Availability of a security group. If it is not included in the boiler design, then the installation of the group will be required in accordance with the design standards for heating networks.
- Insertion of the collector unit. This element will allow you to distribute the coolant flow between radiators and heated floors in the required proportion.
- Installation of a circulation pump. If it is not built into the boiler, then you will have to spend a certain amount of money on purchase, which guarantees the efficiency of heat supply and its uniform distribution throughout all rooms of the building.
A nuance - any modifications carried out on central heating must be agreed upon and accompanied by a certain set of documents, one of which is an approved and agreed upon design solution. Buying a boiler will not be a cheap pleasure, but it will allow you to avoid many troubles with licensing authorities.
Principle of operation
The history of this type of heating originates in St. Petersburg. The times of mass construction of residential premises allowed the development of this type of heating. “Leningradka” began to quickly gain popularity, captivating with its ease of installation and affordable prices. Engineers developed technical conditions for installing the Leningradka. Regulate the installation of the heating system.
The Leningradka heating system involves the installation of a single pipe that heats the room. The heat exchangers are located on a common line in order, as if put on a pipe. You can't come up with a simpler design. Thanks to this, the “Leningradka” spread widely throughout the country.
The coolant passes through the radiator units, starting from the place where the system is heated. Of course, the heating temperature decreases as the coolant moves; at the beginning of movement, the radiators have a maximum temperature.
This heating system is designed to operate in natural mode. A forced coolant movement system can be used. This does not affect the placement of radiators.