Preparation for dismantling the split system
First you need to decide on the purpose of dismantling.
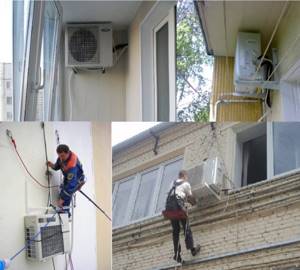
As mentioned above, there may be no need for complete dismantling and it is enough to remove only part of the system. This goal greatly simplifies the work and is one of the stages of the complete process of removing the air conditioner. Therefore, it is worth considering actions when dismantling the entire split system with external and internal (internal, in the case of a multi-split system) units, pipelines and other equipment. Complete dismantling of the split system must be performed by at least two people. An assistant is necessary, first of all, to comply with safety regulations (insurance) and when performing outdoor work, when access to tools is limited and the workspace does not allow performing individual operations independently.
Dismantling of air conditioners. Necessary tools and equipment
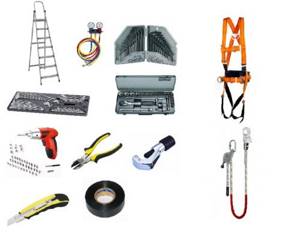
The list of tools and equipment provided is not final. It can be supplemented and changed depending on the conditions and nature of the work, as well as on the ability of the air conditioner owner to purchase equipment and on the skills of using various kinds of tools. So, optimally you need:
- Ladder. The height of the stepladder depends on the location of the units outside and inside the air-conditioned room. It is better if there is more than one stepladder.
- Gauge manifold. In principle, it is possible to carry out work without a pressure gauge (evacuating the system according to an approximate time, for example), but this will be incorrect and will harm the ozone layer of the atmosphere if the freon in the system is not completely removed from the pipelines. In addition, there is a danger of equipment breakdown, and the refrigerant released into the atmosphere will have to be refilled additionally, which will certainly require contacting specialists (with associated costs).
- Open-end wrenches (mostly sizes 13, 14, 17, 19, 22 and 24).
- Socket and adjustable wrenches.
- Hexagons of various sizes.
- Screwdriver with a set of bits and a set of screwdrivers.
- Construction knife.
- Pipe cutter It may not be necessary, and if necessary, it can be replaced with other metal-cutting tools.
- Side cutters or pliers.
- Insulating tape or any other material to protect the cavities of removed pipelines from damage, dirt and moisture.
- Rope or halyard for more convenient and safe removal of the external unit from the outside of the room wall.
- Safety equipment.
- Containers for storing or transporting removed equipment.
Preparation of the workplace
In order for the work of dismantling the split system to be carried out conveniently and safely, it is necessary:
- Remove all furniture and other property from the work area in the area of the indoor unit of the air conditioner.
- If the external unit is located on a wall facing a loggia or balcony, it is also necessary to ensure free access to the external air conditioner equipment.
- When performing work in the cold season, take into account that the room will be cold during the work and this should not cause harm to residents or pets.
- Consider the procedure for use and, if necessary, fix the safety equipment in the necessary places.
- Place tools and equipment in a convenient and accessible place.
Preparation
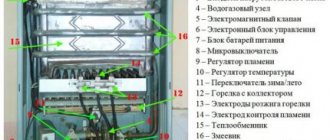
Before dismantling the split system with your own hands, you need to prepare a tool, not a simple one from your home arsenal, but a purely professional one, as shown in the photo:
Many users do not take seriously the advice of professional craftsmen on how to properly dismantle any split systems. As a result, the shutdown is carried out with numerous violations: they dismantle the product without pumping freon into the air conditioner, and it leaks, which will not be as easy to replenish as many people think.
Refilling the entire system with refrigerant will result in serious financial costs:
- first, the master will check the integrity of all pipelines - 600 rubles;
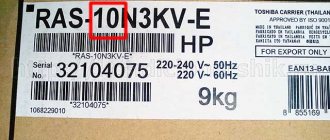
- refilling an air conditioner with a power of up to 4.5 kW - up to 3 thousand rubles;
- the same actions with equipment power up to 7 kW - up to 3.5 thousand rubles.
At the bare minimum for household air conditioners, this operation will cost you at least 4 thousand rubles, depending on the refrigerant used.
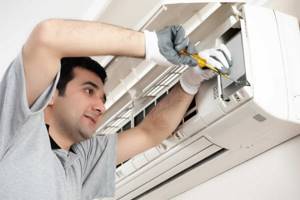
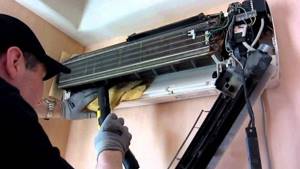
How to dismantle the indoor unit of an air conditioner yourself
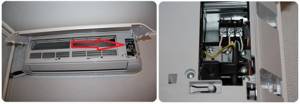
To remove the internal module from the wall, you need to disconnect all communications from it - cable, tubes for freon and condensate. The place where the pipelines are twisted is usually located in a housing niche located in the lower part. Depending on the split system model, there are 2 ways to get to this niche:
- Unlock the 3-4 plastic latches that secure the bottom of the unit to the mounting plate. Move the bottom of the housing away from the wall and insert any rod between them, remove the communications harness from the niche.
- If your “split” model does not have latches, then you need to remove the front plastic panel, after first dismantling the blinds and additional covers (when available).
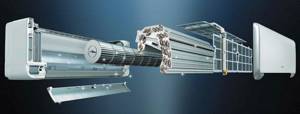
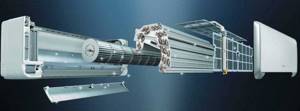
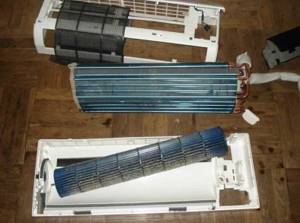
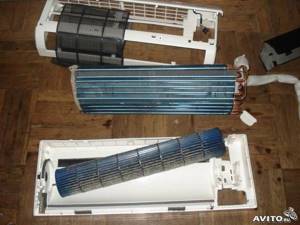
Composition of the indoor unit of a split system
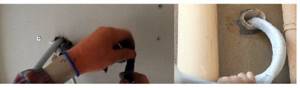
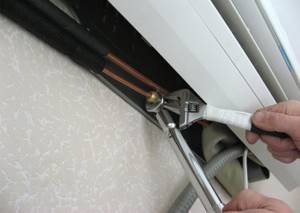
When you get to the harness, make a longitudinal cut on it with a utility knife, which will allow you to move the insulation and grab the nuts with the keys. Do not make the cut too long, otherwise you will have to change the insulating material later. Perform further operations in this order:
- Use two open-end wrenches to unscrew the joints of the lines. An important point: the drive soldered to the short tube of the block itself cannot be rotated; it must be held in place with a wrench while unscrewing the union nut.
- Wrap the ends of the pipelines with electrical tape or tape to protect them from dirt.
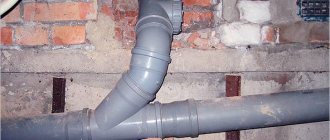
- Find the joint between the drain pipe and the outlet pipe and disconnect it. You should not cut the corrugation anywhere, so that later it will be more convenient to join it back together.
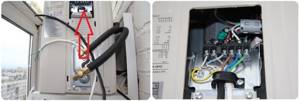
- Remove the cover of the electrical compartment (located on the right side of the case or under the front panel), make notes using a marker and tape, then unscrew the screws and disconnect the cable cores. Tighten the screws back and screw on the cover.
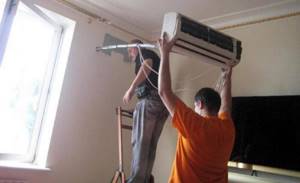
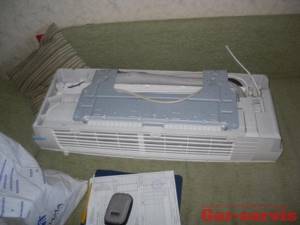
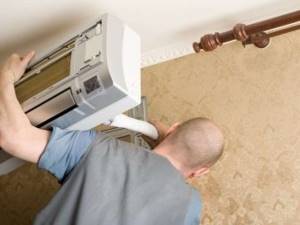
- When all communications are disconnected, grab the housing from both sides and remove it from the mounting plate, lifting it up slightly. Give the block to your assistant.
- Remove the mounting plate by unscrewing all the dowels.
Before removing the unit, the electrical compartment cover must be screwed into place.
After removing the inner section from the wall, place all the unscrewed parts on it, tighten the screws and put on the mounting plate. Place the protruding pipes in a niche, securing them with masking tape. Use the same material to secure the opening front panel so that it does not dangle during transportation.
If the communications harness is short, it can be removed along with the block
The last step is the dismantling of communications laid along the wall or inside it. There are no difficulties here, the main thing is not to bend the copper tubes under a small radius. Such treatment at the bend reduces the flow area, and it is quite difficult to align the tube with an oval profile. Pull the harness out of the outer wall carefully so as not to damage the insulation. If the hole was sealed with polyurethane foam, then it must be cut out in parts. When finished, roll the tourniquet into a ring and secure with tape.
Dismantling sequence
It is recommended that you familiarize yourself with the specifics of dismantling the system in advance.
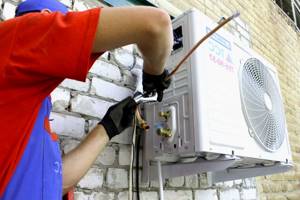
Outdoor unit
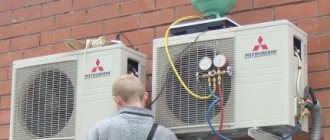
Dismantling begins with disassembling the outdoor unit. First, the thermal insulation of the structure is removed. Then carefully unscrew the nuts responsible for attaching the air conditioner to the wall
When the fasteners are unscrewed, the system is carefully removed. It’s better to do this together so as not to damage anything.
Indoor unit
To remove the indoor unit, perform the following steps:
- remove the housing cover;
- disconnect the cable that supplies electricity;
- unscrew the pipe;
- remove the heat insulator and disconnect the freon pipe;
- Unscrew the screws and remove the indoor unit with mounting plastic.
Disassembly in winter
If the outside temperature has dropped to -5°C or more, it is recommended to refrain from dismantling for the following reasons:
- it will not be possible to pump the refrigerant into the external module;
- in cold weather, you cannot disassemble connections, unscrew plugs or close service ports;
- As a result of disassembly, service valve seals often fail.
In a situation where you cannot do without removing the split system at subzero temperatures, be sure to warm up the fittings of the outdoor unit with a hair dryer. Then unscrew the plugs and close both valves, thus retaining some of the freon remaining in the outdoor unit circuit. Then slowly unscrew the lines from the fittings and disconnect them, releasing the second part of the refrigerant into the atmosphere. Then proceed according to the algorithm described above.
At temperatures above -5°C, you can perform work according to standard instructions, but it is advisable to use a pressure gauge to control the pumping of refrigerant. If you act “by eye”, you may not guess the holding time and will still lose some of the freon. It is equally dangerous to keep the compressor running without cooling (and it is cooled by circulating freon); overheating can cause it to fail.
You will successfully dismantle your home air conditioner if you get to work during the warm season and follow the instructions provided. You must not miss a single detail, act very carefully and without haste. Do not neglect the pressure gauge, since the loss of refrigerant will negate all savings from this procedure.
Do-it-yourself dismantling of an air conditioner while saving freon
If you dismantle the air conditioner while preserving the refrigerant, you must follow the given algorithm:
- The fitting with the nipple is freed from the protective elements.
- The capacitor is set to cold value.
- After 15 min. The valve that regulates the fluid fitting should be closed. As a result, refrigerant no longer enters the evaporator.
- Monitor the pressure level using a pressure gauge.
- Once the reading reaches 1 MPa, it is necessary to tighten the valve regulating the gas fitting. This operation is carried out with a hexagon. You can't do without an assistant here.
- The indicated pressure gauge values indicate refrigerant flow into the condenser. The pipelines and compressor are filled with technical vacuum.
Disadvantages of DIY dismantling
The main danger is under-pumped freon. And this can happen if there is no special pressure gauge to measure the pressure on the gas line. Freezing of water vapor in the air conditioner leads to pump failure.
Actions using unprofessional tools will lead to damage to the evaporator pipes of the indoor unit, which are located very close to the place where the device is mounted in the walls.
If the pipeline was cut too short, it may simply not be the right length for subsequent installation. Building a new one disables the unit.
Evaporative units of ducted split systems, in addition to pumping out the refrigerant, disconnecting the pipeline, electrical wires and drain hose, require careful disconnection from the air ducts. It is quite difficult to do this without experience.
To dismantle the air conditioner yourself, you will need special tools, the cost of which is significantly higher than the price of dismantling by qualified craftsmen, even if you rent them.
Large semi-industrial splits have considerable weight and size. It is impossible to remove them alone. Here you can add the difficulty of removing the external unit - it is located on the facade of the building, often at a sufficient height and a decent distance from the window. Here, in any case, you will need a team of industrial climbers if the amateur does not want to risk his life.
No one can guarantee 100% preservation of the functionality of the air conditioner when dismantling it with their own hands. The risks of delivering a device to a new facility in a faulty condition are very high.
If these arguments do not stop a person from his decision to try himself as a master installer, then he should carefully study the instructions for dismantling various types of air conditioners given below.
Duct type of air conditioners
There is another type of air conditioning equipment - duct devices, which are even more difficult to dismantle. The thing is that the design of this device is quite heavy and massive, since its system consists of numerous branched air ducts. These mechanisms must also be dismantled.
Having turned off all the pipes that serve for air intake and outlet, you need to turn off the equipment itself. The most important thing when removing a duct device, like any other air conditioning equipment, is to turn off the pipes in time and drain the working fluid in a timely manner so that freon does not leak. After disconnecting the pipes, the system should run in a little (just a few minutes is enough), and after that you should completely turn off the device and remove the electrical circuit.
The next step is to disconnect the shut-off valves from the air conditioner and remove these parts. Now you can start dismantling the external unit. To remove it, it is recommended to contact a specialist. The fact is that, firstly, you may not have the appropriate tools, and secondly, they have experience working at high altitudes and can easily cope with their task.
When removing the device, do not forget that during installation the equipment was fastened well and in good quality, configured and intended for a long service life, so during dismantling it must be depressurized. During this procedure, it is necessary to ensure that freon does not come into contact with human skin. The fact is that it can cause frostbite.
As follows from the article written above, dismantling air conditioning equipment is not such a difficult job, but still in some cases requires the intervention of professionals. All that can affect the complexity of the removable process is the model of equipment and the method of its installation.
The article on how to remove an air conditioner from a wall is intended for people who like to do all the housework themselves. I would like to hope that the information will be useful and will help you cope with this task without the need to contact specialists
Before starting the dismantling process, it is important to carefully study all the information and consider each step step by step. This will help avoid incorrect actions and possible injury.
Of course, if you are confident that you can handle the job and remove the device with your own hands, then we advise you to familiarize yourself with the safety measures and take action.
Still, if you doubt whether you can complete the task yourself, it is better to contact professionals and pay for their services to dismantle the air conditioner. Moreover, you may not have the necessary tools for the job and will have to spend time searching for or purchasing the missing keys.
Dismantling the indoor unit
After pumping the freon, it may seem that the process of dismantling the split system is almost complete (you just need to remove it from the wall). But this is only at first glance.
The main difficulty when dismantling the indoor unit of the air conditioner is that the evaporator mounting elements can easily be damaged. Near it there is a cable, which is secured with latches. The internal block itself is inserted into the grooves of the guides, which are also attached to the latches.
The latches must not be damaged, as this will impair the quality of fastening the air conditioner in the new location. In most cases, the cover covering the evaporator is located where the equipment adjoins the wall. This is done to ensure that only professionals handle the maintenance of split systems.
You can solve this problem with the help of two thin screwdrivers and one more person. Screwdrivers will be needed to get to the bracket between the block and the wall. An assistant will hold the air conditioner while the last screws are removed and the latches are released.
When removing a duct-type split system, special attention is paid to disconnecting the air ducts. This process includes the following steps:
- The supply and exhaust adapters (with grille) are dismantled;
- the clamps are unscrewed;
- the air duct is disconnected from the indoor unit.
Video about dismantling the air conditioner:
https://youtube.com/watch?v=vku06MgrHgY
Emerging problems
People who have understood how to remove an air conditioner so that freon does not leak out, and have carefully prepared for the installation procedure, also make mistakes. Here are the most common ones:
- The outdoor unit of the air conditioner has fallen.
- Entry of debris, dust and other foreign substances into the internal system.
- Freon loss.
- Common mistakes during the dismantling procedure.
- Damage to the body.
- Breakdown or loss of small air conditioner parts.
- Removing wires without marking them with a marker.
Understanding how to remove the air conditioner yourself without losing freon is not enough. All these mistakes can be avoided by being careful and attentive when dismantling the split system.
Vacuuming: why and how to do it
Vacuuming is necessary in order to clean copper tubes from air and moisture that gets inside during installation. If it is not removed, a large load will be created, and the compressor will accordingly overheat.

There are two ways to evacuate a split system.
Spray method
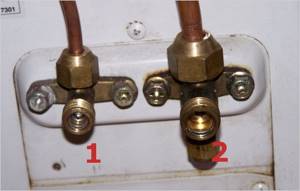
If you look at the port into which the copper tubes are connected, you can see two plugs, in addition to the nut with a fitting. Both plugs are unscrewed.
Work is carried out with a larger diameter port. Inside there is a special slot for a hex key. The size is selected according to location, and can also be found in the instructions.
Turn the valve 90 degrees with the key for 1 second, then release. This means that a little freon was released into the system, resulting in excess pressure. On the same port there is a spool, which must be pressed with your finger to start the release of a mixture of freon and residual gases. The operation is carried out for 1-2 seconds 2-3 times.
After everything, a plug is put on the spool, and the hexagon port is completely unscrewed to release freon into the system
It is important to make sure that all plugs are tightly screwed in; you can lubricate the threads with soap for a better seal
Vacuum pump
The vacuum pump is connected to the spool for 20-30 minutes. During this time, he must completely vacuum the system. Then the pump turns off, but the tube remains in the spool for 15 minutes. This is necessary in order to monitor the pressure using a pressure gauge. If the arrow freezes and stands still, then everything is fine. Chaotic movement of the arrow indicates an air or moisture leak, so the pump should be turned on again.
Before disconnecting the pump, you must let freon into the system using a hex wrench. A characteristic sound in the system indicates a successful launch. After this, you must quickly disconnect the pump.
How to disassemble an air conditioner
Before inspecting the internal contents of the air conditioner, you need to prepare for this work. First, you should wipe the case from accumulated dust and then disconnect the device from the DC source. Disassembling the unit requires special tools and materials.
What tools and materials are needed for the job?
Dismantling the internal contents of the device can be done using the following tools:
- ladder;
- drill;
- containers for condensate;
- hexagons;
- screwdrivers.
In addition, you should stock up on rags to wipe surfaces and collect excess dust. It would be a good idea to include an industrial vacuum cleaner that can safely clean the structure of accumulated debris.
Note! Before removing the device body, you should wipe it well, thereby eliminating the possibility of debris getting inside the air conditioner elements.
How to remove the cover
Before disassembling the internal unit of the split system, carefully remove the front cover from it. It is secured to the device using bolts or clip elements. Typically, such fasteners are hidden under decorative fixtures. The clip elements can be removed using a regular straight screwdriver with a thin body. To remove the cover bolts, use an electric drill with an appropriately sized bit.
By the way, the clip elements are located at the bottom and top, so to conveniently remove the front panel, each of them should be removed. Next, you need to remove the strainer (rough cleaning). After this, you should remove the plastic blinds from the unit, which can be easily removed from special grooves. Now you can disassemble the indoor unit.
Disassembling the indoor unit
The true air conditioning system is located inside the fascia. To remove it, open the clips located inside and unscrew the bolts securing the block. Now you need to drain the resulting condensate into a container prepared in advance. Many devices have an internal drainage system similar to a tray. Some air conditioner models have a single system of housing and internal unit. In such cases, these elements should be carefully removed together.
The algorithm for the following actions is as follows:
- Disconnecting all the chips from the tray (unscrewing the blind motor).
- Removing the tray and then disconnecting the self-tapping screw (latch) holding the “tail” to the drainage hose.
- Removing the fan element (shaft).
Common Mistakes
Sometimes, during independent dismantling, errors occur that can affect the technical characteristics during future operation.
Errors include:
Mechanical damage to both units if precautions are not followed. The outdoor module falls from a great height. The appearance of dust in open pipes. Atmospheric air containing water vapor can enter the evaporation compartment. The danger of transporting an air conditioner filled with freon. Possibility of damage to elements during rough transportation of the product.
A person who carefully reads the recommendations for dismantling the air conditioner will cope with the task. The main thing is to follow the rules and stock up on the necessary equipment.
In what cases is it not necessary to dismantle
There are several cases when it is not necessary to completely dismantle the air conditioner:
- Re-pasting wallpaper. Some people remove structures when wallpapering, but this is not necessary. Simply remove the housing of the indoor unit.
- Alignment of walls. In this case, too, only the internal part of the system is dismantled.
See also
Instructions for using Calgon for washing machines and what to replace it with
Dismantling only the indoor unit
The indoor unit is removed separately when it interferes with repairs. After repair, it is reinstalled in place. It can be removed separately if the air conditioner is installed correctly. There are cases when the nuts of the indoor unit are hidden in the wall, which is unacceptable. Then the air conditioner will have to be removed along with the “route”.
First, we carry out the operations of points 1 to 4. Then we do the following:
- unclip the lower clips of the indoor unit. We put some kind of support under the block;
- open the flex under the block. We unscrew the nuts with two wrenches, this will bleed off the remaining gas (a little oil may leak out). We seal all ends of the tubes;
- open the cover for connecting the interblock wires of the indoor unit. We sign how the wires are connected. Then we turn them off;
- disconnect the drainage hose (water may leak);
- disconnect the “power” cable if it goes to the indoor unit. We check if there are any other additional wires;
- remove the support and remove the internal block (up) from the plate;
- then remove the plate of the indoor unit.
And don’t forget to attach the plate and remote control to the indoor unit so as not to lose it. For subsequent installation of the indoor unit in place, it will be necessary to evacuate the system.
How to disconnect the outdoor unit from the indoor unit
Many people wonder how to dismantle an air conditioner without losing freon? This procedure requires caution, attentiveness and the help of another person, his safety net. After all, if the air conditioner is installed on the upper floors, then all the work will be carried out at height. As soon as the freon is collected, they begin to disconnect the split system units installed outside and inside the room:
- First, remove the pressure gauge hose and close the pipe. They were connected to each other using a special plug.
- Using a wrench, unscrew all the fasteners that connected the fittings and tubes. To avoid the entry of dust and dirt, the resulting holes are covered with lids or a thick layer of tape.
- Disconnect the cable. The air conditioner must not be plugged in. Terminals that also need to be disconnected are first marked with a marker, recording the order in which they were connected. The terminals are located on top of the valves of the freon tubes.
- The lines that were previously disconnected are tied to the bracket so that they do not bend or break.
- After this, unscrew the nuts connecting the outer part of the air conditioner to the bracket. And then they wrap the block tightly with a strong rope and carefully lift it. It is best to use assistants for this, because the module weighs many kilograms.
When removing the split system from the wall with your own hands, you should not forget about the bracket and disconnecting various freon tubes from it. After which you can remove the structure itself, which is secured with ordinary bolts. They can be easily unscrewed with a regular wrench.
How is freon discharged?
There are several ways to remove a working air conditioner.
- An ordinary pressure gauge station is used. With its help, all freon is pumped out.
- Using a special station connected to a cylinder with two valves. Such a device pumps out liquid and gaseous freon.
The first option is considered simpler. However, this requires running the air conditioner. But you can do this only if it’s not too cold outside.
The second option is more complicated, but it can be used in almost any situation, even when it’s cold and turning on the air conditioning is prohibited. In addition, this method has another advantage: freon will be completely pumped out of the condenser. Thanks to this, it is possible to transport the air conditioner from place to place.

The use of such a station allows for dismantling in winter
Necessary tool
There are several different tools that will be needed to complete the job.
Pipe cutter
A pipe cutter is a tool used to cut pipes. It differs from a hacksaw in that it makes perfectly even cuts and does not create sawdust during operation. During use, the pipe cutter is put on the pipe, after which it is carefully tightened and rotated around its axis. This is done until the pipe wall is completely cut.
Gauge manifold
This is a special device that is used to control the pressure inside refrigeration systems and air conditioners. The pressure manifold is also used to fill and evacuate cooling systems. The collectors are connected to refrigerant cylinders and refrigeration units, after which the system is filled with freon.
Precautions
If the air conditioner is out of order and cannot be repaired, then it is easy to remove it - there is no need to save freon, the tightness of the compressor, condenser and evaporator is not important.
You cannot do this with a working air conditioner. And in this case, the main thing is that dust and even air do not get inside the system. Otherwise, we can talk about guaranteed compressor output after installation and start-up of the air conditioner in a new location. The reason is the design feature of the vacuum pump.
Freon is extremely fluid, and the temperature difference at the inlet and outlet reaches several tens of degrees. None of the seals and rings used in conventional pumps and compressors will withstand such operating conditions. The required tightness is achieved through extremely precise adjustment of the surface of the moving elements of the pump to the internal geometry of the chambers. The slightest scratch from a solid particle leads to compressor failure. And such a particle could be a grain of ice formed when moisture in the air trapped inside freezes.
That is why new air conditioners are sold filled with inert gas, which is pumped out with a vacuum pump before pumping in freon.
When removing the air conditioner yourself, the freon must be pumped out and the units disconnected. This must be done so that dust and air do not get inside the system. That is, create a vacuum there. And it is advisable to save all the freon (or most of it) so that it would be easier to get the system into working condition in a new place.
Preparation
To properly remove the air conditioner, the only professional equipment you need is a pressure gauge station, which can be rented.
Every home craftsman has the remaining tools:
- a set of wrenches and hex keys;
- screwdrivers;
- pipe cutter or side cutters;
- hand bench vice;
- pliers.
Freon release
There are two ways to dismantle a working air conditioner:
- Using a pressure gauge station to collect freon in an external unit.
- Using a freon pumping and collection station connected to a special two-valve cylinder. The station has its own pressure gauge manifold and a compressor for pumping out refrigerant in liquid or gaseous state.
The first method is more “affordable”, but it can only be used when starting the air conditioner - freon is transported using a standard compressor.
The second method is universal. It can be used even in winter, when the air conditioner cannot be turned on due to low outside temperatures. The advantage of this method is that the external unit will be evacuated - without freon in the condenser. Which is much safer when transporting to a new place. But renting such a station and a cylinder will cost more than a regular pressure gauge manifold.
Freon collection in the external unit
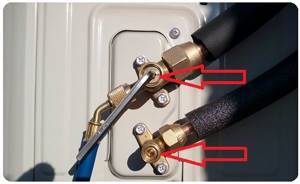
On the side of the outdoor unit body there are two fittings from which tubes extend:
- thin - for transporting liquid freon from the condenser to the evaporator;
- thick - for pumping freon gas into the condenser.
Both fittings have shut-off valve heads under the caps. An outlet with a nipple extends from the gas head.
Freon is collected in the condenser in the following order:
- Remove the protective covers from the fittings and nipples.
- The manifold is connected to the nipple.
- Turn on the air conditioner to maximum cold.
- After a few minutes, close the valve of the liquid fitting, stopping the supply of freon to the evaporator.
- The pressure is monitored using a pressure gauge.
- When the arrow shows “-1 MPa”, tighten the gas fitting valve with a hexagon and immediately turn off the air conditioner (which is why you need an assistant) - during prolonged idle mode, the compressor pump may fail.
The pressure gauge reading “-1 MPa” means that all the freon is in the condenser, and there is a technical vacuum inside the evaporator, in the tubes and in the compressor.
After this, you can separate the blocks.
Dismantling in winter
Many users are interested in the question: how to remove the split system in winter, when due to low temperatures it is impossible to pump refrigerant into the condenser. The oil in the compressor will thicken, and all attempts to turn it on can end very badly.
If you have a special model equipped with a kit that includes heating of the compressor crankcase and the entire drainage system line, as well as a unit that slows down the rotation of the fan, then your intentions will be crowned with success. If it is not available, you can use a special refrigerant collection station, which is connected in the same way as a pressure gauge manifold.
A few more practical tips: you can start dismantling yourself only when you are completely confident in your own capabilities and have a qualified partner. Also, having a special tool makes the job much easier.
Mistakes when dismantling a split system
Why might you need to dismantle the split system? The reasons can be completely different, for example:
- People move from one place of residence to another,
- The apartment is undergoing renovation and it is necessary to remove equipment from the room so that it does not interfere with the finishing work.
- The equipment has broken down and needs repair or maintenance.
Under no circumstances should you begin this complex procedure without first learning how to do it correctly. For example, unknowingly you can unscrew the fittings where they connect the block and the copper pipes. In this case, all the refrigerant will simply leave the system. And then you will have to refill the air conditioner with freon, and this is an additional expense.
If you make mistakes when uninstalling the climate system, then in the future this may negatively affect the service life of the air conditioner. And sometimes this can lead to equipment becoming unusable and having to be either seriously repaired or completely replaced.
Any violations in the technology of shutting down the system can lead to a freon leak. This substance is under high pressure inside the freon line
If you handle the device carelessly and allow microcracks to appear in the heat exchanger, air or moisture may get inside. Such an omission will negatively affect the operation of the air conditioning compressor, leading to its breakdown.
Air conditioning monoblocks
Uninstallation of air conditioning equipment that was carried out incorrectly can lead to the fact that the device will not work for a very long time in the new location. In order not to make mistakes, you will need instructions for the air conditioner. It should indicate how to properly dismantle it. As for practical recommendations, they will be given below.
Dismantling the air conditioner step by step
Disassembly while maintaining the functionality of the dismantled air conditioner is as follows:
- sealing of pipeline fittings;
- disconnecting and dismantling the external unit from the facade;
- dismantling the indoor unit in the apartment.
Below are instructions for dismantling a wall-mounted air conditioner.
Outdoor unit
To remove the outdoor unit of the air conditioner, first disconnect the tubes.
There are two ways:
- Unscrew the union nuts that press the flared edges of the tubes to the flanges of the fittings of the outdoor unit. And in place of the nuts, pre-prepared caps are screwed on. The advantage is that the tubes remain intact. The disadvantage is that there is a high risk of air getting into the compressor.
- Side cutters are used to cut copper tubes (about 15 cm from the fitting). The edges are folded and clamped (caulked) using a vice. The disadvantage is that new tubes must be installed in a new place. The advantage is that the operation is quick and the likelihood of dust getting inside with air is much lower.
Note. The other cut edge of the tube must also be caulked to protect the evaporator of the indoor unit.
The next step is to disconnect the cables (signal and power), remove the fastenings of the unit to the frame on the outer wall and lift it into the room.
Compressor
One of the situations when it is necessary to remove the outdoor unit may be to replace the air conditioning compressor. And in this case, the dismantling algorithm is slightly different. The differences are as follows:
- Freon must be completely removed from the system. The correct way is to collect it in a cylinder using a freon pumping station. Incorrect, but simple - release it into the atmosphere (if the compressor is replaced in the warm season and the air temperature is higher than the boiling point of freon at normal pressure).
- There is no need to caulk the tubes - after installing a new compressor, the system is “pumped out” with an external vacuum pump.
Preparing the air conditioner: “packing” freon
So, first of all, it is necessary to ensure the safety of the refrigerant. To understand how this is done, you need to remember the design of the split system. It is a closed circuit filled with freon, which consists of a compressor, two relatively speaking chambers (evaporator and condenser) and freon pipes connecting these elements (copper tubes).
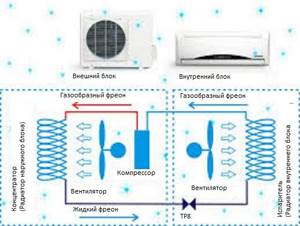
Split system design diagram
The refrigerant flows from the condenser to the evaporator in liquid form, so the tube through which it flows has a smaller diameter.
The second freon line - from the evaporator to the compressor - carries freon in a gaseous state, so the diameter of this branch is increased.
To carry out dismantling without loss of gas, it is necessary to collect it in a condenser:
- while the air conditioner is operating, the valve between the condenser and the thin tube is closed for cooling;
- when all the refrigerant, thanks to the operation of the compressor, “moves” into the condenser, you will also need to close the valve between the thick tube and the compressor.
Shut off the refrigerant
An important point: after what time should the second valve be closed? It is best to monitor gas pressure using a vacuum pressure gauge. But for this you will have to borrow a special tool from the masters - a pressure manifold.
Those who do not have this option simply wait about a minute: as experience shows, during this time a household air conditioner usually manages to pump almost all the freon into the condenser.
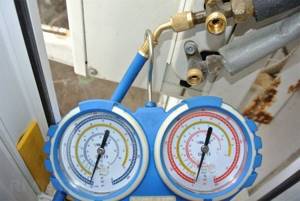
Pressure gauges for monitoring pressure when pumping freon
Let's move from theory to practice:
- If you managed to get a manifold, attach it to the nipple (schredder valve) on the fitting to which the “gas” freon line is connected. If such a tool is not available, we simply skip this point.
- We turn on the air conditioner and enter the settings from the remote control: cooling operation, turbo mode, temperature as low as possible (the permissible minimum must be specified in the passport). So the device should work for 10 minutes.
- On the external unit, find the valve to the fitting of which the liquid freon line is connected (remember that it is thin). Under the protective cap, which must be removed, you will find hexagon slots. After inserting the key, the valve must be closed.
- Now you should watch the pressure gauge or, if there is none, the clock. In the first case, we wait until the device shows the presence of vacuum; in the second, we time it for 1 minute.
- Next, you need to remove the protective cap from the second valve on the outdoor unit, to which the thick “gas” line is connected, and also close it using a hexagon. After this, turn off the air conditioner immediately. We return the protective caps to their places.
That's it, now the freon is trapped and the system can be safely disassembled and dismantled.
How to remove the air conditioning compressor
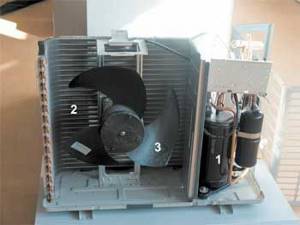
the compressor is designated by number 1.
The most serious malfunction of the split system can be a breakdown of the compressor. It occurs when:
- poor-quality installation - lack of evacuation, violation of the rules for laying the freon pipeline;
- using a split system in an unacceptable temperature range;
- factory defect.
In this case, you will also have to remove the air conditioner control unit yourself and disassemble it. Some climate control equipment can do without complete dismantling, but it is problematic for a non-specialist to do this, since in this case access to many elements is severely limited.
The outdoor module has been dismantled, how now to remove the air conditioning compressor? In fact, there is nothing supernatural here:
- Remove the protective cover from the external unit housing;
- Disconnect the lines going to the discharge and suction, as well as the electrical wires leading to the fan and compressor;
- Unscrew the fastenings with an open-end or socket wrench and remove the compressor from the vibration dampers.
It is worth considering that before removing the air conditioning compressor, it is necessary to check the degree of oil deterioration. If it has an unpleasant odor and changes color when tested for oxidation, then replacement + flushing of the KKB will be required. If the properties are normal and the oil oxidation test is negative, a simple replacement will be sufficient.
The procedure for dismantling the split system
Evacuation of the freon circuit
- On the external unit of the air conditioner, unscrew all the plugs on the two-way and three-way valves.
- Connect the gauge manifold to the filling connection of the three-way valve (it is usually larger in size than the two-way valve, and the pipeline is thicker). It must be remembered that the fitting has a nipple through which gas and compressor oil can escape when the hose is connected.
- Turn on the air conditioner in cooling mode.
- Set the minimum temperature on the air conditioner control panel.
- Close the two-way valve (smaller in size) with a hex wrench of a suitable size.
- Use a pressure gauge to control the decrease in pressure in the freon circuit.
- If the pressure in the gas circuit drops below zero (freon is completely pumped into the external unit and there is vacuum in the pipelines), close the three-way valve with a hex wrench.
- As soon as the three-way valve is completely closed, you must immediately turn off the air conditioner.
- Screw all the plugs into place.
Dismantling the external unit
After there is no freon left in the pipelines, you can begin to dismantle the split system.
- Unscrew (if the pipelines are not dismantled) or cut the pipelines with side cutters, thus disconnecting them from the valves of the external unit. When re-installing the split system, to ensure high-quality sealing of the connection between the pipelines and the valves, you will need to re-roll the copper tubes. Therefore, to protect copper pipelines and valves of the external unit from dirt and moisture, it is more advisable to bite and caulk them.
- If the nuts from the pipelines were simply unscrewed, then plugs must be installed in their place or protected from debris and moisture entering the valve cavities in another way (with electrical tape).
- Disconnect the wires from the external unit and mark them if necessary.
- Disconnect the outdoor unit from the bracket.
- Remove the outdoor unit following safety regulations (you can use a rope or halyard).
- Remove the brackets from the wall (if necessary).
- Pack the outdoor unit.
Dismantling the indoor unit
Dismantling the indoor unit must be done carefully so as not to damage the unit body and not to deform the evaporator tubes soldered to the heat exchanger in the unit itself.
Study the instructions for the arrangement and design of the fasteners and latches of the indoor unit. Unclip the lower latches of the unit housing from the mounting plate. If the design of the external unit housing does not provide for fixing it in the open position, then fix it with improvised means or seek the help of a friend. Open the thermal insulator of the pipelines of the indoor unit. Unscrew or cut (with a distance of 5-7 cm from the nut on the side of the external unit) the copper freon pipes using side cutters
When unscrewing the nuts, you must use two wrenches and act carefully so as not to deform the tubes. Caulk the cut ends of the tubes or close the cavities with protective plugs. Disconnect (or cut with a construction knife) the drainage pipe. Please note that there may be residual water in the tube. Open the cover of the electrical line of the indoor unit and disconnect the electrical wires (sign or mark them if necessary). Remove the indoor unit from the mounting plate
Typically, the upper part of the indoor unit body hangs on fasteners located at the top of the mounting plate and is easy to remove. Remove the mounting plate. Pack the indoor unit.
Dismantling of pipelines, drainage and electrical communications
If the pipelines, drainage hose and electrical line are tightly walled into the wall, then there is nothing else left to do but simply cut off all communications at the points of their entry into and exit from the room.
If it is possible to remove them without violating the integrity, then it is necessary to first pull out the most amenable part of the route, and then the rest. Before removing the tubing, the nuts must be removed by cutting the tubing using a pipe cutter or side cutters. Straighten the ends of all communications and securely wrap them with electrical tape so that nothing interferes with extraction and dirt and moisture do not get into the cavities.
After removing the route, it is necessary to carefully, so as not to break or deform the copper tubes, wind up the pipeline, cables, drainage hose and pack them.
Now the dismantling of the split system can be considered complete.
Dismantling a working air conditioner with refrigerant recovery
Any type of working split system can be dismantled for the purpose of moving and installing it later in a new location. Most often, this operation is carried out when organizations move to a new office. In order not to waste resources on refilling the system when installing it in the future, you need to collect all the freon located in the evaporator (indoor unit) and in the pipeline. To do this, dismantling should begin with distillation and collection of freon in the condenser (external unit). As an example, consider the dismantling of the most common and popular air conditioners, wall-mounted split systems.
Refrigerant transfer
First, turn on the air conditioner in air cooling mode (at the lowest possible temperature) and wait for the compressor to start. Next, remove the plastic protective casing installed on the outdoor unit, which covers the connection point for the pipelines.
Using an adjustable wrench, unscrew the protective caps of the taps of both pipes. Inside, behind the brass caps we will see hexagon taps. First, close the tap of the thinner diameter tube (liquid line) with a hexagon of the required size.
Thus, the supply of liquefied freon to the evaporator is stopped, while the compressor continues to operate and pump gaseous freon into the condenser. After some time, 1–2 minutes, depending on the length of the pipelines, we will hear the characteristic sound of an idling compressor. Then we tighten the valve of a tube with a thicker diameter (gas line) in a similar way, and immediately turn off the air conditioner. The first stage has been completed - all the freon has been distilled into the outdoor unit.
Disconnecting electrical wiring
According to the installation technology, the air conditioner's power should be supplied to a separate circuit breaker or, using a power cable with a plug, plugged into a regular outlet, like any household electrical appliance. We turn off the required circuit breaker in the distribution brush or remove the plug from the socket. Open the front panel of the indoor unit, under which there are filters. To the right of the filters is a small cover. Using a Phillips screwdriver, unscrew and remove this cover; under it there is a block with connected wires that form a connection between the indoor and outdoor units of the split system.
We check the absence of voltage with a tester to make sure that the desired machine has been turned off, then unscrew and disconnect all the wires. Then we disconnect the same wires on the external unit, the terminal block of which is located under the cover just above the protective casing of the service port, where the main line is connected.
Removing the wall block
There are two latches at the bottom of the wall-mounted air conditioner unit; their location is indicated on the plastic of the case. Most often it says “Push” (push, press), but it also happens the other way around - you have to pull the plastic down, for example, on a Mitsubishi Electric or Lessar. By simultaneously pressing these points, the indoor unit should unfasten from the mounting plate and move away from the wall.
Under the block, approximately in the center, there is a pipe connection point. Using adjustable wrenches, disconnect the block from the main line and disconnect the drainage hose. Pull the housing up, removing it from the mounting plate. The wall block has been dismantled. Using adhesive tape, we close the pipelines, protecting them from debris getting inside.
Dismantling the outdoor unit
Using adjustable wrenches, unscrew the nuts securing the pipelines and disconnect them. In order not to lose it, we screw all the nuts and caps into place and protect them from possible debris with adhesive tape. The external unit is secured to the brackets at four points using bolts and 13mm nuts. Unscrew them and remove the unit from the brackets. The external unit has been dismantled.
How to properly re-hang an air conditioner
Situations often arise in which relocating an air conditioner is more important than completely dismantling it. In this case, one of the blocks is left in its place, and for the second the tubes are simply extended. The process of removing both the internal and external units is no different from those described above, the only difference is the need to build up copper or ordinary pipes.
When dismantling one of the units, you should also monitor the safety of freon and pump it into the outdoor unit before carrying out all operations. After undocking the split system, it is necessary to rehang it as carefully as possible, without damaging the air conditioner housing. To save more money, you don’t have to do the soldering of pipes yourself, but entrust this task to specialists. Split system service technicians have a corresponding column in their price list, which is called extension of the interblock route.
Preparatory stage
It involves collecting the tools needed to dismantle the system. It is best to purchase professional equipment, thanks to which it will be most convenient and realistic to remove the split system without losing freon.

For those who do not have a sufficient supply of professional equipment, a number of tools will help in their work:
- Wire cutters.
- Hexagons (size 5-10 mm) to unscrew the fittings.
- Set of wrenches.
- Electrical tape, tape, masking tape.
- Permanent marker.
- Bench vice.
- A reliable knife (a stationery knife will do).
- Stepladder required for dismantling the indoor module.
- Pipe plugs.
- Pliers.
- Screwdriver Set.
- A pipe cutter or hacksaw, which is universal and will be needed in the future on the farm.
- A pressure manifold or pressure gauge, thanks to which you can measure the pressure in the air conditioner, will be needed when it is necessary to pump freon into the outdoor unit. These devices can withstand pressures of 10-15 bar.
- Safety gear and equipment you shouldn't skimp on.
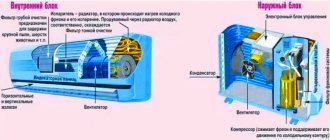
How does the air conditioner work?
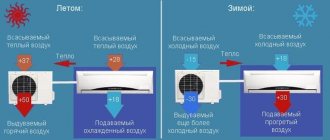
The principle of operation of the air conditioner is known: the compressor of the outdoor unit (condensing) pumps out refrigerant vapors from the indoor unit (evaporative), they condense, warm up, give off heat to the environment through the radiator of the outdoor unit, then the liquid refrigerant is supplied to the evaporator of the indoor unit, evaporates there, absorbing the heat of the room , and the cycle repeats.
Cam vacuum pump design
From here you can already see one weak spot - the air conditioning compressor pump. Working in such difficult conditions, it must be a fairly complex unit. That's right - household air conditioners use cam vacuum pumps. Its heart is two or three (in this case, there are three cams on each rotor) rotors of complex configuration in a sealed chamber, see fig. Additional seals such as piston rings, gaskets, valves, etc. No; the required tightness and one-sided action are ensured solely due to the precision machining of parts. Any other design will not provide the required performance at such temperature and pressure differences.
Now it’s clear why the pump is so vulnerable: the slightest scratch from a speck of dust, a piece of ice or a piece of oxide from the pipes - and the air conditioner will waste electricity wasting the refrigerant rather than cooling the room. After all, on one side of the pump there is freon vapor at minus -70 degrees (approximately) at a pressure of a fraction of an atmosphere, and on the other, its condensate at +80 at a pressure of several atmospheres. And freon is extremely fluid.
It is for the sake of preserving the pump that air conditioners are sold filled with purified inert gas under pressure (remember, it was vented during installation), and before filling the system, they are pumped out to a vacuum to remove water vapor - if they freeze in the system, they will form ice, which will quickly disable the air conditioner.
Knowing all this, let's try to figure out how to remove the air conditioner yourself, and what the risk factors are.
How to remove the indoor unit from the mounting plate
Everything is clear about how to remove the air conditioner compressor and the outdoor unit itself from the wall with your own hands. All that remains is to figure out how to dismantle the internal module. This process also takes place in several stages:
- Remove the protective cover from the housing;
- Unscrew the fasteners;
- Disconnect all connecting communications: freon line, electrical interconnect cables, drainage pipeline. First turn off the power;
- The block is removed from the plate by opening the fastening latches;
- Unscrew the mounting plate and dismantle the plastic wire with the remaining copper tubes.
When removing the air conditioner indoor unit from the wall, extreme care must be taken not to damage the mounting latches that hold the unit to the mounting plate. Pack the indoor unit in a thick cardboard box, line it with foam and wrap it in soft bubble wrap.
The evaporation unit can be transported in any position, unlike the KKB
Pack the indoor unit in a thick cardboard box, line it with foam and wrap it in soft bubble wrap. The evaporation unit can be transported in any position, unlike the KKB.
If any element of the indoor unit of the air conditioner needs to be replaced or cleaned, it may also require its removal from the wall or partial disassembly into its components. It looks like this:
- Remove the front panel and wash its back side with a stream of water and detergent or soap;
- Remove the air flow guide plates by carefully removing them from the grooves. Some models have special latches for this;
- Unscrew the screws, carefully pull the lower protective part towards you and slightly lift its top, then remove it from the latches;
- Disconnect the supply wire and drainage;
- Disconnect the interconnect wires from the corresponding terminals, having previously recorded their location;
- Remove the tray with the hose. For some models it may be stationary, then it is lowered a little;
- Now remove the tangential fan by lifting up the evaporative heat exchanger.
All elements are washed with water and a cleaning agent. You can use a steam generator for more thorough cleaning. When the parts have dried, they are fixed in reverse order in place.
If you need to dismantle the control board, first remove the protective cover from the electronic unit and disconnect all wires (connectors for indicator panel sensors, air damper drive). Then unscrew the board from the fastening elements using a screwdriver or simply disconnect it from the latches.
When the indoor unit is not dismantled, but disassembled, there is no need to cut the freon line.
Monoblock systems can be dismantled in almost the same way. The only difference is a slightly different electrical circuit and nozzles with working fluid.
Dismantling stages
Saving freon will help reduce the cost of reinstalling the air conditioner in a new location, where it will subsequently continue to operate. Proper pumping of freon - without losses, as indicated in the operating instructions. Freon destroys the ozone layer of the earth's atmosphere and is itself a greenhouse gas. And refilling the air conditioner for 2021 with new freon when you have lost the old one will cost several thousand rubles.
Relieving the system circuit of refrigerant
Be sure to pump freon into the outdoor unit. This is done as follows.
- Start the “cold” operating mode.
- Select the lower temperature limit using the remote control, for example, 17 degrees. This will allow the indoor unit to pump freon to the outdoor unit faster. Wait until it gets cold.
- Unscrew the bronze plugs that close the valves of the “route” tubes.
- Close the valve between the outdoor unit and the thin pipe. Air conditioners manufactured in the last few years have valves that are turned using hex keys.
- Connect a pressure gauge to the outlet of the larger valve.
- Wait a few minutes for all the freon to go into the circuit of the street block. It is convenient to track the process of pumping freon using an arrow, which should reach the zero mark of the pressure gauge.
- Wait until warm air blows and close the valve on the thick tube. Turn off the air conditioner. Its deactivation is indicated by horizontal and/or vertical blinds that close automatically after both units stop.
- Screw the plugs back onto the valves. This way you will protect the external unit from the penetration of foreign particles that interfere with its operation. If there are no separate plugs, cover these holes with electrical tape.
If it is impossible to pull the tubes out of the wall, then use side cutters to cut through the copper tubes at a distance of 20 cm from the fittings, flatten and bend the resulting ends.
Disabling electrical circuits
Removal of electrics and pipelines is carried out according to the following scheme.
- The housing of the indoor unit is removed. The electrical wires are disconnected and removed.
- The drainage hose is disconnected and removed.
- The freon lines are unscrewed and removed.
After this, the indoor unit can be easily moved and removed. The external unit is even easier to disassemble, but in the same sequence.
- Unplug the power cables. Relabel them - this will allow you, when reinstalling the split system, to quickly, in a couple of minutes, connect them to the appropriate terminals.
- Unscrew the smaller diameter tube from the fitting. Similarly, remove a larger diameter tube from the other fitting.
- Turn off the drainage and drain the water that was not removed when the air conditioner was operating in the blowing mode.
Removing internal and external modules
To remove the indoor unit, do the following.
- Determine the locations of the latches and locks of the case, and carefully unclip them. To do this, use a special puller designed specifically for latches and locks. Flathead screwdrivers (even with a thin tip), knives and pry blades, which are used, for example, to remove rubber from bicycle wheels, can break these locks. Proceed with extreme caution.
- Using the arrows on the housing as a guide, unscrew the screws holding the indoor unit to the mounting plate.
- Having freed the case from the lower fastenings, move its lower edge away from the wall. Don't remove it completely yet.
- Remove the electrical cable powering the indoor unit. To do this, remove the terminal block cover, release the ends of the cable and pull it outside the indoor unit.
- Disconnect the drain hose. Up to a glass of water may spill on you - place a glass or mug in advance.
- Remove the thermal insulator and unscrew the freon tubes from the fittings. Immediately plug the fittings to prevent dust and moisture from the air from getting into the freon pipes of the indoor unit.
- Lift the outdoor unit up. Remove it from the retaining plate.
- Set the block aside. Remove the mounting plate itself.
The indoor unit has been removed. To remove the outdoor unit, do the following.
- Remove the mounting cover on the side, disconnect the electrical wires from the air conditioner and pull them out of the terminal block. Tighten the terminal screws and close this cover.
- Disconnect the drain hose that drains condensate from the outdoor unit to the street.
- Remove the freon lines in the same way as on the indoor unit. Move them aside.
- Remove the bolts on the brackets holding the outdoor unit. Remove the block itself from these fasteners.
- Remove the bolts holding the brackets to the wall. Remove the fastenings from it.
- Pull the “route” and electrical cables out of the holes in the wall.