During operation of the heating communication, a very high temperature of more than 700°C rises inside the chimney. When exposed to heat, the pipes become deformed. The entire structure of the chimney is distorted, ruptures and cracks appear.
The movement of flue gases in the chimney is disrupted. Carbon monoxide begins to penetrate into the living room and settle on the surface of the pipes. It becomes impossible to live in such a room. The accumulation of soot on pipes provokes the formation of condensation and can be a source of fire in the chimney.
General information
Depending on the material of manufacture, chimneys are:
- Brick;
- Steel single-circuit;
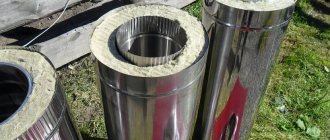
- Steel sandwich chimney;
- Ceramic;
- Asbestos-cement;
- Polymeric.
Therefore, it is very important when installing a chimney to choose the right sealing method and material. This will preserve the integrity of the output design and make it resistant to mechanical and other loads.
Types of sealant
In hardware stores you can see a wide range of sealing products. They can be divided into several groups:
Composition based on silicone and silicate;- By the number of components - one-component and two-component;
- Temperature-resistant and heat-resistant sealants.
One-component sealants are easy to use and are often used to insulate chimney structures. They contain one component. No mixing required before use.
Two-component preparations for work are mixed according to instructions in strict proportions. And must be used within two hours. The use of such isolating agents is mainly observed among professionals.
Heat-resistant and heat-resistant sealants
To seal chimneys, heat-resistant and temperature-resistant sealants are mainly used. The differences between the sealants of this group are the size of the temperature regime and the location of the area to be sealed.
Heat-resistant sealants are insulation products that retain their properties at very high temperatures up to 1300°C, and under light loads - up to 1600°C. They are produced on a mineral (silicate) basis. I have dark gray or black color. Ideal for connecting joints in chimney ducts made of steel and stainless steel, as well as for sealing surfaces of brick parts.
Fire-resistant silicate allows you to treat cracks in fireplaces and stoves with direct contact of the sealant with fire.
Advantages:
- Can be used for sealing structures made of any material due to chemical inertness;
- The silicate base is resistant to ultraviolet radiation and all weather conditions. Can be used for treating chimneys outdoors.
- Due to the porosity of the top layer, it allows for additional processing;
- Has high water permeability.
- Has increased strength after the hardening process;
Rules and principles for sealing chimneys
When working with two types of polymers, it is necessary to prepare the surface of the flue: clean, remove dust and dirt, and degrease. Metal areas must be sanded with fine sandpaper for effective adhesion of the polymer material. The surface under the heat-resistant seal must be absolutely dry. The tube is inserted into the gun and a small amount of material is squeezed onto the edge to be sealed. They provide the opportunity to harden; the polymerization time is usually indicated on the packaging.
The base for the heat-resistant silicate polymer is prepared and slightly moistened. Carefully apply the sealant to seal the gap tightly and allow time to harden. Excess heat-resistant mass is removed before it petrifies. It is possible to pre-glue the length of the seam with masking tape, and then remove it after completion. Activities are recommended to be carried out during the warm period of the year.
Some important rules when using heat-resistant sealants:
- Work with silicate sealing components is carried out in a temperature range from +6 to +41 C.
- The desired connection result is achieved only in the case of rough and uneven surfaces. For this purpose, when used, the areas are pre-treated with grinding materials.
- The surfaces must be degreased with a solvent, after completing the stage, allow them to dry for 20-25 minutes.
- When the mass hardens in the areas where the sealant is applied, very strong and hard seams are obtained; for this reason, it is not recommended to use these heat-resistant kits for systems operating in conditions of high vibration.
- The remaining sealing material is removed with a damp rag, but only until the paste hardens. After polymerization, this will require the use of force and tools.
Operating rules
When working with fire-resistant sealants, you must follow some rules:
Work with insulating surfaces is carried out up to +40°C and standard humidity;- To obtain a strong connection, the joining places must have roughness. Therefore, before gluing, they must be treated with abrasive materials, degreased with acetone, and allowed to dry;
- Due to the increased strength of the seam, it is not advisable to use this sealant for elements operating under vibration conditions.
Heat-resistant sealants are made on a silicone base. They are used in areas with temperatures up to 350 °C and only when assembling the external surfaces of stoves and chimneys made of natural brick.
When using such a sealant, not only the temperature is important, but also the thickness of the applied layer. During polymerization, the insulator uses moisture from the air. And if more layers are applied than indicated in the instructions, there is a chance that you will not get a strong connection between the surfaces.
There are two types of silicone sealants:
During polymerization, sealants release water and alcohols into the environment. These substances do not affect the chimney material, so they can be safely used when sealing stainless steel chimney structures. And iron oxide, formed as a result of high temperatures, due to its brown color makes the fact of gluing more invisible.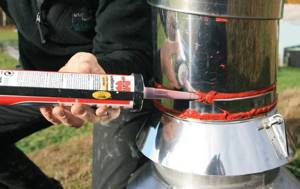
Neutral- Acidic sealants, unlike neutral ones, produce acetic acid during hardening, which can lead to corrosion of the metal elements of the chimney and destruction of the contacting surfaces of the roof. Therefore, they are not used to seal the chimney system.
Advantages of heat-resistant sealant:
- They stand out for their great ability to glue different surfaces made of ceramics, glass, brick, and soft roofing materials.
- Due to its high flexibility after polymerization, this type of sealant allows you to maintain the strength of the connection under the influence of temperature conditions, as well as vibrations of the open parts of the chimney;
- Moisture resistance and ultraviolet resistance make these materials indispensable for sealing the external elements of the chimney and installing pipes for various purposes on the roof.
Purpose of chimney sealing
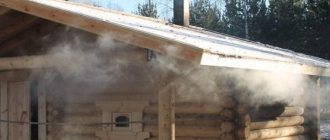
In order to prevent smoke from leaking through cracks, sealing the chimney is an indispensable condition for its functioning. High-tech heat-resistant seals are used to seal the joint seams of various elements of prefabricated chimneys. In addition, they are used for emergency repair of leaks formed during the operation of heating sources in winter, when it is not possible to disconnect the boiler and replace damaged areas.
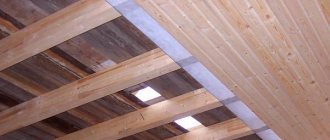
Such materials are used to seal cracks in a classic chimney made of brick. Previously, traditionally, clay was used for this, but it is short-lived. In addition, heat-resistant pastes are used to treat the exhaust pipes to the roof - this protects the rafter system from getting wet and rotting.
Cement
Sealing a chimney with cement has been a long-forgotten method since the last century. However, it is still used today. The binding agent in this case is an asbestos-cement mixture in a 1:1 ratio.
The mixture is prepared by hand as follows:
- I fill the asbestos with water and bring it to a homogeneous mass;
- A homogeneous and swollen mass of asbestos is mixed with a portion of cement;
- The mixture is coated with the joint between the roof and the chimney;
- Operation of the chimney system is possible after the sealing mixture has completely dried.
Preparation
The preparatory stage includes carrying out calculations on the proposed configuration of the chimney, developing a diagram - drawing, marking the mounting points. This will allow you to calculate the required number of modules, connecting parts, and develop a plan for further work.
Consumables and tools
In addition to the standard elements included in the sandwich chimney kit, for independent installation you will need the following consumables and tools:
- Clamps.
- Wall brackets.
- Fasteners.
- Fireproof sealant.
- Scissors and jigsaw for metal.
- Hammer.
- Side cutters.
- Construction hairdryer.
- Putty knife.
- Master OK.
- Measuring tools: tape measure, square.
- Construction level and plumb line.
- Marker.
What to fasten with?
The structural parts must be secured with special clamps, which are tightened with nuts. The finished chimney, if it is located along the wall, must be secured to it with brackets in increments of 1.5 - 2.0 meters. A stretcher should be installed on the upper element.
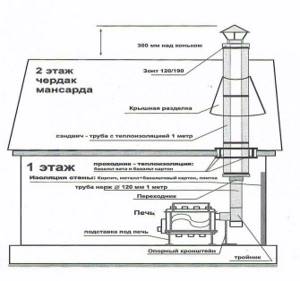
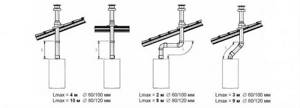
Chimney height (total + on the roof)
When calculating the height of the structure, the following rules should be observed:
- The height of the channel from the nozzle of the heating unit to the final element - the head - must be at least 5 m.
- The part of the pipe located on the roof must rise above the ridge by no less than 0.5 m and the roof of neighboring buildings by no more than 1.5 m. If there is a need to lengthen this section of the smoke exhaust duct, then a guy should be installed for additional fixation .
Connecting the tee to the heating device + sealing + mounting to the wall
A heating device with a horizontal outlet pipe on the rear side is connected to a monopipe using a tee (mono), equipped with a plug at the bottom with a condensate collector. Before installing it, the inner surface of the central outlet should be covered with a layer of heat-resistant sealant.
Next, the tee should be tightly placed on the stove pipe, pushed in all the way and secured in the area of connection with the pipe with a clamp and bracket. In this case, it is important to check the verticality of the tee axis using a building level; only after this procedure can it be secured to the wall with a bracket using anchors or dowel plugs.
Installation of a monopipe
To install a straight section of a monopipe, you must first mark on the wall the place where the bracket is attached, so that the markings coincide with the junction of the module and the tee, and drill holes for the fasteners. Then you need to put a clamp on the upper branch of the tee, but do not tighten it completely, but fix it with a bracket to the wall.
Further installation work will be carried out using the “condensate” method - inserting the lower end of the monopipe into the tee. A heat-resistant sealant is used to seal the joint. It is applied with a narrow spatula and distributed in an even layer in the joint zone.
Then the pipe moves in the tee pipe until it stops. The installation of this section of the monopipe ends with tightening the clamp. The next block with a damper is installed according to the same scheme: a clamp is put on the already installed pipe, its free end is coated with sealant, where the upper part is inserted, and the clamp is tightened. It is advisable to mount another section of monopipe, 50 cm long, behind the damper to ensure maximum heat transfer from the flue.
Sandwich + polyurethane foam installation
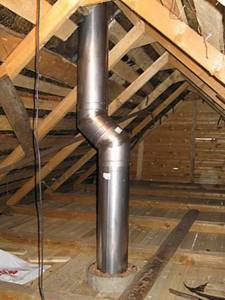
Sandwich modules are installed in the same order: applying sealant, joining parts and tightening with a clamp. In the ceiling, in the place where the channel will cross it, you need to drill an opening and continue assembling the structure, checking the verticality using a plumb line. The factory-made ceiling pass-through assembly consists of a box-shaped body made of galvanized steel, covered at the bottom with a stainless steel plate.
In the middle of the body there is a through hole corresponding to the outer diameter of the sandwich pipe. The PPU is placed on top of the already installed module and lowered into the ceiling opening. The bottom of the polyurethane foam should be flush with the surface of the ceiling, the top of the box should be filled with fire-resistant insulation - basalt wool, expanded clay or vermiculite and immediately closed with a lid.
Mono-pipe again (if the room is 2nd floor residential)
If the building is two-story and the rooms on the second level are residential, then in order not to lose useful thermal energy, the part of the structure passing through them should be assembled from monopipe sections. To do this, first install an adapter from a sandwich module to a single-circuit pipe. Then, in the usual manner, the chimney is assembled from monopipe sections up to the attic floor, fastened with clamps to each other and brackets to the wall.
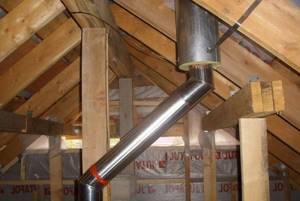
Again sandwich + polyurethane foam
An adapter is installed in front of the attic floor, now from a mono section to a sandwich pipe, and then the assembly of the channel to the head will be carried out from sandwich products in the order already discussed. At the point of passage through the attic floor, an opening is also cut out and polyurethane foam is installed and filled with heat-insulating material.
Making a hole in the roof
The hole in the roof must be calculated so that it does not affect the elements of the wooden rafter structure and is located at a distance of at least 13 cm from them. The shape of the hole can be rectangular - for a roof covering laid on a continuous or frequently spaced sheathing, or oval - on a pitched roof. You can make an opening using an electric jigsaw, having first marked its boundaries.
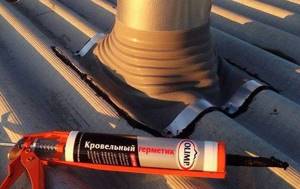
Installing master flash
After the chimney is brought out through the roofing, the passage must be sealed by installing a special master flush passage unit. It consists of an elastic base (flange) with flexible aluminum strips around the perimeter, ensuring the best possible fit to the roofing material. Connected to it is the upper part - a corrugated cuff in the shape of a truncated cone, made of silicone or EPDM rubber. In the working position, the cuff fits tightly to the pipe, preventing the penetration of atmospheric moisture and dust.
What to look for when looking for sealant
When choosing a sealant, the following points must be taken into account:
- Operating conditions of the heating device;
- Location of the joint or seam (inside the pipe, outside the chimney or on the roof);
- Temperature regime of the treated surface: Heat-resistant agents are mainly used to seal chimneys
- Consistency and composition of the sealant: solid silicone is best used for cracks in brickwork;
- Material for the manufacture of chimney elements.
A properly selected sealant will save you from unexpected expenses for cleaning or disassembling the chimney installation.
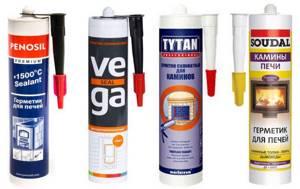
Popular manufacturers
There are quite a few companies producing pyrogenic sealants in the construction market today; the most famous brands include:
- The presented company produces both heat-resistant and heat-resistant sealing products. The heat-resistant material is made on the basis of red silicone acid paste, resistant to high temperatures up to 300 C. There is a heat-resistant modification of the material for Penosil-1500. This substance is black in color with a maximum operating temperature of up to 1500 C.
Penosil-1500 - The brand sells heat-resistant products from the Polish company Selena Group. The sealants of this model can withstand ambient temperatures up to 1250 C. The presence of a fiberglass mixture in the material’s formulation creates smoke- and gas-tight seals, thanks to which the sealant is in deservedly high consumer demand among craftsmen.
Sealant from the Polish company Selena Group - Soudal C. A Belgian company that produces a wide range of sealing materials, including pyrogenic ones, for example, Soudal Calofer, Fix All and some others. Soudal C.
High-temperature sealants are considered an indispensable product in the construction of smoke ventilation systems for various boiler equipment, stoves and fireplaces. They have many significant positive qualities and specific properties. Therefore, on the eve of purchasing a sealant, it is necessary to carefully familiarize yourself with its parameters and the advice of qualified specialists. All of the above makes it possible to insure against miscalculations and make the best selection of sealant, in which the tightness of the chimney system will be guaranteed.
Processing options
In the field of maintenance and restoration of chimney ducts, traditional materials have long ceased to be relevant.
They are being replaced by polymer-based products. With their help, sealing a stainless steel chimney becomes as reliable as possible and maintains the result obtained over a long period of operation. Chimney treatment can be done in two ways.
The first method involves applying PEK-1 paste, made on the basis of diane epoxy resin, which can be converted into a polymer having a spatial, network structure, onto the inner walls of metal pipes. The paste turns into a solid if a special hardener made using an aromatic polyamine is used when performing work.
Application to the surface of chimneys occurs as follows.
- Specialists prepare the surface.
- A special primer is prepared and applied to the surface.
- Polymer paste is applied to the surface of the applied primer, brought to working condition.
- The craftsmen check the quality of the work performed.
The composite polymer paste is also characterized by increased resistance to aggressive environments, including sulfuric acid solution at an operating temperature of no more than 250 degrees Celsius.
However, the protective coating should only be applied by a worker. Accordingly, the use of this technology becomes possible if there are pipes with a diameter of at least 150 centimeters.
The second method is intended for those who use a chimney whose diameter is no more than 120 centimeters, where, accordingly, a worker cannot climb inside. Here we are talking about a pre-prepared composite sleeve.
The presented sleeve is a prepreg, the structure of which includes fiberglass for additional reinforcement. The prepreg is impregnated with a paste based on furan resin. Once rolled up, the sleeve is lowered into the chimney, which needs to be completely sealed.
Next, specialists begin to use steam, with which the sleeve is inflated. The sleeve then completely takes the shape of the old channel. Under the influence of elevated temperature, hardening occurs, resulting in the appearance of a new surface. In other words, here we are talking about lining chimneys using composite-based materials.
The procedure is performed in the following sequence.
- The chimney is inspected.
- The material is pulled along the entire length of the channel.
- The roll is inflated using steam to achieve the desired size. There is a tight fit to the inner walls of the canal.
- The material is brought to a state of complete readiness within 2-4 hours.
- The correctness of the work is checked.
Due to the unique installation technology, the material is optimally suited for both small and large diameter pipes. Thanks to the special properties of this product, excellent installation capabilities are provided regardless of the slope or the number of irregularities inside the channel.
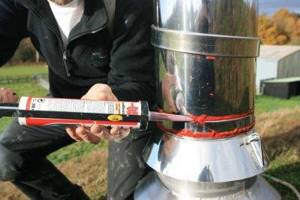
Methods of use
Today, almost all sealing agents are produced in special tubes that are inserted into a suitable gun.
It is with his help that the entire process is carried out. First of all, it is necessary to prepare the working surface, clean it from dirt and dust. Also in some cases it is necessary to clean the seams and wet the surface.
Sometimes there is stubborn dirt on the chimney. They are best removed with a rag and acetone.
Adviсe:
- If the apron extends onto the pipe, it should be covered with masking tape. It is removed as the surface being treated is filled with sealant.
- When working, it is necessary to take into account that the width of the seams cannot be more than 3 centimeters.
- Before starting work, the tip of the tube is cut off at such a level that the released sealant can completely close the seam or gap at one time. The cut should be inclined, the quality of sealing depends on this.
- It is especially important to ensure that when working indoors the temperature does not drop below 5 degrees Celsius.
- Since during the process substances can get on the skin and cause harm to health, you should use special safety equipment: a respirator and gloves. However, if the sealant does come into contact with the skin, it should be washed off immediately with running water.
- During storage, it is not recommended to store sealants near acids and flammable substances.