Choose
The place for arranging a vegetable moat should be located on a hill, which in the future will protect it from turning into a swimming pool during spring snowmelt or autumn rains.
Before starting construction, you should find out in advance the depth of groundwater by looking into the nearest well. (Read here how to find water on your property.)
We are building
To begin with, a pit is dug about 2.2 meters, about two meters wide. A “cushion” of sand and crushed stone is placed at the bottom, and bitumen is poured on top. A concrete slab is suitable for the flooring; in extreme cases, you can use hardwood boards.
Even if the owner is lucky and the soil is dry and dense, the walls of the pit will sooner or later begin to crumble . So you will have to spend money on brick walls that you can lay out yourself. To protect against moisture, it is desirable to treat the walls of vegetable storage with bitumen; sometimes they are additionally sheathed with clapboard.
We insulate
In regions with mild climates, you can do without additional insulation.
Here are some tips for residents of harsher climes.
A suitable insulation should:
- are not afraid of water,
- be non-toxic,
- do not emit strong odors,
- do not lose thermal insulation properties for a long time,
- have a minimum thickness.
fits all these parameters . It is sprayed onto the walls and ceiling, and after hardening it turns into a monolithic layer of sealant with good insulating properties. There is only one minus - it is not a cheap pleasure, and therefore less convenient polystyrene foam . It is better to apply insulation to a prepared and plastered surface.
Ventilate
without ventilation in a pit for storing vegetables. One of the pipes (preferably plastic) is embedded in the wall at a height of 20 cm from the floor, the second - on the opposite wall under the ceiling. The ends of the pipes from the outside should be raised as high as possible. The air flow resulting from the difference in temperature and pressure prevents the appearance of dampness and allows food to be stored longer.
SOS! We're drowning!
High groundwater levels can cause a lot of trouble for owners. The only way to quickly dry a cellar is with a heat gun. A slower method: an old bucket, in which the fire is maintained until the room dries out. And, of course, before this you need to pump out or bail out the water.
Radical Savings
Such a depression in the ground is one of those small architectural forms on the construction of which you can save a lot . It can be built from a pile of rubbish that is lying around in the backyard of almost any household.
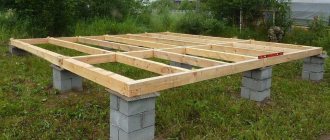
is installed at the corners of the pit . A metal corner is best suited for this; a frame around the perimeter is also made from it. Pipes made of the same material are also suitable. A fine mesh fishnet is attached to the frame. It will hold the earthen walls.
Our vegetable cellar is covered with an iron sheet or boards, polystyrene foam is placed on top (for insulation) and covered with earth.
Disadvantages of such a structure:
- suitable only for regions with warm climates;
- In winter, frost forms on the ceiling, during a thaw it turns into water and drips down onto the vegetables;
- the soil may sag and frost gets inside;
- metal rusts.
Pit in the garage
It would be a good idea to provide for the possibility of storing food in the garage when constructing the building itself. But since you didn’t think of it then... You should balance your appetites with the size of the garage: you shouldn’t dig under the foundation, the walls will crack from greed.
You should go deeper into the soil carefully and slowly: you can find a lot of interesting things there, like a gas pipeline or an electric cable.
The vegetable pit in the garage is dug and strengthened according to the recommendations outlined above.
A vegetable pit is the most practical way to store crops for a long time. Such a pit or cellar is a special place for storing food, which can be arranged in a summer cottage, in the basement of a residential building, in a garage or even under a loggia. Its main advantage is the complete absence of energy costs - the freshness of your vegetables and fruits will be maintained naturally. From the article you will learn how to build a vegetable storage facility with your own hands and how to use its space most efficiently.

How to build a vegetable pit with your own hands?
Getting a rich harvest of vegetables at your own dacha is great if you have a place to store it. To place the harvested crop, you can make a vegetable pit.
Such a structure will help keep supplies fresh for several months, without requiring any electricity or special financial costs.
The simplest storage for vegetables at your own dacha is made without the use of expensive materials, and you will need the simplest tools.
Choosing a site for construction
The place for the vegetable pit must be chosen correctly
In order for a vegetable pit to serve you well for a long time, you need to choose the right place for it.
What to consider when choosing:
- The vegetable pit must certainly be located on a hill so that groundwater does not get into it. It is advisable to find out in advance the level at which they lie.
- For this, the following options are possible: you can drill a well - a depth of 2.5 meters is sufficient. Then the well is left for several days to see if water appears there. If it remains dry, you can safely build a hole in this place. If moisture is detected, it is better to choose another location.
- if it is not possible to drill a hole of such depth, there is another way - you can measure the water level in nearby wells.
- There should be no utility lines laid nearby, otherwise there is a risk of damaging a pipe or electrical cable during digging.
Builder's advice: before starting work on arranging a storage facility for vegetables, it is recommended to complete at least its simplest design. A pre-drawn plan will make it much easier to navigate while doing the work.
There are several key requirements for a vegetable pit
Let's consider the basic requirements for the technology of constructing a vegetable pit:
- Selection of dimensions
- Waterproofing
- Bottom device
- Ventilation
When completing a project, it is necessary to indicate in it the dimensions of the future pit. Its depth should ideally be approximately 2-2.2 meters, width - 1.5. It will be quite comfortable to be in, and the temperature can be easily maintained at +5 degrees.
This is optimal for storing vegetables - they will not spoil and retain maximum nutrients. Humidity must be maintained at 90% so that the vegetables do not wrinkle and dry out.
If the groundwater level fluctuates at 1-1.5 meters from the surface, and it is difficult to choose another place for the hole, you can try to install a drainage system. In some cases, it may also be necessary to provide good waterproofing.
Of course, this will result in some costs, both in terms of finances and labor. But if you neglect this stage, you should prepare for the fact that sooner or later the water will find a loophole and penetrate inside.
Take note: even if the walls of the pit are filled with concrete mixture, additional waterproofing must be provided.
It is recommended to insulate the walls - any heat-insulating material in the form of plates that is well resistant to moisture, for example, polystyrene foam, is suitable for this.
Sand and crushed stone are laid at the bottom, then bitumen or other similar material is poured onto this cushion. It is best to install the flooring in the form of a reinforced concrete slab. If it is impossible to provide this option, strong boards are laid on the base.
It is important to remember: ventilation must be provided in the pit.
The simplest option is to build natural ventilation, for which two pipes are used, placing them at different heights from the floor surface in the garage. One pipe is a supply pipe, the other is an exhaust pipe, and their outer ends should be brought out as high as possible.
This ensures a constant flow of fresh air. This helps keep vegetables in edible condition longer.
Materials and tools
To build a vegetable pit you need a set of certain materials and tools
To complete the work you will need the following tools and materials:
- shovels;
- buckets for lifting the earth up;
- container for mixing the solution;
- fasteners (nails or screws);
- hammer or screwdriver;
- floor boards and covers;
- crushed stone;
- sand;
- cement;
- metal corner;
- insulating material.
Stages of work
Stages of building a vegetable pit with your own hands
To build a good vegetable pit, it is recommended to perform the work in the following sequence:
- To begin, check the project prepared in advance and dig a pit in accordance with the dimensions indicated in it. The simplest option is to make a hole in the ground with sides 1.2x1.4 m, depth 2 m. The work should not be done alone, but with an assistant.
- When the pit is ready, it is necessary to strengthen the walls as best as possible.
No matter how convenient the composition of the soil is for work, over time the earth may crumble and your cellar will be filled up. Therefore, you should make the bottom of concrete as carefully as possible, and place a metal frame in the corners of the future cellar. The best material is a metal corner - it is used to make a frame around the entire perimeter of the structure. - A barrier is installed between the frame and the wall of the future cellar, which protects against crumbling earth.
It is a fine-mesh mesh. A frame is placed on top of the frame, the task of which is to hold the lid. It can be made from boards on which thermal insulation material is strengthened. The lid should fit as tightly as possible to the frame - this way the cold will not get inside the pit.
Features of the device in the garage
Installing a vegetable pit in the garage requires additional conditions
For example, with a strip foundation, work will be carried out differently than with a slab foundation. The best option is to plan a location for the cellar during the construction of the garage. Then it will be possible to leave a reinforced hole in the base for the subsequent arrangement of the pit.
What to consider when building a pit in the garage:
- The floor level in the garage where the pit is being constructed should be 30 cm higher than the foundation.
- Make sure that when manipulating the integrity of the foundation, no harm will be caused to the building itself.
- You should not choose large dimensions for the pit - a depth of 1.7 m and sides of 2 m each is sufficient. The stages of arrangement are almost no different from the construction of a vegetable pit in an open space.
Preparation for work
At first, building a cellar with your own hands may seem like an extremely difficult task, but even a novice builder can cope with it. The most difficult step will be choosing a suitable location. Previously, it was believed that a cellar could only be located under a house or on a summer cottage. But in reality, it can be organized even in the garage. Therefore, apartment owners should not refuse to store their crops.
Before you start building a vegetable pit, you need to consider the following questions:
- Checking the availability of utilities. If you are going to build a cellar within the city, make sure that you will not touch electrical cables, pipelines and gas lines. In this regard, it is much better to make a hole in an already finished room - a garage or cellar.
- Soil study. Most often, you will need the help of a specialist to carry out this stage. It will help establish soil characteristics and groundwater levels. You cannot ignore these factors, as otherwise you risk getting a regularly flooded vegetable pit. Ideally, groundwater should lie well below the intended bottom of the storage facility, otherwise you will need a complex waterproofing system. This will entail large financial and time costs. Most professional builders believe that even waterproofing will not help - sooner or later water will still seep into the hole.
- Project development. Before starting construction, it is worth spending time calculating the area of the future storage facility and creating a drawing. This will reduce possible shortcomings and greatly simplify your work.
Caisson for cellar
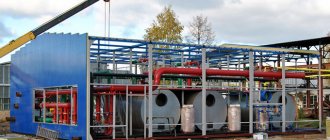
If you need a vegetable pit, you can install a caisson with your own hands. On sale today you can find similar designs made of different materials. This can be a prefabricated reinforced concrete structure, a metal caisson or a product made of plastic. In the latter case, no additional treatment of the cellar is required. The structure is lightweight, and its installation can be done independently, without the need to involve construction equipment. For several decades, the plastic caisson will endure negative impacts.
Construction stages
Digging a hole for storing vegetables is not too difficult. It is much more difficult to equip it correctly. When building a vegetable storage facility, it is necessary to take into account the issues of arranging the floor and walls, organizing hydro- and thermal insulation, as well as ensuring ventilation.
If you are installing a hole in an open area, and not in a finished basement or garage, first dig a pit of the required size.
Arrangement of floors, walls and ceilings
10 cm of crushed stone and 15 cm of sand are placed at the bottom of the pit. Each layer must be compacted thoroughly. After preparation, the layers must be filled with bitumen or another substance with similar properties. Ideally, pour a slab of reinforced concrete, first laying a layer of waterproofing material. If this option is not possible, you can cover the floor with wooden boards.
Then you need to tackle the walls and ceiling. Alternatively, you can lay the walls out of brick. In this case, it is better to lay out the ceiling of the pit with a vault, laying bricks on templates made of boards. You can also make a concrete floor. To do this, you need to prepare wooden formwork and lay the reinforcement frame inside.
When working with the ceiling, you need to leave room for a crawl space. It is best to make it in the middle of the ceiling. In this case, you will have enough space to place shelving. A stop for the lid should be installed in place of the hole.
When the ceiling is ready, it is necessary to insulate it. To do this, coat it with bitumen and insulate it using the existing insulating material (foam, expanded clay or slag).
Waterproofing
High-quality waterproofing is a prerequisite for long-term storage of crops. This issue should be taken especially seriously if the groundwater level in the area is high enough. In this case, you will have to build a circular drainage system.
Thermal insulation
Natural vegetable products do not tolerate sudden temperature changes. Sudden warming can lead to rot and disease, and frost will cause severe flavor changes. For this reason, you must ensure that your storage unit is maintained at a suitable temperature at all times. This is easiest to do with proper thermal insulation.
It is better to insulate the walls on both sides - external and internal. But often the vegetable pit goes to the owner of an already built one, so its external insulation is impossible. Then all that remains is to insulate its internal walls. This work can be done with your own hands using any slab insulation. Don't forget to make sure it is moisture resistant. Experts believe that polystyrene foam will be the best choice.
Providing ventilation
Constant air circulation will help maintain the correct microclimate in the storage. Therefore, the final stage of construction should be the organization of a balanced ventilation system.
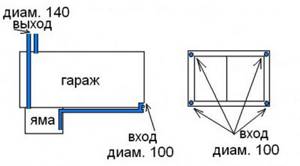
An option for installing ventilation in a vegetable pit located in the garage.
The simplest option that you can build with your own hands is natural ventilation using two pipes. One of them will be a supply, and the other an exhaust. They need to be placed at different heights in opposite corners of the cellar. You can use any pipes that you have, but for a vegetable pit, plastic or asbestos-cement pipes with a diameter of 10-15 cm are better suited. The supply pipe should start 20 cm from the floor and go out at a height of about 20 cm above the level of the cellar lid. The exhaust system should start right at the ceiling and extend as high as possible above the roof of the room.
Valves should be installed on the pipes to regulate the air flow. To protect the storage from pests, the end of the supply air duct is covered with a fine metal mesh. To protect against precipitation, the upper end of the exhaust pipe is placed under a special umbrella cap.
The difference in temperature and pressure will ensure a constant flow of fresh air into the room.
Separately, it should be said about the need for high-quality ventilation of the pit located in the garage. Exhaust gases from the vehicle must be removed in a timely manner and not reach food products.
Necessary tools and materials for arrangement
Before arranging the cellar under the garage, prepare the necessary materials and tools.
Among the tools that will be used during construction work are the following:
- Bayonet shovel. Used to dig a pit in which the cellar will be built.
- Shovel Used to clean a dug pit from excess soil.
- Hacksaw. An indispensable tool used for sawing wood beams from which the basement walls will be sheathed during insulation.
- Fastening components. To fasten wooden and metal structural elements, nails and screws are used.
You will also need the following materials:
- bricks for creating walls;
- cement mortar;
- insulating materials that will protect the cellar from freezing;
- iron corners;
- wooden beams.
Installation Features
Before installing a plastic caisson, it is necessary to carry out external thermal insulation, since the temperature difference between the outside and inside can be significant, which will certainly cause condensation to form on the walls. Installation of such a product is carried out on a clay pillow, the thickness of which should be approximately 20 centimeters. It is important to prevent water from getting into the hole before installing the caisson, otherwise the product will begin to float. If such a problem does arise, you will need to additionally install a hydraulic lock; for this, the gaps between the walls and edges of the pit are filled with clay, as in the case described above. Waterproofing is performed below the soil freezing depth.