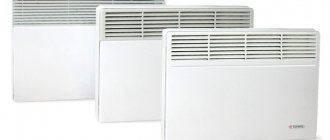
From the author: Greetings, dear friends! We suggest we talk about how to install a gas convector with your own hands . These heating devices are less popular among consumers than their electric counterparts. The fact is that this type of heater implies the presence of a centralized gas supply or a gas cylinder. But such models are much cheaper to operate. They are usually installed in dachas or country cottages - that is, in those locations that do not require constant heating.

How does a gas convector work?
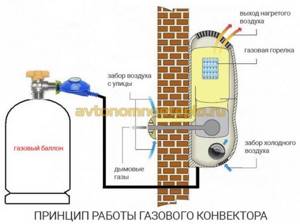
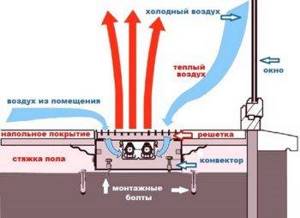
Gas heating convectors for heating residential premises use the principle of natural air convection. Cold air masses are always at the bottom of the room. When heated, air rises until it begins to cool. The operating principle of all convectors is based on the natural circulation of air masses.
Operating principle of convectors
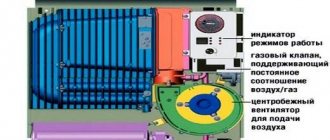
A gas heating appliance works as follows:
- Inside the convector there is a heat exchanger connected to convection channels.
The heat exchanger heats up when gas is burned.
The air passes through the heating element and heats up.
- Heated air flows enter the room.
The operating principle of a gas convector has several advantages that distinguish the heating device from its analogues.
Advantages of gas convectors
The operating principle used by convection heaters has several advantages:
Lower gas consumption - the air in the room is heated directly, and not thanks to the coolant, which increases the efficiency of the equipment and reduces heating costs.
No need for coolant. Heating of the room is carried out using air heating. Convectors can be installed in unheated rooms, starting only when necessary, without fear of freezing of the heating system. For this reason, installing a gas convector for a summer residence is the best option.
Finally
Although a gas convector is not a very popular means of heating, we can still say with confidence that it justifies its cost and the effort spent on its installation. Such a device would be the best option for a country house where you come on vacation in winter. The heater is capable of warming up the air in a room very quickly , it is more economical than its electric counterpart, and can also be powered from a gas cylinder. Perhaps the only significant drawback of the device is that it heats only one room, and not all rooms, as a boiler with a heating system does.
Source
Types of gas convectors
To choose a suitable convector, you should learn about the main differences between existing equipment, the pros and cons of modifications.
By what criteria can heaters be classified?
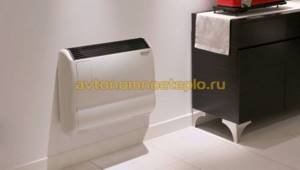
- Installation method - there are wall and floor models. The former take up less space, are lightweight and efficient, and are limited in performance (maximum power 10 kW). For heating a garage or large premises, it is better to choose a floor-standing model. The heaters are heavy due to the enlarged heat exchanger. The performance of floor convectors reaches several mW (industrial versions).
Exhaust gas removal. A conventional convector has an open gas combustion chamber. The operating principle of the device is somewhat reminiscent of a simple wood stove. The design has several disadvantages - it burns oxygen, requires good ventilation of the room, as well as the manufacture of a complex smoke removal system.
New generation convectors use a closed combustion chamber. Instead of a chimney, a coaxial pipe is used. Air is taken from the street, so the oxygen in the room is not burned during operation. Systems with a closed combustion chamber have only one drawback - the cost is 30-50% more than classic models.
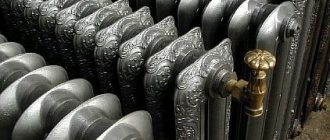
Heat exchanger material. The operating principle of the convector is associated with constant thermal exposure. One of the common causes of heater failure is burnout of the chamber walls. The heat exchanger is made of steel or cast iron. The crystalline structure of the latter metal ensures a long service life (about 50 years) and high heat transfer. A steel camera will last about 10-15 years.
Fan . High power convectors are equipped with a forced air circulation system. Budget household models may not have a fan.
Gas type. The models are designed to operate on any type of “blue” fuel. A gas convector running on natural gas can also operate on propane. For conversion you will need a special adapter kit.
Closed type water heat exchanger
The operating principle of all closed heating systems is based on the elementary laws of physics - when heated, the density of water decreases and is pushed from below by colder water, it begins to rise through the pipe, entering the expansion tank, and from there it returns to the heater along the entire circuit.
In this case, the chimney acts as a heater, which with its energy pushes water along the contour of the heating system.
Homemade coil
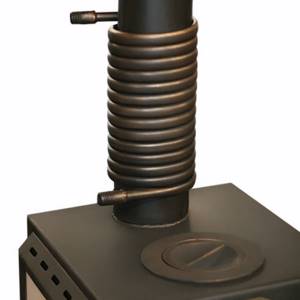
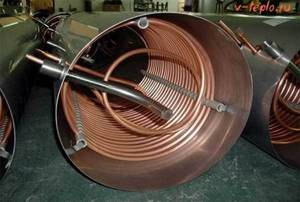
Homemade water heat exchanger
The design shown in the photo is the most common and simplest way to use heat from a chimney. The upper edge of the tube is connected to the expansion tank, and the lower edge to the heating circuit.
Most often, such a system is used as an auxiliary one. With its help, you can heat small rooms in which heating was not previously provided, but nothing more. It will not be able to act as the main heating, since its design has several significant disadvantages:
- The temperature on the surface of the chimney is an unstable and difficult to control value, as a result, it is impossible to regulate the degree of heating of the coolant.
- Due to the variability of temperature, it is very difficult to calculate the optimal coil length. If it is too short, the water will begin to boil and rupture the tube, and if it is too long, the coolant will not warm up to the desired temperature at all.
- The water from the expansion tank cannot be used for showering or other purposes, and this is not just due to unregulated heating. When the tank is filled with cold water, it will begin to cool the chimney through the coil, resulting in the formation of condensation and accelerating the process of soot formation on the internal walls.
- The temperature to which the chimney heats up is not enough to warm up a long circuit. With conventional heating, water passing through the system loses only 25 degrees; to maintain this figure in this situation, the entire system must be small in size.
Register heat exchanger
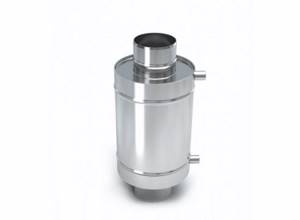
Factory heat exchanger
To avoid problems with homemade devices, you can purchase a register heat exchanger for the chimney pipe. Of course, the price of such a device will be higher than that of a DIY one. But the quality characteristics cannot be compared.
The principle of operation of such a device is identical to that described above, with the only difference being that all the calculations have already been made to protect the device from boiling. Unfortunately, there is no heating control here either, but there are several significant advantages compared to “homemade” ones:
- The outer casing retains heat inside, allowing the coil to warm up even at low chimney temperatures;
- Copper tubes do not come into close contact with the heating surface, this protects the device from possible boiling.
Internal structure of the heat exchanger
How to choose a gas convector
You should pay attention to the technical characteristics of heaters. The best option is to choose a convector with a closed cast iron heat exchanger and a programmable control unit.
When choosing equipment you will need to consider the following:
- Power calculation. When heating a room, air convection is used. Consequently, heaters are only effective in limited spaces. For each room you will need to install a separate convector. Power calculation is carried out according to the formula 100 W per 1 m².
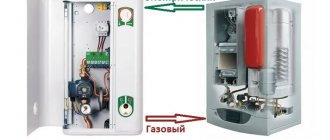
Type of housing. Heaters with a closed combustion chamber and exhaust of combustion products through a coaxial chimney are suitable for apartments. You can install any type of equipment in your home. But when installing a heater with a closed chamber, it is necessary to take care of a constant and intense flow of fresh air.
How to install a convector correctly
Installation regulations, requirements and limitations are described in detail in the operating instructions. In particular, it states:
- Installation of a gas convector in a wooden house. During operation, the housing heats up to 50-55°C. It is necessary to insulate wooden surfaces in contact with heating parts of the structure. The rules for installation in a wooden house require the manufacture of fireproof roof breaks. If coaxial pipe is used, no insulation is required where it passes through the wood wall. The surface of the coaxial chimney heats up slightly due to the special design of the burner and pipe.
Location from the floor. Air heating of a country house or residential building has certain features that affect the heating efficiency. To ensure maximum performance, the convector should be installed as close to the floor as possible. As a result of this solution, the intensity of circulation of convection flows increases and the efficiency of the equipment increases.
Which is better, a gas convector or a boiler?
It all depends on the technical characteristics of the building and the features of its operation. Installation of the convector requires less time and material resources.
Air heating is recommended for use in country houses that are not heated in the winter. During installation there is no need to use a water circuit; the building can be heated only from time to time. Even at negative temperatures in the room, you can warm up the room in 20-30 minutes.
A gas convector for a home using bottled gas is inferior to a boiler connected to the main pipeline in terms of efficiency, but superior in functionality. The choice of an air heater is justified in the absence of gasification. With a fully charged cylinder, the heater will operate for approximately 10 days.
A convector heats a room better and faster and uses less fuel, but its effectiveness is limited by the properties of convection currents. The heating intensity decreases as obstacles arise: walls, furniture, etc.
For heating a country house or small rooms, a convector type heater is optimal. But for residential heated houses with large rooms, it is better to install a traditional gas boiler.
source
conclusions
Undoubtedly, gas convectors are the most popular type of heating appliances today for small residential, household facilities and even vehicles. The difficulty is that the most affordable and affordable type of fuel can be dangerous if the operating instructions are violated.
If the rules of use are strictly followed, there will be no threats to life, health, or property. Homemade products will not create any risks if the gas moves through sealed circuits. However, if there are doubts that you can ensure tightness, it is better to buy a factory-made device and not tempt fate.
Would you like to talk about how you installed and connected your own gas convector? Perhaps you have an interesting idea for assembling or upgrading a gas heater? Please leave comments in the block form below, ask questions and post photos on the topic of the article.
Installing a gas convector in the house: do-it-yourself, installation features
Hello, dear readers. Is it possible to install a gas convector yourself? What criteria must be followed? And which models are easiest to install? And how much does such work cost?
This article discusses how to install a gas convector yourself. The general principles of installation and work with models of certain brands are described. The material also touches on the subtleties of installation work in wooden buildings.
Criteria for installation
When doing independent or custom work, the requirements for installing a gas convector must be met:
- Placement in apartments and especially fire-hazardous premises is unacceptable.
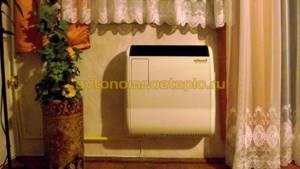
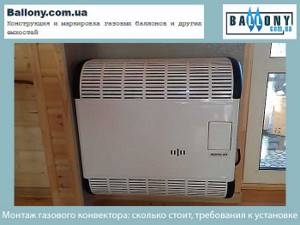
- The device should be placed only under a window or at a short distance from it.
- The pipe for the gas convector must pass outside.
- The pipe must be equipped with an outlet. As a rule, this is a job for a professional.
- After installation, you need to test run the device.
Independent work
You can install a gas convector yourself. To do this you will need the following arsenal:
- The device itself.
- Hacksaw or pipe cutter.
- Drill.
- Silicone, resistant to high temperatures.
- Polyurethane foam.
- Wrench.
- Another silicone, only for plumbing.
- Crosshead screwdriver.
- A hammer drill with a crown.
- Spatula.
- Gas valve.
- Plastic dowels with self-tapping screws.
The first step is to select the area for installation. This is the place under the window. You can place the device a little further from the window due to one or another layout.
- Fitting the convector into place. You can use tape measure and transfer parameters. You can attach the device to the wall and mark the required holes.
- Creating a gas inlet. If it is located at the bottom of the equipment, leave a gap for the pipe to pass to it. Place the clamp fitting on the pipe itself.
- Based on the diameter of the outlet pipe, a hole is created through the wall. Operate the hammer drill extremely carefully and carefully.
- Dust in the room. Before this, all furniture and household equipment are covered with polyethylene.
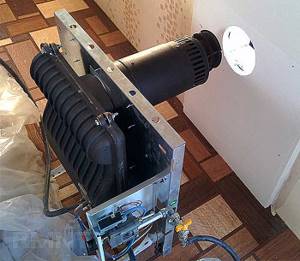
Holes for fastenings are drilled. Dowels are carefully driven into them. The exhaust pipe is inserted into a special hole in the device. The joint area is treated with silicone, which is resistant to high temperatures.
- While holding the device in your hands, place the pipe into the created hole.
- Mount the device on dowels located in the wall - use self-tapping screws.
- Filling any gaps that may arise. Foam is used.
- Protecting the burner from the wind. To do this, a construction cap is strung onto the end of the pipe. It is attached with self-tapping screws.
Calculation of basic parameters: drawing and recommendations
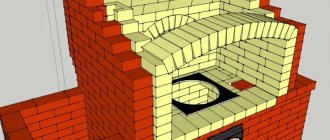
It was previously said that installing a gas stove in a garage with a car is prohibited, but is popular among most owners trying to save on materials. There are many analogues of this stove, in particular, a metal potbelly stove based on gas cylinders.
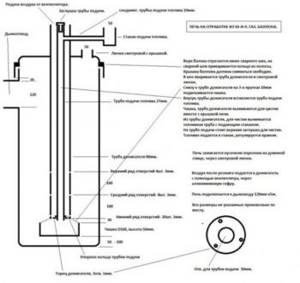
Before creating a furnace, it is necessary to draw in plan what the parameters of the materials should be. They depend on the immediate volume of the gas cylinder. It is necessary to calculate the length of the chimney and the length of the pipe based on the height of the stove.
The classic chimney is made from a pipe with a diameter of 160 mm with a wall thickness of 4 mm; it must be removable for easy access to the chimney system and its cleaning. The chimney is usually placed vertically, but some have improved the stove and began to make a chimney that has several perpendicular fasteners.
A zigzag chimney is installed to preserve heat for a long time and provide the necessary draft.
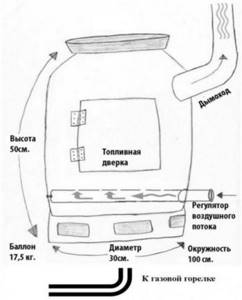
Having a 50-liter liquefied gas cylinder, the overall dimensions of which are 300 mm in diameter, 850 mm in height with a 4 mm metal wall, you can begin to create a heating unit.
The fire box and ash pan are equipped with lockable doors. Materials should be about 300 mm in diameter. In order to separate ash and coals during the combustion process, grates will be needed. They must be made of thick fire-resistant material.
Thick legs made from corners or any other durable material are welded to the stove
It is important to remember that the finished structure must be installed on iron sheets
Required materials and tools
Depending on the type of construction chosen, the set of necessary materials and tools may vary.
Basically, welding a stove from gas cylinders is possible with the following number of devices:
- welding machine;
- angle grinder;
- protective mask for welding;
- gloves;
- a sheet of metal with a thickness of at least 4 mm to create an ash pan;
- 2 doors, cut from the oven wall or purchased separately;
- door fittings - hinges and handles;
- roulette;
- grill made of fire-resistant material;
- metal legs in the amount of 4 pieces;
- pipe branch.
If the stove is gas-powered, then additional materials may be needed to create it.
Preparatory work before assembling the stove
Before assembling a stove from gas cylinders, you need to prepare the materials and the chimney. First, you need to empty the gas cylinder by completely unscrewing the valve. Before cutting off the valve with a grinder and starting to chop other parts of the cylinder, it must be completely filled with water so that it does not explode.
At the moment when the container no longer hisses from the contents, you can heat it up a little. To eliminate the unpleasant odor from the cylinder, it is recommended to fill it with cleaning agent and leave it for a while. When finished, rinse the container with water and soda.
After completing the installation of the chimney, it is necessary to attach an iron sheet of about 600x600 mm to the floor. It is also necessary for the fire safety of the premises.
Making a potbelly stove from a propane gas cylinder with your own hands
By taking two thinner and oblong cylinders you can make a unique long-burning stove. Having chosen the type of design, you can begin manufacturing the stove.
After preparing the materials, using an angle grinder, you need to cut out the doors in the cylinder, as well as a hole for attaching the pipe. Then, using a welding machine, an ash box and a grill made of refractory metal are welded.
By the way, if you have time and materials, you can make a grille from metal reinforcement bars. Once the installation of the “insides of the oven” is complete, the doors are welded and handles are installed.
The final stage of welding is installation of the chimney to the stove
It is important to ensure that the pipe is tightly welded to the stove, but the structure itself is disassembled. This can be done by fastening the chimney pipes with specific locks
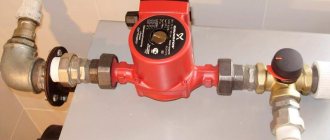
Gas supply
The pipe connected to the convector must go outside. This is a GOST requirement. If it has an exposed thread, you need to screw a gas valve onto it. It will become a special fuse and will block gas from entering the device.
If there is no outlet in the pipe. Create it. Ideally, these operations should be performed by a qualified gas welder.
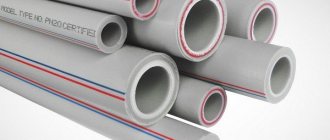
Next, run the pipe to the device. Its material should be metal-plastic. Use a tape measure to determine the length of the pipe. It is important to determine the position of the fittings.
Lay the pipe. Fix the product on the clips in increments of one meter. To install them, there must be more holes in the wall.
Lubricate the fittings and pipe with silicone. This is a measure to enhance sealing.
Test run
Before testing the device, open the gas valve and go over all important areas with a brush. Wet it with soapy water. The important areas are where the fittings and threaded contacts meet.
If swelling bubbles appear, immediately close the valve and eliminate the leak area.
After this, the unit can be turned on: the gas button is pressed for a minute. Fuel follows all pipes to the combustion compartment.
Next, start the piezo ignition - press the corresponding igniter. The spark ignites the gas and a blue flame appears in the firebox.
The situation with a wooden house
Installation of a gas convector in a wooden house and installation features are related to the fulfillment of the following criteria:
- Identify a suitable site for tube insertion. This is influenced by the type of convector placed: on the wall or on the floor.
- Creating a hole through a wall. It does not differ in diameter from the outlet pipe.
- At the third stage of installing a gas convector, dowels are attached to a wooden wall to secure the convector itself. Holes are created in the wall for these tasks. When installed on the floor, they are made in the floor.
- The device must be connected to the outlet pipe. The connection area is sealed with silicone.
- After installing the device, polyurethane foam is used to fill all existing voids.
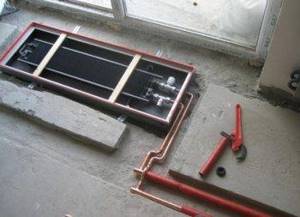
Installation technology
You can install the in-floor convector yourself. All work includes the following stages:
- Preparing a niche in the floor for the box.
- Box installation.
- Heat exchanger connection.
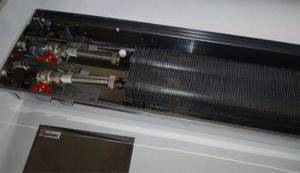
Box installation
The preparation of a niche for the unit body is carried out after the brand of the convector has been determined and the dimensions of its body are known. First, determine the installation location of the unit. The recommended parameters are:
- The distance from the window to effectively blow glass is 5–15 cm.
- The distance from the walls (to the left or right of the heater) is 15–30 cm.
It is more convenient to equip a niche for a convector during the process of creating the floor at the stage of building the building. The depth and width of the niche is made with a margin of 1–1.5 cm. This takes into account the thickness of the future screed and finishing coating. The convector grille must be level with the finished floor.
If the heater is installed in an existing floor covering, it is necessary to remove the finishing layer and measure the distance to the rough base. It may be possible to find a unit whose dimensions will fit into the existing gap. If the distance from the rough base to the surface of the finishing coating is small, it is necessary to consider options for deepening the niche.
The heater tray is attached to the base of the niche through adjustable brackets. The horizontal position of the upper edge of the box is adjusted using the bracket bolts and set so that the grille is level with the finishing coating.
When pouring concrete into the box, it is recommended to use a weight pressing from above and install spacers to prevent its deformation.
Connection to the heating circuit
Electric models simply connect to the wiring. Water convectors must be connected to the heating circuit pipes. Before connection work, the fans must be removed. In most modern models they are attached using magnets or Velcro. The heat exchanger can be connected in two ways:
Flexible connection. Flexible hoses with metal braid are used. This installation requires most convector models that come with flexible hoses. This method is convenient because it is not demanding on the accuracy of the location of the supply pipes. The flexible connection makes cleaning the convector easier, since it is possible to lift the heat exchanger and remove debris accumulated under it. This connection method is suitable for models with natural circulation.
Hard connection. This method is used for installing units with an electronic control system, equipped with a servo drive and a forced ventilation system. A servo drive and a thermostatic valve with a remote sensor are installed on the supply pipe, and a check valve is installed on the return pipe. A rigid connection is made using fitting elements. Supply pipes must be thermally insulated and laid in a screed.
The quality of the connection is checked by hydraulic testing: maximum pressure is applied and checked for leaks.
Models with a fan and an automatic control system are connected to the power supply.
After pouring the screed and installing the finishing coating, a decorative frame is installed and covered with a grille.
Video of how to install the convector:
During operation, the heat exchanger radiator is periodically swept with a brush, and the bottom of the box is cleaned with a vacuum cleaner. Such measures must be carried out at the beginning of the heating season in order to make the heater work as efficiently as possible.