Autonomous power supply systems for suburban properties allow you to live in comfort even far from centralized communications. Often, along with traditional schemes, alternative ones are used, based on the use of solar energy.
In order for the solar system to function correctly, a well-designed solar panel connection diagram is required. You will need a set of high-quality equipment capable of coping with the assigned responsibilities.
We will tell you how to correctly plan the placement of mini-power plant components. You will learn how to select technical devices for assembling the system and how to connect them correctly. Taking into account our advice, you can build an efficient installation.
Manufacturing process
In any photo of a homemade solar battery, you can see that the elements are attached to a common housing, which is necessary and reliable protection for the entire structure.
First, a frame of the required size is made from wood or aluminum, and then transparent glass is glued to it using silicone, on which the plates are laid out, keeping a distance of about 5 mm between each. This is done in order to avoid damage due to thermal expansion of the material.
When soldering contacts, it is necessary to take into account that parallel connection of individual elements increases the output current of the battery, and serial connection increases its voltage.
This way you can achieve the required output parameters. It is necessary to evenly include 4 diodes in the electrical circuit to prevent overheating of the elements and their failure.
A simple solar cell circuit should provide an output voltage of up to 19 volts because the battery (12 volts) is charged when connected to a source with a higher voltage than it itself has. At a minimum, you must have a battery of 36 plates.
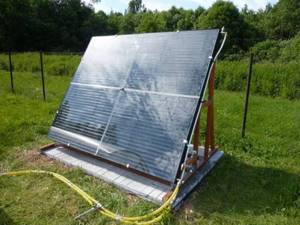
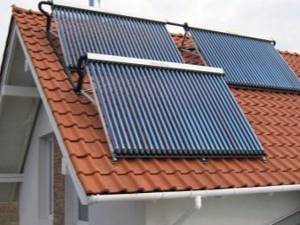
Open solar collectors
An open solar collector is a system of tubes, unprotected from external influences, through which coolant heated directly by the sun circulates. Water, gas, air, and antifreeze are used as coolants. The tubes are either fixed to the supporting panel in the form of a coil, or connected in parallel rows to the outlet pipe.
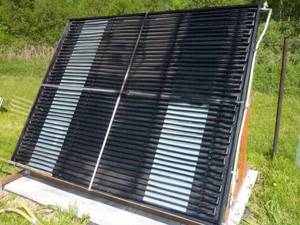
Open solar collectors are not able to cope with the heating of a private home. Due to the lack of insulation, the coolant cools quickly. They are used in the summer mainly to heat water in showers or swimming pools.
Open collectors usually do not have any insulation. The design is very simple, therefore it has a low cost and is often made independently.
Due to the lack of insulation, they practically do not store the energy received from the sun and are characterized by low efficiency. They are used mainly in the summer to heat water in swimming pools or summer showers. Installed in sunny and warm regions, with small differences in temperature of the ambient air and heated water. They work well only in sunny, windless weather.
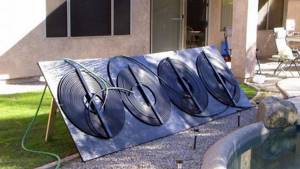
The simplest solar collector with a heat sink made from a coil of polymer pipes will provide the supply of heated water to the dacha for irrigation and domestic needs
Connection features
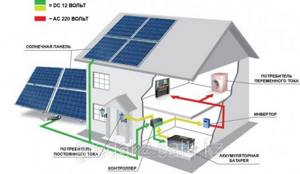
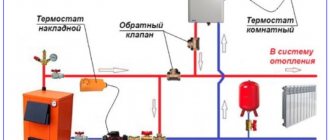
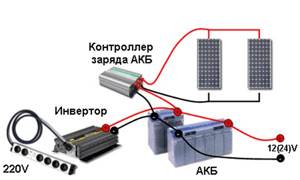
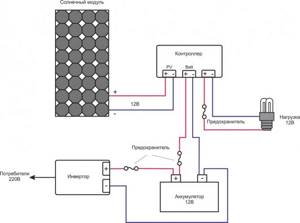
- A solar panel.
- A device that controls charge.
- Battery.
- Inverter.
- Electrical network at home.
This circuit must include short circuit fuses and a light bulb.
, which shows the load level. Fuses are installed on wires with a positive charge in front of the battery, light bulb, inverter.
The light bulb and batteries are connected to the charge controller.
This scheme provides for the presence of one solar panel or several operating with the same load.
Several batteries are connected by one wire, the cross-sectional area of which is always greater than 4 mm². If you plan to install several solar panels on the roof of a house, and some of them will be tilted at a different angle, then the connection diagram provides for a controller for each panel.
Practice has shown:
- Monocrystalline ones are capable of generating current for 3 decades or even more.
- Cheaper polycrystalline ones will work for 20 years.
- Flexible panels have a service life of 7-20 years. Products of the first generation have the shortest “life”, products of the second generation have the longest. The main disadvantage is rapid degradation. During the first 24 months of operation, their power drops by 10-40%.
The modules used in large solar stations were able to operate at the same power for 25 years.
The characteristics stated in the description were fulfilled 100%. This indicates the absence of degradation. Some of the panels reduced output by 10%. Manufacturers guaranteed a 20% reduction in output.
Regardless of the period of use, photosensitive elements never lose their performance. That is, 50 years can pass and they can produce the same amount of electricity. The deterioration of production is affected by the destruction of protective films, which allow moisture to penetrate inside the panel and cause corrosion of all connections. This minus leads to an increase in resistance, excessive heating, and destruction of connections. Batteries can last 2-15 years, power electronics - 5-20 years.
Schematic diagrams of solar panels and options for connecting them to control and converting devices are not very complicated. The practical complexity of the general circuit, with specific values of the characteristics of all elements, lies in the correct calculation of the load, setting up the charging controller and the controller for taking energy from other sources.
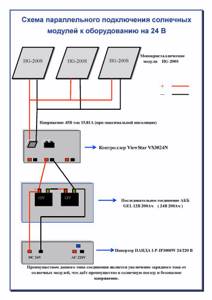
Using the example of the figure, we will consider some of the nuances associated with the multidirectionality of the panels, which leads to different illumination of the panels. In addition, we will consider the types of ABK charging controllers.
Placing several panels in the same plane does not cause any special problems in circuit design and practical connection. Panels placed in different planes, even close ones, work differently. The more illuminated panel (closer to the maximum power point) generates electricity, part of which is used to heat the other panel, because current flows along the path of least resistance.
And there are two ways to avoid these losses:
- Install your own controller on each panel. It makes sense if these are powerful panels (more than 1 kW) or the panels are spaced over a long distance.
- Install cut-off (blocking) diodes. Some manufacturers equip their panels with diodes and provide their place in the junction box. By the way, inside the panel (panel circuit) there are diodes between the modules (plates), which allows you to obtain maximum power and not “heat” the plate with lower performance.
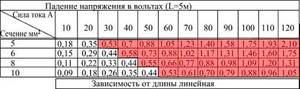
Another little thing that little attention is paid to is the voltage drop in the wires of the low-voltage part of the system and losses in connections. For example, with a cable length of 1 m with a cross section of 4 kW
mm when passing a current of 80 A with a voltage of 12 V, the voltage drop will be 0.383 V (3.19%) or 30.6 W. In “twists” the drop is 0.1-0.3 V.
The red color indicates the mismatch of the transmitted power with the cross-section of the wire, at which strong fire-hazardous heating occurs.
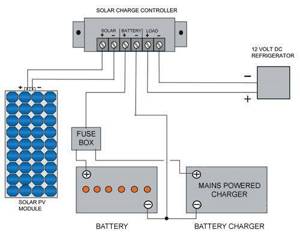
Battery connection
As mentioned above, the batteries are connected to a controller that will control their charge.
On the other hand, they are connected to an inverter, which converts 12V, 24V, 48V to 220V for consumer use. It is also important to observe the polarity of the entire circuit and use a larger cross-section of wire; a cross-section of 3 mm is recommended in this part of the system. You can connect batteries directly to the panels, without using a controller. However, this is not advisable for several reasons, the most important of which is “overheating of the batteries,” that is, excessive uncontrolled charging, which will reduce their service life.
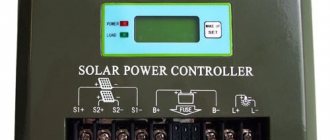
Battery charging controller
The battery charging controller is designed to redistribute the generated electricity. The priority is to keep the battery charged and, when fully charged, to direct the energy to the inverter.
There are two ways to organize charging control:
- PWM (PWM) controller is a device that generates its own measuring pulses with a frequency (about 1 Hz) to monitor the condition of the battery in a wide range of characteristics (pulse wide). Circuit with simple relay logic, i.e. above the voltage on the battery (acid batteries - 16.2 V) - turned off the charging, below - turned it on again.
- An MPPT controller with a processor constantly monitors the position of the maximum power point (MPP) of the solar battery in terms of current and voltage. The other arm of the controller monitors the condition of the battery. The processor compares the data and determines the current and voltage values sent to the battery depending on the charge level.
Both types of controllers provide comfortable battery operation and do not have decisive advantages over each other. The advantage of MPRT is the visibility of its work process and the ability to accumulate information.
Making at home
A complex solar system will require a considerable investment. But all the money spent will be returned in the future. The payback period will vary depending on the number of modules and methods of using solar energy. But it is still possible to reduce initial costs not due to loss of quality, but through a reasonable approach to the selection of solar battery components.
It will be interesting➡ Modular pin grounding - the essence of the process, pros and cons
If you are unlimited in the installation area of solar modules, and you have a decent amount of space at your disposal, then per 100 sq. m you can install polycrystalline solar panels. This will save a considerable amount in the family budget.
Don't try to cover the entire roof with solar panels. First, install a couple of modules and connect to them the equipment that operates on constant voltage. You can always increase the power and increase the number of modules over time.
If you are on a limited budget, you can refuse to install a controller - this is an auxiliary element that is necessary to monitor the battery charge level. Instead, you can additionally connect another battery to the system - this will avoid overcharging and increase the capacity of the system. And to control the charge, you can use a regular car clock, which can measure voltage, and they are several times cheaper.
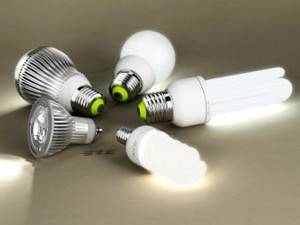
And one important piece of advice: replace all incandescent lamps with modern ones. Ideally, use LED ones - they have much lower power consumption and operate on 12 V.
Operating rules
One purchase and installation will not be enough for happiness - you should definitely familiarize yourself with the rules for using solar energy collection systems and batteries. In order to save energy, the maximum possible transfer of electricity from the solar receiver to the end consumer should be ensured. Batteries should be used exclusively for storing electricity. In this case, the service life will be artificially increased. Protection from shaking and other unwanted influences will serve the same purpose.
The temperature of the batteries should be kept under control. If increased, it may be necessary to add water or additional maintenance. As a result of lowering the temperature, the electrolyte may thicken. Both options can lead to rapid exhaustion and interruptions in work. This means that the owner will face additional costs for unplanned repairs. Deep discharging and charging the device from the solar panel leads to a reduction in capacity. This causes premature failure of the batteries. You can prevent an unpleasant end with the help of modern system components.
Over time, the installed system may need to be upgraded. In this case, you should once again study the technical characteristics of the existing equipment
It is important to understand what can be reused. Faulty and unsuitable elements must be replaced either exactly the same or with corresponding analogues
Do not neglect the possibility of re-equipping and improving the solar system in order to increase efficiency.
To learn how to choose a battery for solar panels, watch the following video.
Battery types
In solar energy, the most popular is the sealed lead-acid battery, produced using 2 different technologies:
- Gelled Electrolite.
- Absorptive Glass Mat.
Gelled Electrolite Technology
began to be used in the late 50s. It consists of adding quaternary silicon oxide to the electrolyte, which promotes the transition of the electrolyte into a gel state. This method makes it possible to achieve absolute tightness of the battery, and the circulation of gases is carried out in the numerous pores of the jelly-like electrolyte. A big plus of gel batteries for solar panels produced using Gelled Electrolite technology is that there is no need to add water during the entire operation.
Absorptive Glass Mat Technology
was developed in the 70s. It involves the use of a porous fiberglass separator filler. It is impregnated with electrolyte and thereby transferred to a liquid-free state. By dosing the amount of electrolyte, we ensure that only small pores are filled, since larger ones are intended for the free circulation of gases. AGM batteries also do not require additional maintenance.
Solar batteries produced using both the first and second technologies have both advantages and disadvantages. You can learn about them in more detail from tables 1 and 2.
Table 1. Benefits
| AGM technology | GEL technology |
| The completely sealed design eliminates the possibility of acid leakage and terminal corrosion, and also allows the battery to be mounted in any position, except upside down. | It is possible to install the battery on the side surface and upside down. They are more resistant to deep discharges. |
| The possibility of explosion and release of gases is excluded, but subject to proper charging. | Stable operation at high humidity and high vibration levels. |
| Stable battery operation at temperatures below -30°C. | Possibility of operation at temperatures above +50°C and below -35°C, as well as near sensitive electronic devices. |
| Increased service life due to increased vibration resistance. | Increased service life due to the use of active material that increases the battery capacity. |
| The time to fully charge the battery is 7 times less than the charging time of a conventional lead-acid battery. | Minimum price in the categories “Price/Number of months of service” and “Price/Number of cycles”. |
Table 2. Disadvantages
| AGM technology | GEL technology |
| Due to the lower quantitative electrolyte content, they have increased sensitivity to excess charging voltage | Compared to classic batteries, gel batteries have worse load characteristics |
Economic feasibility
They order inexpensive equipment made in China on one of the Internet sites.
The main elements of the device include: Special batteries that will absorb light.
To purchase, you need to register and enter the desired query in the search bar. Thus, the photocells become jammed and must be left like this for half a day. The best option is a convector with an output power of 3 kW or more - such a device is able to provide energy not only for lighting a house or apartment, but also for the work of a larger number of other consumers.
If you are interested, then you can read about the voltage relay wiring diagram. Busbar for soldering solar cells.
The panels are connected to each other in series or parallel depending on the required voltage. Connect the photocell to the controller in the same way.
In the diagram below you can clearly see this process. Selecting a Connection Diagram The energy produced by solar panels cannot be supplied directly to any electrical appliances. When assembling a solar power plant, you should keep each device in mind, even if the specific connection does not concern it. The installation process is quite clear and does not require much effort, but many are put off by the high price of the system. Using this panel connection scheme, we can regulate the voltage and current at the output of several panels, which will allow us to select the most optimal operating mode for the entire solar power plant.
Battery charging controller
Among them, solar systems are widely popular. These are maintenance-free and absolutely safe devices that do not emit harmful substances.
An alternative energy source based on solar panels is an excellent option for organizing an independent power supply. It will provide high energy efficiency not only on hot days, but also in cloudy weather. It would be nice to have such a device at home, wouldn't it?
To do this, you just need to correctly select the technical components and carry out installation. Anyone can do this if they know the diagrams and methods of connecting solar panels. We will tell you how to build a productive system that converts “green energy” into electricity needed to power household equipment.
In addition, you will learn how to choose a place to install solar panels and how to combine them with a stationary electrical network. Useful tips and important recommendations will provide effective assistance to home craftsmen. To make it easier to understand, thematic photographs, diagrams and videos are provided.
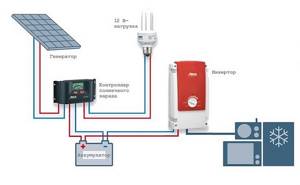
Solar battery and wind generator
Circuits in which different energy sources are adjacent must be based on a common characteristic - the same voltage of the sources, because otherwise, different charging controllers and, possibly, inverters will be required (if the spread in the power of the sources is large), and the circuit of the battery pack allows it to be adjusted to the voltage of the sources.
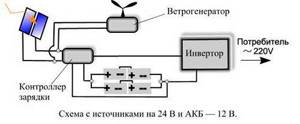
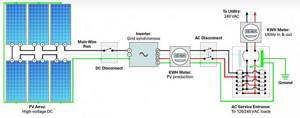
Connecting a source with an alternating current generator with network parameters slightly changes the connection diagram. The figure shows the most common option without a battery recharging unit (controller and transformer with a rectifier, which take energy from an external AC source).
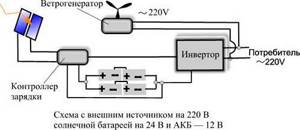
The connection diagram becomes more complicated if the autonomous system is connected to a centralized network. In Russia, situations where a private consumer can transfer excess energy to the grid are not regulated. In addition, switching is not “smooth”, i.e. a voltage drop occurs lasting 0.3-1 seconds depending on the complexity of the switch.
The complexity of the connection diagram increases with the connection of other sources. Here are some questions that have to be considered in complex configurations:
- Coordination of characteristics of sources, control and energy conversion devices,
- System reliability, combined with problems of recycling excess energy.
Our specialists can help in a number of situations. To do this, you can use the site’s services: an online consultant and a feedback form.
An alternative energy source based on solar panels is an excellent option for organizing an independent power supply. It will provide high energy efficiency not only on hot days, but also in cloudy weather. It would be nice to have such a device at home, wouldn't it?
To do this, you just need to correctly select the technical components and carry out installation. Anyone can do this if they know the diagrams and methods of connecting solar panels. We will tell you how to build a productive system that converts “green energy” into electricity needed to power household equipment.
In addition, you will learn how to choose a place to install solar panels and how to combine them with a stationary electrical network. Useful tips and important recommendations will provide effective assistance to home craftsmen. To make it easier to understand, thematic photographs, diagrams and videos are provided.
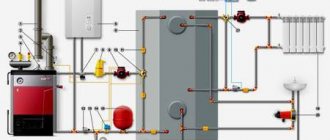
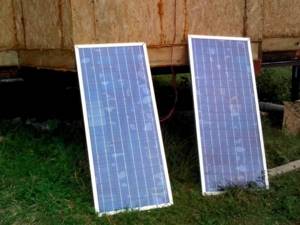
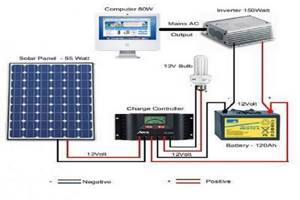
When planning to connect solar panels yourself, you need to have an idea of what elements the system consists of.
Solar panels consist of a set, the main purpose of which is to convert solar energy into electrical energy. The current strength of the system depends on the intensity of the light: the brighter the radiation, the greater the current generated.
In addition to the solar module, the device of such a power plant includes photoelectric converters - a controller and an inverter, as well as batteries connected to them
The main structural elements of the system are:
- Solar battery
– converts sunlight into electrical energy. - A battery
is a chemical current source that stores generated electricity. - Charge controller
– monitors battery voltage. - Inverter
, which converts the direct electrical voltage of the battery into alternating 220V, which is necessary for the functioning of the lighting system and the operation of household appliances. - Fuses
installed between all elements of the system and protecting the system from short circuits. - Set of MC4 standard connectors
.
In addition to the main purpose of the controller - to monitor the battery voltage, the device turns off certain elements as necessary. If the indicator at the battery terminals during the daytime reaches 14 Volts, which indicates they are being overcharged, the controller interrupts charging.
At night, when the battery voltage reaches an extremely low level of 11 Volts, the controller stops the operation of the power plant.
Installation of solar panels and auxiliary electrical equipment
The electrical equipment of the solar station is installed using copper wire. The copper wire cross-section for one panel should be at least 2.5 mm2. This is due to the fact that the normal current density in a copper conductor is 5 amperes per 1 mm2. That is, with a cross section of 2.5 mm2, the permissible current will be 12.5 A.
At the same time, the short-circuit current of the RZMP-130-T panel with a power of 145 W is only 8.5 A. When combining several panels with parallel connection, the cross-section of the common output cable should be selected based on the maximum total current of all panels according to the concept described above (5 A per 1 mm2 ).
There are a variety of cables available for connecting solar panels. Their distinctive feature is that the external insulation of the cable has undergone special treatment and has increased resistance to ultraviolet radiation. It is not necessary to purchase such cables. Solar panels can be connected with a cable with regular PVC insulation, but it should be laid in a corrugated sleeve, which is designed for laying external wiring. This option will cost 30–40% less.
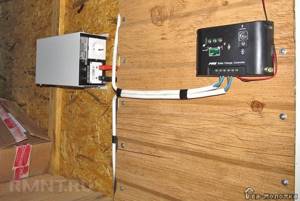
The battery charge controller and inverter must be placed in a dry room at room temperature, for example, in a closet or hallway. It is not advisable to place this equipment outdoors, since the electronic components of the equipment should not be subject to significant fluctuations in temperature and humidity. The battery itself can be placed together with the electronics.
If you decide to use acid or alkaline batteries, you should place them in a well-ventilated non-residential area, since their operation produces harmful electrolyte fumes. In addition, in the room with batteries there should be no sources of spark and fire hazards, since the released oxygen and hydrogen in poorly ventilated areas can form an explosive mixture.
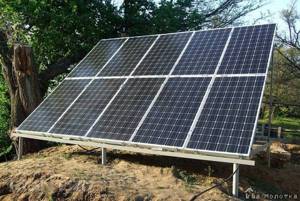
The solar panel can be installed in two ways:
- fixed installation involves permanently placing the panels on the roof of the house or on a bracket attached to a wall or foundation. In this case, the panels should be directed to the south, the horizontal inclination of the panels should be an angle equal to the latitude of the area plus 15°. The latitude of your location can be determined, for example, from the readings of a GPS navigator or in the Google Maps service;
- The movable installation of the panels is carried out on a traverse, which is capable of rotating azimuthally (in the direction of the sun's movement along the horizon) and zenithally, tilting the panels so that the sun's rays fall on them perpendicularly. This installation system makes it possible to increase the efficiency of the solar panels used, but requires additional tangible financial costs for the design of the traverse, drive motors and the system for their control.
How to connect?
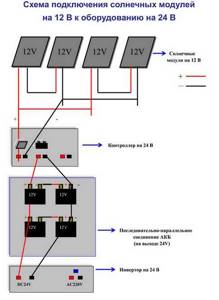
The most important rule for connecting solar storage devices is compliance with all existing safety rules. It is they who are taken as a basis when drawing up current connection diagrams. Most often, when arranging a power supply system based on solar panels, more than one energy storage element is used. This is necessary to increase voltage and capacity.
When connecting solar systems, three schemes are currently used.
- Series connected systems. The capacity in this case is equal to the capacity of one element of the system. The voltage is calculated as the sum of all values throughout the entire chain of elements.
- Parallel connection of the system. The voltage in such a circuit is equal to the value of one of the elements. The capacitance throughout the circuit is summed up.
- Combined battery connection. This option allows you to use the previous two principles.
One of the principles of safe connection is the need to use batteries of the same type: they must have the same capacity, voltage, and age. It is advisable to use batteries from the same manufacturer. They should be installed on racks in case of large quantities. Sequential and combined schemes often lead to imbalance of the entire system. When using both options, it is imperative to use controllers. Once a year in such circuits it is necessary to check the capacity of each component element by charging and discharging. For the same purpose, it is recommended to use special alignment jumpers.
In general, you need to correctly calculate the power of generated electricity. After this, the required number of modules is determined. At the end of all this, we can talk about the preferred type of storage element. One of the strict rules can be considered the ban on installing long-term storage devices in solar systems. However, the lifespan of consumables can be increased.
To do this, you need to constantly monitor the following aspects:
- temperature (the optimal figure is ten degrees Celsius);
- ventilation system (must meet the requirements for the operation of battery storage; it should be used to remove explosive gases);
- capacity (if the calculations are incorrect, the energy supply will stop);
- control of charging and discharging (failure to comply leads to failure and breakdowns);
- maintenance (allows you to detect breakdowns in the early stages).
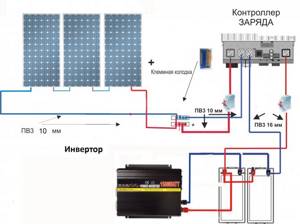
Stages of connecting panels to solar power plant equipment
Connecting solar panels is a step-by-step process that can be done in different orders. Usually, the modules are connected to each other, then a set of equipment and batteries are assembled, after which the panels are connected to the devices. This is a convenient and safe option that allows you to check the correct connection of all elements before applying voltage. Let's take a closer look at these steps:
To battery
Let's figure out how to connect a solar panel to a battery.
Therefore, a controller must be installed between the photovoltaic cells and batteries to ensure normal charging and energy release. In addition, an inverter is usually installed at the controller output in order to be able to convert the accumulated energy into a standard voltage of 220 V 50 Hz. This is the most successful and efficient scheme, which allows the batteries to give or receive a charge in the optimal mode and not exceed their capabilities.
Sometimes a simplified diagram for connecting modules without a controller is used. This option is used in conditions where the current from the panels will certainly not be able to recharge the batteries. Typically this method is used:
- in regions with short daylight hours
- low position of the sun above the horizon
- low-power solar panels that are not capable of providing excess battery charge
When using this method, it is necessary to secure the complex by installing a protective diode. It is placed as close as possible to the batteries and protects them from short circuits. It is not dangerous for the panels, but for the battery it is very dangerous. In addition, if the wires melt, a fire can start, which creates a danger for the entire house and people. Therefore, ensuring reliable protection is the owner’s primary task, which must be completed before putting the kit into operation.
To controller
The second method is often used by owners of private or country houses to create a low-voltage lighting network. They purchase an inexpensive controller and connect solar panels to it. The device is compact, comparable in size to a medium-sized book. It is equipped with three pairs of contacts on the front panel. Solar modules are connected to the first pair of contacts, batteries are connected to the other, and lighting or other low-voltage consumer devices are connected to the third.
First, the first pair of terminals is supplied with 12 or 24 V voltage from the batteries. This is a testing stage; it is needed to determine the functionality of the controller. If the device has correctly determined the amount of battery charge, proceed with the connection.
Low-voltage lamps or other consumer devices powered by 12 (24) V DC are connected to the third pair of contacts. This set cannot be combined with anything else. If you need to provide power to household appliances, you need to assemble a fully functional set of equipment - a private solar power plant.
To the inverter
Let's look at how to connect a solar panel to an inverter.
The process itself is not difficult at all. The inverter comes with two wires, usually black and red (“-” and “+”). At one end of each wire there is a special plug, at the other there is an alligator clip for connection to the battery terminals. The wires, according to the color indication, are connected to the inverter, then connected to the battery.
Related Posts
Light reflection Solar panel ventilation Do not install the bottom side of the solar panels closely, there must be a distance between the panel and the installation plane for air circulation. How to connect a solar battery How to connect a solar battery The question of how to connect a solar battery is solved with the help of elements completing the system. Despite this, we chose solar panels from the Chinese company Suoyang.
How to assemble a small solar power station In order to assemble a small solar power station, you will need: Solar battery; The battery is preferably sealed if you plan to install it indoors; Inverter for converting electrical voltage 12V to V; Fuses for short circuit protection are desirable; Set of MC4 connectors for connecting a solar battery to the controller. In this case, you need to know the three main types of solar panel connections.
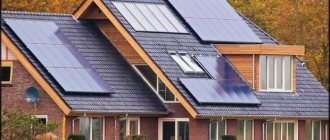
When solar panels are placed on the roof, the panels can completely cover the slope or occupy a small part of it - there are no specific rules, so what width and length the frame will be is chosen by the assembler himself. The efficiency of the panels directly depends on their correct orientation relative to sunlight.
This design is available for sale in the following versions: inclined - such systems are optimal for installation on a pitched roof; horizontal - this structure is attached to flat roofs; free-standing - batteries of this type can be installed on roofs of various types and sizes.
When designing this installation option, it is worth taking into account two types of load: non-redundant - light in the house, household appliances, etc.
Follow the sequence of connecting the elements of the solar power plant to avoid damage to the controller. The main thing is to remember two rules, without which energy consumption will be impossible. Solar panels. Green tariff. Part 4. Network inverter.
How to connect solar panels to make the most of the capabilities of all elements
Mixed backup connection scheme. They will depend on the dimensions of the panels themselves and their quantity.

Now there's just a little bit left to do. With the same characteristics, the next type of panels - thin film - will require a larger area for installation in the house. Of course, at your own risk, you can connect the panel directly and the battery will charge, but such a system must be supervised.
If the house is located in the shade of other buildings, then installing solar panels is only advisable only polycrystalline ones, and then the efficiency will be reduced. In all cases there should be no shadows. Natural airflow of the battery will help solve this problem. All these factors must be taken into account when choosing an installation location and installing panels according to the most convenient option.
Of course, at your own risk, you can connect the panel directly and the battery will charge, but such a system must be supervised. This is interesting: Many of the standard radio components can also generate electricity when exposed to bright light.
At this stage, it is important not to confuse the back of the panel with the front. This is the most important point, since whether the panels are in the shade of other buildings or trees will determine their productivity, and therefore the amount of electricity generated
When connecting several panels in series, the voltage of all panels will add up. The frame is assembled using bolts with a diameter of 6 and 8 mm. There will be no change in voltage in this case.
A mixed connection scheme is often used. It turns out that properly installed solar panels will work with the same performance in both winter and summer, but under one condition - in clear weather, when the sun gives off the maximum amount of heat. To avoid damage, it is recommended to fasten photocells on the long side, choosing the method individually: bolts are fastened through the holes of the frame, clamps, etc. It can be secured with a thin layer of silicone sealant, but it is better not to use epoxy resin for these purposes, since you can remove the glass if necessary It will be extremely difficult to carry out repair work without damaging the panels. Solar panels. How to make a cheap and efficient solar power plant. Connection lifehack
Solar Power Kit
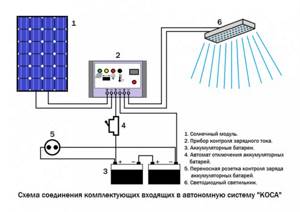
Typical solar power plant kit This equipment is used in small solar systems that can be used for home or garden purposes. Required components include:
- Solar panels or batteries can be monocrystalline or polycrystalline. Read about the differences and which ones to choose here.
- Inverter - what it is for and how to choose it, read this article.
- Connectors for solar panels - designed for quickly connecting wires to panels. If your budget is limited, you can use soldering, but this connection is much more convenient.
- The cable uses single-core copper in double insulation, resistant to any weather conditions, cross-section from 1.5 mm.
Optional components that do not necessarily have to be in the system and are installed for certain tasks:
- Rechargeable batteries - there are several options, which one to choose is described here.
- Battery charge controller.
- A reverse electricity meter is installed if you want to sell electricity. In some countries there is a so-called “green tariff”, which allows you to earn money by doing this.
Important battery characteristics to consider
• Rated voltage of panels – 12V or 24V. • Maximum voltage at peak power Vmp
• Open circuit voltage Voc – voltage produced by the panels without load (important when choosing a battery charge controller). • Current Imp – current at maximum panel power in A
Design and principle of operation
Figure 1 – General view of the solar battery.
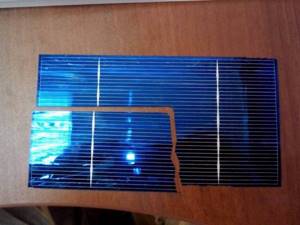
The main components of a solar cell are photovoltaic cells made from wafers of silicon. The panel consists of an aluminum frame into which tempered, impact-resistant, ultra-clear glass is inserted. Cells are placed on the glass in the form of a matrix, which are connected in series by soldering. A general view of a solar battery is shown in Figure 1, and a typical connection diagram of its cells is shown in Figure 2. The number of cells may vary depending on the required power. As a result, the assembled battery has two terminals - “+” and “-“. Next, this set of cells undergoes encapsulation, that is, it is carefully sealed with a special film or filled with a two-component compound - a substance similar to epoxy resin.
Under the influence of light, a potential difference arises on silicon elements, which is ultimately summed up, since the cells are connected in series. The voltage of the solar panel will vary depending on the light intensity. To effectively use the generated electricity, the solar battery must be correctly connected to the interaction circuit with other devices.
Specifications
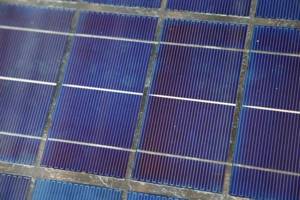
The main element of each solar battery is a photovoltaic converter.
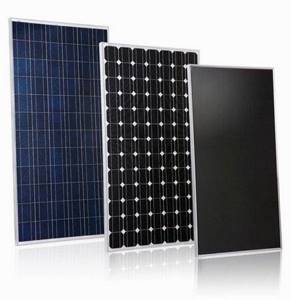
There are three types of silicon cells used in mass production.
- Monocrystalline - artificially grown silicon crystals are cut into thin wafers. The module is based on purified pure silicon. The surface is more like a honeycomb or small cells that are connected to each other into a single structure. The finished small plates are connected to each other by a grid of electrical conductors. In this case, the production process is more labor-intensive and energy-consuming, which is reflected in the final cost of the solar battery. But monocrystalline elements have greater performance, and the average efficiency is about 24%. Monocrystalline batteries have a longer service life; they last on average about 30 years.
- Polycrystalline - based on silicon melt. Such modules are considered the optimal solution for a residential private country house. Several silicon crystals are combined into one solar cell. The surface of a polycrystalline solar cell has a non-uniform surface, which is why it absorbs light worse. And the efficiency, accordingly, is lower, within 20%. The service life of a polycrystalline panel is 20-25 years. They have a characteristic difference - a dark blue coating color. Such modules are cheaper than analogues, which allows you to pay for the entire system in about 3 years.
- Thin-film - have a flexible substrate, which allows you to mount the battery on any surface with corners and bends. A thin layer of semiconductors is sputtered onto the surface of the battery. Such systems have an obvious drawback - low efficiency. Productivity averages about 10%. That is, to provide energy to a home, you will need twice as many thin-film batteries as polycrystalline batteries. And the service life of such panels is shorter than other analogues - on average, the service life is about 20 years.
It will be interesting➡ IP68 protection level in smartphones and watches?
Ideally, solar panels can fully supply the house with electricity. But quite often, solar energy is used for hot water supply or heating. But to achieve any of these goals, it is necessary to calculate the actual power per square meter and the required number of modules. The power of a solar module depends on the amount of sunlight that hits the surface of the battery. To make the right choice, you should also study the operating principle of a home mini-power plant.