Niche for a convector built into the floor - device
The easiest way is to make a niche on the ground floor in the earthen floor.
- The niche must be covered with a layer of waterproofing. Moreover, the waterproofing of the niche must be combined with the waterproofing of the main floor.
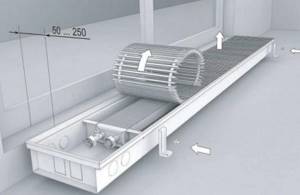
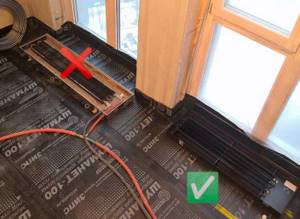
- The size of the niche should match the size of the radiators. There must be a distance of at least 100mm from the walls of the niche to the edges of the radiator. The distance from the edge of the niche to the window should be 50-250 mm.
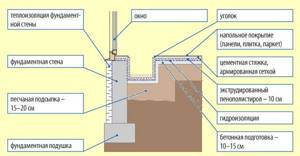
- The general design of the niche for the radiator is clearly visible in the figure. This is a diagram of a niche for a radiator on the first floor of a house.
- If a niche needs to be made on the second and third floors, it is necessary to provide for lowering the floor beams to the required height.
- The niche can be plastered, but it must first be insulated. It is better to use polystyrene foam. This is a rigid insulation that will further strengthen the niche. Insulation will reduce heat losses due to unnecessary floor heating.
- It is better to make the “trough” of the niche itself from galvanized steel. It will additionally serve as a heat reflector. You can cover the niche (instead of steel, with ceramic tiles).
- The edges of the niche need to be trimmed with a corner for laying a decorative lattice.
General tips for installing a convector after installing the final flooring
Such situations may arise during construction work; the installation location of the convector should be provided during the installation of the flooring and heating system. The dimensions of the recess must correspond to the dimensions of the housing with a margin of 2–3 cm around the perimeter; the length of the plastic pipe outlet must guarantee trouble-free connection of the device. They are always made with a reserve, the excess length is then cut off.
Installation diagram of convectors, indicating the dimensions of the niche for equipment
It is recommended to install the convector at a distance of no more than 30 cm from the window, otherwise the double-glazed windows may fog up - warm air will not heat their surface. The thickness of the thermal insulation layer under the convector body should be adapted to the overall height of the finishing coating; it is advisable to use the same thermal insulators as under the main floor surface.
Most convectors have a right-hand standard connection, but you can change it yourself or, at the time of purchase, select the type that matches the existing wiring. Place the fans in the housing on the side of the window or doorway; they should capture cold air. Due to this placement, the efficiency of the device increases and the microclimate in the room improves.
It is imperative to connect the Mayevsky tap to the heat exchanger; it is located at the coolant inlet. The Mayevsky tap allows you to vent the convector; failure to perform this operation may cause the device to malfunction.
The power connection is carried out according to the diagram, and the fan rotation speed can be changed with a potentiometer. After completing the electrical installation, all open connections must be covered with special sealed covers. Make sure that the rubber gaskets do not have mechanical damage. Mount the controller to the wall at a height of approximately 1.5 m from the floor, this position is convenient for use.
Video - Installing a convector
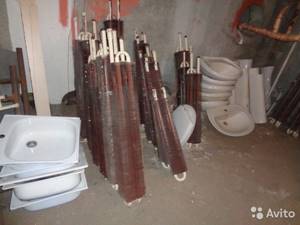
A homemade niche for a convector built into the floor is often made in private houses during their construction. A homemade niche allows you not to buy ready-made heating ducts, but to assemble a heating system built into the floor from standard radiators.
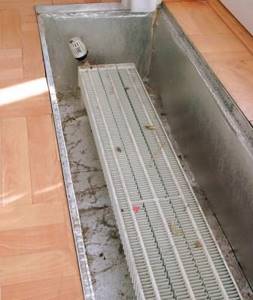
Installation of radiators in a niche
We are considering the simplest convector built into the floor. This is a convector with natural circulation. The niche for the convector built into the floor is already ready, let's start installing the heat exchanger.
The coolant moves through a two-pipe heating system. It is supplied by one pipe, and by the second pipe it is removed from the radiator. A thermostat with a Mayevsky tap is installed at the input, and a shut-off valve is installed at the output. Everything is the same as when installing radiators on a wall, only in a horizontal plane.
The four-pipe heat exchanger is connected as in the photo, with a snake.

The system is tested at 25 bar. Working pressure does not exceed 15 bar. For the coolant, you can use antifreeze or other artificial “anti-freeze” coolants.
This topic has 15 replies, 6 participants, last updated by Alex_bdr 30 Aug'17 at 04:27.
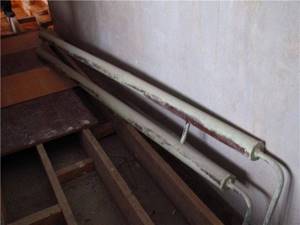
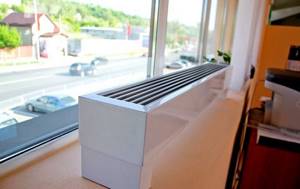
Gentlemen, urgent question: there is a 2-story residential building. Until now, only the first floor was heated. Electric boiler + aluminum radiators. It is urgent to turn on the heating on the 2nd floor. The power of the electric boiler is enough. But on the second floor there are floor-to-ceiling windows - and the price tag for convectors built into the floor is absolutely inadequate. I'm interested in the possibility of installing ordinary Sovdepov steel convectors without a decorative screen in a prepared niche on an entire wall with windows. The confusing thing is that they are designed for mains heating at high temperatures. At the same time, the rooms are 18 square meters. there was a 1.5 m convector. I am planning for 18 sq. m. install a 3 m convector along the wall. Will the heat transfer on the second floor be sufficient compared to the first when using one boiler, or is a separate boiler needed? Convectors are planned as in the picture
I’m on the phone, so I don’t want to write a lot about the pros and cons and features of this solution, I’ll just share an idea that, in my opinion, has more life... Let’s take a square pipe. Or better yet, rectangular. The bigger, the better. We jam it on both sides, make inserts and install it in the floor. There is a flight of fancy depending on the aesthetics and design of the CO. Can be monolithed into the floor, with a wide surface level with the floor. But then everything is welded and with thermal pads. The result is an inertial heating device. If it is the end of a single-pipe, then you can actually cut it directly into the main line. Anyway, further nuances... Oops... this scheme is only for the French. The rest is classic...
If you have panoramic windows, then in any case you need to install in-floor convectors. Reviews indicate that to create a powerful thermal curtain, you need to use radiators with forced convection. They are available in different lengths; you need to select a slightly smaller one than the window opening.
Homemade heating batteries
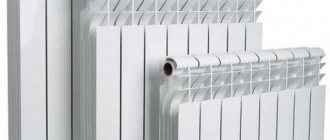
Despite the huge range of heating radiators on the market, for dachas, garages and small houses it is more economical to use homemade heating radiators, which will cost much less.
Such batteries can be made from round pipes, and from square or rectangular pipes. This design is called a heating register. The principle of operation of the register is similar to that of . The coolant heats the metal of the register, and it heats the air in the room. There are two types of homemade heating devices - homemade heating radiators made from round or rectangular pipes. Homemade registers made from rectangular pipes are more compact, they are easily hidden in the interior and have proven themselves well in operation.
Registers made of round pipes are divided into two types:
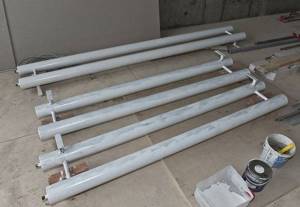
- sectional registers;
- serpentine registers.
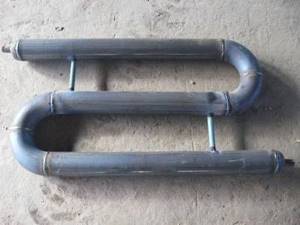
These devices are made from pipes of different diameters and differ in structural geometry. In sectional registers, large-diameter pipes are arranged in parallel and connected to each other by a pipe of a smaller diameter, and in coil registers, a large-diameter pipe can have several bends. After production, the registers must be subjected to high pressure testing. Test pressure - 13 atmospheres.
Types of in-floor radiators
Let us immediately note that the installation of in-floor convectors in a screed does not depend in any way on its type. In this case, the operating principle of different heat exchangers is different. There are two main differences - this is the method of air circulation:
Convector design with natural circulation.
Radiators with natural circulation are a copper collector made of two pipes with aluminum fins, which are placed in a metal trough. In such batteries, air moves due to temperature differences. As you know, hot streams are lighter than cold ones, so they rise upward.
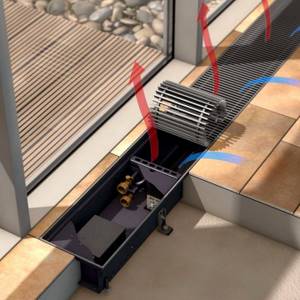
In convectors with forced circulation, air moves due to the operation of a built-in tangential fan. It looks like a wheel with curved blades. It works quietly, but there is still some noise. Trench convectors with a fan are connected to the electrical network and have a control unit with a thermostat installed.
Advantages
The positive aspects of such a heater include:
- Economical, quick heating of the room.
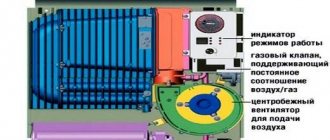
- Easy installation, the ability to install a gas convector with your own hands.
- No need for water heating.
- Reasonable price.
- Unlike an electric appliance, a gas appliance does not burn oxygen.
- Autonomous operation mode.
- No connection to the power grid.
- Possibility of connecting the device to a gas cylinder.
Manufacturers of trench convectors, prices
The Russian market offers a fairly wide selection of trench convectors. According to reviews, the following radiator models are especially popular:
Before installing heating pipes in a private house, you need to draw up a project, preferably supporting it with hydraulic calculations.
You will find rules for replacing heating pipes in an apartment building here.
The price range is quite significant. You can find heat exchangers for 6 thousand rubles. Prices for branded products reach 60 thousand rubles. Naturally, the quality of materials also depends on the cost. The grille can have an anodized coating that does not wear off over time. Expensive models have a stiffer trough. This extends the service life and simplifies the installation of in-floor convectors.
The cost of the heat exchanger should also include additional costs for fittings for piping. It is likely that fasteners will also be required - in cheap models the fasteners are not feminine enough. We wrote about how to choose fittings for piping a radiator in a water heating system here.
Spaces from windows and walls
The location of the in-floor convector to a window with natural convection is universal, the convector can be connected to the left side and to the right side, it can simply be turned around, since the heat exchanger is located in the middle. If the heat exchanger is closer to the edge of the convector, then place it so that the heat exchanger is closer to the room.
The location of an in-floor convector to a window with forced convection is considered by default to be a left-side connection; if the convector needs to be connected to the right, this must be indicated in the order when purchasing. At the manufacturer's factory, exits are made for the right side. The heat exchanger should be located on the window side.
Recommendation 2: Spaces from windows and walls | Recommended dimensions for the location of the in-floor convector relative to the room itself and the panoramic window where it will be installed. Manufacturers recommend 5-20 cm away from the window for effective circulation of cold and heated air; 10-20 cm indentations to the left and right of the walls, if any, so as not to expose wall coverings (wallpaper, plaster, etc.) to heat. and of course for ease of battery installation.
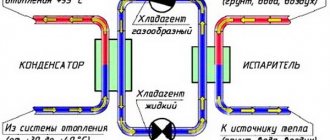
Operating principle in 2 and 4 pipe systems
Installation of in-floor convectors can be carried out in two-pipe and four-pipe circuits. In the first case, the heat exchanger works only to heat the room, and in the second - for heating and cooling. With heating, everything is simple; in this case, the convector is connected and works in the same way as any other battery. When purchasing, you need to pay attention to the characteristics; they indicate the ability to work with antifreeze. In two-pipe heating systems, the coolant can be water or propylene glycol (anti-freeze liquid).
The operating principle of a convector with forced ventilation.
In order for the floor convector to operate in two modes (heating and cooling), it must be connected to:
- water heating system;
- fan coil unit
A fan coil is a unit that produces cold according to the principle of an air conditioner. In this case, the heat exchanger built into the floor will act as a chiller. The difference between a chiller-fan coil tandem and split systems is that the working substance is not freon, but water. This is what allows you to install an in-floor convector on two systems at once. Naturally, it can only work in one of the modes at a time.
Brief list of manufacturers
To make your choice easier, we suggest familiarizing yourself with the most well-known manufacturers of convectors; their products have positive reviews from numerous consumers.
| Brand name | Technical specifications |
| Manufactured in Poland, can be with natural or forced convection. The thickness of the aluminum radiator plates is 0.22 mm, the steel frame is coated with zinc-magnesium. The diameter of the main copper tubes is 15 mm, body dimensions are from 100×50 mm to 200×100 mm. It is equipped with aluminum, wooden or stainless steel gratings. | |
| They can be with or without fans, the depth of the box is 18–35 cm, the width is 9–20 cm. It is used as additional heating of the room, installed near entrance doors and stained glass windows. The small installation height allows the devices to be mounted on thin interfloor ceilings. | |
| German convectors for in-floor installation. They can have radial and tangential fans, and there are electric heating options. Depth 7–19 cm, width 18–41 cm. A wide range of models makes it possible to increase the scope of use of the equipment. Maximum pressure 16 atm., working pressure 10 atm. They can function in one- and two-pipe heating systems. | |
| The box is made of galvanized steel, width 14–42 cm, depth 6–19 cm. Manufactured in Belgium, small dimensions significantly expand the scope of use. They can have natural or forced ventilation of the heat exchanger. Service life is at least 30 years. | |
| Hi-End devices operate with forced or natural ventilation. Manufactured in Germany, the company was founded in 1972. Depth 9–20 cm, low noise fans. The heat exchanger has aluminum fins and can withstand temperatures up to +120°C. | |
| Produced in the Czech Republic, they have a reduced height (from 5 cm), which allows the devices to be installed on thin flooring bases. The box is made of stainless steel. They have a wide selection of decorative grilles. | |
| During manufacturing, the most modern technologies are used, due to which the efficiency is significantly increased. Convectors are manufactured in Germany, the frame is made of powder-coated galvanized steel. Width 10–42 cm, depth 8–20 cm. A wide range of sizes allows consumers to choose the best option, taking into account the size of the room and the specific installation location. There are options with natural and forced ventilation of the heat exchanger. | |
| The devices are manufactured by a domestic company, the casing is made of galvanized steel, there are options with and without fans. Depth 7–19 cm, width 20–40 cm. Heat exchanger tubes are copper, aluminum lamellas. The thickness of the lamellas is 0.5 mm, the diameter of the tubes is 16 mm. Designed for working pressure 15 atm., pressing pressure 25 atm. There is manual or automatic control of operating modes. | |
| They are widely used in Europe and our country, the casing is made of galvanized steel, and electric heater options are available. They can work both for heating and cooling a room with natural or forced convection. Depth 9–20 cm, width 14–37 cm. | |
| The manufacturer is a Polish company; they may have one or two heat exchangers, which increases heating performance. Housing made of alloy sheet steel, depth 7–34 cm, width 18–38 cm. Tube diameter 22 mm, coolant temperature up to +90°C, operating pressure 10 atm. |
Each company produces a wide range of equipment according to technical characteristics, which makes it possible to find the most suitable convector option, taking into account the maximum number of different factors.
Violation of installation technology can cause troubles during operation of convectors. Particularly big problems arise when convectors with water coolant break down. It is for this type of device that we will give step-by-step instructions. For installation you will need a set of keys and sealing thread. You need to start work by assembling the heat exchanger. The prerequisite is that the final floor covering has not yet been installed.
Installation and piping of batteries in the floor
The difficulty in installing an in-floor convector with your own hands is that its grille is flush with the floor covering. Therefore, it is extremely important to accurately align the heat exchanger trough with the water level. At the same time, it is necessary that it stands rigidly, because people will walk on the grate. Installation is carried out in a cut-out niche; a screed is poured around the perimeter. Filling nuances:
- stick damper tape around the perimeter of the body;
- Do not remove the grate until the solution has completely hardened.
The convector grille must be level with the floor.
The damper tape compensates for the thermal expansion of the screed and dampens possible vibrations from the fan. It is extremely important that the grille is inserted into its seat. During hardening, the screed may deform the trough and the grate will no longer fit there at all.
The case has holes for several connection options, which mainly depend on the position of the radiator relative to the circuit. In principle, the simplest piping option is to install conventional ball valves on the supply and return. Ideally, faucet handles should face down so that they are not visible through the grille. Also, some convectors do not have enough trough height to install shut-off valves with the handles up.
If the electrodes for welding heating pipes are damp, they cannot be used, at least until they dry.
Here we compared pipes for heating a private house.
The piping method described above is not suitable if you have a long heating system with several branches of different lengths. In this case, for proper operation of the circuit, balancing will be required, and for this there must be a balancing valve on the radiator return. In addition, ball valves do not make it possible to regulate the degree of heating of the battery, which is very useful. Therefore, you need to install a thermostatic valve on the supply, preferably in tandem with a thermal head or servo drive.
Which one to choose
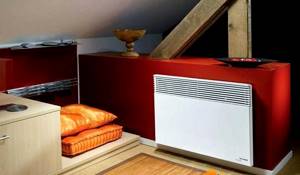
At the very beginning of the article, we already said that wall-mounted heating convectors have been and remain popular among consumers. This type of equipment takes up little space and can be easily placed and securely fixed on a suitable vertical surface. The thermal curtain created by the heater is quite powerful, and in the interior the device looks harmonious, without standing out from the general background.
Floor-standing models are good because they reliably “travel” with the owner to any room he needs. Like the previous type of devices, they do not require complex installation and various unpleasant “bonuses” in the form of permission from the relevant authorities.
If you have an urgent need to purchase climate control equipment, but you haven’t been able to specifically decide on its location, we advise you to pay attention to universal convectors, which can be equally successfully placed on both vertical and horizontal surfaces

A convector for heating a house with a large area or large windows (from ceiling to floor), or too many of them, cannot be wall-mounted and cannot be purchased in a single copy. Another solution is needed here. The most correct thing is to install in-floor built-in convectors. But you need to think about this type of heating in advance - even at the stage of building a house and arranging the floor, since destroying not only the floor covering, but also the lower layers of the floor to install a convector is too long and dirty work.
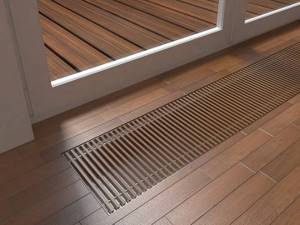
Visually, built-in convectors look like a neat decorative grille from which heated air rises - no wheels, no hinges on the walls. There is no convector, but the heat from it is not just present, but very noticeable.
Built-in heating devices can be hidden anywhere – not just in the floor. Skirting convectors are in great demand among consumers. Such models in the field of convector heating systems have become a real rage, since they are even more invisible than in-floor ones. Stylizing as a plinth allows you to save not just the maximum usable area, it saves all of it. And the question does not arise: how much heat can such a small device provide? On this score, the consumer should be calm - the heat will be quite sufficient for a given area. But there is one “but” - these powerful “babies” are not included in the low and even middle price segment. To provide yourself with “invisible” heat without overpaying for a climate control device, you need to look for devices among the products of domestic manufacturers; they are several times cheaper than imported ones.
Advantages and disadvantages of trench convectors
Nowadays it is fashionable to install panoramic windows. Most of the heat leaves the room through the glass, and in the same way cold enters the room. This is why batteries are mainly installed under the window - to create a thermal curtain. Only in-floor convectors are suitable for panoramic windows. The dimensions must be selected so that the heat exchanger covers the entire opening.
The main advantage is that they create a thermal curtain for panoramic windows and do not spoil the view.
The disadvantages include the convection heating method, an integral part of which is air circulation. At the same time, all the dust collected in the battery trough is carried away. In fact, it is very harmful. Constantly staying in a dusty room can cause respiratory diseases, including asthma. Therefore, do not forget to clean the heat exchanger and the more often the better. To do this, just lift the protective mesh and remove all debris with a vacuum cleaner.
What do you need to install a convector with your own hands?
- Drill and drill bits for it.
- Pipe cutter
- Adjustable wrench, wrenches.
- Hammer.
- Spatula.
- Gas tap.
- Silicone (high temperature, plumbing).
- Screwdriver.
- Self-tapping screws, dowels.
Important! First, you need to choose the place where the convector will be located. Don’t be lazy to study GOST, according to which the heater will be located under the window. All surfaces and furniture need to be covered with textiles, since the work ahead will be quite dusty.
Niche for a convector built into the floor - device
The easiest way is to make a niche on the ground floor in the earthen floor.
- The niche must be covered with a layer of waterproofing. Moreover, the waterproofing of the niche must be combined with the waterproofing of the main floor.
- The size of the niche should match the size of the radiators. There must be a distance of at least 100mm from the walls of the niche to the edges of the radiator. The distance from the edge of the niche to the window should be 50-250 mm.
- The general design of the niche for the radiator is clearly visible in the figure. This is a diagram of a niche for a radiator on the first floor of a house.
- If a niche needs to be made on the second and third floors, it is necessary to provide for lowering the floor beams to the required height.
- The niche can be plastered, but it must first be insulated. It is better to use polystyrene foam. This is a rigid insulation that will further strengthen the niche. Insulation will reduce heat losses due to unnecessary floor heating.
- It is better to make the “trough” of the niche itself from galvanized steel. It will additionally serve as a heat reflector. You can cover the niche (instead of steel, with ceramic tiles).
- The edges of the niche need to be trimmed with a corner for laying a decorative lattice.
Deciding on the location for installation
The quality of operation of the in-floor convector depends on the chosen location. Silence, speed, power, efficiency - these factors are fundamental. The distance from the window or wall should be at least 8 cm and no more than 35 cm. The fan should be placed in relation to the window so that air flows are drawn in and used to heat the room. Air flows can be divided into two types: large and small. The large one is directed in the direction of the heat exchanger, and the small one is directed in the direction of the fan. The convector will work for heating when the fan is directed towards the window to draw in air. To remove condensation from windows, the fan must be located in the center and the heat exchanger in relation to the window. This will allow you to heat the room with a smaller flow and blow the window with a larger flow.
Installation of an in-floor convector: choosing the type of pipes
Expert advice: install pipes made of the same material as those present in the room. This will allow you to achieve better hydraulics in the system.
Pipes connected to the convector can be from:
- Cross-linked polyethylene - installation is carried out using a press tool.
- Polypropylene - requires a special soldering iron and adapters.
- Copper - requires a special heating pad and solder, angles and fittings.
- Steel - requires a welding machine and electrodes.
Installation of radiators in a niche
We are considering the simplest convector built into the floor. This is a convector with natural circulation. The niche for the convector built into the floor is already ready, let's start installing the heat exchanger.
The coolant moves through a two-pipe heating system. It is supplied by one pipe, and by the second pipe it is removed from the radiator. A thermostat with a Mayevsky tap is installed at the input, and a shut-off valve is installed at the output. Everything is the same as when installing radiators on a wall, only in a horizontal plane.
The four-pipe heat exchanger is connected as in the photo, with a snake.
The system is tested at 25 bar. Working pressure does not exceed 15 bar. For the coolant, you can use antifreeze or other artificial “anti-freeze” coolants.
If you have panoramic windows, then in any case you need to install in-floor convectors. Reviews indicate that to create a powerful thermal curtain, you need to use radiators with forced convection. They are available in different lengths; you need to select a slightly smaller one than the window opening.
Why convectors
Energy conservation and cost savings during the heating season are at the forefront of the tasks of each homeowner. Nowadays it is not a shame to save, but it is fashionable and correct, and it is also important to use the experience of European countries, where utility bills are many times higher than ours, and where, due to the high cost, they have learned to find alternative sources of heat.
Such alternatives also include electric heating convectors, reviews of which from our fellow citizens are positive in most cases.
People call the first and main advantage of a convector a significant reduction in heating costs: 30-40 percent - this, you see, is a significant indicator.
Next: ease of installation and ease of use.
Also: fits into a modern or classic interior.

Convector heating is widely used in country houses, if the room was intended as a summer one, or if it is not possible to install a stationary system. Compact heaters perfectly serve as both an additional and a main source of heat, since in active mode they are able to continuously create a flow of heated air that will provide the room with comfortable warmth. And in order to save energy and not “drive” the convector in vain, there is a timer that turns off for a while when the air reaches a certain temperature.
Another advantage of convector heaters is local action and mobility. Moving a heat source to a room that is considered the coldest, or “carrying” it along with you - isn’t this the dream of every heat-loving person? So: it is easy to implement if you have a convector on wheels in your house.
Types of in-floor radiators
Let us immediately note that the installation of in-floor convectors in a screed does not depend in any way on its type. In this case, the operating principle of different heat exchangers is different. There are two main differences - this is the method of air circulation:
Convector design with natural circulation.
Radiators with natural circulation are a copper collector made of two pipes with aluminum fins, which are placed in a metal trough. In such batteries, air moves due to temperature differences. As you know, hot streams are lighter than cold ones, so they rise upward.
In convectors with forced circulation, air moves due to the operation of a built-in tangential fan. It looks like a wheel with curved blades. It works quietly, but there is still some noise. Trench convectors with a fan are connected to the electrical network and have a control unit with a thermostat installed.
The battery can be heated by the coolant liquid or by means of a heating element inserted into the collector tubes. Separately, it is worth highlighting universal in-floor convectors. In the photo above you can see that in appearance they do not differ from ordinary ones, the difference lies in the design of the collector. These heat exchangers can operate both in a two-pipe heating system and in a four-pipe system, which we will talk about a little later.
Water convector
Not so common among the consumer audience due to the complexity of installation and high cost. But if you have enough money for this type of heating, do not give it up in favor of others, since water heating convectors will serve as an excellent upgrade to your outdated heating system: the unit can be connected to supply pipes of any diameter and made of any material.
A water installation is not a dismountable device, it is a unit that functions as part of an autonomous heating system for an apartment or house.
Advantages of a water convector:
- compactness;
- light weight;
- heating rate;
- safety.
Flaws:
- high price;
- labor-intensive installation process.
Operating principle in 2 and 4 pipe systems
Installation of in-floor convectors can be carried out in two-pipe and four-pipe circuits. In the first case, the heat exchanger works only to heat the room, and in the second - for heating and cooling. With heating, everything is simple; in this case, the convector is connected and works in the same way as any other battery. When purchasing, you need to pay attention to the characteristics; they indicate the ability to work with antifreeze. In two-pipe heating systems, the coolant can be water or propylene glycol (anti-freeze liquid).
The operating principle of a convector with forced ventilation.
In order for the floor convector to operate in two modes (heating and cooling), it must be connected to:
- water heating system;
- fan coil unit
A fan coil is a unit that produces cold according to the principle of an air conditioner. In this case, the heat exchanger built into the floor will act as a chiller. The difference between a chiller-fan coil tandem and split systems is that the working substance is not freon, but water. This is what allows you to install an in-floor convector on two systems at once. Naturally, it can only work in one of the modes at a time.
Choosing your unit
What should we teach you about choice, dear reader, if you yourself know perfectly well the standard set of conditions?
Desires must correspond to possibilities - no one has yet canceled this rule.
Experts advise paying attention to the brand of the product and the obligatory visual “fitting” of the future purchase to suit your interior and the size of the room - you will not be happy with an inexpensive purchase if you notice that the floor heating convector (aka mobile) is too small and does not have the necessary power in order to heat the room efficiently. And here, don’t take it with you – it won’t help and won’t warm you up.
Power, design, installation method, energy consumption - everything should suit you in your newly acquired heat source. And then you will be happy with your purchase and feel comfortable in your home.
Tweet
Fence for a summer residence: which one to choose?
Custom-made furniture according to individual sizes
Roller blinds for plastic windows, photo in the interior
(Visited 377 times, 1 visits today)
Installation and piping of batteries in the floor
The difficulty in installing an in-floor convector with your own hands is that its grille is flush with the floor covering. Therefore, it is extremely important to accurately align the heat exchanger trough with the water level. At the same time, it is necessary that it stands rigidly, because people will walk on the grate. Installation is carried out in a cut-out niche; a screed is poured around the perimeter. Filling nuances:
- stick damper tape around the perimeter of the body;
- Do not remove the grate until the solution has completely hardened.
The convector grille must be level with the floor.
The damper tape compensates for the thermal expansion of the screed and dampens possible vibrations from the fan. It is extremely important that the grille is inserted into its seat. During hardening, the screed may deform the trough and the grate will no longer fit there at all.
The case has holes for several connection options, which mainly depend on the position of the radiator relative to the circuit. In principle, the simplest piping option is to install conventional ball valves on the supply and return. Ideally, faucet handles should face down so that they are not visible through the grille. Also, some convectors do not have enough trough height to install shut-off valves with the handles up.
If the electrodes for welding heating pipes are damp, they cannot be used, at least until they dry.
Here we compared pipes for heating a private house.
The piping method described above is not suitable if you have a long heating system with several branches of different lengths. In this case, for proper operation of the circuit, balancing will be required, and for this there must be a balancing valve on the radiator return. In addition, ball valves do not make it possible to regulate the degree of heating of the battery, which is very useful. Therefore, you need to install a thermostatic valve on the supply, preferably in tandem with a thermal head or servo drive.
Housing installation
Step 1
. Screw the adjusting screws into the threads and open the holes for supplying pipes to the floor heating system. They are closed with removable flaps.
Step 2.
Place the housing in its place of installation, using a bubble level to set it in a strictly horizontal position. This is a very important stage. If the heat exchanger is at an angle, then there is a high risk of airing it, as a result it will not work at full capacity. In addition, the grate will not be located in the same plane as the flooring. Check the position in several directions, constantly tighten or unscrew the adjusting bolts.
Important. When installing the housing, take into account the zero level of the floor covering. It is in this plane that the decorative grille of the convector should be located.
Step 3.
After installing the housing, you need to fix its position. To do this, use adjustable legs made of perforated steel plate. Fix one end to the body using bolts and washers, and the other to the base of the floor. To fix it to the base, you need to use dowels of the appropriate length and diameter. After fastening, check the position of the device again and, if any deviations are found, correct them.
Step 4.
Place the heat exchanger in the housing; there is a special place for it. Insert the plastic pipes of the floor heating system into the holes, measure their length and cut off the excess with a special pruner.
Step 5.
Using a special portable welding machine for plastic pipes, heat the ends and attach them to the tap and valve fittings.
Step 6.
Using a nut, screw the elements to the heat exchanger, while constantly holding the fittings with a second key. It is made of stainless alloys, and they have low physical strength. Exceeding the maximum load can cause cracks. Another unpleasant property of such alloys is their low resistance to metal fatigue. This means that even not very strong tightening forces, applied over a long period of time, cause cracks to appear and the metal “gets tired.”
Step 7
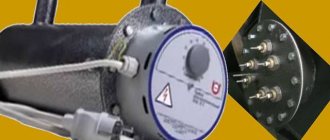
Connect electrical cables to the module. For this purpose, a terminal block is installed; the connection diagram is in the instructions for using the device. The module automatically supports user-specified convector operating modes. When connecting the power, you must turn off the network; all work must be carried out in strict accordance with the requirements of the PUE.
Step 8
If you fix the convector body with cement-sand screed or polyurethane foam, be sure to insert special spacers into it to prevent deformation.
We looked at an example of installing a convector with hybrid heat distribution; the device is connected to a common floor heating system. The coolant temperature in the convector is the same as in the system, which somewhat limits the capabilities of the equipment.
Advantages of converter devices
Such chimneys have many advantages, which have already been appreciated by many. These include:
- Easy installation. The convector is connected to a pipe on one side, and on the other to a chimney outlet leading outside.
- Safe operation. Through the main chimney, combustion products go outside without lingering indoors.
- Benefit. The room heats up very quickly, using very little energy.
- Some purchased models are equipped with the function of shutting off the chimney, due to which you can regulate the intensity of heat release.
- When a device is made of high-quality materials, there is no doubt about its durability.
In general, a chimney-convector is really an inexpensive design that you can make yourself. It has many advantages, thanks to which it is widely used for heating baths, residential buildings and other premises.
DIY chimney heat exchanger:
Ecology of consumption. Estate: Among the various methods of heating a house, convector heating rightfully occupies not the last place. Its main advantages are that when using this method, there is no need to create a complex heating system design, and there is no need for pipes and expensive water heating boilers.
Among the various methods of heating a house, convector heating rightfully occupies not the last place. Its main advantages are that when using this method, there is no need to create a complex heating system design, and there is no need for pipes and expensive water heating boilers.
Let's try to figure out what convector heating is. As the name suggests, this is a method of heating a room, which is based on air convection throughout the room itself.
It follows from the laws of physics that when heated, warm air rises and cold air goes down.
Thus, natural air circulation occurs and the room is gradually heated. This type of heating is a fairly simple, but at the same time effective way of heating.
How to make a convector from a battery
If you wish, you can, of course, make with your own hands not only a built-in, but also a regular outdoor convector. The easiest way to make such a device is to use a regular heating radiator as a base. You can increase the battery efficiency by converting it into a convector by simply adding several fans to this device.
To manufacture such a device, you will need to purchase approximately 4-5 fans. In this case, you should choose high-quality devices that operate as silently as possible. You will also need a steel or plastic corner with a shelf that is not too wide.
How to connect fans
Fan housings can be fastened together in a row, for example, using cable ties threaded through holes in the corners. It is best to connect the two-pin connectors of these devices in pairs with pieces of cable, passing one behind the other.
This installation method will reduce the number of wires connecting to the power supply. Ultimately, on one side, a two-wire AC cable should approach the power supply, and on the other, DC wires from the fans.
If the heating radiator is located low, the structure assembled in this way can simply be placed under it on the floor. If there is a lot of free space between the battery and the floor, the fan unit will have to be slightly improved.
In this case, among other things, you will need to attach legs from the corner to the assembled structure. To do this, you first need to cut 4 pieces 10-15 cm long from the corner. Next, the legs obtained in this way will need to be attached to the bodies, having previously made holes for the screws.
Principle of operation
In essence, convectors form flows through which heat is transferred. Constant circulation occurs through a closed chamber or housing. The design of the chimney consists of the chimney itself in the center, which discharges combustion products into the environment. The second element is the external circuit, where cold air is captured, which prevents the system from warming up to significant temperatures.
A chimney running through the center of the house through the second floor:
A convector on a chimney pipe can have another design option: smoke from the chimney takes part in the work, as well as water in the barrel, circulating after heating. The central pipe is the same as in the case of the first design; it is connected to the heating furnace. The second pipe is a barrel surrounding the first, which has two tubes for liquid circulation. The water warms up and the room is heated.
Economizer chimneys can be installed even in wooden walls of premises. They are considered safe for installation in residential buildings.
There are both metal and stainless steel convectors