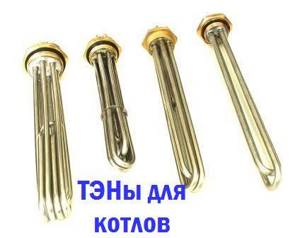
Heating elements with thermostat
A heating element for heating with thermostats is installed on all household heating devices without exception, where liquid is used as a coolant.
The maximum heating temperature of the coolant is 80° C. The heating element with a built-in thermostat consists of a heating element and a temperature sensor with a temperature controller.
Criterias of choice
When choosing a tubular electric heater with a thermostat, you need to pay attention to several important points:
- Tube material. The heating element body can be made of acid-resistant stainless steel or more durable copper. Typically the outer tube has a diameter of 13 mm, but there are also less powerful budget options with diameters of 10 or 8 mm;
- Work in water and weak alkaline solutions. In the marking of the device, this is indicated by the letter P before the designation of the operating voltage;
- Power. In order not to overload household electrical wiring, it is better to purchase a heating element with a power of no more than 2.5 kW, otherwise you will have to lay a separate cable of a larger cross-section from the panel;
- Thermal sensor device. So that a failed temperature sensor can be easily separated and replaced with a new one, it must be located together with the thermostat in a separate tube and can be easily removed from it. A failed temperature sensor causes the heating element to turn off at low temperatures.
Scope of application
- in radiators for organizing temporary heating;
- in a shower container where temporary heating of water is needed.
That is, for temporary use, a heating element with a thermostat is the cheapest device before use. A budget model with components is unlikely to cost more than 5–6 dollars, and installing it yourself will not be a problem, because any device comes with instructions for its installation.
Tubular electric heaters are included in any electrical equipment associated with heating. With the development of science and technology, they are improved, becoming more economical, safe and acquiring additional useful functions. And less and less homemade devices are being used, which are cheap to install, but in terms of performance and, most importantly, safety, are far from factory-assembled devices.
Requirements for operation and maintenance of heating heating elements
Regular preventive maintenance of devices comes down to a visual inspection of the equipment, descaling and updating when defects appear on the equipment.
The rules of use are also not complicated:
- Purified or settled water and technical oil are used as a coolant.
- Before putting into operation a heating element for heating with a thermostat, a safety group with an automatic start/shutdown system is installed on the equipment.
- Frequent switching on and off of devices reduces their service life. In order to prevent the units from failing, the optimal operating mode is selected with a difference in heating temperature of the coolant of 10 degrees. In this case, the device will not start and turn off every minute to maintain heating.
- Checking the tightness of the system will reduce the risk of static electricity forming in the battery and reduce the possibility of an accident.
Heating elements can be a good replacement for all types of radiators and heat guns. To increase the thermal efficiency of appliances and reduce heating costs, you need to pre-insulate the premises.
DIY electric boiler
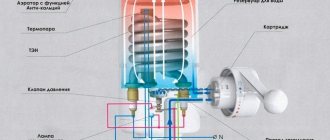
Electric boiler design
Is it possible to make a boiler that uses electric heaters to heat a house yourself? First you need to familiarize yourself with the design of factory models.
They consist of a block with an installed heating element, a control and safety system. Unlike traditional boilers, it is small in size and can be installed almost anywhere in the system. For manufacturing you will need the following tools and materials:
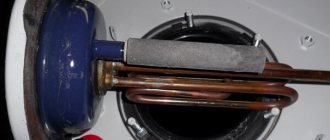
- Block of heating elements. It is best to use this type of heaters, as they have maximum power;
- Thermostat and temperature sensor;
- Steel body divided into two zones. In one there will be an electric heating element with a thermostat for heating, and in the second a control and protection unit will be installed.
Since the heating element in the heating system must be constantly in the water, it is recommended to install a liquid level sensor. Liquid circulation occurs through the inlet and outlet pipes. To improve this process, a connection block for the circulation pump is provided. But it should be noted that it is not recommended to make such boilers with a power above 9 kW for a private home. This is due to the maximum load on the power grid and high overhead costs.
Types of heating elements
A heating element with a thermostat may differ in:
- Constructions.
- Installation method.
- Material.
The shape of the equipment can be straight or curved. Experts advise focusing on the design of the room where such a device will be located. According to the composition of the product design there are:
- Tubular. This is a metal tube with a conductor. Inside there is dielectric sand, which serves as an insulator.
- Closed. Dry is in a protective flask. The space contains special oil or quartz sand. This model does not come into contact with water.
According to the installation method, the heating element with a thermostat can be flanged with thread and nut. Copper and stainless steel are used in production. In dry type devices, magnesium silicate is used, which is used to obtain the flask.
Correct choice of heating element model
When going to purchase a heating element, the buyer needs to know a number of technical characteristics:
- required power of the device;
- length, diameter and shape of the tube;
- length of the insulating cap;
- overall length;
- connection type;
- method of fastening.
To calculate the power of a heating element intended for heating water of a certain volume, use the formula:
P – power of the heated element, measured in kW;
m is the mass of the heated coolant circulating in the device, in kilograms;
tH – initial temperature of water or liquid, in °C;
tK – final temperature of water or liquid, in °C;
T – heating time of water or liquid.
Heating element in a heating radiator - video review:
Heating elements for water heater Ariston (Ariston) made in Italy
Application:
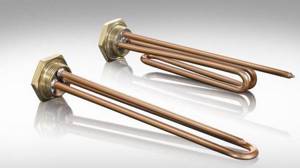
Ariston threaded (type RDT and RCT) have been supplied to our country directly from Italy for several decades.
Due to their high quality, long service life, ease of installation, the ability to install a thermostat, and most importantly, reliability and safety, they are used in almost every domestic production, and many manufacturers of water heaters complete their products with this particular heating element. Quite often, heating elements for Ariston water heaters are used in everyday life to make homemade devices for heating water in barrels and tanks in the country, screwed into heating radiators, thereby providing additional heating of the coolant, installed in country washbasins, etc. A high level of reliability and quality was achieved thanks to the technical knowledge and unique experience of the manufacturer Thermowatt, the most advanced and automated production processes, as well as numerous sets of laboratory and production tests that simulate specific, and sometimes harsh, operating conditions of the heating element. These tests help identify weaknesses in the shell design and then eliminate them. All heating elements have quality certificates from major international organizations, including our domestic GOST. The price-quality ratio for all products is ideal, due to the wide power range, from 1200W to 4000W inclusive, and the temperature control range, from 40 to 80°C, it will suit a very wide range of consumers and will help implement a wide range of assigned tasks. Where you need to heat water to a certain temperature, the best solution is to buy an Ariston heating element.
Compound:
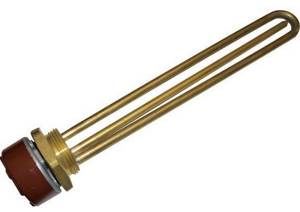
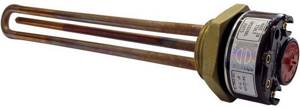
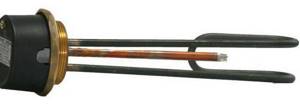
Ariston heating element consists of:
- The heating element itself is made of copper, which ensures high heat transfer
- A hollow tube for the sensor located in the center; it is into this tube that the thermostat is inserted
- Brass flange on G1¼ thread, which is 42mm in diameter, for ease of installation this flange is made in the form of a hexagon
- Some models provide space for a magnesium anode
Installation:
Installing an Ariston heating element with a thermostat in a container is not difficult. You need to make a hole with a diameter of 43-44mm. insert the heating element into this hole, having first put a rubber gasket on the base of the thread to prevent water leakage, and tighten it from the inside with a counter nut. If you need to install a thermostat from the outside into a hollow tube, clamp it into the contacts, set the desired heating temperature and connect the power wires to it. It is imperative to prevent water from getting on the contacts, otherwise a short circuit may occur which will damage the heating element and thermostat.
It is important to know:
A prerequisite for reliable and durable operation of the Ariston heating element is its complete immersion in water or another coolant; it is necessary to exclude operation in the air, even if not for large areas of the shell. Otherwise, there will be local overheating of the exposed area and premature failure.
See also: Ariston thermostats
How to properly install a heating element in a moonshine still
With welding
This is the method most often used. It does not require the purchase of additional equipment, although welding skills are required. The method is considered not entirely reliable for the reason that due to welding, the seam near the bottom of the cube is broken, as a result of which it can burst and leak.
Therefore, at your own peril and risk, take welding and weld the clamp two inches into a similar hole that must be cut in advance (a drill bit costs 250 rubles). Then the heating element will be quietly screwed in there, and after distillation it will be removed back.
This process is clearly shown in the video from the Steel Jet channel, where the author of the video shows the conversion of a Luxstal still.
No welding
The work looks like this:
Screwed-in heating element without welding.
- Using a drill with a crown, a hole is drilled for the heating element. This is usually two inches, but varies depending on the size and power of the heater.
- The original ring is removed from the heater and a special one is put on (Where can I get it? More on that later).
- A heating element is inserted into the hole, and a special nut is screwed onto it from the inside, which firmly attaches the heater to the container.
As a result, the ring follows the contours of the container, and the nut tightens everything. As a result, no welding and unnecessary work.
This set is sold in a specialized store, which I mentioned a little earlier. I didn’t find the price for the nut, but the ring costs only 70 rubles. In any case, this matter will not be very expensive, because the nut, although unique, is quite simple. You can see all this in the video below.
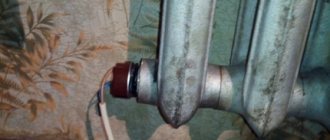
Heating element for a radiator: why is it needed?
Like any other heating element for heating, a radiator is designed to heat the coolant and maintain its operating temperature. The device can be installed in almost any heating device that has an internal cavity filled with liquid. Thanks to this, its scope of application is quite wide.
Radiator heating elements can act as the main or additional heating source. They are very good as heat sources for rooms with a relatively small area, which are used periodically during the cold season.
For example, various utility rooms or for heating a garage. In this case, the heating element is mounted in an autonomous radiator; it usually has impressive dimensions.

A radiator with a built-in heating element is practically no different in appearance from traditional batteries. During the off-season, when the central heating is not yet turned on, it will help residents not to freeze
The battery is not connected to the heating system and is filled with coolant, which circulates exclusively within the radiator body.
In such cases, technical oil with a low viscosity is chosen as a coolant, which allows you not to be afraid of the radiator completely freezing during non-working hours. It turns out to be an analogue of an oil-type radiator, only larger in size.
Radiator heating elements have proven themselves quite well as the main source of heat for country houses that are heated periodically. The system is set up similarly to that described above, but only the heating elements are mounted in batteries installed in each room.
It is possible to organize such heating for houses with permanent residence. In this case, the batteries can be filled with ordinary water, since there are no plans to allow the system to freeze. True, such options are used extremely rarely due to the high cost of electricity.
More widely, radiator heating elements are used as additional heat sources. They can be built into an existing heating system with a liquid coolant and come into operation when the main heating is not functioning for some reason.
This solution is especially suitable for houses with centralized heating. During the period when it is turned off, heating elements literally save apartment residents from freezing.
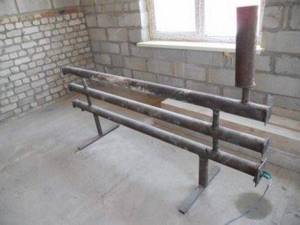
The so-called heating registers are very popular among DIYers. You can easily assemble them with your own hands and thus create practical heating for a garage or utility room
Another good option is to connect the devices to an autonomous heating system with a solid fuel boiler. This will allow maintaining a comfortable temperature in the rooms even at times when the owner is not able to supply fuel on time.
If it is possible to use a multi-tariff meter, it may be practical to switch to night heating with electricity when it is relatively cheap. During the day the boiler will start working again.
Practice shows that it is not economically profitable to use radiator heating elements as an additional heat source for autonomous systems running on gas. This type of fuel itself is relatively cheap, so replacing it with more expensive electricity does not make sense.
If boilers using liquefied gas or diesel fuel are used indoors, the benefits will be obvious. But only if you have a two-phase electricity meter.
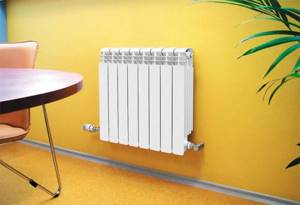
Heating elements for heating radiators
In radiators, heating elements are installed to maintain the temperature of the coolant during a short-term shutdown of the central heating system or for additional heating of the coolant. Such additional heating at night can be beneficial if the main source of heat is a boiler using expensive liquid fuel, and a two-tariff electric meter is installed in the house.
Heating elements for heating radiators are distinguished by a thin flange and a narrow heating element. They are installed on cast iron and aluminum radiators, can be made in different capacities and differ in the length of the heating element. The delivery set includes a protective casing that protects the heating element from moisture.
Since the tube is plated with chromium and nickel during the manufacturing process, heating elements for radiators are durable and reliable. The capillary thermostat allows you to accurately regulate the heating temperature, and two temperature sensors protect the device from overheating. Modern heating elements have additional functions, for example “Turbo”, when the device operates at maximum power for some time to quickly warm up the room, or “Anti-freeze”, designed to maintain a minimum temperature of 10 ° C for a long time.
Installing a heating element into a radiator is quite simple: remove the plug from the bottom flange of the heating device, screw the heating element into the hole, install the thermostat and connect the power supply to grounding. The passport for the device must indicate the requirements for tightness, if not met, the radiator may become energized, and this is life-threatening. Advantages of installing heating elements in a central heating system:
- protection of the premises from freezing;
- protection of the system from damage in severe frosts;
- efficiency, because all energy is converted into heat;
- pulse operation, which saves energy;
- high accuracy of temperature control;
- additional useful functions;
- reasonable price.
Important Features
- It is important to use heating elements in cases where you need to quickly heat a room, require an additional heating system, or want to reduce your costs.
- You can turn on the heating element into the network only when it is in water. An explosion may occur when a heated coil is lowered into water.
- The main danger to heating elements and thermostats is salts dissolved in water. This occurs due to electricity in the process of heating water and hydrolysis of salts, which leads to the formation of sediments on the surfaces of the tubes, and often the salts interact with the materials of the apparatus. Therefore, the device contains a magnesium anode, which, gradually dissolving, protects the heating element device.
- You can also buy dry heating elements with a thermostat on the market. They are placed in a protective flask, they do not interact with water, and therefore last much longer than conventional heating devices.
- If there are problems with the quality of the power supply or the supply of energy, it is better to connect a stabilizer or uninterruptible power supply.
- Installing a heater requires studying the electrical wiring in the house and setting its power limit. Regardless of the type of electric water heater, their maximum power reaches 3 kW, but the electric cable must be designed for a larger load. Therefore, it is recommended to install a separate power line. In this case, it is necessary to ground the boiler with a separate wire.
- The ideal option for connecting a heating element together with a thermostat is to power it through an RCD circuit breaker. If the heating element breaks down, it will disconnect the device from the network.
By following the instructions for use and safety precautions, of course, you can extend the service life, but there are still factors that disrupt the operation of the device: corrosion processes of the shell, its rupture as a result of severe overheating, frequent changes in electrical voltage, general depressurization of the tube.
How to choose?
The operating time of the heater depends on many factors: operating conditions, power surges, etc. An open heating element operates on average for about 5 years, and the operating life of a wet heater reaches 10-15 years. When choosing a heating device, it is important to take into account the operating mode, frequency of technical work, volume of heated liquid, heating time, etc. etc. You can always get information on questions of interest from Polymernagrev specialists using the contacts on the website. We will carry out all the necessary calculations specifically for your water heater. You can also compare several types of heating elements and choose the best option for yourself.
Heating elements with thermostat
A water heating element with a thermostat (thermostat) is installed to regulate the temperature. Thermostats turn water heating on or off using tubular electric heaters. This allows the owner to significantly save energy.
Also, a heating element with a thermostat is safety, which is very important when electricity and liquid work together. It promptly turns off the heating system in case of problems.
The heating element for a water heater with a thermostat is usually made of wire containing nickel and chromium. The wire is placed inside and filled with a special powder (magnesium oxide).
The thermostat itself can be of different types: capillary, electronic and rod.
A heating element for heating water with a rod thermostat is the most common today. It looks like a small tube that works according to physical laws. When the tube heats up, it expands linearly and puts pressure on the switch. When the tube cools, it contracts and the tubular electric heater turns on.
The rod thermostat has a disadvantage associated with inaccurate operation due to its close location to the water supply.
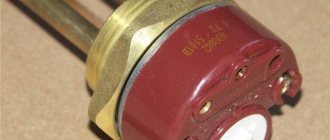
Heating element with rod thermostat
Capillary thermostat is the most modern solution. It looks like a small diameter tube containing a capsule with contrast liquid. The thermostat changes the volume depending on the temperature inside the heater. When a certain heating level is reached, the liquid presses on the membrane connected to the electrical contacts.
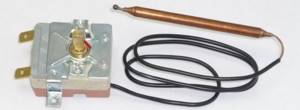
Heating element with capillary thermostat
Electronic thermostats are also common. For better performance, it interacts with a protective relay. Because of this, if necessary, an emergency power cut occurs (if, for example, the tank of the water heating structure is empty).
Electronic thermostat for Ariston water heater
Of course, heating elements for water with a thermostat can have other classifications depending on different parameters: electromechanical and electronic, simple and programmable devices.
We invite you to watch a video that will answer the questions: how to connect a thermostat to a heating element or how to install a thermostat for a heating element with your own hands.
Flaws
A heating element with a thermostat for heating also has disadvantages. But the type of equipment should be taken into account. If the coil burns out, it will not be possible to repair the heating element. With prolonged use, scale appears, which affects heat transfer. Customer reviews confirm the presence of negative aspects of the equipment.
Hard water reduces service life. Dry types of equipment are not considered universal. They are created for specific types of broilers. Therefore, during repairs, it can only be replaced with a similar element. Experts advise using the device correctly, then it will not require repair or replacement.
Heating element and single-phase network. What to screw to what?
This case is typical for dachas and old-built village houses. First you need to generally understand what we are talking about and the easiest way to do this is by looking at the following figure:
So, a single-phase electrical network has two conductors - zero and phase. The picture itself shows two ways to turn on the load - parallel and serial. These methods differ in how the initial voltage is divided between the elements. In most cases, heating elements are connected in parallel so as not to lose useful power; a series circuit is suitable only for various specific cases. A block prepared for connection to one phase will look like this:
It is also worth paying attention to the choice of cable, but we will touch on this point a little later, and now let’s move on to the three phases
Using TENs
Recently, more and more people are thinking about the possibility of autonomous heating of their home. Every year the cost of traditional heating increases, so quite often with the help of an autonomous system there is a chance to save money.
Also, sometimes there is simply no possibility of connecting to a central heating system - this is especially true for holiday villages. The only option to heat the house in this case is to install a heating boiler. Solid fuel and gas boilers continue to be the most popular, but their use is also not always possible - access to the main gas pipeline is not always available.
The best way out of such situations is to install electric heating equipment, since electrical networks are available almost everywhere. The main element of any such heating device is TEN. The efficiency of the heating system largely depends on its type. Typically, household heating equipment uses tubular heating elements, as well as elements with a thermostat. The latter make it possible to regulate the operation of the heating system.
Electric heating systems are very convenient to use: they do not emit harmful substances, since they do not form combustion products, do not require installation in a separate room, are safe to use, and are easy to install and adjust. But still, when installing electric heating equipment, you should first check whether the electrical network can withstand the high load. You also need to prepare in advance for the fact that you will have to pay a lot of money for electricity.
What affects the price?
A heating element for water with a thermostat differs in cost depending on its type and modification. The price of open devices is low. This is a more accessible heat source, especially if the body is made of steel.
Dry devices that have an unfilled flask are available at an affordable price. Heating elements with quartz fillers are considered more expensive. It should be taken into account that service prices also depend on the cost of the equipment.
Installation options
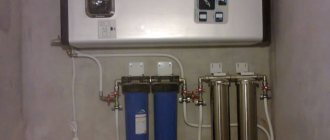
So, first, let’s look at the options for connecting an electric boiler in a private house or apartment with our own hands:
- If the power of the water heater does not exceed 3.5 kW, then it is usually powered from an outlet. In this case, the use of a single-phase 220V network is allowed.
- In the event that the power varies between 3.5-7 kW, it is necessary to carry out the electrical installation yourself directly from the junction box. This is due to the fact that the outlet may not withstand high current loads. As in the previous case, a 220-volt network is allowed for use.
- Well, the last option that may come up is an electric boiler with a power of over 7 kW. In this case, it is necessary not only to run a separate cable from the distribution box, but also to use a more powerful 3-phase 380V network.
Selecting a heating element
When choosing a heating element, you need to pay attention to some details. Only in this case can you count on a successful purchase, high-quality heating, long service life and compatibility of the selected model with a water heating tank, boiler or radiator
Shape and size
There are dozens of heating element models available for buyers to choose from. They have different shapes - straight, round, figure-eight or ear-shaped, double, triple and many others. When purchasing, you should focus on the use of the heater. For installation in sections of heating radiators, narrow and straight models are used, since there is quite little space inside
When assembling a storage water heater, you should pay attention to the volume and shape of the tank, and based on this, choose a suitable heating element. In principle, almost any model will fit here. If you need to replace a heating element in an existing water heater, you need to purchase an identical model - only in this case can you count on the fact that it will fit into the tank itself.
If you need to replace a heating element in an existing water heater, you need to purchase an identical model - only in this case can you count on the fact that it will fit into the tank itself.
Power
If not everything, then a lot depends on power. For example, this could be the heating rate. If you are assembling a small-volume water heater, the recommended power will be 1.5 kW. The same heating element will be able to heat disproportionately large volumes, but it will do this for a very long time - with a power of 2 kW, heating 100-150 liters of water can take 3.5 - 4 hours (not to a boil, but on average by 40 degrees).
If you equip a water heater or water tank with a powerful 5-7 kW heating element, the water will heat up very quickly. But another problem will arise - the house electrical network will not withstand it. When the power of the connected equipment is above 2 kW, it is necessary to lay a separate line from the electrical panel.
Protection against corrosion and scale
When choosing heating elements for heating water with a thermostat, we recommend paying attention to modern models equipped with scale protection. Recently, models with enamel coating have begun to appear on the market. It is this that protects heaters from salt deposits.
The warranty on such heating elements is 15 years. If you don’t find similar models in the store, then we recommend purchasing electric heaters made of stainless steel - they are more durable and reliable
It is this that protects the heaters from salt deposits. The warranty on such heating elements is 15 years. If you don’t find similar models in the store, then we recommend purchasing stainless steel electric heaters - they are more durable and reliable.
The presence of a thermostat
If you are assembling or repairing a boiler or want to equip a heating element with a heating element, choose a model with a built-in thermostat. It will save on electricity by turning on only when the water temperature drops below a set point. If there is no regulator, you will have to monitor the temperature yourself by turning the heating on or off - this is inconvenient, uneconomical and unsafe.
Choice
It is necessary to choose the right heating element for a radiator with a thermostat, as well as for other purposes. Usually the purpose, amount of electricity used, heating mode, and installation option are taken into account.
When purchasing, you need to inspect the device body. Copper appliances with a brass base are more expensive and have a longer lifespan compared to stainless steel. It is important to look at the symbols indicated on the case. If the letter “P” is indicated before the voltage indicator of 220V, then this indicates the possibility of using water and slightly alkaline solutions.
For domestic use, experts recommend using electric heating elements with a thermostat with a power of no more than 2.5 kW. The remaining devices are used for spacious rooms. A heating element with a 2 kW thermostat will be most suitable for a home. There must be thermal protection. It should be taken into account that due to voltage fluctuations and hard water, the operation of the device deteriorates. If any malfunction is detected, experts advise replacing the device.
Let's consider connecting a three-phase heating element through a magnetic starter and a thermal relay.
Rice. 1 The heating element is connected through one three-phase MP with normally closed contacts (Fig. 1). The starter is controlled by a thermal relay TP, the control contacts of which are open when the temperature at the sensor is below the set one. When three-phase voltage is supplied, the contacts of the starters are closed and the heating element is heated, the heaters of which are switched on in a “star” configuration.
Rice. 2 When the set temperature is reached, the thermal relay turns off the power to the heaters. Thus, a simple temperature controller is implemented. For such a regulator, you can use a RT2K thermal relay (Fig. 2), and for a starter, a third-value contactor with three opening groups.
RT2K is a two-position (on/off) thermal relay with a copper wire sensor with a temperature setting range from -40 to +50°C. Of course, using one thermal relay does not allow you to accurately maintain the required temperature. Turning on all three sections of the heating element each time leads to unnecessary energy losses.
Rice. 3 If you control each section of the heater through a separate starter connected to its own thermal relay (Fig. 3), then more accurate temperature maintenance can be achieved. So, we have three starters, which are controlled by three thermal relays TP1, TP2, TP3. The response temperatures are selected, let's say t1
Rice. 4 Relay-temperature sensors provide switching of the executive circuit up to 6A, at a voltage of 250V. To control a magnetic starter, such values are more than enough (For example, the operating current of PME contactors is from 0.1 to 0.9 A at a voltage of 127 V). When alternating current passes through the armature coil, a low hum of industrial frequency 50 Hz is possible. There are thermal relays that control the current output with a current value from 0 to 20 mA. Thermal relays are also often powered by low voltage DC (24 V). To match such an output current with low-voltage (24 to 36 V) starter armature coils, a level-matching circuit on a transistor can be used (Fig. 5)
Rice. 5 This circuit operates in key mode. When current is supplied through the contacts of the thermal relay TP through resistor R1, to the base VT1 the current is amplified and the MP starter is turned on. Resistor R1 limits the current output of the thermal relay to prevent overload. Transistor VT1 is selected based on the maximum collector current, which exceeds the contactor operating current and the voltage on the collector.
Let's calculate resistor R1 using an example.
Let’s assume that a direct current of 200 mA is sufficient to control the starter’s armature. The current gain of the transistor is 20, which means that the control current of the base IB must be maintained within the range of up to 200/20 = 10 mA. The thermal relay produces a maximum of 24V at a current of 20mA, which is quite enough for the armature coil. To open the transistor in the switching mode relative to the emitter, the base voltage must be maintained at 0.6 V. Let us assume that the resistance of the emitter-base transition of an open transistor is negligible.
This means that the voltage on R1 will be 24 - 0.6V = 23.4 V. Based on the base current obtained earlier, we obtain the resistance: R1 = UR1/IB=23.4/0.01 =2.340 Kom. The role of resistor R2 is to prevent the transistor from turning on due to interference in the absence of control current. Usually it is chosen 5-10 times more than R1, i.e. for our example it will be approximately 24 kOhm. For industrial use, relay regulators are produced that realize the temperature of the object.
Write comments or additions to the article, maybe I missed something. Take a look at, I will be glad if you find something else useful on mine.
The thermostat is designed to maintain a set temperature by controlling heating (cooling) elements.
These devices come in several types, ranging from simple mechanical ones to electronic multifunctional and even smart devices.
The principle of operation is that the device has an external temperature sensor, which reports the ambient temperature to the device. A thermostat is used to maintain and adjust a given limit. They are used for maintenance in various devices, such as: refrigerator, heated floor, water heating or heaters, incubator, greenhouses, etc.
Why do you need a room thermostat?
Not everyone wants to constantly go down to the furnace room and regulate the temperature. Therefore, it would be wise to purchase a room thermostat. This way, you can directly regulate the power of the heating boiler based on the air temperature in the house. The operating principle of a room thermostat is as follows: after the device reaches the set temperature in the room, the device closes an electrical circuit that connects it to the boiler. A heat-sensitive element located inside the housing is responsible for this action. This element mechanically acts on electrical contacts. In products with a more complex device, such an element is a temperature sensor.
After the circuit is closed, the controller or gas valve turns off the operation of the burner or reduces the flame. It all depends on the design of the device. The coolant in the radiators will cool down, and the air temperature in the room will decrease. As a result, the circuit breaks and the burner operation resumes.
Such regulation is effective. Since fuel is used as much as needed.
Connecting a heating element with a thermostat
Let's consider the principle of operation and the connection diagram.
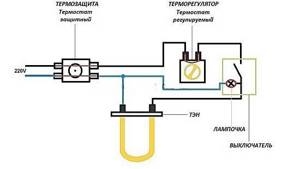
They are used for boilers and heating boilers. We take a universal one for 220V and 2-4.5 kW, a regular one, with a sensitive element in the form of a tube, it is placed inside the heating element, in which there is a special hole.
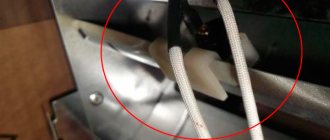
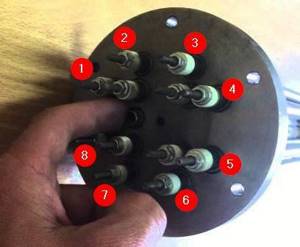
Here we see 3 pairs of heating elements, six in total, you need to connect as follows: set zero to three and phase to the other 3. We insert our device into the open circuit. It has three contacts, in the photo below you can see one in the center at the top and two at the bottom. The upper one is used to switch to zero, and which of the lower ones to phase should be checked with a tester.
Therefore, the power of the 1st heating element may not correspond to the parameters for heating the vessel and may be more or less. In such cases, to obtain the required heating power, you can use several heating elements connected in series or series-parallel. By switching various combinations of connecting heating elements, a switch from a household electric. plates, you can get different power. For example, having eight embedded heating elements, 1.25 kW each, depending on the switching combination, you can get the following power.
- 625 W
- 933 W
- 1.25 kW
- 1.6 kW
- 1.8 kW
- 2.5 kW
This range is quite enough to adjust and maintain the desired temperature. But you can get other power by adding the number of switching modes and using different switching combinations.
A series connection of 2 heating elements of 1.25 kW each and connecting them to a 220V network gives a total of 625 W. A parallel connection gives a total of 2.5 kW.
We know the current voltage in the network, it is 220V. Next, we also know the power of the heating element, knocked out on its surface, let’s say it’s 1.25 kW, which means we need to know the current flowing in this circuit. Knowing the voltage and power, we find out the current strength from the following formula.
Current = power divided by line voltage.
It is written like this: I = P / U.
Where I is the current strength in amperes.
P is power in watts.
U is voltage in volts.
When calculating, you need to convert the power indicated on the heating element body in kW into watts.
1.25 kW = 1250W. We substitute the known values into this formula and get the current strength.
I = 1250W / 220 = 5.681 A
R = U / I, where
R - resistance in Ohms
U - voltage in volts
I - current in amperes
We substitute the known values into the formula and find out the resistance of 1 heating element.
R = 220 / 5.681 = 38.725 Ohms.
Rtotal = R1+ R2 + R3, etc.
Thus, two series-connected heating elements have a resistance of 77.45 Ohms. Now it is easy to calculate the power released by these two heating elements.
P = U2 / R where,
P - power in watts
R is the total resistance of all lines. conn. heating elements
P = 624.919 W, rounded to 625 W.
Table 1.1 shows the values for series connection of heating elements.
Table 1.1
| Number of heating elements | Power, W) | Resistance (Ohm) | Voltage (V) | Current (A) |
| Serial connection | ||||
| 2 heating elements = 77.45 | ||||
| 3 heating element =1 16.175 | ||||
| 5 heating element = 193.625 | ||||
| 7 heating element=271.075 |
Table 1.2 shows the values for parallel connection of heating elements.
Table 1.2
| Number of heating elements | Power, W) | Resistance (Ohm) | Voltage (V) | Current (A) |
| Parallel connection | ||||
| 2 heating element = 19.3625 | ||||
| 3 heating element = 12.9083 | ||||
| 4 heating element=9.68125 | ||||
| 6 heating element = 6.45415 |
From the point of view of electrical engineering, this is an active resistance that generates heat when an electric current passes through it.
In appearance, a single heating element looks like a bent or curled tube. Spirals can be of very different shapes, but the connection principle is the same; a single heating element has two contacts for connection.
When connecting a single heating element to the supply voltage, we simply need to connect its terminals to the power supply. If the heating element is designed for 220 Volts, then we connect it to the phase and working zero. If the heating element is 380 Volt, then connect the heating element to two phases.
But this is a single heating element, which we can see in an electric kettle, but not in an electric boiler. The heating element of a heating boiler is three single heating elements mounted on a single platform (flange) with contacts located on it.
The most common boiler heating element consists of three single heating elements mounted on a common flange. On the flange there are 6 (six) contacts of the electric heating element of the boiler for connection. There are boilers with a large number of single heating elements, for example, like this:
How to connect a heating element with a thermostat
Now you know how and by what parameters heaters are selected. But how is the connection made? In order to connect a heating element with a thermostat, you must select a wire with reliable insulation. We also pay attention to the cross-section - it must be such that the wire can provide adequate power to the heater and not melt. For example, for a 3 kW heater, the wire cross-section must be at least 2.5 mm. We recommend choosing cables with copper conductors for connection.
Do not forget to pay attention to the presence of an RCD - it will instantly turn off the power in the event of an unexpected failure of the heating element or a short circuit. The RCD must be installed as close as possible to the heater itself. You should also ensure a reliable connection of the conductors with the contacts of the heating element (without “snot” and flimsy contacts that can spark).
How to connect a thermostat to an infrared heater
Electrical wiring can be open or hidden.
Is it possible to use one thermostat in several rooms?
When installing a thermostat, it is necessary to take into account that the set temperature will be maintained only in the place where the sensor is located. Cables laid in several rooms must be connected in parallel, as when connecting one heating cable to the thermostat.
You should not use one thermostat when the operating conditions of the premises are different (bathroom and kitchen), and also when the rooms have different heat loss rates (room and balcony).
The thermostat will only monitor the temperature in the room where the temperature sensor is installed. In other rooms the floor may be too hot or too cold.
All gas boilers are equipped with an internal sensor. It, in turn, maintains a certain temperature in the supply pipeline. But you have to choose the desired temperature regime yourself. To do this, you need to regulate the power of the equipment. To avoid visiting the furnace room every time the weather conditions change, you can install a room thermostat in the house. Let us consider in detail what types of room thermostats there are, as well as how to connect them correctly.

- Why do you need a room thermostat?
- Types of thermostats
- Electromechanical thermostats
- Electronic thermostats
- Mechanical thermostats
- Device and connection
- Setting the room thermostat
Two ways to connect heating elements to three phases.
“Three-phase” used to be something not very necessary and understandable for the common man, but in our time it has become a necessity for a private home. It is needed primarily for heating with electricity. Since an electric boiler has a high power (in most cases more than 6 kW), when using one phase you will need to install cables with a large cross-section of conductors. And this will be expensive, especially if the cable cores are made of copper. In a three-phase network, the cross-sections of the conductors will be noticeably smaller, for this reason most modern electric boilers are connected to a “three-phase” system. Now let's talk about the basic schemes for connecting heating elements to such a network.
Star.
This method is used if the heating element is designed for 220 V. In addition, the “star” requires that the neutral wire be connected from the panel. For clarification, consider the following figure:
In this case, instead of two jumpers there will be one. And it will be connected to zero, and the three remaining free ends will be connected to the corresponding phases. If you look at the block nut from above, it will all look like this:
Triangle.
This method is used to connect heating elements designed for 380 V. If you suddenly decide to install heating elements designed for 220 V in a “triangle”, they will simply burn out. Don't miss this important moment. The main difference between a “triangle” and a “star” is the absence of a neutral conductor. There are only 3 phases and nothing more. To better understand what we are talking about, look below:
In the picture everything looks simple and clear, but if you start connecting the contacts on the block nut, you will get the following:
It looks a little complicated, but in fact it is no different from the top picture. Colored lines and numbers here indicate the phases, and letters indicate the heating elements of the block.