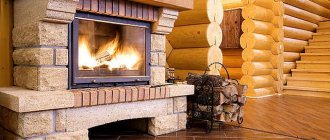
An outdoor fireplace is not at all a luxury, as many may think. This is an excellent design that can have additional functions, for example, a barbecue fireplace or a grill fireplace.
No one will argue that food cooked over an open fire and in the fresh air is much tastier than with the standard cooking method. Therefore, the fireplace complex has recently gained great popularity and demand among owners of country houses.
Garden fireplace-barbecue
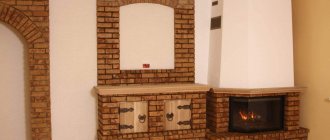
Barbecue fireplaces have quite a lot of functions that allow this design to be widely used in everyday life, for example, you can combine cooking and heating the room.
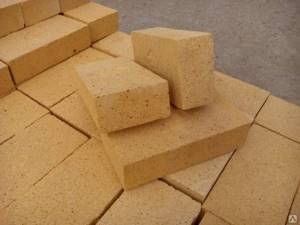
One of the features of a barbecue device is its permanent location. A special type of brick is used for them, which contributes to greater heat transfer.
How to build a gazebo with fireplaces, step-by-step work plan
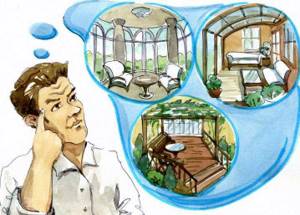
The implementation of the idea of arranging a site by building a cozy gazebo with a fireplace in the garden area involves the following standard algorithm of actions:
- development of a project that takes into account the general artistic concept; — project approval; — cost calculation and creation of a budget estimate indicating all materials necessary for construction; — purchase of materials; - construction works.
When drawing up a project, you need to understand that there are no formal norms or canons that would affect the design of the building. The owner can build a gazebo of any shape and decorate it to his liking with original decor
However, it is extremely important to comply with the requirements regarding the correct choice of foundation for the building and not to neglect the rules for using fireplaces
Why build a chimney in a light gazebo
From the point of view of the lazy layman, there is no point in arranging a chimney for an outdoor open shed, because there is no room as such, there is only a roof with lattice walls, and if the wind blows in the opposite direction, then you can get by with a collapsible barbecue.
The key word here is “if,” experienced summer residents know that as soon as you light a fire and start frying meat, according to the “law of meanness,” all the smoke will go to the table. And in a protected barbecue with a chimney, according to the laws of physics, warm air, and accordingly, smoke must go into the chimney.
Without a smoke eliminator, soot will settle on the ceiling of the gazebo.
In addition, without a smoke eliminator, after the second use of the barbecue, the ceiling in the gazebo will be covered with a layer of soot, and it is impossible to clean it off. Plus, the more you cook, the more intensely this soot will fall on your head. In addition, there is a high risk of fire.
How to build a fireplace barbecue from metal
The fireplace can be built from metal. The product consists of compartments for fuel and a smokehouse. The latter has grates in which you can place smoked products. To be able to regulate the supply of smoke, the design includes a chimney damper.
This fireplace is made from steel sheets 1 mm thick. For the stove and the bottom of the ash pan you will need sheets 2 mm thick.
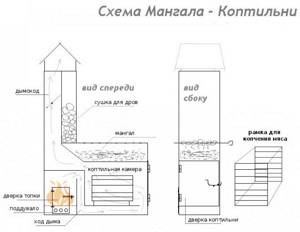
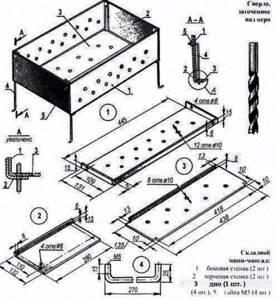
Diagram of a metal barbecue-smokehouse.
To lighten the load on the bottom of the ash pit, it makes sense to make a pedestal from gas blocks and bricks. You can also make a stand from other materials.
In order to build a fireplace from metal, you need to prepare parts according to patterns. The finished elements are connected with steel angles. To avoid coal falling out of the ash pan onto the floor, you need to monitor the tightness of the wall joints. If necessary, you will need to connect the unjoined areas using a welding machine.
You need to assemble the grill in the correct sequence. This is the only way the structure will last a long time.
A type of fireplace of this type is a smaller version of the Russian stove. Using this design you can bake baked goods, fry and stew food. To do this, the fireplace must be heated for 2 hours, after which the ash and coals must be removed. To smoke food, you need to leave the coals and add dry sawdust.
If it is not possible to equip a complex fireplace-barbecue, you can use a propane cylinder. The structure is made as follows:
- The balloon is filled with water.
- Holes are cut.
- The outlet is welded.
- A damper is installed at the junction of the pipe and the outlet. The hinges are mounted and sealed with a lid.
- Stands are being built.
Building a fireplace barbecue is quite simple if you follow the manufacturing technology and have the necessary elements.
Installation of beautiful decorative fireplaces for the home
Before you start building your brainchild, we recommend that you familiarize yourself with its structure.
So, the fireplace consists of:
- A firebox made of fireclay. This is where a miracle happens—fuel combustion.
- The portal is located outside the firebox and creates a decorative load.
- The grate, which is located under the firebox and helps the combustion process occur, supplies air from below to support the fire.
- An ash pan is a metal compartment that serves as a collection point for ash.
- The area in front of the firebox prevents sparks from the fire from falling onto the floor in front of the fireplace, and also serves as a decorative element.
- Hailo is the first source of smoke in front of the chimney.
- Gate valve for regulating air supply.
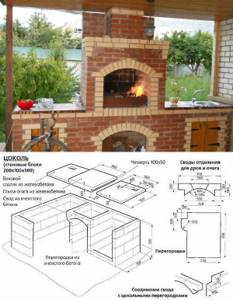
How to make a barbecue with your own hands from natural stones and concrete blocks
The easiest way to build a barbecue is to lay concrete blocks in a U-shape. To do this, you need to prepare the place and pillow as follows:
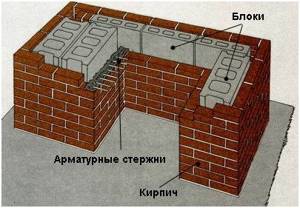
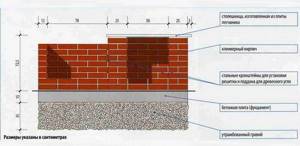
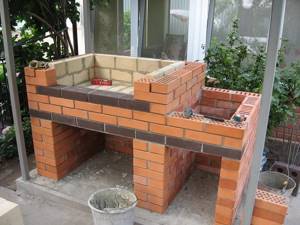
Scheme of a barbecue made of blocks and bricks.
- First of all, the concrete base is prepared.
- The first row of bricks is laid around the perimeter.
- Concrete blocks are laid out along two rows along the walls at the back and sides at a distance of 1 cm from the brickwork.
- Blocks and bricks are connected at intervals of 25 cm using ties.
- Steel rods are inserted at the level of the eighth row with a protrusion of approximately 10 cm.
- On the 10th row, rods for the grate are installed.
- The seams are being unstitched.
- Bricks are laid over the fourth row of blocks.
- Smooth stones are installed in the upper part of the grill.
A fireplace made of natural stones with a combination of sand and clay mixture can decorate any area. If such a barbecue is placed near a pond or an equipped gazebo, then it can become the center of landscape design
In the process of choosing the location of the barbecue, it is important to take into account the direction of strong winds, the level of groundwater and the terrain features of the area.
The technology for making a barbecue from natural stones is as follows:
- The foundation is laid (the boundaries are marked, a pit is dug, the cushions are compacted, formwork is erected, reinforcement is made, the concrete mixture is poured).
- The stone is laid using a mixture of clay. The ratio of sand and clay should be 3 to 1.
- Filling with cement mortar is carried out.
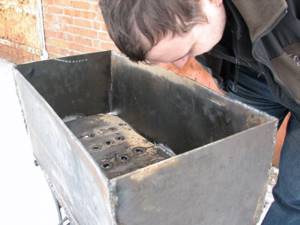
Instructions for making a portable barbecue
The model of a collapsible barbecue consists of four legs, walls with holes and a bottom. You need to think over and draw your option in advance.
The list of required tools includes:
- grinder,
- welding machine,
- drill and drill bits,
- mounting hardware.
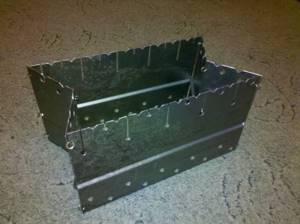
Step-by-step instruction.
- On a sheet of metal it is necessary to measure and draw the bottom and walls.
- The metal “pattern” is cut out using a grinder, the edges are folded and connected with a weld.
- Drill holes for air.
- You can make slits on the walls for fixing skewers.
- The easiest way to make support legs is from a metal corner, welding (or screwing) them to the base of the box.
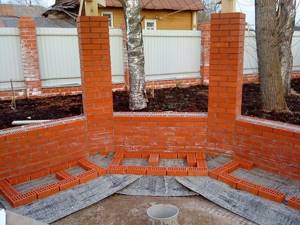
Construction of a fireplace-barbecue
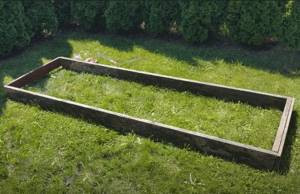
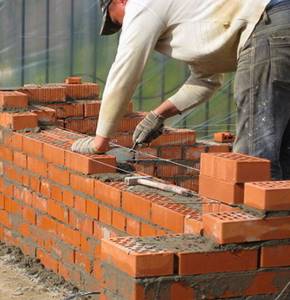
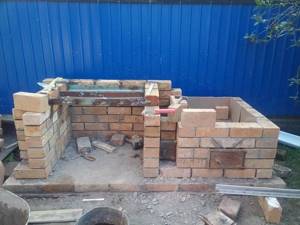
The construction of all brick buildings begins with the preparation of the base - the foundation.
Foundation
At the preparatory stage of its construction, a pit is dug, the depth of which will depend on the massiveness of the structure and the composition of the soil. The average depth of the pit, which follows the contours of the foundation of the future structure, is 40 cm.
A quality foundation is required
- A cushion of crushed stone or gravel is placed at the bottom of the pit and compacted well. The thickness of this layer should be from 15 to 35 cm.
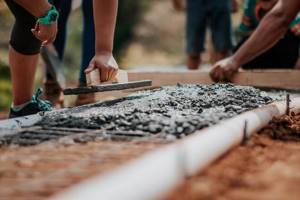
- The next step is the installation of formwork for pouring concrete mortar.
- A reinforcing structure is installed - it can be welded or simply tied together with stainless wire.
- For the upper part of the foundation, a mortar consisting of sand and cement 3x1 is mixed. If for some reason a deeper pit is dug, then it is poured in two layers, with different solutions: the lower one is pebbles and cement, and the upper one is sand and cement. The reinforcing mesh must pass through both layers being arranged.
- The upper part of the foundation is leveled along the horizontal beacons, and it is left to dry.
- Next, a sheet of waterproofing material is laid on top of the base, on which the first row of brickwork will be laid.
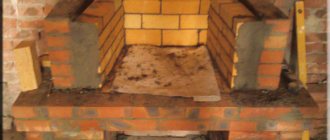
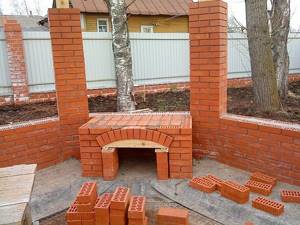
Fireplace wall masonry
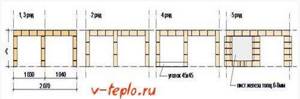
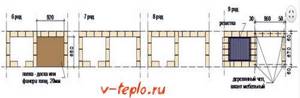
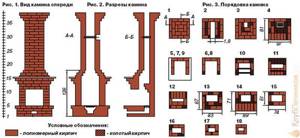
The barbecue fireplace is laid out according to a pre-drawn diagram and plan. If the master is carrying out such work for the first time and has no experience in this art, it is better to use ready-made, already proven schemes. In this case, you can consider one of the examples of simple buildings, the intricacies of which can be quite understood.
One of the simple designs of a barbecue fireplace
This option can be installed either under the roof in a gazebo or on the terrace, or outdoors. It is convenient due to its compactness and simplicity. At the same time, this model provides all the maximum possible functions for it. The design allows you to arrange a brazier for barbecue and shish kebab, and also, if desired, a grill if you make holes for a spit at the level of the third row of the fireplace insert.
The diagram clearly shows the sequential laying of the fireplace-barbecue, focusing on which you can easily cope with this important work.
Ordinal layout of the lower part
- The first row is laid out solid, but you need to follow the brick laying pattern.
- Further, up to the fifth row, everything is arranged according to the scheme. On the fifth row, it is necessary to fasten a metal corner or strips to support the bricks of the next row, since the sixth and seventh rows will be solid.
- The eighth, ninth and tenth rows have the same configuration and are placed in accordance with the diagram.
From row 10 and above
- The eleventh row will also require metal strips or corners.
- The twelfth and thirteenth should have a solid surface.
- From the fourteenth to the nineteenth row, sand-lime brick is laid inside the firebox - it is installed on the edge.
- On the twenty-first row it is also necessary to install a corner, since next will be the laying of the chimney, where the rows are arranged offset inwards of the structure - this continues until the twenty-eighth row.
- Then work is done on the pipe arrangement according to the provided diagram.
- An umbrella must be attached to the top of the pipe so that moisture cannot penetrate into the chimney cavity.
General recommendations
In order for the result of the work to be successful, you need to follow some tips that will help you navigate the process of constructing the structure. After installing the foundation, do not rush, wait until it dries completely. This will take about fourteen days (sometimes more), depending on the thickness of its concrete layer. If you have no experience in such work, do not be lazy and lay down the entire fireplace-barbecue without mortar
This will help you understand the entire internal structure. Each row must also first be laid without mortar - this process is necessary in order to select the bricks to size, and if necessary, shorten one or more of them. It is very important to control the evenness of corners, horizontal and vertical surfaces. This is done using a level corner or a plumb line. If the fireplace will not be decorated with finishing material, jointing must be carried out immediately, without waiting for the solution to harden. For laying sand-lime bricks used in the firebox, a special sand-clay mortar is used. After complete completion of the work, the entire structure must be thoroughly dried before it can be used to prepare your favorite delicacies.
This will take ten to fourteen days.
In the video attached to the article, a home craftsman shares his experience of building a barbecue fireplace with his own hands. Although there are critical reviews of such a project, however, this is a completely workable and uncomplicated option:
Popular manufacturers
If you don’t have time to make a fireplace yourself, you can take a ready-made option. Models from both domestic and foreign manufacturers are widely represented on the market.
"Forge Manufactory"
The products are made of ferrous metal. For decoration, details made by forging are used - these can be silhouettes of animals, trees, leaves, or simply geometric patterns. All fireplaces are made portable and collapsible, so they can be placed in a convenient place, and disassembled and hidden for storage during the winter period.
"B-B-Q"
These fireplaces belong to the more expensive segment. Most often they are made of brick. There are different versions: with a sink, space for a cauldron, etc. The products of Barbecue LLC are distinguished by their beautiful appearance, reliability and durability. These fireplaces are stationary, so you need to choose the right place to install them.
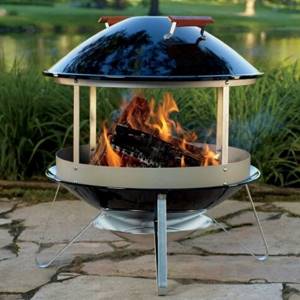
Weber
The American manufacturer has been producing its products for more than 60 years. A special feature of barbecues is their spherical shape. The grill body is made transparent or solid. There are coal, gas, and electric models, but the most delicious barbecue is made on coals.
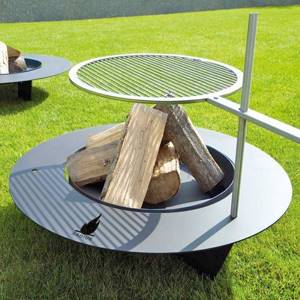
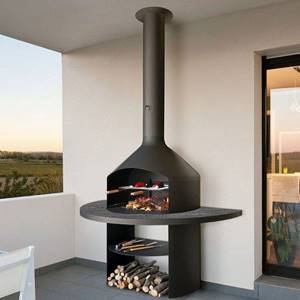
Radius Design
The German company offers fireplaces with a round hearth bowl, as well as a grate installed directly above the flame. Radius Design fireplaces have an unusual appearance; they decorate any area and allow you to prepare delicious and healthy dishes.
Main stages of construction
After all the preparatory work, the actual construction of the gazebo with barbecue, stove or barbecue begins. For any type of gazebo and any stove option, the construction steps are usually the same:
- Preparing the site for construction. Preparation includes removing the top layer of soil.
- Marking and construction of the foundation. The foundation can be columnar if the structure is made of wood or metal, or strip if a heavy brick structure is intended.
Construction of the foundation of the future gazebo
Creating a frame or supports. The support pillars are installed vertically, and then they are tied (usually at the top and bottom).
Construction of the frame and supports of the future gazebo
Construction of a barbecue, oven or other device. If you decide to build a stove yourself, it is built from chamotte (refractory clay), stone or metal according to a previously prepared diagram. If it is intended to use a ready-made structure, including a mobile one, proceed immediately to the next stage.
It is better to entrust the work of constructing a barbecue or stove to a specialist
Creating a chimney. To ensure that combustion products are discharged outside and not accumulate under the roof of the gazebo, a chimney must be made of brick, tin or other metal.

After the construction of the furnace, the construction of the chimney begins
- Construction of the roof. Depending on the chosen shape of the gazebo, a roof is installed. Most often, all work on preparing the rafters is carried out on the ground, and then they are placed on the base. A variety of materials can be used to finish the roof: tiles, boards, plastic, etc.
- Finishing the gazebo. The design and decoration of the building is the final stage of construction. At this stage, walls, floors, railings, windows, steps are decorated and other finishing work provided for by the project is carried out.
When the gazebo is built, you can begin finishing and decorating it
When constructing with your own hands, it is important to consider that the gazebo with the stove is as safe as possible. Flame sparks from the wind should not fall on flammable elements, the walls inside should be made of materials that will not melt from high temperatures, the electrical cable, if provided, should be placed in a special corrugated hose, etc.
All these points should be taken into account at the stage of preparing the project and the detailed construction plan.
Combined gazebo made of stone and wood

Inside the gazebo you can organize a real mini-kitchen
Peculiarities
If, as a rule, there are no problems with installing a fireplace in a private house, then installing such a device in an apartment building raises many questions. As you know, a real fireplace that runs on solid fuel (usually wood) requires a firebox, a portal made of refractory material and a chimney. All of the above requirements can only be met in an apartment located on the top floor.

The placement of a real wood-burning fireplace will need to be approved by architectural and fire authorities to ensure that its use will not compromise the integrity of the building. This requirement is due to the fact that the installation of a fireplace places an additional load on the floors of the building, and combustion products escaping through the chimney can serve as a source of ignition.
In the event that it is not possible to legalize the installation of a real fireplace in an apartment, it is worth trying to install one of the options for an alternative device, because today there is a huge variety of decorative, electric and bio-fireplaces on the market.
Fireplaces and barbecues in the landscape of the site
Once you are excited about building a fireplace, think through everything carefully and objectively assess your strengths, choose a place to install it. Only after this can you decide on the type of construction.
To help you choose a fireplace-barbecue model, here are several interesting options. These are both the simplest fireplaces and more complex ones that have many useful functions.
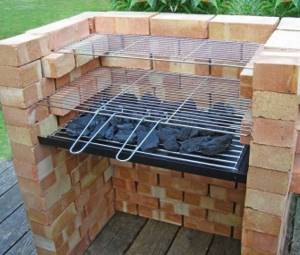
The simplest structure, accessible even to beginners
This is the simplest version of the barbecue fireplace, which even a beginner can put together. It does not require a deep foundation, since the building is not very massive. It can be made of any brick, as it has a decorative finish. An important condition will be the layout of the firebox - in any case, it should be made of sand-lime brick.
The top panel of the grill has a grate on which the products for frying will be placed. You can even arrange a grill in the firebox, since its area and volume allow this. To do this, you need to make holes in the walls through which you can pass the spit. The outer surface of the walls is finished with limestone tiles, which turns the building into a decorative decoration of the site. The only drawback of this barbecue is that in winter it must be covered with waterproof fabric or film.
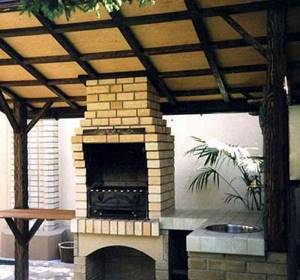
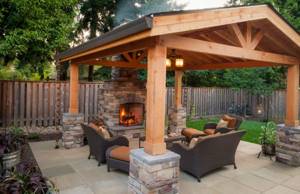
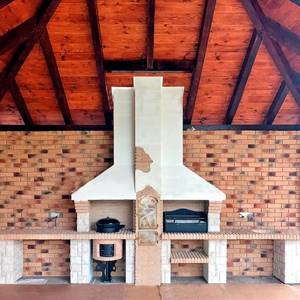
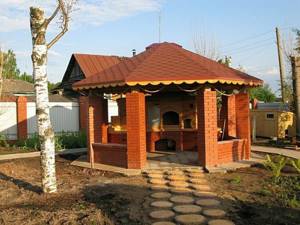
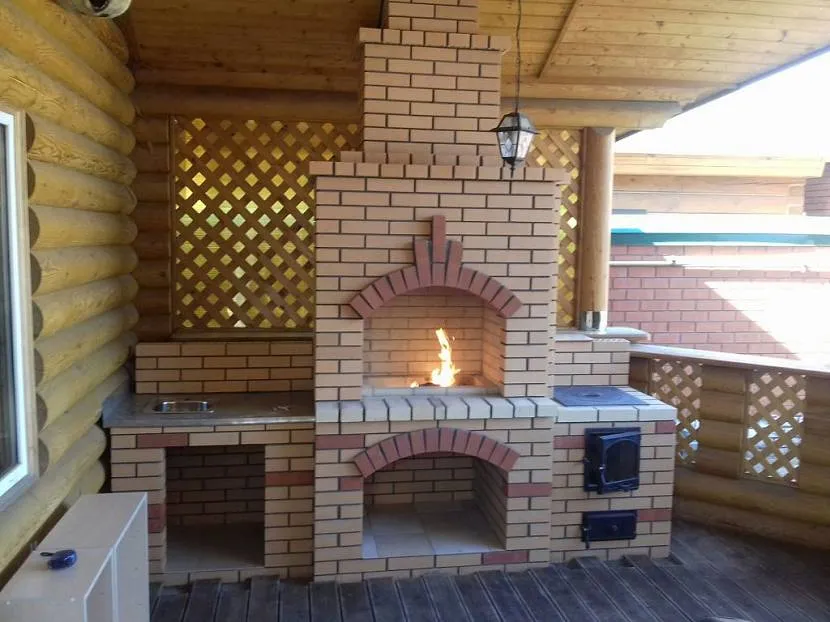
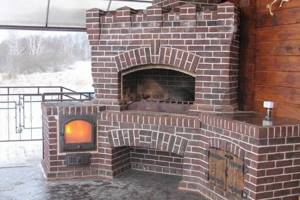
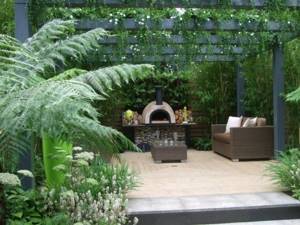
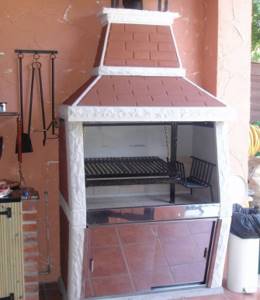
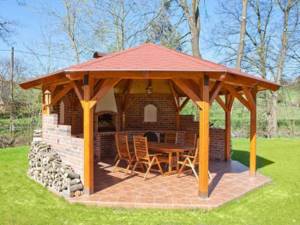
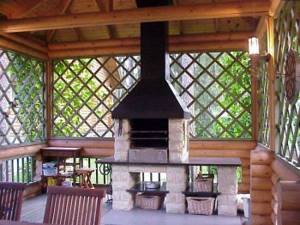
Fireplace-barbecue under a canopy - no fear of rain
This version of the fireplace is more complex in construction and is installed in a designated area under the roof. Next to it there is a cutting table and a sink. The grill is equipped with a metal grill that encloses the coals, which is extremely convenient for placing skewers or fried foods on top. The fireplace is made entirely of sand-lime brick, which will allow it to last for a long time. A supply of firewood can be stored in the niche provided at the bottom of the building. Despite the more complex design, such a fireplace-barbecue will also not be difficult to build - you just need to make a calculation of the entire structure and the necessary materials in advance.
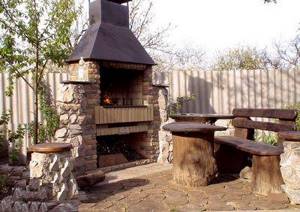
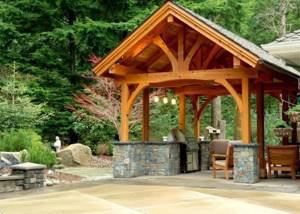
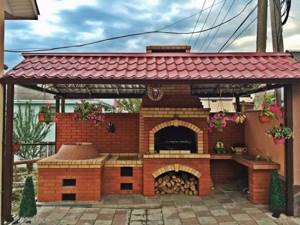
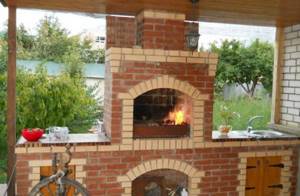
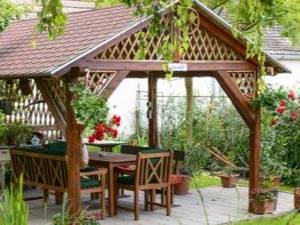
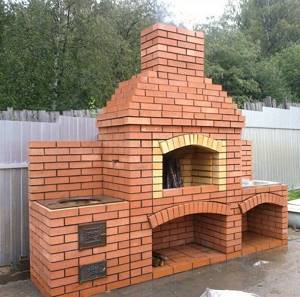
The center of a cozy outdoor seating area
In this case, a complex consisting of benches and a table is arranged around the fireplace-barbecue, which is convenient for vacationers. Everything is decorated with natural materials - stone and wood, they support the fusion of the complex with the environment. This design does not have any particular difficulties in execution; it is similar to the row diagram described above, except for the chimney, which is made of metal.
The functions here include a barbecue and barbecue, although the building has every opportunity to additionally arrange a grill
I would like to draw your attention to the area in front of the fireplace - it is originally laid with wooden round timber. The designer did a good job on the decor of the composition and ideally selected the finish of the fireplace itself and homemade garden furniture
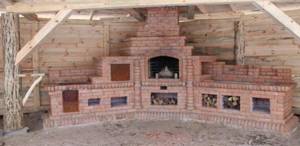
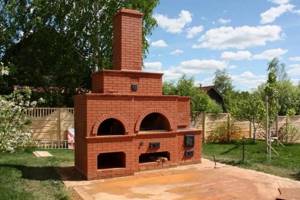
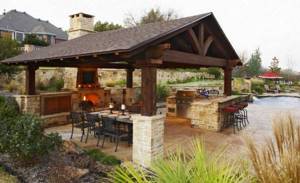
For those especially experienced in construction - a multifunctional building
And lastly, I would like to mention a multifunctional complex, which includes a fireplace and barbecue. This is a complex design, and its execution requires experience in operation and a well-thought-out design.
In this version, next to the fireplace there is an oven for baking bread or roasting meat, a stove with a hob on which you can cook any dish, including real Uzbek pilaf in a cast-iron cauldron set over an open fire.
This complex will require more expense and time to set up, but thanks to it you can surprise your guests with a variety of delicious dishes.
Kinds
Among the huge selection, there are only three options that are considered the most popular:
- Barbecue oven. She has a barbecue and a chimney, thanks to which all the smoke enters the chimney.
- Barbecue complex. The name speaks for itself; there is a fireplace, a grill, a Russian stove, as well as a stove for a cauldron and a smokehouse.
- Fireplace with barbecue function. His arsenal includes a barbecue grill and special grates at the base of the structure.
Barbecue complex
Any design is quite functional, you can easily equip it with your own hands in the country house or in the yard.
How to lay stove bricks correctly
Outdoor brick ovens are heavy and are assembled on a solid foundation. This could be a strip foundation, a reinforced concrete slab or screw piles connected by a grillage.
There are the following rules for the manufacture of brick structures:
- A layer of waterproofing is laid on top of the concrete. Ruberoid or dense polyethylene is used.
- The lower part (woodshed) is made of stove bricks. The shape of this part is arbitrary. The optimal solution is a woodshed with a height of 12 rows.
- The roasting pan is made of fireclay bricks that are resistant to high temperatures.
- To ensure that stone stoves remain strong and airtight, a solution of clay and sand is used to connect the stones.
To control the verticality of the walls, it is recommended to use a plumb line or bubble level.
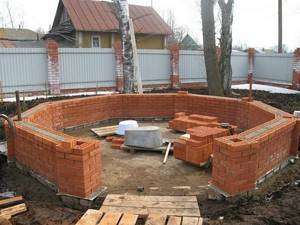
Foundation
A stationary brick grill definitely requires a foundation, which is due to the significant weight of the structure. A reliable foundation is necessary even for a small grill if you want it to look presentable and serve for a long time without subsidence or cracks.
Work algorithm:
- Using a tape measure, pegs and cord, we mark the place according to the dimensions chosen in the project.
- We remove the turf and dig a hole 30-35 cm deep.
- Fill one third with sand, compact it, water it, tamp it.
- Add the same layer of crushed stone with sand in a ratio of 3:1.
- We waterproof the walls by laying roofing material so that it protrudes 10 cm above ground level.
- We construct formwork around the perimeter from boards or timber with a protrusion of 5-10 cm above ground level.
- We lay the reinforcing mesh.
- Fill with a solution of cement, sand and gravel, prepared in a ratio of 1:2:4.
The foundation must be poured in one go so that the slab is monolithic and does not crack.
After pouring, do not rush to erect a brick structure. The foundation should dry evenly and harden after standing for at least 2-4 weeks. During this time, you can cover it with film.
- Ready foundation for barbecue
What is a fireplace-barbecue
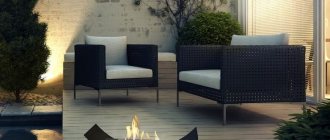
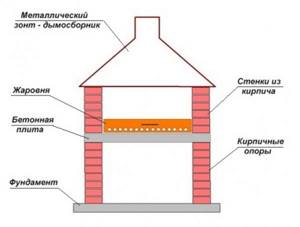
The popularity of fireplaces and barbecues is explained by the versatility of these country accessories. Such a structure becomes the center of a recreation area; gazebos or canopies and comfortable seating areas are built around it.
Having such an area with a fireplace-barbecue where you can cook a barbecue, shish kebab or grill, you can organize a party in any weather. Spending time outdoors is especially pleasant if you can spend it in comfortable conditions near a live fire. In addition, a fireplace-barbecue will be a worthy decoration of any landscape and an integral element of its design, since such buildings fit perfectly into the natural environment.
Such fireplaces in design and appearance are not much different from fireplaces installed indoors. Its simplest version consists of a foundation, the firebox itself and a chimney.
If you have the opportunity and desire to complicate the structure, you can additionally arrange around it an oven, a hob with a hole for a cauldron, a grill, as well as a sink and a cutting table. Be that as it may, the center of the entire composition will always remain a fireplace-barbecue.
You can decorate the building with various natural finishing materials, such as stone-look tiles, finishing stones or tiles.
Types of fireplaces and barbecues
Fireplaces and barbecues installed outdoors can be of several types:
- Free-standing buildings without a hood or roof, more reminiscent of ordinary barbecues, but made of brick and having a niche for firewood.
- Also free-standing fireplaces and barbecues with a stone or metal chimney. These buildings, with appropriate design, will resemble fairy-tale stoves.
- These buildings can be combined with other useful devices for preparing various delicacies on a country holiday.
- Barbecue fireplaces are located both under the roof in summer buildings and separately from them.
- You can also divide them by shape - they can be semicircular, triangular, square or round, and also have exclusive asymmetrical shapes.
Masonry tools
If you decide to build such a barbecue fireplace on your site yourself, make sure that you have all the necessary tools for this. To work you will need:
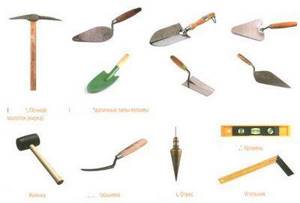
Tools for laying fireplace barbecue
- container for mixing the solution;
- shovels and bayonet shovels;
- rubber mallet and pick hammer;
- trowel (trowel);
- jointing;
- folding meter;
- level;
- square;
- plumb line
Materials
Since the fireplace will be located outside, it will be subject to the negative influence of external factors such as wind, rain, dust and ultraviolet rays. That is why there is a need not to take the cheapest ones, but to turn to high-quality construction products. To build you will need:
- Red brick;
- sand-lime brick for firebox;
- cement, sand, pebbles, crushed stone;
- metal reinforcement for the foundation;
- boards for formwork;
- facing material (optional);
- metal corner 50 × 50 cm;
- waterproofing sheet.
These are the basic materials needed for the simplest design. If it is decided to equip this complex with additional functions, then other construction, plumbing and finishing materials may be needed.
Types of outdoor fireplaces
An outdoor fireplace can be a purely decorative element of the landscape. But a much more rational option is a full-fledged oven designed for cooking. There are several types of arrangement of functional fireplaces. They differ in the complexity of their design, appearance, and operating principle.
BBQ oven
This oven is designed for cooking meat, fish and vegetables over smoldering coals. With this cooking option, food is laid out on a wire rack, which is located above the roasting pan. The fryer itself has several dampers, with the help of which the heat supply is regulated. In addition, a lid is used. The method of processing products under a closed lid is essentially an express smoking method.
Barbecue oven in the yard Source krov-torg.ru
The stationary barbecue oven has impressive dimensions. They are laid out from fire-resistant brick, stone or monolithic concrete. A barbecue fireplace can have different shapes. They are usually built with additional niches and projections that increase ease of use. A chimney is provided above the brazier, just like in a stove installed indoors.
Dishes prepared using the barbecue method are very popular in European countries and America. They make up menus for family and holiday picnics. Barbecue, as a fairly simple and quick way to cook food in the open air, is becoming increasingly popular in our country.

BBQ Dishes Source: nbcwashington.com
Stove-grill
A grill is a device for frying meat and vegetables on skewers. While barbecues often have a round shape, barbecues are usually rectangular braziers. Their depth is shallower than that of a barbecue, and the skewers are located almost above the coals, which ensures a higher processing temperature.
Stationary barbecue ovens are not much different in shape from barbecue ovens. Moreover, one niche can be used for removable braziers of different types. In this way, it is possible to prepare barbecue dishes or kebabs as desired. A fireplace barbecue made of brick can be supplemented with other stove structures - a stove for a cauldron, an electric hob, a niche for a samovar, etc.
Stove with barbecue for a summer residence Source kaminko.ru
Russian stove
The traditional Russian stove allows you to cook a wide variety of dishes, including baked goods. In addition, you can process food in it by simmering for a long time. However, a stove located outside can only be used for cooking food in cast iron pots that are placed on the fire. You can equip a stove with burners. But it is only suitable for preparing dishes in containers.
In order to be able to not only cook and fry food in a vessel, but also process it with fire and smoke, a Russian stove is built with elements for installing a barbecue, grill or smokehouse.
Russian stove on the site of a country house Source pechmaster.su
In addition to the fact that a Russian stove installed outdoors has limited capabilities, it is also very complex in design. In addition, if you make a real Russian stove, you will get a fairly large design. Therefore, on the plots of private houses they usually build not a classic, but a stylized Russian stove. It looks attractive and authentic, but is essentially a device for frying meat on a grill or grill.
This does not mean that classic Russian stoves are not built in courtyards at all. Some homeowners prefer this particular fireplace option, despite its complexity and high cost. But most traditional ovens are still complemented by a grill or barbecue function.
Stylized Russian stove Source pinterest.com
See also: Catalog of companies that specialize in the installation of fireplaces and stoves.
Tandoor
A tandoor is a jug-shaped oven with a lid. On the inside of the lid there are fastenings for hanging skewers. In a tandoor, meat is not fried like on a grill or barbecue, but baked. In a round, closed oven, the temperature spreads evenly, so there is no need to constantly turn food.
The tandoor is a traditional Asian type of oven. It was created in areas where it is necessary to save wood, and therefore the principle of its operation involves minimal fuel consumption.
With all the advantages of the tandoor, it is not familiar to us, and is used as an additional, and not the main element of an outdoor fireplace-barbecue. For example, you can build a barbecue oven and complement it with a tandoor module.
Outdoor fireplace with tandoor Source remontnik.ru
Smokehouse
A smokehouse takes up more space than a grill or barbecue. But it is a very useful furnace feature that many homeowners prefer to have. Smokehouses come in hot, cold or combination types. An oven with a regular roaster and smoker allows you to maximize the variety of menus for your family and guests at home.
Variety of gazebos
Gazebos on the site can be of absolutely any shape and design. These include light sheds with mobile barbecues, solid structures with a whole barbecue complex, and closed rooms with a stove-fireplace, where you can comfortably stay even in winter. The decision on choosing a gazebo design is made by the owners, taking into account the available free space, other buildings on the territory and the landscape design of the site.
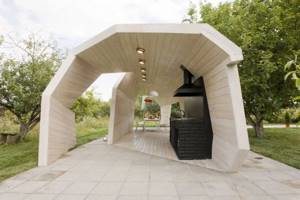
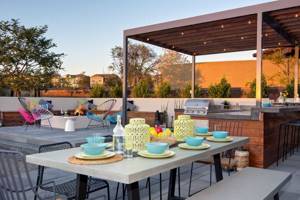
Incredible avant-garde design of a gazebo equipped with a modern stove
Pergola with fireplace-stove, surrounded by thickets of plants and flowers
Building materials for the construction of gazebos can also be different, depending on the financial capabilities of the owners and the chosen design option:
The most common material is wood, which allows the gazebo to fit into any landscape. Wood makes excellent open gazebos, similar to pergolas, where a stove is placed against one of the walls. Wood is considered the most affordable and easy-to-use material, but one of its properties is flammability, and therefore it cannot be used for all work on building a gazebo with a stove. To protect wooden structures, the material is pre-treated with special non-flammable mixtures.
Traditionally, gazebos are made of wood - a noble and durable material
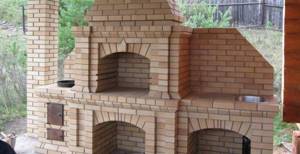
A large gazebo with a Russian stove, barbecue, stove and other components is usually built of brick or stone, however, such a large structure will require an appropriate area. In small areas such large objects will look out of place.
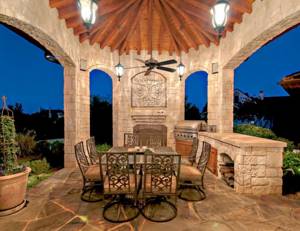
Richly decorated stone gazebo, which has an oven and grill
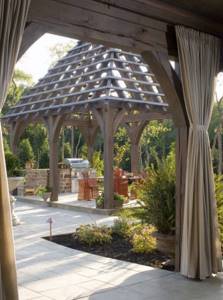
To “lighten” the structure, you can build a forged gazebo, which consists of supports and a low fence, as well as a canopy made of wood, plastic or aluminum.
Lightweight aluminum structure of the gazebo, which includes a grill
Spit and other devices
In order to provide maximum functionality to your brick barbecue, it should be equipped with as many accessories as possible. A banal device for preparing barbecue is not worth starting a grandiose project on the scale of a country house.
In the process of laying a fireplace for picnics, it would be nice to also provide a spit on which you can cook a whole small lamb. A device on which you can hang a cauldron would also be useful. In other words, a barbecue oven should become your summer kitchen, only much more functional.
In the process of laying the side walls of the portal, somewhere at the level of the fourth or fifth brick, you need to make recesses in the bricks on both sides opposite each other.
To ensure that they do not move relative to each other, a pipe is threaded into the recesses, which must remain there until all work is completed. Today, many people have beautiful stoves in their dachas, but not many people have one in which you can take and roast a wild boar on a spit.
Materials and tools for fireplaces and stoves
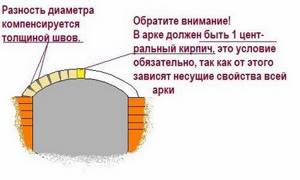
Figure 2. Scheme of the correct design of the barbecue fireplace arch.
You will need:
- Fireproof brick or regular red brick.
- Portland cement, lime, sand (or ready-made dry mix).
- Barbecue oven kit - ready-made from the store or made by yourself. It includes: grill grate, tray, oven. If desired (or lack of funds), you can limit yourself to a grill grate.
- Metal reinforcement, wooden formwork.
- A metal sheet (if you make a tray or oven for the stove with your own hands), and you will need a welding machine and electrodes.
- Container for preparing the solution.
- Trowel, hammer, wide-bladed chisel, level, chalk.
Choosing a place
It goes without saying that you want to keep your DIY BBQ oven relatively close to your home since you will have to carry all the food and utensils from home. However, you may forget something, so you will have to return to the house again to grab it
This is why it is important to have a stove nearby. Wind direction must be taken into account
It is unlikely that you will want to design the stove so that smoke constantly blows into the chef's face or fills the entire space of your house. And finally, the stove in the yard should be located on a flat surface, away from fences, buildings and overhanging trees.
Order and layout of masonry
https://youtube.com/watch?v=oylkEIHYiII
Having removed the formwork and waited until the concrete has hardened, the most important stage begins - laying bricks. Markings are applied to the slab, indicating the dimensions of the future structure. You need to apply the level again and make sure that the surface is horizontal. If significant errors are found, they are eliminated.
Rows from the first to the fourth must be laid with a spoon dressing. In front of the fifth row, a 40x40 mm corner is placed on the front side - it will act as a kind of support. To create bases for the pallet and shelf, the sides of the fifth row are placed with a tying bandage.
The spoon dressing should be followed when laying rows six to eight. Row number nine is made in the same way as row five to form supports for the table top and grille.
At this point, the construction of the table can be considered complete. Next, the barbecue oven with your own hands will be built only from the roaster side. Bricks are laid again using a spoon bandage from the tenth to the fourteenth rows. In front of the fifteenth row, a metal corner is again placed on the front side, acting as a support for the stove vault. The fifteenth row is laid.
1f8683af01cdd717f398a2a01b5a2186.jpe
5b6027f1fd565a39b7d9f054b8937253.jpe d4c248074f8a46e4f1b275d8d06f7af7.jpe
Then you need to arrange a gradually tapering vault. It can be done by alternating the splint and spoon ligaments, gradually moving them to the center. In the sixteenth row, stitching is done on the front side, spoon stitching is done on the sides. In the seventeenth row, on the contrary, in the eighteenth row we change again. The resulting protrusions can be arranged according to their purpose.
From the nineteenth to the twenty-first rows are laid with spoon masonry.
The twenty-second poison begins the pipe. In the twenty-third row, the necessary narrowing is made and work continues in the same sequence to the desired height. The higher it is, the better the traction will be.
In the penultimate row, windows are made to remove smoke. The last row will be laid completely.
The work can be considered completed. While the solution dries, all that remains is to think about the exterior finishing and reliable protection from the vagaries of nature.
We recommend reading the instructions for making a false fireplace with your own hands
Finishing work
It is necessary to install shelves, a finishing countertop, a frying grid and a tray for coals. The latter is made from a sheet of steel with folded edges. The minimum side height is about 5 cm.
You can take the grate from your old oven or buy a new chrome model. The main thing is that it fits in size. Tabletops and shelves are made of moisture-resistant material.
The top of the pipe should be covered with a stainless steel roof. This will protect the smoke windows from rain. The monolithic slab is covered with tiles or porcelain stoneware to prevent moisture from penetrating inside.
You can build a full-fledged gazebo around the barbecue stove, the canopy of which will cover the structure
It is very important that flammable objects and materials are located away from brick walls, which become very hot.
By welding the smoking chamber, the functionality of the stove will expand.
Video instruction
Conclusion
Building a barbecue oven with your own hands is not difficult if you plan each stage competently and slowly and prepare well for the work. The most important stage is masonry. The longevity of the service of the entire structure will depend on the quality of its implementation.
f865172a8d51505597d87f00badffcfb.jpe
Preparing the base
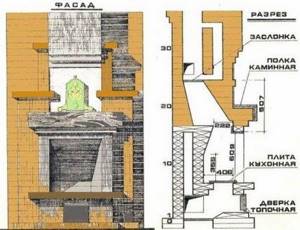
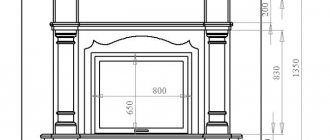
Figure 3. Basic calculations and requirements for a fireplace.
A barbecue oven is a heavy structure, like any fireplace, so it needs a solid foundation. It is necessary to make a small foundation.
- To create a solid base for the stove, it is necessary to remove the turf, remove all debris and roots from an area of 1.5 x 1.5 m and a depth of 15 cm and install wooden formwork 20 cm high.
- Prepare the concrete mixture. You can use a ready-made dry mixture by simply adding water according to the instructions on the package. Fill the area where the stove will stand with this solution, approximately 8-10 cm, lay 3 pieces of reinforcement at a distance of 30 cm from each other. Fill it all with concrete mixture for another 8-10 cm. Smooth the surface of the solution.
Some tips
It would be nice to make the stove base a slight slope of 1.2-1.3 cm (the front wall of the base relative to the back). This slope will help rainwater flow freely without becoming trapped, and your BBQ oven base will last longer. Now just give the base you created 48 hours to harden.
While your base is curing, you can head to the store to purchase the things you need to make your own barbecue, namely the firebox and grill. you should purchase them before you start laying them: you need to be sure that they will match the size of your stove or fireplace.
Brick barbecue projects: drawings, photos
Features: the length of the firebox should not exceed 1 m - this is enough for 8-10 skewers at a time. The width should be consistent with the length of a standard skewer - 47-62 cm. The height of the frying area is ideally just above the waist of the person who will cook.
Since a stationary barbecue often becomes the central decorative element of a site, this should be taken into account when designing and choosing a location. Its reverse side looks like a solid brick wall, so it is advisable to position the structure so that it is not visible from the reverse side. Or provide for its decoration taking into account fire safety.
Useful tips and general recommendations for beginners
To make not only a beautiful, but also a durable fireplace yourself, you must follow the recommendations of experts:
although the outside foundation hardens already on the 2nd day, inside it is still fragile, so walls cannot be erected right away;- first it is better to place a row of bricks without mortar, see how they lie, make the necessary trims and only then fix them;
- constantly monitor the horizontality and verticality of each row;
- the solution on which the firebox elements are laid takes several days to prepare, this is due to the need to sift and soak the clay;
- You can use the barbecue only 2 weeks after completion of construction, so that the masonry is completely hardened.
Materials
As for the choice of materials for building a gazebo in which the hearth is supposed to be placed, it is worth starting from several aspects.
It is important to consider:
- on what area is it planned to place the gazebo;
- where the stove will be located (directly inside or next to the building);
- is the gazebo intended to be used in winter;
- whether a foundation is provided or not.
What matters is compliance with the design style of the entire site and harmonious inclusion in the landscape design of the area. Many owners of even small plots try to acquire a gazebo. But in this case, it is not recommended to place bulky and capital buildings on the territory. It is better to get a small canopy or covered fabric awning, next to which you can place a small grill or barbecue. It can be made of either PVC or natural fabric. This will allow, if necessary, to quickly remove such a gazebo and use the area for other needs. A huge disadvantage of this option is the impossibility of using it in windy weather and winter for obvious reasons.
If your garden or summer cottage is spacious enough, then you can give free rein to your imagination and build a stone gazebo the size of a small castle
It is important to remember that in any case the building should look neat, not occupying an area of more than 1/10 of the entire territory of the estate
When choosing a location for a fire source, safety should be considered first. It is clear that in contact with a building made of flammable materials, an open flame can cause a fire, so when choosing a wooden gazebo, you should carefully consider this point
There are several ways to protect wood from high temperatures.
- You can install a fireproof screen at the most likely point of contact with fire or high temperatures.
- It is allowed to use fire-retardant impregnations - fire retardants, which will, if not completely make the wood non-flammable, then slow down the spread of the flame for some time, thereby allowing people to evacuate from the fire site.
- It is possible to sheathe the inside of the building with non-combustible material (for example, plasterboard). This will not completely protect the gazebo from fire, but it will not allow the flame to spread at lightning speed, as would be the case if the wood was not treated or covered with anything.
If the barbecue oven is supposed to be placed next to the gazebo, and not inside, then the owner is not limited in any way in the choice of materials. The gazebo can be made of stone, wood, woven from wicker or, as an economy class option, thick curtains can serve as its walls. It all depends on the tastes of the site owners and their financial capabilities.
Civilized hospitals
The most suitable choice is a gazebo with a barbecue among the trees for relaxation and summer meals, combined with a stationary brazier (barbecue).
Before building a gazebo on your own, you need to decide on the size (maximum number of people gathered at the table), materials and construction site so that the smoke does not interfere with the neighbors’ rest.
The shapes of the gazebo have already been established; they are either multifaceted (with six or eight corners) or classic - square or rectangular in cross-section. Type – closed with windows and doors or open, but covered with curtains in case of rain or wind
Barbecue has become so commonplace that there is already an architectural designation - a separate stationary structure for cooking meat. Like an outdoor fireplace. But first, about the construction of a barbecue-roaster-fireplace in the future gazebo.
Semi-closed wooden gazebos
The gazebos below are not completely closed from external weather conditions, however, they create an atmosphere of comfort and it is extremely pleasant to be in good company.
Thanks to the wooden sheathing, rain will be contained and will not become a serious obstacle to relaxation. In the winter season, the gazebo will no longer be used, so it is better to protect it with a shelter.
Such options can often be seen not only at dachas, but also at recreation centers, on a river or in the forest. The cheapest possible design is used, which creates some privacy, but does not close off from the outside world. In winter, this option is not used, but in summer it is the most popular, as it allows you to be seemingly indoors, but also in the fresh air at the same time.
We lay the walls
Laying a stove with a barbecue or barbecue with your own hands must comply with certain rules:
- the firebox must be laid from heat-resistant materials that can operate normally at elevated temperatures;
- the construction of the device body can be carried out using ordinary materials;
- under the stove body you need to build a strong and level base from several rows of bricks. The evenness of the podium should be checked using a building level;
- the walls must be laid with ligation of the seams;
Arranging a classic outdoor fireplace
- during the construction of the walls, it is necessary to install grates that will supply the outdoor fireplace with the necessary amount of air;
- fasten the stove door to the masonry using welded embedded parts;
- starting from the sixth row of masonry, build a base for the combustion chamber. Lay the brick crosswise so that a small part of it protrudes. This is useful for attaching barbecue nets or if using a grill;
- The wall thickness depends on the dimensions of the stove and ranges from 120 mm to 250 mm.
Brick, masonry mortar, other materials
When building a barbecue, you will need two types of bricks: fireclay and regular. Fireclay is needed for laying the firebox and chimney.
Firebox made of fireclay bricks
The furnace body is made of ordinary brick. And this circumstance must be taken into account when calculating the amount of brick.
The brand of fireclay brick ShB-8 (250x124x65 mm) is closest to a regular ceramic block, and this “extra” 4 mm of bed width is compensated for by the different thickness of the masonry joint. In other cases, the sizes differ quite significantly.
In addition to bricks, you also need masonry stove mortar. You can make it yourself, but the composition depends on the fat content of the clay, which in turn is determined by the percentage of sand. The volumetric clay/sand ratio in the solution looks like this:
- lean clay (up to 30% sand) - 1:1;
- medium clay (up to 15% sand) - 1:1.5;
- fatty clay (up to 4% sand) - 1:2.5.
Before making masonry mortar, the clay is soaked for a day, then fine sifted sand is added and thoroughly mixed until smooth. The consistency of the solution is made such that it “slides” off the trowel when it is tilted at approximately 45°.
For those parts of the furnace body that are not exposed to heat, use a regular masonry mortar based on sand and Portland cement.

The main building materials also include a metal corner 32x32x4 mm. With its help, the arches of the firebox and woodpile are formed, as well as the working surface of the table (if it is made of brick).
The rest of the stove appliances, except for the obligatory barbecue grill, are purchased as needed. These can be: ash and oven doors, grate bars, the hob surface of the stove, a damper for adjusting the draft (gate). And since metal and ceramic bricks have different coefficients of thermal expansion, an asbestos cord is also needed to install all stove accessories. They fill a gap of 3-5 mm, which is left between the metal and ceramics at the installation stage.
Stage 4 - floor installation
Plank floor in a gazebo
To install a wooden floor, you need to proceed as follows:
- Crossbars are laid along the foundation (on posts or on concrete) - thick beams that are connected using nails or self-tapping screws. They will serve as support for the walls and roof.
- Install wooden logs on the crossbars.
- You need to start finishing the floor after the walls and roof are ready. The floor can be made from planed boards. They can be connected in different ways: tenon in groove, in a quarter, using tongue and groove. Do not forget about the slope from the place where the stove will be located.
- To prevent the wooden floor from rotting, all boards should be treated with an antiseptic.