Rules for connecting to the chimney
Construction of a fireplace or stove is a complex and responsible matter.
It is necessary to build a smoke removal system for the heating boiler and heater: not only the efficiency of the heating unit or heater, but also your safety and peace of mind depends on how professionally the chimney is installed. Incorrect installation of the chimney pipe can negate all your efforts and financial investments in installing a fireplace.
Insufficient traction is the most harmless thing that can happen to you if you are careless in solving this problem. It is worse if smoke and sparks are carried into the room. It's not far from fire and carbon monoxide poisoning. Let's figure out how to connect a gas boiler to a chimney.
What do you need to know for proper connection?
Types of chimneys
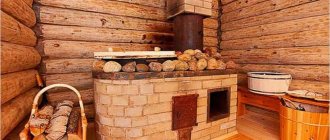
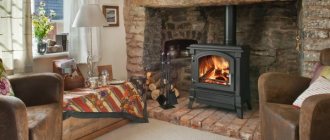
In earlier times, almost the only material for making chimneys for a heating boiler or water heater was brick. It has not lost its attractiveness even today. It has not lost its attractiveness even today. If a stove or fireplace is initially made of brick (see Laying brick fireplaces), then the chimney is most often built from it according to all the rules of stove art.
In this case, connecting the fireplace to the chimney is not required; it is part of the overall structure.
As for modern models of fireplaces, heating boilers or water heaters running on gas or other fuel, they most often have a metal body with an outlet pipe for connection to the chimney.
It is a pipe of a certain diameter, the material for the manufacture of which can be the following materials:
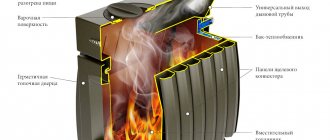
The most popular today are steel chimneys of a double-circuit design - sandwiches. They consist of two pipes, internal and external, between which a layer of non-combustible basalt-based insulation is laid.
The insulation prevents the chimney from quickly cooling and condensation forming in it.
Chimney installation options
Manufacturers offer water heaters and heating boilers with various pipe outlet options. Therefore, connecting a gas boiler to a chimney is carried out in different ways.
Chimney with horizontal section
The most common option is with a vertical pipe at the top of the firebox, but depending on the location of the fireplace relative to the outlet, the chimney can deviate from the vertical by 30, 45, 60 or 90 degrees . And in each case you have to choose how to connect the chimney to the heating boiler.
Connection methods may vary depending on room conditions. For example, it depends on whether it is possible to install a chimney with access to the roof or whether it needs to be brought out to the outer wall of the building.
In old houses with existing chimneys in the walls, the best option may be to connect a water heater or wall-mounted heating boiler to them, instead of installing new ones.
But in this case, before connecting the chimney to the heating boiler, it is necessary to first inspect and clean the smoke exhaust channel.
But the main condition for installing chimneys for a gas water heater or heating boiler is their location inside the house. The shorter the outer part, the less the risk of reverse draft occurring when the fireplace is not working due to the strong cooling of the pipe.
If this is not possible, the chimney should be well insulated and a tight damper should be installed to block the access of cold air to the room.
Attention! When connecting chimneys, it is necessary to strictly comply with the requirements of GOST, which are regulated by SNiP 2.04.05–91 “Heating, ventilation and air conditioning.”
Instructions for assembling and installing a chimney for a fireplace
Assembly of the fireplace chimney occurs from the bottom up after installing and fixing the firebox. All pipe seams must be reliably sealed, special attention is paid to the joints of the pipe with adapters and other individual elements.
Chimney installation algorithm:
- All pipe elements are first connected to each other.
- The pipe is placed on top of the smoke collector pipe and secured with a metal clamp and sealant.
- The joints of the chimney pipe parts are additionally wrapped with aluminum tape.
- A special flexible fixing element is installed at the bottom of the structure - it will hold the pipe taking into account the thermal expansion of the metal.
- In the roofing part, the chimney pipe is crimped with a special clamp and strengthened with rivets.
- A metal corner is installed in the opening of the ceiling into which the chimney pipe is placed. The corner is fixed using fasteners.
Attention! The installation of the chimney pipe must be completed in such a way that its weight does not fall on the smoke collector of the fireplace insert, but on the clamp and angle attached to the roof slab.
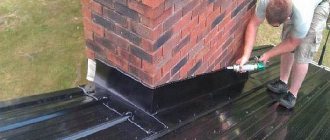
After completing the installation of the chimney pipe, you can make a brick lining or disguise it with any wall material. Before this, it is important to take care of the thermal insulation of the pipe if it is not located inside the shaft in the wall. This will provide additional safety to the structure, which is quite heated by smoke.
It is advisable to install a special protective element - a canopy or deflector - on the upper part of the chimney, rising above the roof. The second option is more preferable, because it creates additional draft, which increases the performance of furnace equipment, and also protects the chimney from water, snow, leaves and other blockages.
Chimney installation
General rules
Attention! According to the requirements of GOST 9817–95, the area of the smoke channel should not be less than 8 sq.cm per 1 kW of stove or fireplace power with an estimated flue gas velocity of 0.15–0.6 m/s.
Internal chimney device
If possible, it is better to install the chimney indoors and with small areas of deviation from the vertical. This installation method will provide the best draft and efficiency of using the fireplace or stove.
Incorrectly selected chimney configuration
If it is difficult to light a fireplace, the flame burns sadly, and some of the smoke enters the room, the draft is weak; the reasons must be sought in the incorrectly chosen chimney configuration. Moreover, the thrust force is not constant; it can vary significantly depending on the direction and speed of the wind and other weather conditions. It should be mentioned that a prerequisite for good draft (and a healthy microclimate in the house) is the presence of a sufficient flow of fresh air from the street. The flame burns a large amount of oxygen, the chimney works like a powerful hood. Modern window systems are practically airtight when closed. It is recommended to connect a separate air duct from the street to the fireplace with the possibility of adjustment. Or, during heating, set the window fittings to microventilation mode and open the window.
Insufficient chimney height
For good draft, it is necessary to ensure sufficient height of the chimney pipe in two respects:
- The total height from the grate to the top of the chimney on the roof must be at least 5 meters. The higher the height, the stronger the thrust.
- The pipe should rise above the ridge by at least half a meter, provided that it is located at a distance of up to 1.5 m from it. If further, the mark is determined taking into account the angle of inclination of the roof.
The chimney cannot be combined under one hood with ventilation pipes. If they are located in the same block, the exit from the fireplace should be raised higher.
Significant deviation from vertical
The straight vertical tube provides the best traction. Bends, inclined and especially horizontal sections worsen it. If it is not possible to make the chimney straight, it is advisable to make the offset using inclined elements, and select an angle of no more than 45º. The standards still allow the installation of a horizontal section at the connection point, but its length is limited to one meter. The sum of the horizontal projections of the displacements of the pipe axes from the level of the exit from the fireplace to the head on the roof, regardless of the slope of the pipes, should not exceed 2 m. In this case, the minimum height of the chimney (5 m) should be increased by this amount (the sum of the projections).
Incorrectly defined section
The cross-section of the chimney for a fireplace should not be less than required; more is welcome, but in moderation. Determining the optimal parameters is easy:
- For a factory fireplace, you just need to look at the instructions for the specific model. Such fireplaces have a round profile outlet with a diameter of 150 to 260 mm.
- The dimensions of the chimney for the fireplace can be approximately determined based on the dimensions of the firebox. Roughly: the cross-section of a round profile pipe should be equal to 10% of the area of the fireplace mirror (the width of the portal multiplied by its height). For more accurate calculations, take into account the shape of the chimney (square, rectangle) and its height. In addition to formulas, you can use graphs of interdependence of indicators.
If the chimney is made of brick, it is also necessary to make allowances for the resistance to gas movement caused by uneven masonry. Depending on how carefully it is performed, the cross-section should be further increased by 5-20%.
How to improve draft without reworking the chimney
Is it possible to improve draft without remodeling the chimney inside the house? Yes, there are three ways:
- Increase the height of the chimney above the roof. This can have a positive effect in a certain wind direction, if the pipe is located at a significant (more than 1.5 m) distance from the ridge.
- Install a special chimney weather vane on the head. It does not show itself in any way in calm weather, but in windy weather it protects against blowing and prevents the occurrence of reverse draft.
- Install an electric smoke exhauster. This is a moderately expensive method, but guaranteed to be effective.
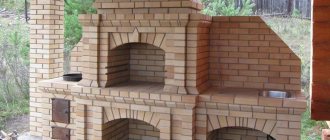
So that the fire in the firebox never goes out: building a brick pipe for a metal stove
A wood-burning stove operates using the traction principle . Hot gases released during combustion rush upward through the chimney, giving off heat along the way to heat exchangers.
To generate draft, you need a properly designed chimney. Ceramic bricks have long been used for this purpose due to the properties of baked clay.
When designing a heating system, it is very important to check the compliance of the pipe and the stove - brick is not suitable for all systems.
Types of chimneys
To build, you need to decide on the type of pipe . Depending on the location, there are:
For metal stoves, it is better not to use a mounted chimney - too much mass leads to deformation .
You cannot build such a chimney from brick; it is better to use lightweight metal pipes, thermally insulated and sewn into the body (sandwich chimneys).
This saves material and does not waste free space; the pipe can be made into several floors without loss of strength. Disadvantages - when soot ignites, the wall turns into a red-hot pillar, which leads to a fire, and if the pipe gets constantly wet from condensation, it can collapse.
If the only materials available for the chimney of an iron stove are brick, it is worth choosing the option of a root or wall pipe. It does not put pressure on the stove itself, you can connect at different levels and is not difficult.
Violations of fire regulations
It will not be possible to describe all the intricacies of fire safety measures carried out when laying a chimney within the framework of a short chapter. More detailed materials are available on our website; a lot can be learned from the instructions for the factory firebox. Let's mention the most important points:
- Between the fireplace chimney and combustible structures (floors, access to the roof) there should be a fireproof groove filled with fireproof material; basalt wool is suitable for these purposes. The distance from the outer surface of the chimney and wooden structures is determined by the type of fireplace or stove and the type of pipe.
In any case, it should be at least 13 cm for sandwich pipes and 25 cm for single pipes. If the plates covering the hole are made of steel, they are applied to wooden structures through a sheet of insulating material (asbestos cardboard, glass magnesite, gypsum fiber board).
- Instead of being cut with cotton wool, a brick chimney can be thickened to one and a half bricks (38 cm) with a lining of asbestos cardboard or LSU at the points of passage through combustible structures.
- It is necessary to maintain a certain distance between the fireplace chimney and walls made of combustible materials or install a protective screen.
- It is important to correctly install the lining of the factory fireplace insert to prevent overheating. Between the ceiling and the internal space of the cladding there should be a convection chamber separated by heat-insulating screens. Ventilation holes of sufficient cross-section must be made in the lining and chamber.
In conclusion, we note that calculating a chimney for a fireplace and its installation is a responsible matter and the execution of this work should be entrusted to qualified craftsmen.
Describe your question in as much detail as possible and our expert will answer it
Building a chimney for a metal stove with your own hands
Its construction requires the skills of a mason . In the old days, the most experienced stove maker was always invited to build a chimney. A person who is confident in his abilities will be able to cope with this task if he is patient and lays each brick carefully.
The construction of a chimney consists of a number of important stages - design, preparation of the base, purchase of materials, pipe laying, finishing.
Attention! Neglecting technological nuances will lead to serious consequences! Poor draft will cause smoke inside the room and carbon monoxide poisoning.
Poor quality materials or non-compliance with masonry technology leads to the destruction of the chimney.
Project selection
To avoid mistakes, take into account the following factors:
Type of fuel. Wet firewood, even when burning “hot” quickly, releases a lot of moisture. It evaporates and penetrates the pores of the brick.
The condensate contains sulfuric acid, which has a detrimental effect on the masonry. You need to burn with well-dried wood with a moisture content of no more than 15%.
Brick sizes. The internal diameter depends on this. The smallest pipe, a quadrangle, is formed from four bricks and has a wall width of half a brick - 125 mm, a six - 250 mm.
The more powerful the firebox, the wider the smoke outlet pipe should be.
Attention! Failure to comply with these rules can lead to a fire or collapse of ceilings, which leads to financial losses and casualties.
Materials
The chimney must withstand significant thermal loads and expansion. Ceramic bricks produced by hyper-pressing, silicate and hollow bricks are not suitable for building a chimney.
The choice should be made either on inexpensive but durable ceramic bricks of plastic molding brand M250 , or special ceramic chimney blocks. The option with solid ceramic bricks is cheaper and better. When choosing it, you should pay attention to the presence of foreign inclusions and cracks - this is the reason for rejection.
Mason's tools
Chimneys are built using simple hand tools.
Procedure
The chimney is built according to the following steps:
Foundation construction. The heavier the chimney is planned, the more reliable the support should be. The bottom of the slab or pile is below the soil freezing level and rests on solid continental soil.
Incorrectly selected pipe material and incorrect installation
The properties of the pipe material must correspond to the operating conditions. The following materials can be used to make a fireplace chimney:
Brickwork
Traditional and reliable option. It should be noted that the quality of firing solid kiln bricks must be high. This is especially important when connecting a long-burning factory firebox to the chimney. In economy mode, the temperature of the exhaust gases is low, which can cause condensation to form in the pipe. Insufficiently strong and porous bricks will begin to collapse, most quickly above the roof, where the moisture will freeze in winter.
The optimal solution is to install a stainless steel liner inside the brick channel.
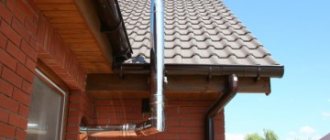
Stainless steel pipes
Stainless steel pipes, single and double insulated, are the most popular and affordable type of chimneys today. They do not require the construction of a foundation and are quickly installed. However, the mistake of some developers is choosing a product solely based on price without taking into account the properties of the metal. Not all types of steel are fully suitable for use with fireplace inserts. Heat-resistant (operating temperature 700 ºС and above) brands are AISI 304, AISI 309, AISI 316, AISI 321. Operating temperatures of brands AISI 430, AISI 409 start at 500 ºС. The maximum temperatures that steel can withstand for a short period of time are 200-250 ºC higher.
Exhaust gases in fireplaces with a closed firebox heat up to 200-500 ºС, and in an open fireplace - up to 350-600 ºС. However, these data are valid only until the fireplace is heated in the normal mode, loading no more firewood than required and not exceeding the intensive burning time specified in the instructions. Those who like to “heat up” the fireplace quickly and heat it hotter can easily bring the temperature of the exhaust gases at the entrance to the chimney to 1000 ºС. As they move along the vertical chimney, they cool down noticeably, but the first half a meter or meter can heat up very, very much.
Which pipe to choose for the chimney? The ideal solution is AISI 321 steel. At a relatively reasonable price, it has sufficient heat resistance, is resistant to soot fire, and is acid-resistant. Pipes of this brand are best suited for gas fireplaces. For coal (there are some), it is advisable to use the AISI 309 brand, its heat resistance is higher, but the price is also higher. If the budget is tight, the design of the chimney for the fireplace can be a compromise: the first segment from the firebox, about a meter long, is made of AISI 321 pipe with a thickness of 1 mm; above, less expensive steel is used, for example, AISI 409, the thickness can be reduced to 0.8 mm, if light the fireplace moderately. It must be remembered that such a chimney may not withstand the ignition of soot and you need to monitor the cleanliness of the internal surfaces of the pipes and use high-quality fuel. The grade of stainless steel for the outer shell of the insulated pipe does not matter much, and a thickness of 0.5 mm is sufficient.
It is recommended to connect the insulated chimney to the firebox through an uninsulated section 40-100 cm long, this will prevent it from overheating.
Ceramic chimneys
They fully comply with the requirements for a fireplace, but are quite expensive, so they are not used often.
Enameled air ducts
A few words about enameled air ducts, which sellers often offer for fireplaces. The operating temperature of such pipes does not exceed 500 ºС, the maximum is 650 ºС. Theoretically, they are suitable for closed fireboxes, in which the instructions directly allow the use of chimneys with a temperature limit of 500 ºС. In practice, if the manufacturer’s recommendations are violated and used with powerful fireboxes, the enameled pipe may not withstand the increased thermal load. At best, the coating will melt, at worst, the steel will burn out.
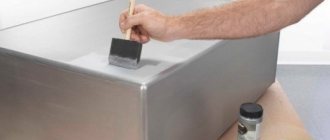
Finishing and design solutions
Children always draw a pipe on the house. The appearance becomes “warmer” and more comfortable , the house looks lived-in and neat. A crooked or collapsed chimney indicates a bad owner, so when laying a chimney you should also think about the design.
The brick chimney for the stove is already a ready-made art object . Using artistic masonry techniques and contrasting facade paints, even from cheap brick you can get a real masterpiece. However, if such masonry does not fit into the overall design, you should think about finishing.
The surface is primed, the first adhesive layer is applied, and beacon corners are installed. Then the main layer is pulled together with a rule and rubbed over. The result is a smooth surface for processing with façade paints.
Source