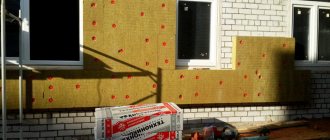
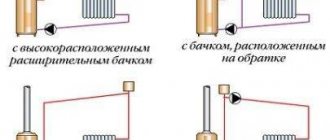
Traditionally, in private houses it is customary to use a gable ridge roof.
Few people think about its design and what it can affect.
Recently, one can observe a noticeable increase in the popularity of pitched roofs. This design not only looks more attractive and original compared to other structures,
but also has a lot of advantages :
- Proper insulation of a pitched roof can significantly improve the thermal performance of a room. The house will be warmer, and the microclimate will cool more slowly than in the case of a gable roof.
- Reduced roof weight, allowing to reduce the load on supporting structures.
- Reduced windage . This is especially important in open areas or if the region experiences strong winds.
- Easy to maintain both inside and outside.
- Possibility of creating an additional spacious room in the attic .
- Ease of installation of rafter structures and design of a pitched roof.
- The economic issue follows from the previous point - such a roof will be significantly more profitable . This also applies to the materials used in pitched roofs.
- A variety of roofing and rafter materials that can be used in such a roof.
- Original and interesting appearance . The design allows you to create a whole space for architectural and design creativity.
Unfortunately, a pitched roof has some minor disadvantages. For example, increased snow loads and all the ensuing consequences. We also recommend reading the article about insulating gable roofs yourself.
Pitched roof insulation technology
The advantages of a pitched roof include simplicity of design and installation, low windage and minimal costs for building materials. The attic space underneath is of little use as a living space; most often it is used as a storage room.
Insulation of a pitched roof is carried out in order to reduce overall heat losses; work is best carried out at the construction stage.
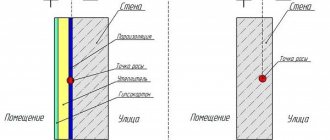
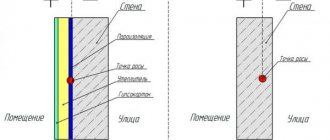
The roofing pie consists of three layers: hydro-, heat- and vapor barrier; the nuances of installation include the need for gaps, a tight fit of the insulation to the rafters and the choice of the correct side for placing the vapor barrier film.
Outdoor installation
With this approach, all layers of insulation and waterproofing are located on the outside of the ceiling. Accordingly, it is necessary to create a heat-saving “pie” that can withstand all temperature and climate changes. There are two main types of flat roofs, insulated differently:
A classic roof is insulated according to a standard scheme and the layers are laid in the following order, counting from bottom to top:
- Floor slab
- Vapor barrier film
- Insulation
- Waterproofing
This scheme has a significant drawback - external waterproofing requires periodic maintenance and repair. It is produced every two to three years and this entails additional costs, although such a roofing device is slightly cheaper than the other option - the inversion one.
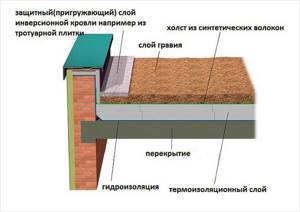
This type of roofing is considered more expensive to install, but it withstands temperature changes better and does not require such frequent repairs. Its fundamental difference from the classic version will be a different scheme for laying layers and arrangement:
- The first will be, as in the previous case, the floor slab
- Then - screed
- Next comes waterproofing
- Next is insulation
- A special film is placed on top - a filter.
- Cover the pie with expanded clay or gravel, at least 50 millimeters thick
This solution allows you to protect the waterproofing gasket and significantly increase its service life.
Selection of material, basic requirements
A low-density thermal insulation material is selected that places minimal load on the rafters, with a thermal conductivity coefficient not higher than 0.05 W/m∙°C.
The insulation must withstand changes in temperature, be moisture-resistant, non-flammable, and resistant to biological influences (fungus, mold, rodents).
An important requirement is that the material fits tightly to the rafters and that there are no gaps.
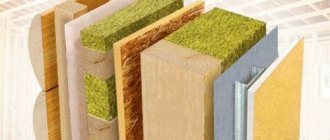
Suitable types of insulation in this case are:
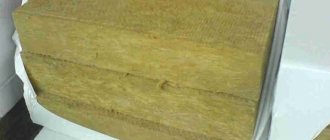
- Mineral wool from basalt rock melts.
- Good quality glass wool.
- Extruded polystyrene foam.
- Liquid polyurethane foam.
The recommended layer thickness is 15-20 cm, the width is selected taking into account the pitch between the rafters (on average 60 cm). To eliminate cold bridges and quick installation, it is more convenient to use the material in rolls.
The use of foamed polyurethane foam completely eliminates the problem of gaps and cracks. Read the article about polyurethane foam and its properties.
The cheapest option is polystyrene foam that does not meet fire safety standards; dense natural insulation materials made from flax and jute are impractical to use due to their high cost.
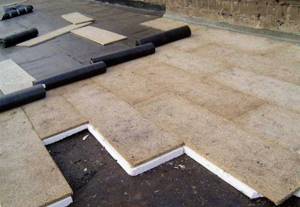
Filling with bulk materials (expanded clay or perlite) is only possible when insulating a pitched roof from the outside simultaneously with its construction; this method is considered inconvenient and is rarely chosen.
depositphotos
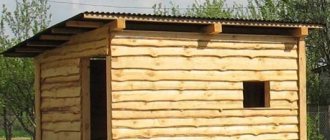
Photo report from the construction site: a pitched roof on a house made of aerated concrete
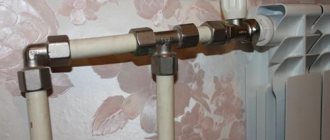
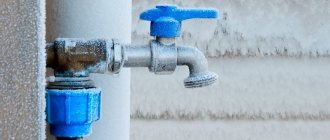
A house was built in St. Petersburg. There was no project, there was a general idea, which is presented in the photo. The house is made of aerated concrete, the finishing is plaster, the roof is seam, chosen on the basis of low cost, reliability, and ease of installation.
Idea of a house with a pitched roof
After the walls were removed, an armored belt was poured into them, into which studs (Ø 10 mm) were installed every meter. When the concrete in the armored belt reached the required deterioration, a layer of waterproofing (“Gidroizol”, cut lengthwise into strips of the required width) was laid on the bitumen mastic. A mauerlat - 150-150 mm timber - is laid on top of the waterproofing. All lumber used for roofing is dry and treated with protective impregnations and fire retardants.
Beginning of installation of a pitched roof - laying the Mauerlat
First, they put it in place (lying on the pins, held by assistants), and walk along it, hitting with a hammer on the places where the pins are. The places where the studs stick out are imprinted in the timber. Now they drill holes and simply push it onto the studs.
Since the span turns out to be large, supports made of timber (150-150 mm) were placed on which the purlin was laid, which will support the rafter legs.
Installation of racks and purlins
The width of the roof is 12 meters. This takes into account a 1.2 meter offset from the front side. Therefore, the Mauerlat bars and the purlin “stick out” beyond the walls exactly at this distance.
To ensure the removal of the roof, the mauerlat and purlin stick out from the walls
At first there were doubts about such a large offset - the rightmost beam hangs 2.2 meters. If this offset is reduced, it will be bad for the walls, and the appearance will deteriorate. Therefore, it was decided to leave everything as it is.
Laying rafters
Rafters are laid from two spliced boards 200*50 mm, with a pitch of 580 mm. The boards are nailed together in a checkerboard pattern (top-bottom), with a pitch of 200-250 mm. Nail heads are sometimes on the right, sometimes on the left, in pairs: Two on top/bottom on the right, two on top/bottom on the left, etc.). We space the joints of the boards by less than 60 cm. The resulting beam is much more reliable than a similar solid beam.
The rafters are laid
Method of fastening the rafters
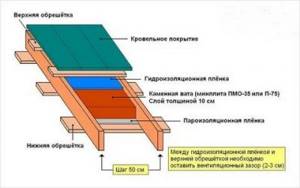
Next, the pie of a pitched roof for this case is as follows (from the attic to the street): vapor barrier, 200 mm stone wool, ventilation gap (lathing, counter-lathing), moisture insulation, roofing material. In this case it is dark gray pural.
An example of a roofing pie for a pitched roof (it’s actually standard)
We will carry out insulation from the inside later, but for now we are laying a Tyvek Solid hydro-windproof membrane (vapor-permeable) on top of the rafters.
We lay a waterproofing windproof vapor-permeable membrane
The membrane is laid from bottom to top and secured with staples. The fabric that is rolled out higher overlaps the one already laid by 15-20 cm. The joint is sealed with double-sided tape (bought together with the membrane). Then the planks are placed on top of the membrane, and on them is a sheathing for a standing seam roof.
Lathing made of boards 25*150 mm
First, the sheathing was made from 25*150 mm boards in increments of 150 mm. After installation, walking around the roof, it was decided to strengthen the sheathing. To do this, we fill 100 mm wide boards between the already laid boards. Now there is a gap of 25 mm between the boards.
Sheathing a pitched roof as a result
Next, hooks were placed on the lower gable for installing the drainage system. They are filled unevenly, since due to the large length of the pediment, it was decided to make two receiving funnels at a distance of 2.8 meters from the edge. To ensure drainage in two directions, such a relief was made.
Filled hooks for the drainage system
Next, you need to bring in pieces of metal (pictures) 12 meters long. They are not heavy, but they cannot be bent, so the “sled” disappears. For lifting, a temporary “bridge” was built connecting the ground and the roof. The sheets were lifted along it.
Lifting sheets along the bridge
Next comes roofing work, which differs depending on the type of roofing material. In this case, it was necessary to solve the problem of thermal expansion of the material - galvanized steel (pural) significantly changes its dimensions when heated/cooled. To ensure freedom of expansion, it was decided to fasten the material to the sheathing by the seam using movable clamps with a freedom of movement of 15-20 mm.
Installation of clamps for seam roofing
Laying seam roofing from pural
After laying the roofing material, what remains is the lining of the overhangs, and they are no different.
The roof needs to be brought to perfection - the overhangs need to be hemmed, but basically it is already ready
Well, the photo below shows what happened after finishing. Very modern, stylish and unusual.
House with a pitched roof - finishing is almost finished
Work order
The sequence of laying layers depends on the method of insulation: external or internal.
Due to the low slope of a pitched roof, it is advisable to insulate it from the outside; in this case, to lay heat-insulating material, a lathing is attached to the underside of the rafters, on which a vapor barrier is laid in a continuous layer (inside the room).
After installing the insulation, it must be protected from moisture; roll waterproofing or membrane films are used.
If the work is carried out indoors, first the waterproofing material is nailed down, then the insulation is laid, and the last layer is a vapor barrier.
The installation of each layer has its own nuances and requirements.
Waterproofing
Protecting the insulation from external moisture is a must, otherwise it will lose its insulating properties. A gap of 3-5 cm is provided between the roof and waterproofing.
The moisture-proofing membrane sheet or film is laid with a slight deflection. For fastening, a construction stapler is used, the places of fastenings and joints are taped with tape.
With internal insulation, the rafters remain unprotected from moisture; it is recommended that these structures be treated with antiseptics. For information about the protection of wooden structures, see the link.
Insulation
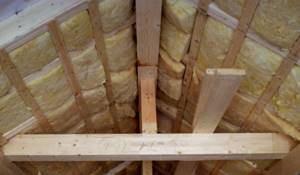
Before installation, fibrous materials such as glass or basalt wool are opened in advance so that they regain their shape. The space between the rafters is filled with insulation. Soft types of insulation cannot be knocked down or specially compacted, as this will worsen its thermal insulation properties.
Rigid slabs of extruded polystyrene foam are laid according to the same principle - in the gaps between the rafters, in at least two layers; to seal, all the cracks are filled with polyurethane foam.
Vapor barrier
The main purpose of this layer is to prevent the insulation from getting wet under the influence of rising moist air. This stage can be excluded only if you purchase insulation with a special protective layer (for example, lavsan).
When choosing the required installation side, the manufacturer's recommendations are taken into account; a mandatory overlap of 10-15 cm is provided. The material is attached to the rafters with staples, and the joints of the panels are treated with sealant tape.
Algorithm for roof insulation - how to lay thermal insulation
Installation of a roof with insulation comes down to the following sequence of actions:
First, the installation step of the rafter legs is measured. The heat-insulating material slabs are cut in accordance with the obtained dimensions, but 1 cm is added to them - this will allow the insulation to stay in place on its own. You can simplify this stage of work when installing a new roof by calculating it so that the distance between the rafters corresponds to the width of the insulation boards. A waterproofing layer must be installed in the space between the rafters and the finishing coating. The membrane must be attached to the rafters so that it envelops them. For fixation, you can use a construction stapler, which attaches the waterproofing to the rafters and sheathing. Waterproofing material must be applied to the eaves so that the collected moisture escapes beyond the roof. The described method of fastening does not allow for proper ventilation, so only a special waterproofing membrane should be used as a material. If waterproofing is already installed under the upper part of the roof, then nails are driven into the rafters every 10 cm so that the distance between them and the membrane is at least 3-5 cm. The driven nails allow you to stretch a cord along the line of which the air gap will pass in the space between waterproofing and thermal insulation material. If the insulation itself is attached using a cord, then the nails will also need to be hammered along the outside of the rafters. When using insulation materials produced in the form of slabs, installation is reduced to inserting them into the space between the rafters (naturally, they will have to be compressed a little so that they fit into the gap). Before properly insulating the roof, more rigid materials must be carefully adjusted to fit the gaps in the rafter system. For maximum efficiency, it is worth installing two-layer insulation. When installing narrow fragments that require joining along one of the planes, you need to make sure that the joints of the first and second layers of thermal insulation do not coincide with each other. The thermal insulation layer should not extend beyond the rafters, and if this happens, then additional timber will have to be placed on the rafters. To attach the insulation, a cord stretched between nails or a lath made of slats can be used. These slats need to be nailed to the rafters at a distance of 30-40 cm from each other. In this case, the vapor barrier layer must be attached before the sheathing is installed - due to the thickness of the slats, an air gap is provided. When installing a vapor barrier, you need to make sure that the material is installed hermetically. To do this, the joints need to be covered with two layers of adhesive tape.
Particular attention should be paid to the points where the material connects to the wall and chimney. When all structural elements are installed, you can proceed to the final stage - installation of the sheathing.
Conclusion
Roof insulation is a very important part of the structure, which allows you to increase the thermal efficiency of the roof. Knowing how to properly install insulation on a roof and high-quality performance of all work will allow you to create a reliable and high-quality structure that will perform its functions throughout the entire period of operation.
Roof insulation has been of concern to people since time immemorial. Even in the most primitive buildings, various tricks were used to prevent heat from the fire from leaking out. With the development of construction, technologies changed. Not so long ago, the upper sections of buildings were insulated with clay concrete or furnace slag, including ordinary shavings and cement. Today, such materials are gradually becoming a thing of the past. Modern products and insulation methods have replaced them.
How to properly insulate a pitched roof
Roofs with one slope are very beneficial from the point of view of heat conservation, since the attic of this design provides less space for the movement of cold air masses.
A pitched roof does have this obvious advantage, but only under one condition: the insulation work is carried out correctly.
Previously, roofs with one slope were insulated using clay concrete or cement-bonded slag. These two materials are not very beneficial in terms of heat retention.
What is katepal soft roofing and what are its advantages.
Read about the existing types of bitumen sealants for roofing in the article on the website.
Currently, combined materials based on insulating boards, basalt mats, glass wool or fiberglass blocks are widely used. Such insulation has proven itself to be the best, and it is also very cost-effective.
How to properly insulate the roof and the ceiling underneath it?
We begin to figure out how to properly insulate a ceiling under a cold roof and when is the best time to do it. Materials for insulation may be different. Everything will depend on the technical characteristics of the materials and the preferences of the home owner.
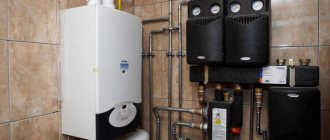
The time has come when the bulk of housing is heated using gas equipment or electric heat-generating components. Such heating appears even in country houses. But here, too, insulation material is provided. Rarely does the owner of a country house light a stove. This does not apply to fireplaces - such attributes will always be present in country houses!
Will we insulate ourselves?
Even before work begins, you should decide: who will carry out the insulation of the ceiling under a cold roof? If you have the slightest uncertainty, you should use the services of builders. If the property owner cannot complete the work themselves. Or has some doubts or uncertainty about his abilities. The companies have qualified personnel, they are familiar with the work first hand. They know how to properly insulate a ceiling under a cold roof.
Every property owner is interested in the cost of heating their building. Costs can be reduced. To do this, you need to insulate the roof. How to reduce heat losses to almost 15%. You still have to pay for heating. Those who do not want to do this invest in thermal insulation. These are the laws of heat conservation in a building; you cannot do without them.
The owner faces many questions, for example, how to properly insulate an attic roof, if there is one? Sometimes the owner uses a pitched roof. The design of the roof depends on the purpose of the house and its under-roof space. The choice of roof shape and material for it depends on the design of the rafter frame and the presence or absence of a thermal insulation layer. In the construction of private houses, two types of roofs are used: warm and cold structures.
Warm roof
A type of roofing structure that provides for complete insulation of slopes. A warm roof is installed when the space located under the slopes is used as living space. This is an excellent option when equipping a residential attic. Having an insulated attic in your home is the dream of many.
This type of roof is erected for houses that are heated. And they are used as residential buildings all year round. Here there are no heat losses through the slopes. The installation of such a roof requires considerable expenses, which will go towards the cost of materials and installation work.
Cold roof
It is erected for buildings in which the attic is not used as a living space and is not heated in winter. Such structures do not have the usual structure when the roof is formed by layering materials. Either waterproofing or thermal insulation. This is a type of rafter system on which waterproofing and roofing material are laid.
The weight of the structure is light. Its cost is lower, installation work on the device is not complicated. But this is a practical solution for a country house building. Some say that it is not customary to insulate a cold roof.
Insulation of a cold roof
The work of properly insulating the roof of a residential building is painstaking. But only they, properly executed, will create a comfortable microclimate in the building. Experts know how to properly insulate a ceiling under a cold roof. First, the attic is independently equipped into a living space.
They replace the old roofing with profiled decking or metal tiles. Condensation can form on a metal roof. This happens in autumn or spring with possible temperature changes.
There are a lot of materials on the market for thermal insulation, but not all of them are suitable for insulating a ceiling located under a cold roof. The thermal insulation layer must be resistant to moisture, have low thermal conductivity, and comply with safety standards. Do not negatively affect people's health. Yes, a lot still needs to be foreseen: what is needed for the work, how to properly insulate the roof of the house - the decision is up to the owner.
Materials
To prevent condensation, the roof of the house is insulated from the inside. This is done using suitable thermal insulation materials. The material chosen for the work must be vapor permeable. And preserve building structures and waterproofing from the outside. Moisture should not get on the thermal insulation layer. Water vapor must be removed from the attic or attic of the building.
It is best to use fibrous materials for thermal insulation. It can be mineral wool or basalt. These materials allow water vapor to pass through and reduce indoor humidity. These indicators distinguish the listed materials from polyurethane foam or polystyrene foam. But fiber insulation loses its properties in the presence of moisture. This causes them to become deformed over time.
The complexity and duration of insulation depends on the characteristics of the insulation. Much depends on the cost of the insulation material. After all, cheap material must be laid in two layers. Working with two layers is more difficult and takes longer.
It’s easier to work with expensive analogues. They can be quickly secured, which is convenient. Working with polyurethane foam will not cause much trouble. This is important for sloping roofs. Only the cost of insulation in this case will be high.
Basic material requirements
A high-quality insulation material must have some necessary qualities:
- 1. It should be light so as not to place significant load on the roofing base. To determine the weight of a material, when choosing it, you should first of all pay attention to the density.
2. The insulation must be moisture resistant. If it allows moisture to pass through, it will become saturated with it over time, and the entire structure may collapse. In addition, when exposed to moisture, the material loses more than half of its technical characteristics and simply becomes ineffective.
3. It is necessary to take into account the thermal conductivity coefficient: the indicator should be low - approximately about 0.05 W per square meter. meter.
4. You should choose environmentally friendly materials, especially when insulating the roofs of residential buildings.
5. It is also necessary to take into account such qualities as fire safety, flammability, self-extinguishing.
6. The insulation must be completed in such a way that it fits tightly to the surface.
7. A very important quality is resistance to changes in temperature conditions and sudden temperature fluctuations. The length of the service life largely depends on it.
8. The service life is determined by several factors, including high-quality installation and the specific type of material.
- Fiberglass, mineral wool, polyurethane foam, extruded polystyrene foam, and basalt wool are suitable for insulating a pitched roof.
They meet all the basic requirements for insulation quality.
- Sometimes natural materials are used: straw, linen insulation, seaweed, etc.
However, they are not durable, and some varieties are quite expensive.
How to insulate a concrete roof of a garage or house
Externally, you can use polystyrene foam and mineral wool slabs of increased rigidity, for example, Tekhnoruf from the well-known company TechnoNIKOL. External insulation of a concrete roof is preferable when the ceiling has been finished inside the room and additional costs will be required for dismantling and installing the finishing. In addition, high-quality waterproofing of the insulation will be required, since it will be exposed to moisture all year round.
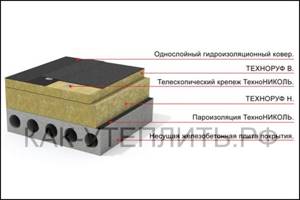
Photo. Scheme for laying mineral wool slabs on a flat roof
If waterproofing is properly installed on the outside, then work can be done from the inside. In this case, you can use cheaper mineral wool with a lower density, as well as foam boards. Please note that carrying out work inside is accompanied by a loss of some ceiling height in the room. And mineral wool needs to be additionally protected with a vapor barrier membrane from moisture contained in the air.
Insulation of a pitched roof
As you know, a pitched roof is the easiest to install, operate, and further maintain. It is based on a frame system based on wooden beams of a specific section, which are supported by a mauerlat. The insulation of the roof must be taken care of already at the stage of its installation. In this case, the insulation becomes an integral part of the roofing pie and reliably protects the interior from cold penetration in winter and overheating in hot weather. It also prevents condensation from forming during sudden changes in temperature and humidity levels.
Algorithm for carrying out installation work
In order to insulate the roof from the inside with your own hands as efficiently as possible, you need to carefully prepare - study topical articles and forums, watch training videos, consult with professionals. The work procedure itself can be divided into four stages:
Arrangement of waterproofing. This step is usually done when covering the roof with roofing material. The waterproofing film is mounted to the rafters with slight sagging
When laying a hydrobarrier, it is important to lay it with the smooth side facing up, then seal the joints with tape. After the film covering is laid, it is fixed with counter-battens, to which the sheathing is nailed.
Installation of thermal insulation
At this stage, insulation of optimal thickness is selected, cut to the required size and placed between the rafter beams. To keep the insulation in place, it is secured using small slats, rope or fishing line stretched between the rafters. To avoid the appearance of cold bridges, heat-insulating mats are placed with each row offset to the side.
Installation of vapor barrier. This film material is placed with the smooth side towards the insulation, and the rough side towards the room. It is important to do everything clearly and not confuse the bottom with the top. Laying a vapor barrier is an important step when arranging the “pie”. Its installation is carried out using thin counter-battens or a construction stapler. Installation of bars and guide profiles. This stage is necessary for installing facing materials and creating a ventilation gap.
You can do the work yourself
Materials and tools
Required for work:
- insulation that meets the requirements;
- vapor barrier;
- waterproofing;
- construction buttons, nails;
- tools (carpentry);
- adhesive tape.
Work order
As a rule, a pitch of approximately 60 cm is maintained between wooden rafters, since the standard width of insulation in mats or rolls is 61 cm. The purpose of the technological margin is to fit the sheet tightly into the free space between the beams and prevent the formation of gaps.
- First, a vapor barrier layer is fixed on the inside between the rafters. To do this, use construction buttons or brackets.
- The vapor barrier layers must be completely sealed. For this purpose, all joints must be glued using adhesive tape. From the inside, the vapor barrier layer is completely protected by any type of finishing: fiberboard, clapboard, finishing panels, plasterboard.
- On the outside, insulating material (mineral wool, fiberglass, etc.) is laid at least 15 cm thick. If the material needs to be cut, a special construction knife is used for this. During installation, it is necessary to ensure that the joints of the material fit very tightly.
- The edges of the layer of thermal insulation material and the vertical surface of the outer part of the walls must coincide. To limit the insulation, a board is used: it must be nailed between the rafters. To protect the insulation on all sides, the top edge of the board should be flush with the rafters.
Nuances when drawing up a plan
This working moment always complicates the task. To make the correct calculations , you need to consult with experienced roofers or use a construction calculator, which can be found on the Internet. In any case, the roof is not complex and no problems with calculations and drawing up a plan should arise. What coins are worth paying attention to:
- The size of the beam diameter is affected by the size of the roof. According to technology, the length of the rafters determines the height of the entire roof structure. The width between the beams is from 50 to 100 cm. If beams with a small cross-section are used, then it is necessary to take a small step.
- The roof covering affects the number and thickness of the boards. The permissible size of the sheathing for metal tiles is 30 cm, and for slate - 45 cm. Under flexible tiles, a substrate is made in the form of chipboard sheets, since the material is built-up, there should be no gaps.
- The amount of mineral wool is selected based on the area of the entire roof. The number of boards for the end strip is selected from a certain number of the perimeter of the structure, for example: the perimeter is 25 m, therefore, the number of boards should be equal to exactly this length.
- If you purchase metal tiles, you will find installation instructions along with the material. But basically the fastening is carried out using the same technology. Nails or screws are driven or screwed into the sheathing. The exception is flexible tiles, which are fixed with a burner.
- The total amount of roofing is calculated by the area of the slope. It is advisable to take a 5% reserve for unforeseen situations.
- Where you live also affects the angle of the pitched roof. In flat conditions, the angle should be gentle, since strong winds often occur in such places. The angle increases if there are wind barriers around the perimeter of the house: trees and high-rise buildings.
Features of insulation technology
If the base of the roof is reinforced concrete slabs (they are used, for example, when constructing a garage roof), thermal insulation must be made from the outside. To do this, foam plastic is used, and a concrete screed is laid on top.
The technology requires preliminary carrying out the necessary preparatory work. The slabs should be cleaned of dirt, dust, and various deposits.
The joints located between the slabs are sealed using high-strength polyurethane foam or caulked with fiberglass. The surface prepared in this way is covered with high-strength foam. Thermal insulation material is laid in two layers, staggered and overlapping. It is better to secure the insulation boards together using construction film.
Waterproofing is laid on top of the insulation layer. Ordinary roofing felt or roofing film is perfect for this, both in terms of quality characteristics and price. A concrete screed with special plastic additives or reinforcement is installed on the finished layer. To avoid cracking of the coating in the future, special frost-resistant solutions must be added to the concrete composition.
How to insulate a concrete roof with your own hands
To prevent condensation, it is necessary to protect cold concrete structures from warm air, which contains a lot of moisture. When the air cools, moisture vapor precipitates in the form of condensation. Insulation of reinforced concrete slabs can be done inside and outside, but the stages of work, types of thermal insulation and finishing materials will differ. Let's look at insulating a flat concrete roof step by step.
How to insulate a concrete roof from the outside
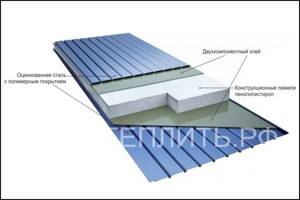
The structure of a sandwich panel with polystyrene foam insulation
The simplest and most reliable way to insulate a flat roof from the outside is to use sandwich panels. As can be seen from the photo, such a panel consists of two sheets of galvanized or painted corrugated board, between which there is polystyrene foam. On the one hand, sandwich panels are reliably protected from moisture and mechanical damage and can withstand heavy loads, and on the other hand they have low thermal conductivity.
Laying sandwich panels will require the use of construction equipment, which will significantly increase the cost of the work. A simpler option, when you can insulate a concrete roof yourself, is to use expanded polystyrene with roll waterproofing, for example, roofing felt. This technology is shown in the video at the end of the material. Such insulation of slabs can last for many years, the main thing is to check the waterproofing.
How to insulate a concrete roof from the inside

Photo. How to insulate a concrete ceiling and ceilings with foam plastic
It will be much easier and cheaper to insulate this structure from below, provided that you do not have to dismantle the expensive finishing on the ceiling. The easiest and most inexpensive way to insulate any surface is to use foam boards, despite the fact that it is a highly flammable material. If you plan to sheathe the ceiling in the future, this will not be a serious problem, especially if you use plasterboard sheets for finishing.
You can use non-flammable basalt thermal insulation, but attaching it to the ceiling will be much more difficult. It will be necessary to make an additional frame from profiles, as well as protect the mineral wool with a vapor barrier. In the video at the end of the article, we have selected a video clip for you, where one of the craftsmen shares his method of insulating a concrete garage roof from the street, using polystyrene foam boards, plywood sheets and roofing felt for thermal insulation.
Internal insulation technology
To properly insulate the roof from the inside, it is necessary to lay three layers:
Such a “pie” must be created both when the base is reinforced concrete slabs and when there is a beam structure made of wood.
To create a water barrier, a special material is used, which is laid on top of the rafter legs.
This is necessary when the height of the rafter leg is greater than the thickness of the thermal insulation.
If the thickness of the material for thermal insulation and the height of the rafter leg are equal, the film is laid on the top of the bars used to extend the rafters. Installation of waterproofing is carried out across the slopes, with an overlap of 10 cm. At least a 50 mm gap is maintained between the roof and the waterproofing layer. For this purpose, bars with a cross section of 50 x 50 mm should be prepared in advance.
After unpacking the thermal insulation mats, they should be left for some time (from 15 to 25 minutes) to restore their dimensions. To speed up the process, you can shake the insulation material.
In the case where the required width of the insulation is previously known, it must be taken into account at the project development stage. Mats measuring 1.2 meters can be laid in two layers with a distance between rafters of 0.6 meters. In all other cases they must be cut. After restoring the size of the insulation, it is cut and, in accordance with the drawn up project, placed between the rafters.
It must be taken into account that the material must be installed in spacers. Its width should exceed the distance between adjacent rafters by 3 cm.
What is good about rubber bitumen mastic for roofing and how to use it correctly?
More about the truss system for a pitched roof here.
In the case where the mats were not cut in accordance with the length of the slope, to ensure reliable insulation of horizontal sections, the length of the overlap will be from 20 to 30 cm.
There must be a gap between the waterproofing film and the insulation layer. For this purpose, conductors based on bars are used.
The last stage of installing a thermal insulation layer is the installation of a vapor barrier. It is necessary to prevent condensation and moisture from penetrating into the hygroscopic insulation, which can lead to dampening of the material and loss of its quality characteristics.
The vapor barrier is located at the bottom of the rafters and is secured using staples or galvanized nails with flat heads. The vapor barrier should be laid with a 10 cm overlap. To ensure the tightness of the canvas, a connection is made using adhesive tape.
In some cases, the underside of the insulating material is equipped with a vapor barrier. In this case, there is no need to install additional layers.
Installation of waterproofing is carried out over a layer of thermal insulation if polypropylene or polyethylene film is used, which do not allow water vapor to pass through.
Installation of thermal insulation is carried out when breathable membranes are used.
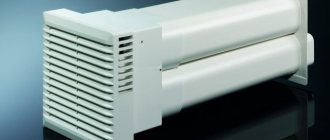
Ventilation of the insulation system is ensured by 1 or 2 gaps.
One hole is made between the waterproofing layer and the roof. It serves to remove atmospheric moisture, which can enter the under-roof space as a result of condensation or leaks.
The second hole is located between the layers of thermal and waterproofing. Its purpose is to remove vapors entering through an insufficiently sealed vapor barrier from the interior.
General requirements and design features of insulation of pitched roofs
In Western countries, where the climate is similar to Russia, houses consume much less energy, because the thickness of the insulation of building envelopes is greater than what is used in our country.
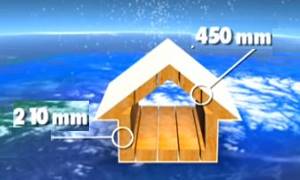
Insulation thickness in Russia Insulation thickness in Sweden
Thermal insulation of buildings is a proven way to save energy. In order to save money, using insulation of the minimum possible thickness leads to intense heat exchange between the room and the outdoor environment. This greatly increases heat loss, and therefore heating costs.
Roofing structures, in addition to roofing material, also include other elements and coatings, without which it is impossible to ensure the proper operation of the roofing system. Layers such as a vapor barrier, thermal insulation and ventilation are responsible for the practicality, durability and functionality of the structure.
The insulation rates for different roofing materials are approximately the same. The differences are mainly in the size of the ventilation gap, but the principle is the same. There must be a ventilation gap to remove excess condensate, especially for pitched roofs. It is impossible to lay the insulation close to the finishing coating, because the formation of condensation in such places is inevitable and it is impossible to create an absolutely sealed system into which air, and therefore moisture, does not penetrate. And if it penetrates there, it must be removed, otherwise the insulation becomes oversaturated with moisture, while its thermophysical characteristics deteriorate, and processes of rotting of the wooden elements of the rafter structure occur. Ventilation of the system is ensured using vents and spacer rails. The slats determine the height and number of air gaps above the insulation. They must be installed along the rafter legs so as not to interfere with air exchange and to prevent the formation of stagnant zones for drip water. In complex structures from an architectural point of view (the presence of attics, roof windows, parapets, etc.) it is much more difficult to ensure air circulation. Therefore, in such roofs it is necessary to provide additional ventilation holes along the ridge of the roof and overhang of the roof, along the entire perimeter.
When considering the various temporary labor costs for the construction of a particular type of roof, it is necessary to take into account not only immediate needs, but also the cost of time and money for its maintenance during operation. For example, if we compare metal tiles with natural tiles, the following picture appears. Due to the lighter weight of metal tiles, from an installation point of view it is much more convenient and simpler, but the low weight is also a disadvantage. Due to the lightness of the material and large area, a problem arises with its high-quality fastening. If piece tiles do not require additional fasteners for the most part, then metal tiles require about 10 - 12 screws per 1 m2 of coverage, so installation speed is naturally lost, despite the fact that laying large sheets is faster. In addition, the service life of roofing coverings made from natural materials is longer than those made from metal. This is explained by the fact that, unfortunately, no one has canceled corrosion and any mechanical damage can lead to defects, which can only be eliminated by replacing part of the coating. You will have to remove the entire sheet, even if the area of the defect is negligible. Soft roofing coverings have their advantages, one of them is that there are no restrictions on the shape and size of the roof itself.
Review of some insulation materials
Mineral wool
A thermal insulation material consisting of long fibers of inorganic origin that has been melted.
Produced in the form of thermal insulation mats and slabs.
- It has low thermal conductivity, a high level of strength in relation to mechanical loads, and high water repellency.
- The presence of randomly arranged fibers provides excellent sound insulation qualities.
- Mineral wool does not deform when exposed to cold or heat.
- It has chemical and biological resistance and is environmentally friendly.
- Excellent thermal insulation qualities are ensured by the presence of many air channels and pores. Belongs to the class of non-combustible materials.
- Quality characteristics are maintained for more than 10 years.
This material has excellent thermal insulation qualities.
- Due to the high level of sound insulation, it is excellent for insulating noisy types of roofs - for example, metal tiles.
- The elasticity of the material allows it to achieve a tight fit to the surface, which ensures ideal thermal insulation.
- The material is not very dense, so if necessary it can be cut using ordinary scissors.
- Its use as insulation makes it possible to significantly reduce financial costs for heating.
Expanded polystyrene
This material occupies a special place among modern insulation materials due to its unique heat-insulating and sound-absorbing qualities. However, due to its vapor-tightness and flammability, it is not recommended for use on flat soft roofs. The choice of extruded polystyrene foam provides excellent ventilation of the room.
The material is fixed on the inside. The slabs are laid in one layer directly onto the waterproofing. Care must be taken to ensure that the edges fit snugly. The joints are filled with polyurethane foam, and reinforced tape is glued on top.
During the installation process, it is important to monitor the tightness of the edges. The joints between the plates should be filled with polyurethane foam, on top of which reinforced tape should be glued.
- Due to its characteristics, a pitched roof allows you to retain the maximum amount of heat.
- To reduce heat loss, the roof must be insulated according to all the rules.
- The main requirements for insulation material are lightness, high thermal insulation qualities, and moisture resistance.
- To insulate a pitched roof, glass wool, mineral wool, fiberglass, etc. are used.
- To carry out the work, it is necessary to prepare tools and materials in advance.
- Work must be carried out in strict sequence.
- Internal thermal insulation is carried out in the following order: waterproofing - thermal insulation - vapor barrier.
- Ventilation gaps are also required.
- The modern market provides a wide selection of insulation materials for pitched roofs.
Roof insulation from above
Thermal insulation of the roof above the rafters will qualitatively protect most of its structural elements from precipitation and temperature changes. In this case, the insulation is laid on solid wooden sheathing. This method is also interesting because it provides the opportunity to use open rafters when decorating the interior of the attic.
But a problem immediately arises - where and how to attach the waterproofing material? The modern market offers thermal insulation panels with already provided waterproofing. In this case, you need one level of air circulation located between the thermal insulation material and the roof. The air cavity is created by means of a counter-lattice, in which the slats are laid parallel to the rafters. A necessary condition for the high-quality functioning of such thermal insulation is the installation of a good vapor-proof layer on the inside of the roof.
The advantages of this roof insulation scheme are the minimal risk of cold bridges, constant temperature and humidity of all structural elements, which eliminates the possibility of thermal deformation of materials; the most effective sound insulation compared to other constructive methods; maximum use of the entire internal space of the attic floor.
Disadvantages - the difficulty of performing insulation work on a roof with a complex shape, high requirements for under-roofing films, and the impossibility of carrying out installation work in bad weather conditions.
Pros and cons of pitched roofs
Like any other structure, pitched roofs have their own advantages and disadvantages.
Relatively small losses of thermal energy.
- As is known, the thermal conductivity of materials and architectural structures varies by the amount of heat lost per unit of time from a square meter of roof. Due to the fact that the area of a pitched roof is always smaller than the area of a gable roof, under all equal insulation conditions, the losses are always mathematically smaller. This is very important at the present time, when the cost of coolants is constantly rising, and during the heating season the costs of maintaining buildings and structures amount to impressive amounts. Another nuance is that our country has ratified an agreement to minimize the negative impact of the greenhouse effect. This is a very significant document that provides for a whole range of various measures aimed at reducing CO2 emissions into the atmosphere. The reduction is achieved, among other things, by reducing heat loss in buildings. Currently, minimum heat loss parameters have been established at the legislative level, obliging all buildings to install thermal protection.
Heat loss in a residential building without insulation
A pitched roof has a simple structure and requires less materials for construction.
In modern architecture, pitched roofs can have a rather original design.
The disadvantage of pitched roofs is the difficulty in creating residential attic spaces. But this can be considered a dependence on existing traditions - there are countries in the world where the vast majority of buildings have flat roofs, this phenomenon is explained by the traditions existing in the area.
Types of insulation
The pitched roof has a simple design. This allows you to use various types of insulation in it:
Expanded polystyrene is one of the most popular insulation materials. Many people confuse it with polystyrene foam, since their properties are very similar: very light, environmentally friendly material , which is also quite cheap.
It is installed very simply and without special tools. The material also retains heat effectively, as it has many air chambers.
The most popular manufacturers are Penoplex and TechnoNIKOL.
Mineral wool - perhaps everyone associates insulation with this material. The material has impeccable thermal properties, but is extremely unstable to wetness . It has more mass and costs slightly more than polystyrene foam. Mineral wool is very easy to install from the inside of the attic by laying sheets of mineral wool between the rafters. We have prepared an article for you where we talk in detail about roof insulation with mineral wool from A to Z.
Ecowool - practically not used in Russia, but very popular in the West. The properties are very similar to min. cotton wool It comes in both bulk and sprayed consistency. Ecowool consists of recycled cellulose and waste paper. It has excellent thermal properties, is lightweight, cheap, and environmentally friendly . The material has a long service life and prevents noise and vibration.
Penoizol is almost the same as expanded polystyrene, only it does not burn, does not melt and does not get wet .
Selection of materials for insulation
Currently, several types of insulation are used to insulate roofs. Each has its own characteristics, strengths and weaknesses.
Table. Types of roof insulation
Any insulation has several of the most important characteristics that influence operational parameters and installation technology. A feature of most pitched roofs is the inability to frequently inspect the condition of all elements of the rafter system. Leaks and deviations from technology are detected only when the geometry of the system is noticeably disrupted or water leaks appear in the interior. Such visible consequences take a long time; during this period, the load-bearing elements receive critical damage and require complete replacement. As a result, the cost of repair work in some cases exceeds the estimate for new construction.
In houses with a pitched roof there is no way to control the condition of the rafters and insulation
What should you pay special attention to when choosing insulation for pitched roofs in order to minimize the likelihood of negative consequences?
Flammability.
- Mineral wool and glass wool do not burn at all; in many cases these materials are used as fire barriers. Modern foam plastics do not support open combustion. In last place is polyurethane foam. Accordingly, from a fire safety point of view, preference should be given to mineral wool and glass wool, in second place are polystyrene foam and extruded polystyrene, and in last place is polyurethane foam. But such a scale is very arbitrary. The fact is that if a building catches fire, the roof will suffer in any case, it does not depend on what material its insulation will be made of. Wooden floor beams, sheathing and other building materials will burn. In practice, firefighters have never encountered a building in which, after a fire, only the roof remained intact, and only for the reason that it was insulated with mineral wool.
Main characteristics of different types of mineral wool
Restrictions on the slope of a pitched roof
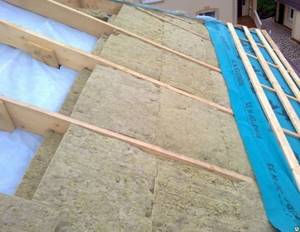
When insulating a roof with mineral wool, it is necessary to attach a windproof membrane
The higher the hygroscopicity of the insulation, the worse it retains heat.
Thermal conductivity values of insulation
Conclusion. To insulate pitched roofs on ordinary extensions, it is recommended to use polystyrene foam. This material does not support open combustion, is not afraid of moisture and wind, and is the cheapest. It is easy to cut and lay, and in terms of thermal conductivity, it fully meets all the requirements of developers.
Technology
Contrary to popular belief, it is better not to do insulation during the construction process. After completion of the work, the house undergoes shrinkage, which can cause minor deformation of all structural elements. As a result, gaps appear on the surface of the heat-insulating cake, which negatively affects the quality of the work performed. Professional builders recommend waiting about a year and only then doing insulation. The process can be divided into several stages that require detailed consideration.
Preparation
Independent insulation of the roof of a wooden house begins with an inspection of all structural elements. This is especially true for old buildings where the roof leaked.
During the inspection, it is necessary to pay attention to damp areas where traces of rot are visible or fungal spores are observed. Such elements are cleaned and treated with special compounds, and if necessary, a complete replacement is carried out.
This rule cannot be ignored. Despite its many undeniable advantages, wood is very dependent on a humid environment, so if there are traces of rot on the surfaces, it makes no sense to engage in thermal insulation until such phenomena are completely eliminated. Dampness will gradually destroy the rafters and ceilings, which will at least lead to damage to the thermal insulation layer.
About the benefits of hydro- and vapor barrier
It is no secret that high-quality thermal insulation is a multi-layer cake, where each element performs a strictly defined function. In the standard version it looks like this:
- waterproofing;
- sheathing (if necessary);
- insulation;
- vapor barrier;
- finishing.
The first layer is waterproofing. Here you can use ordinary polyethylene film, which will do its job perfectly - protect the insulation from exposure to dampness.
Oversaturation leads to separation of the compressed granules with subsequent destruction of the insulation board. Attach the waterproofing directly to the base, fixing it to the rafters with the staples of a construction stapler. If your budget allows, you can purchase a superdiffusion membrane with a reflective layer. This is an expensive material, but it solves 3 problems at once: it protects from moisture, reflects thermal energy, creates additional insulation and sound insulation.
Then the thermal insulation is laid. The recommended thickness of the insulating layer varies between 10–25 mm depending on the climatic characteristics of the region. Ideally, a dense layer of insulation fills the free space between the rafters. A small ventilation gap is usually left at the top of the roof, which will ensure air circulation and prevent condensation from forming inside the insulating pie. Let us add that if mineral wool is used as roof insulation, it should not be used to cover the electrical wiring.
The final layer is a vapor barrier. This is a film that is designed to trap warm, moisture-laden air rising from residential premises. Here you can also use polyethylene, the joints of which are glued with construction tape. If the work is done correctly, the insulation is in a kind of waterproof cocoon, while the ventilation holes left do not interfere with natural air circulation. A finishing coating is laid on top of the vapor barrier.
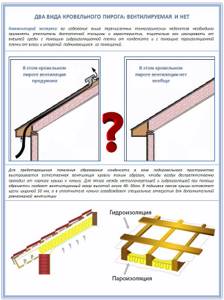
What is a pitched roof pie?
Let's first figure out what the roofing pie of a typical pitched roof actually is. All pitched roofs are divided into ventilated and non-ventilated. In residential buildings, and in most technical enclosed spaces, such a roof is made with ventilation if it has insulation.
The fact is that in any living space there is water vapor (from the kitchen, people’s breathing and the presence of moisture in containers), which rises and, despite the vapor barrier, can penetrate the insulation. If the insulation fits tightly to the ceiling, then the moisture has nowhere to go, and gradually the heat-insulating layer begins to become damp and overgrown with mold.
Therefore, there should be a little space directly above the insulation, through which air from the street will pass and take away excess moisture. But in technical rooms, the pitched roof is often not insulated at all, and therefore no one thinks about its ventilation.
Now let's understand the concepts. So, the ceiling of a pitched roof is made suspended or hemmed:
- Suspended ceiling. Here, between the ceiling and the suspended ceiling, 8-10 cm of empty space is left, where insulation is placed or ventilation is organized.
- The false ceiling is attached directly to the roof, and for only one purpose - to improve its aesthetic appearance from the inside of the room. False ceilings are good, first of all, because they do not “eat up” the height of the ceiling at all.
The ceiling of a pitched roof does not have to be made at the same angle as the roof - a horizontal option is also easy to implement. But the first method will suit you only if the ceiling itself is very low, and every vertical centimeter is important to you, or if you plan to create a unique interior design.