What is Kholmov's boiler?
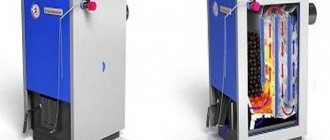
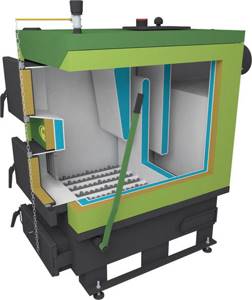
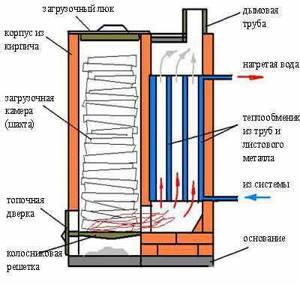
Kholmov boilers are long-burning solid fuel devices. Their design has two vertical chambers. The first shaft, a larger one, is necessary for fuel loading and the combustion process. Fuel combustion is carried out only in a closed space in the lower part of the stack, because of this the unit is also called a shaft-type boiler with bottom combustion. The second shaft, which is smaller, burns fuel gases. In addition, it contains a heat exchanger, and it is here that the water for the heating system is heated with the greatest force.
The mine boiler operates on various solid fuels. The boiler is produced with a capacity of 10, 12, 25 kW. A full load of the furnace ensures that the unit heats the room for an average of 12-16 hours. Dependent and independent units are manufactured.
Recommendations and operating experience
Many people mistakenly believe that if you increase the area or number of heat exchangers inside the chamber, this will increase the efficiency of the boiler. In fact, the largest amount of heat is obtained in the radiation part - about 60-70%.
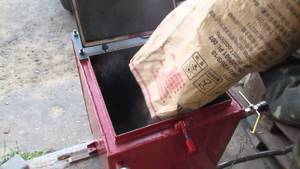
It is recommended to stack firewood along the grate, and not across it, this will ensure better and more uniform combustion of the fuel. The boiler is loaded either completely every 12-16 hours or added periodically. Ash must be cleaned out once every 2 days. The heat exchanger is cleaned once every half month.
Kholmov's boiler quickly gains temperature. When fully loaded, it reaches extremely high temperatures in just 20 minutes. For 1 hour of heating, 3 kg of briquettes are required. When fully loaded with this fuel, it heats for about 13 hours; dry birch (36 kg) burns for up to 9 hours. In some cases, the boiler was unable to operate during the off-season, when a supply temperature of up to 50° was required, as well as at a minimum setting. Kholmov himself advises avoiding using the smoldering mode.
At the first start-up, it is mandatory to pressurize the boiler under a pressure of 1.5 atm with air, having previously coated the seams with a soap solution.
It is recommended to purchase a Kholmov boiler only from a trusted manufacturer and with a contract.
Installation of a wood and coal mine-type boiler
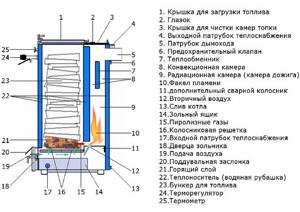
Kholmov boiler design
A boiler of this type in its structure has the following main elements:
- frame;
- fuel loading chamber;
- chamber with heat exchanger;
- grate;
- doors;
- ash pan;
- expansion compensators;
- chimney pipe;
- outputs and inputs for drainage, supply and return, for attaching a safety group or safety valve;
- thermostat.
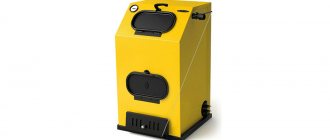
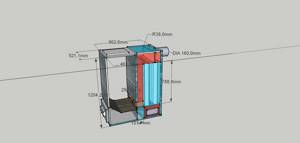
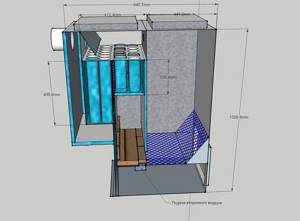
Kholmov's solid fuel boiler with a power of 12 kW weighs almost 255 kg. Its dimensions: height – 124 cm, width – 48.5 cm, length – 66 cm. Moving this unit through a doorway will not cause difficulties. Boilers with a power of 10 kW are similar in appearance and size to the previous model, the only difference is in the design from the inside.
The upper doors of the unit are double; inside there is a thermal insulator, due to which the temperature does not rise above 80 °C. The edges are covered with sealant. Painted with temperature-resistant paint. The cover at the back is closed with four quick-release screws, and the others with special locks. The door of the ash chamber at the bottom is only 40% closed with a heat insulator, and the temperature does not rise above 90 °C due to cooling by constant air flows.
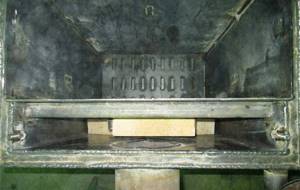
The lowest part of the heating unit is precisely a special plate with an internal thermal insulator and a pair of long legs, and not the bottom of the boiler shaft.
Such a device increases the efficiency of the Kholmov boiler and protects the heating system and the room from fire. Thus, the shaft boiler can even be installed on a wooden floor.
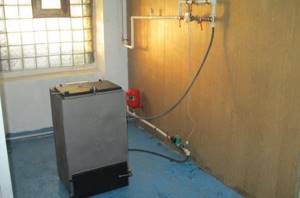
Energy-dependent units additionally have in their design a smoke exhauster or a fan, a controller for regulating the combustion process. However, boilers that do not require energy to operate are still more popular. In non-volatile devices, control is carried out by a RT3 thermostat. It is located on the wall in front. Using a chain, the thermostat and a small blower door are connected through a special eyelet.
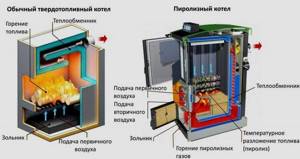
How does a pyrolysis boiler work?
The blower door is needed to supply oxygen to the unit in order to maintain fuel combustion in it at the proper level. It is located on the large door of the ash chamber. It is never completely closed, because a special gap is provided for minimal oxygen passage.
At the back, in the upper part, there is a pipe. A chimney is connected to it. Due to the pipe, natural traction is provided. Through the blower door, air begins to flow into the heating unit, which passes into the under-grid chamber with a pair of cast iron grates. Behind them there is a reserve welded grate (hump), which is located above the previous ones.
Under the grate there is a container for collecting ash. It can be easily removed when cleaning. To drain the liquid, there is a half-inch pipe at the bottom of the boiler; a similar one is intended for the safety group or safety valve.
Expansion compensators are designed to prevent expansion of the Kholmov boiler to emergency sizes and rupture of welds.
Expansion joints are located around the entire perimeter of the boiler. They are also found in the inner part of the case.
What is a solid fuel boiler draft regulator?
Instructions for making a Kholmov boiler with your own hands
Below are step-by-step instructions for creating a Kholmov boiler on your own. The power of the device that will be considered is 8-10 kilowatts.
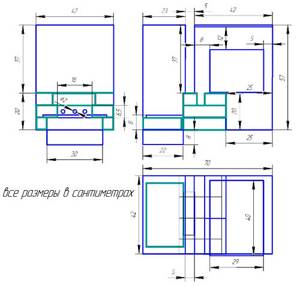
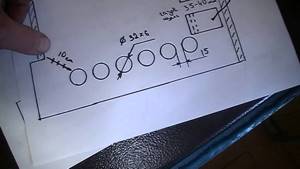
In accordance with the drawings shown in the video below, the dimensions of the product will look approximately as follows:
- 0.8 meters in height;
- 0.47 meters wide;
- 0.576 meters deep (if you add a door with a neck, you get 0.63 meters).
Video - Solid fuel mine boiler
Stage one. We prepare everything you need
To make a Kholmov boiler, be sure to acquire:
- sheet steel 0.3-0.4 centimeters thick;
- an iron rod with a diameter of 1 centimeter and a length of 47 centimeters;
- asbestos cord (recommended dimensions - 1.5x1.5 centimeters);
- pipes - the diameter should be 1.5, 2, 4 and 11.5 centimeters.
As for the quantity of consumables, it should be selected based on the selected drawing. Of course, you shouldn’t forget about a small reserve.
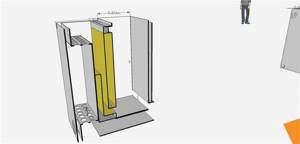
Stage two. Constructing the interior
This part is, in fact, a structure consisting of four walls and having a water partition. The manufacturing process should begin precisely from the construction of this water partition. The dimensions of the element should look like this:
- 48.5 centimeters in height;
- 40.3 centimeters wide;
- 6 centimeters deep.
As for the partition, it is, in fact, a pair of vertical walls to which the bottom and top are welded. A compensator, which is a U-shaped metal element, must be welded in the center. This compensator is welded at the very beginning to one of the walls. If we talk about end partitions, they are not required in this case.
Then, in order to make a Kholmov boiler, you need to adhere to the following algorithm of actions.
Step 1. Cut out the inner side walls of the heater from sheet metal. If you look at the videos and drawings, you can come to the conclusion that the height of these walls ranges from 77 centimeters, and the width is 54.6 centimeters. However, these are not ordinary rectangles, because in front of the bottom corner there should be a vertical rectangle with dimensions of 20.8 x 8 centimeters, and on the same side, but on top, a horizontal one with dimensions of 38.7 x 3 centimeters. In addition, you must cut holes on these sides for the water barrier. They should be located 2 centimeters from the top side and 10.2 centimeters from the back.
Step 2: Next, cut out the front/back sides. The dimensions of the first should be 40.3x56.2 centimeters, and the second - 40.3x77 centimeters.
Step 3. Weld all the elements described above into one structure. Use spot welding. This way the parts will be combined into one whole, but if necessary you will have the opportunity to adjust their location.
Step 4. Next you need to weld a couple of metal arches. The first of them should be U-shaped, and the second should be solid. Fix the first at the bottom of the welded structure, and the second at the top. It is important that the angle between these elements and the walls is 90 degrees. As for the frame, you can cut it from the same sheet metal, although, as an option, you can weld it using metal strips, each 3 centimeters wide.
Step 5. After this, thoroughly weld each of the seams.
Step 6. Make another frame in the shape of the letter "P". Its dimensions should be such that it easily fits inside the unit. Place this frame above the water partition (the distance between them should be 9 centimeters).
Step 7. Weld horizontally an iron strip 40.3 centimeters long and 8 centimeters wide to the upper parts of the rectangles protruding from the front.
Step 8: Cut a 11.5cm round hole at the top of the back side.
Stage three. Constructing the outer part
Now start making the doors and outer walls of the water jacket. The sequence of actions in this case should be as follows.
Step 1. Cut outer walls from sheet metal in the form of regular rectangles. The front side dimensions should be 46.3 x 56.2 centimeters, the side dimensions should be 57.6 x 77 centimeters, and the rear side should be 46.3 x 77 centimeters.
Step 2. In the front wall, cut a pair of round holes for compensation (alternatively, these holes can be diamond-shaped) with a diameter of 1 centimeter. Make sure that the holes are located on a single vertical line. And in the upper right corner make another hole, this time with a diameter of 1.5 centimeters. This hole will be needed for a thermometer.
Step 3. Also make holes in the back wall. This should be a pair of compensation ones and 3 more auxiliary ones (for the chimney pipe, supply of working fluid with a diameter of 4 centimeters and for a drain valve with a diameter of 1.5 centimeters).
Step 4. We continue to build the Kholmov boiler. Now you need to make 4 holes in the side walls for compensation. The first pair on the walls should be located flush with the jacket compensator, and an iron rod will subsequently have to be inserted and welded here. Drill a couple of holes in the left wall - 4 centimeters in diameter (to drain the working fluid) and 2 centimeters (for the thermostat).
Step 5. Make compensators in the shape of the letter “P” in the amount of ten copies. Dimensions should be 3x4x4 centimeters (height, width and length, respectively).
Step 6: Weld these expansion joints to the corresponding holes in the outer walls.
Step 7. Weld all the outer walls to the inside.
Step 8. Weld the chimney pipe and pipes.
Step 9: Weld four bolts at the top of the structure. They should be located around the perimeter of the heat exchange chamber.
Step 10. Check the structure for leaks. To do this, take plugs and place them on each of the pipes, then pour liquid into the device. Raise the pressure reading to approximately 2.2 bar. The standard operating pressure for the described device will be 1.5 bar. If you find any leaks, be sure to seal them.
Step 11. Finally, weld the bottom.
Stage four. We make thresholds, doors and grate
As for the threshold, it is a rectangular lid with a number of holes and sides. The dimensions of this element should be 5.5x16x40 centimeters, and the algorithm for its manufacture is given below.
Step 1.
First, take the sheet metal.
Step 2.
Next, in each corner of the sheet, cut one square hole with a side size of 5.5 centimeters.
Step 3.
Fold the sides up.
Step 4.
Weld the joints thoroughly.
Step 5.
Make 14 1.2 cm holes along one of the 40 cm sides.
Video - Making your own mine boiler
Note! Turn the threshold upside down and place it in the housing so that it is located under the water baffle on the bottom. The gap should be approximately 3.5 centimeters.
The dimensions of the grate, according to the drawings on the Internet, should be 20x40 centimeters, although the holes at the bottom in this case should be longitudinal. Make the main part of the door in the same way as the threshold, then cut a hole 8x19 centimeters in the upper part. It is important that the hole is closed with a flap cover with curtains that are welded over the resulting opening.
Cover the perimeter of the door with asbestos cord, using heat-resistant sealant. Weld ears for the hinges on one side, and an iron strip with a slot in the center on the other. A special handle will fit into this slot.
In the end, all that remains is to make the roofs of the combustion/heat exchange chambers using the same technology as the main part of the doors. That’s all, as you can see, the Kholmov boiler has a fairly simple design, so it’s quite possible to handle the manufacturing on your own. Good luck with your work!
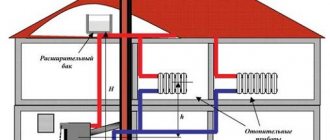
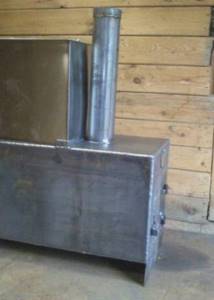
Operating principle of the boiler
Heat in the Kholmov boiler is obtained through two types of heat generation:
- direct fuel combustion;
- afterburning of solid fuel gases.
The pyrolysis boiler is designed in such a way that the incoming air flow does not provide sufficient air volume for good combustion. Therefore, some amount of fuel simply burns, and some simply smolders. Due to smoldering, a lot of smoke appears with a high content of soot and resin. Smoke gases, when passing through hot coals, are further enriched with substances and create even more active gases.
Kholmov mine type pyrolysis boiler
Such a mine-type wood-fired boiler can operate stably for about 12 hours on a single charge, which is several times longer than standard coal or wood-fired units. It is precisely because of this that the Kholmov boiler is called a long-burning boiler. The firebox of the device is very large and holds much more fuel than the chamber of classic solid fuel boilers.
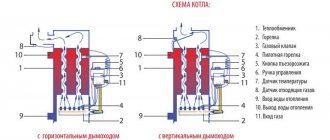
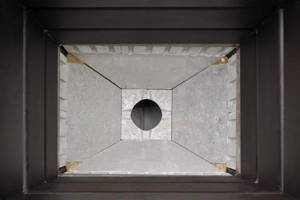
The unit with a power characteristic of 15 kW has a combustion chamber for 180 liters of fuel. Combustion occurs only in the lower 20 cm of the entire planting. The “reserve” fuel on top waits until the fuel below burns out and gradually takes its place. Smoke gases accumulate at a height of 30 cm above the smoldering coals. A larger volume of incoming air moves under the grates and passes under them into another pyrolysis afterburning furnace. This air attracts smoke gases that are located above the combustion layer. The smoke moves through the coals and becomes enriched, thereby increasing the quality of the pyrogen gases.
The second and first shafts are separated by a vertical partition. Only at the bottom of this wall there is a small gap. Through this hole, with the help of draft, fire is sucked from one chamber to another. Here below there is complete combustion of wood gases, and at the top there is a convection heat exchanger. The highest heating is achieved in the lower part of the second chamber (temperature up to +800 °C). Most of the heat energy in this area passes into the water jacket of the heating unit as radiation. The remaining heat from combustion gases is collected by a convection-type water-tube heat exchanger.
Mine boilers can operate on both wood and coal, pellets, briquettes, wood chips, and sawdust. To increase the efficiency of the heating unit, it is better to minimize the use of coal fuel. The fact is that coal is a product of organic decomposition and when it is burned, almost no pyrogases appear.
You can read more about the Popov gas generator boiler in this article.
Features of the operation of mine boilers
The air enters under the grate and directly into the boiler through the ash door, which is why the fuel is burned. When this happens, flue gases are formed - they are discharged through the gas gap. The Kholmov boiler has such a design that the volume of air supplied through the blower door is initially no longer sufficient for complete combustion. As a result, a certain chemical burn is observed during operation of the device.
In our case, chemical underburning indicates that during oxidation, not pure carbon dioxide is formed, but the same, but in combination with carbon monoxide. The air that passes under the auxiliary grate is drawn into the holes on it. The number of these holes is such that the amount of secondary air is already too much. The heat intensity in this place is quite high and can reach 700-800 degrees, as a result of which the remaining carbon monoxide is oxidized.
After oxidation, the gas moves to the radiation compartment of the combustion chamber. There it is mixed, rises and is divided into a pair of streams thanks to the exchanger. Then, through the outlet pipe, the gas enters directly into the chimney. Convective thermal energy is absorbed by the exchanger and the walls located next to it. After passing through the inlet pipe, the working fluid, accordingly, hits the wall, after which it spreads and moves through the entire device between the heat exchanger and the chambers. The already heated coolant is supplied to the heating system through the outlet pipe at the top of the device.
Advantages and disadvantages
Solid fuel mine-type boilers have the following positive characteristics:
- Versatility. The Kholmov boiler can operate on almost any type of solid fuel. You can heat the structure even with wet wood (no more than 45%).
- High efficiency. Heating boilers are highly efficient and, depending on the model, are intended for country houses, cottages, warehouse premises, etc.
- Autonomy. This parameter applies to non-volatile heating boilers. Models can operate without electricity, in economy mode, on one load of fuel for 12-16 hours.
- Easy to use. Work on loading fuel and cleaning the mine is carried out through different hatches. To service the combustion chambers, you do not need to turn off the boiler. The ash is thrown into a special container, from where it can be removed.
- Safety. To use the unit, you do not need to install complex automation. Smoke entering the room and carbon monoxide poisoning is almost impossible.
As for the shortcomings, the following point can be highlighted.
Settlement of soot and tar. Waste appears during the combustion process. And not all of the pyrolysis gases are removed to the second combustion chamber. Therefore, some of the smoke gases are constantly present in the loading chamber, which leads to the accumulation of resin on its walls.
Review of the Kholmov boiler produced by TeploProm
Features of a homemade installation
Before you get down to business, you need to find out what the advantages and disadvantages of making a heating boiler yourself are.
The positive aspects will be:
- individual design (taking into account the characteristics of the house and heating system as fully as possible);
- cost reduction;
- pleasant emotions from a job well done;
- the highest responsibility (rarely does anyone in large enterprises work as well).
But there are also difficulties:
- the need to calculate everything yourself;
- the need to understand structural materials;
- a prerequisite is skill in using tools;
- availability of free space where basic work can be safely performed;
- inability to make a claim to anyone in the event of unstable, abnormal operation of the boiler.
For all at least minimally trained home craftsmen, any of these problems is not very relevant. Most people prefer solid fuel (rather than gas or liquid) designs because they are easier to design
When working in artisanal conditions, this circumstance is very important. At the same time, among solid fuel boilers, the most popular are those based on the shaft principle of operation, because they provide long-term stable combustion
Such systems, in turn, are divided into two subclasses - classical and pyrolysis schemes.
Any shaft boiler has two main chambers, separated vertically. One of them is used to burn fuel, and the other houses a heat exchanger.
Most video courses and printed manuals show a simpler organization diagram, including:
- firebox (accounts for 50% of the total volume);
- loading hatch (located at the top or side);
- ash accumulating chamber;
- grate;
- door for ash removal (with gate);
- heat exchanger chambers;
- chimney.
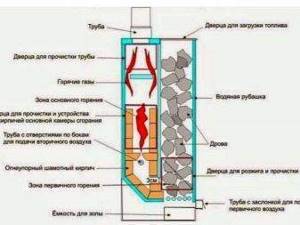
When the boiler starts up, hot gas rushes into the chamber with the heat exchanger and transfers energy to the coolant through it. The smoke flow rushes into the designated pipe, and the water goes into the heating circuit. The pyrolysis boiler is more complex. If you watch a video showing the first launch of such an installation, designed for 45 kW, the difference is quite clearly noticeable. The specificity of the equipment is due to the use of chambers for combustion and afterburning of carbon monoxide, a pipeline for re-supplying air and a wall valve separating the main working compartments.
The pipe through which the air recirculates has abundant perforation. The pyrolysis effect occurs due to the decomposition of fuel when the compartment is incompletely supplied with air. Partial combustion products are burned in another compartment. This solution makes it possible to increase the efficiency of fuel combustion and “extract” maximum thermal energy from it.
But there are a number of other nuances that must be taken into account
Drawings of the Kholmov long-burning boiler
The excellent technical characteristics of the Kholmov solid fuel boiler and its simple design contributed to the appearance of various drawings and diagrams that indicate how to properly make a unit of this type yourself.
However, it is almost impossible to complete such a boiler at home in full and with high quality. In addition, work can cause accidents. Safety can only be guaranteed by heating boilers that are manufactured in the factory and have certificates.
As evidenced by user reviews, mine-type solid fuel boilers from the entire range of heating devices are the most convenient, efficient and easy to maintain. Their price is relatively low, and the presence of complex elements and mechanisms in the design is kept to a minimum. For those who want to have autonomous heating, Kholmov boilers will provide a lot of free time and a sufficient level of comfort.
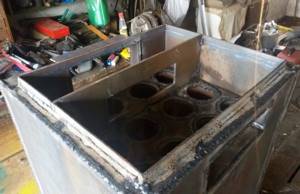
Manufacturing a heating device - assembly sequence
When assembling with our own hands, we use the drawings and adhere to the specified dimensions. The sequence is as follows:
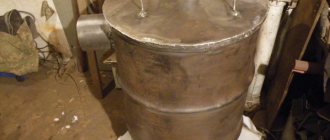
- We cut out the body from 4 mm metal: bottom, side walls, lid, doorways. Everything is grabbed onto the bottom, which extends to the sides, as in the drawing. Inside, we weld the corners, which will serve as a shelf for the grate.
- We carefully weld the joints and proceed to the water jacket made of 3 mm metal. It extends 20 mm from the walls of the body and to install it, we weld steel strips onto the body. We weld the casing to them.
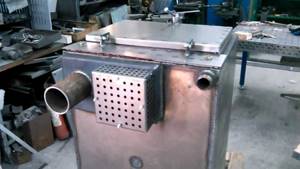
- Installation of flame tubes on top of the boiler. We cut holes in the back and front walls, insert several pipes, and weld them at the ends.
- We cut out the doors, weld two strips from the inside, and lay asbestos between them for compaction. We cut grates measuring 360×460 mm from the corners and weld them to the shelves with the outer corner.
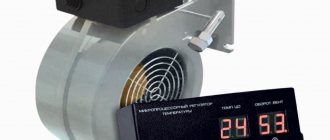
- We cut fittings into the walls of the tank for the supply and return pipelines and the smoke duct pipe. We weld the air duct from a 40x60 mm profile pipe. A fan will be attached to it through a flange. The air entry is made through the rear wall.
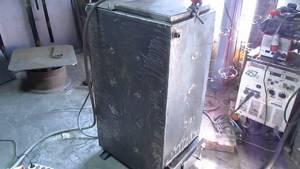
- We weld door hinges and bookmarks to attach the decorative frame. We wrap the boiler tank with basalt insulation and secure it with a cord. We fasten the frame with self-tapping screws to the bookmarks and install the doors.
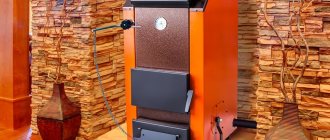
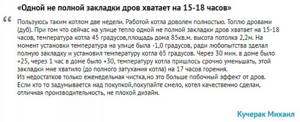
Result of assembling a long-burning solid fuel boiler
We install a fan on the air duct, an electronic unit on top of the boiler, and hide the sensor under the insulation.