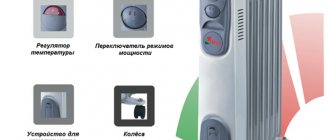
What if the heater doesn't have a thermostat?
- To create cozy warmth, you need to turn such a device on and off - this is inconvenient;
- You cannot warm up the room in advance, for example, in cold weather before returning from work;
- A heater left unattended may cause a fire;
- When leaving for the weekend, you cannot leave the heater on so that it does not work at full strength, but only warms up the indoor flowers a little;
- The temperature in the room will sometimes be excessive, and the electricity bills will be considerable.
The conclusion is obvious: a thermostat for an infrared heater is a useful attribute!
Let's find out how it works, how it connects and how much it costs.
Required tools and materials
In order to quickly and easily install an infrared heater on the ceiling, you will need the following tools:
- Drill or screwdriver (drill holes for fastenings).
- Pliers (for shortening wires).
- Indicator screwdriver (determine phase and zero).
- Metal detector (optional, used to search for wiring and metal objects in the wall, so as not to accidentally hit these objects when drilling holes. You can make your own metal detector from improvised means.
- A simple pencil and a construction tape (mark the mounting points on the wall).
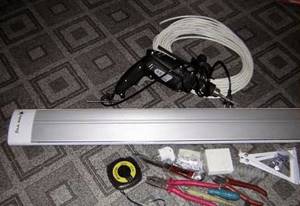
As for additional materials, to install and connect an infrared heater you may need:
- Demountable electrical plug.
- Three-core copper cable, cross-section 2.5 mm2.
- Wall mounts (purchased as needed, as only ceiling brackets are included in the kit).
Having collected all the necessary list of materials and tools, you can proceed to mounting and connecting the heater..
Operating principle of the device
Infrared radiation is a special type of energy released by heated bodies. Any warm object emits energy in the infrared range, the only difference is in the parameters of this radiation.
The higher the temperature, the more intense the release of energy, which is converted into heat.
The peculiarity of such radiation is that the receivers of this energy are objects - physical bodies. This is the reason for the high heating efficiency - there is no preheating of the air, which, in turn, transfers heat to all objects in the room .
Direct transmission is more economical and does not require the participation of an intermediate medium. At the same time, the air also heats up, but from the heat of objects, that is, it receives excess energy released into space.
The design is based on this principle. They consist of the following elements:
- metal case;
- reflector;
- IR element.
The element heats up to a high temperature and begins to actively emit IR waves. The reflector reflects them and directs them in the right direction. This is the most common design of an infrared thermostat, which most clearly demonstrates how this device functions. Operational efficiency depends on the following factors:
- angle of incidence of rays;
- mass or shape of an object;
- item material;
- color.
There are certain restrictions on the distance to the nearest objects or people.
They are different for each type of heater and are described in detail in the device data sheet.
Calculation of the required number of IR heaters
If the IR heater is suspended from a wooden or suspended ceiling, for fastening you should use, for example, metal hooks, which usually come with the device. They can be easily screwed in without the use of additional tools. But if the ceiling is concrete, you will need to make holes in it using a hammer drill.
You should decide in advance on the number of IR heaters that you will need to install in each room
To do this, you should study the performance characteristics of these devices, paying special attention to their power. Of course, you also need to take into account the area of each room.
For example, if the area of the room is approximately 20 m2, then for high-quality heating two IR heaters will be sufficient, the total power of which will be approximately 2000 W.
If you plan to install it in a kitchen with an area of no more than 10 m2, the installed heater should have a power of approximately 800W. When installing in the kitchen, you can use ceiling or wall mounts.
If necessary, in a remote area of the kitchen, you can install another 500W infrared heater. But it should be remembered that these devices should be positioned in such a way that the entire space is heated evenly. But it is not recommended to have a refrigerator in the heating zone.
Connection nuances depending on the heater model
The heater model will determine the specifics of connecting the thermostat.
Ballu is one of the most famous manufacturers of thermostats
Thus, the instructions from the manufacturer Ballu contain the following important additions:
- the total power of the heaters should not exceed the maximum power of the thermostat;
- a distance of at least 1.5 meters must be maintained from the floor to the device;
- a layer of insulation is placed under the thermostat, and its outer surface must not be covered with anything to ensure unhindered air exchange.
For infrared heaters of the “warm floor” system, thermostats with a remote sensor are used, which imposes its own characteristics during installation and subsequent connection:
- the thermostat is located no higher than 0.5 meters from the floor level;
- its design has 6 terminals: a pair for “phase” and “neutral”, a pair for IR floor heaters and a pair for wires from a remote sensor;
- no insulation lining is required, and masking with curtains, etc. will not affect the operation of the device in any way (unlike options with a built-in temperature sensor).
When installing a thermostat yourself, you should take care to follow basic safety rules:
- the grounding loop is made of a conductor of a certain thickness and with low resistance;
- the best place to place the thermostat is a wall;
- in one room - one device;
- it should be left open, without masking with fabric, curtains, interior items, etc.
Thus, an infrared heater equipped with a thermostat allows you to save energy, warm up the room in advance and facilitate the climate control process
It is important to correctly connect the thermostat to the heating device. Strict compliance with the instructions guarantees safe and long-term operation of the device
Infrared heaters are quite popular today. There are several varieties of such heaters, which differ in price, operating features and installation method. As for the principle of operation, it is almost the same for everyone. The advantage of choosing an infrared heater is the ability to significantly save energy. Such a heater can be controlled by connecting a thermostat.
In general, a thermostat or thermostat is a device through which you can periodically measure the amount of heat in a room, the air temperature, and also regulate the operation of the heating device. To explain it more clearly, when the optimal temperature for the room is reached, the heater pauses operation for a while and resumes it only when the temperature begins to drop significantly.
Features of connecting a thermostat to an IR heater
The power of an IR ceiling heater for a city apartment should not exceed 3 kilowatts. The regulator you purchase must match the power of the heater.
Installation recommendations:
- height up to 1.5 meters;
- location - wall;
- Insulation is placed under the thermostat (this is necessary to avoid false alarms of the sensor on a cold wall);
- only one regulator is used for one room;
- To ensure safety, the device must not be covered with interior items (for example, curtains).
How to connect a thermostat to an infrared heater
Whichever of the above options you choose, it requires proper installation for it to work accurately and correctly. First of all, this is due to the choice of a suitable location, when doing which you should take into account the following factors:
High humidity can damage the device;
DIY thermostat installation process
There should be no sources of heat or sunlight nearby.
If these factors are not taken into account, temperature measurements will be made inaccurately, which will lead to incorrect operation of the heating device and its inability to maintain the required temperature in the house.
A separate issue is connecting the device itself to the network and the infrared heater. In order to connect all these elements to each other, it is necessary to use an automatic relay. This will serve as the power source for the heater. Let's look at some of the most common connection options.
Connection diagrams for an infrared heater via a thermostat
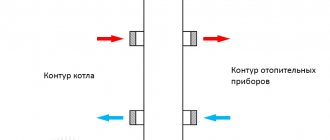
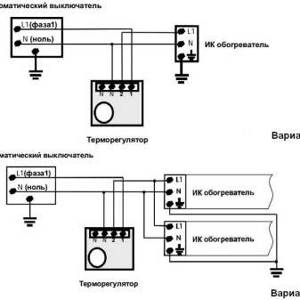
The fastest and most understandable scheme for connecting a thermostat to an infrared heater is to use 1 thermostat per 1 heater. In this case, the connection diagram is as simple as possible: the machine has 2 pairs of wires, one of which goes to the thermostat. One wire is neutral, the other is phase. And they need to be connected accordingly. Using the second pair of wires, a connection is made to the heating device itself.
Options for connecting infrared heaters via a thermostat
The second, slightly more complex, method of connecting an infrared heater through a thermostat involves using a parallel connection. Thus, two heating devices can be connected to one thermostat at once. One pair of wires from the machine is connected to the thermostat, from which, in turn, wiring is made to two different heaters.
The most difficult, but at the same time the most practical option is to use one thermostat for several household heaters. For this purpose, it is necessary to use a magnetic starter, and develop the connection diagram individually. Of course, you can try to find a ready-made one, but this method cannot absolutely guarantee the uninterrupted operation of the system.
To connect several heaters, you must use a magnetic starter
There are even manufacturers who produce original magnetic starters for their devices, as well as sets of wires necessary to connect them. Thanks to this, connecting is much easier, and the quality of such products is considered higher. But in any case, if you have not previously dealt with electricity, it is better to entrust the development of the circuit and connection of the system to professionals.
Installation diagrams
An infrared heater is connected according to the same standards as other electrical appliances - using an outlet or a dedicated line from a separate circuit breaker on the electrical panel. Thus, neutral and phase wires are used.
The regulator is installed between the machine and the heating equipment. The thermostat is mounted in the network between the machine and the heating device.
Simple scheme
The thermostat has 4 terminals: two at the input (neutral and phase) and two at the output (plus and minus).
If one heater is installed:
- two wires are routed from the electrical panel to the thermostat terminals;
- two wires are connected to the output terminals in accordance with the polarity - they are connected to infrared heating equipment (series connection).
If a pair of heaters is installed:
- 4 wires are removed from the thermostat (two each for neutral and phase) and directed to the IR heaters (parallel connection);
- 2 wires are led from the regulator to one, and then to the second heater (series connection).
Sometimes it may be necessary to connect the phase from the machine to the heating device (directly), and connect the neutrals through the machine. The downside of this option is the possibility of the thermostat not functioning properly.
Complicated scheme
A slightly more complex scheme for several heating devices provides the following:
- the thermostat is connected to the machine on the electrical panel;
- the output terminals are connected to a magnetic starter;
- The starter contacts at the output are connected to the heating equipment.
The described connection option is ideal for powerful industrial systems or several infrared heaters. The magnetic starter here operates in automatic mode.
Particularly noteworthy is the need to pay attention to security issues. In particular, we are talking about grounding. The grounding loop of heating equipment must have conductors of the required thickness and low resistance. The security system must guarantee the removal of electricity, since the life and health of the residents of the house directly depends on this.
Connecting a thermostat is not an easy task. Special knowledge, skills and tools are required. Even if you installed the thermostat yourself, it is recommended to call a professional who can competently check the work done.
Modern technologies for managing your own home allow you not only to get a “smart home”, but also to save a lot of money. First of all, this concerns the consumption of fuel used for heating and the hot water supply system. It would seem, why save energy by using infrared heat sources? After all, they themselves are economical. But why not take advantage of even greater savings? To do this, you need to install a thermostat to the IR heaters. It will regulate current consumption by reducing the indoor temperature. The modern electronic instrumentation market offers a large range of similar devices. Therefore, the question of how to choose the right connection diagram for an infrared heater via a thermostat is one of the most pressing.
How to choose a thermostat for an infrared heater
Now there are two main types:
- Mechanical.
- Electronic.
The first option is considered cheap and easy to use. But it cannot be said that it works effectively; it is also difficult to manage. There is no particular difference in quality.
Our resource recommends choosing electronic thermostats, because they have a wide range of useful functions. They quickly respond to temperature, you can set switching intervals, in some modifications you can even set different temperatures throughout the day, for example:
- During the day: +18.
- Lunch: +20.
- Evening: +22.
- Morning: + 18.
So we have sorted out the question: how to connect an infrared heater, there is little left for you - just do everything that is written above. If you have any questions, write them to , we will answer everything immediately.
how to heat pipes with electric cable.
Connecting an infrared heater in stages
Initially, you need to choose the place where the infrared heater will be installed. It can be installed on:
- Wall.
- Semi.
- The ceiling.
Here everything depends only on the preferences of the owners, but please note that it is better to install it in an open place where nothing will interfere with heating
How to connect an infrared heater
How to connect an infrared heater
- When you have chosen a place, you need to make calculations and mark where the fasteners will be installed. We recommend using “Level”, it allows you to set everything up easily.
- Next, we make all the holes; if the wall is wooden, you can use a drill; if it’s concrete, you can use a hammer drill.
- We insert our structure, drive in the dowels and screw in the brackets.
- We install the heater in its rightful place.
Now that the first stage is behind us, now we move on to a more complex one.
Temperature control
To effectively control the temperature in the room, automatic control devices are used. Thermostats control the heating system, allowing you to achieve the most economical operating mode with the ability to set time and temperature parameters individually for each of the heated zones. Correct installation of the thermostat together with infrared heaters, as well as any other types of electric heating, will help maintain the set temperature in the room, despite any weather changes outside the room. Temperature control occurs with high precision. It is possible to create different temperature zones within one room.
MOUNTING TYPE WALL
The wall-mounted option for mounting heating devices is a classic of its kind. Electric infrared heaters are no exception in this case. A great variety of models that are attached to the wall are produced by almost every company. So, there is plenty to choose from.
Our company offers wall-mounted infrared heaters from the following: “Teplofon”, “Mister Hit”, Noirot, Frico, Ballu.
1) Under the window. Wall-mounted infrared heaters are usually mounted in the same places as conventional water heating radiators - under the windows. And their task is the same. Installation of infrared heaters is simple, but when installing a group of devices with monitoring and control functions, it is better to invite a specialist. The device, located near the window, prevents fogging of the windows, traps waves of cold air from the walls, thereby adjusting the air temperature throughout the room, making it uniform and therefore comfortable. It does not overheat the wall - the wallpaper does not deteriorate, and the heat does not escape into the street.
|

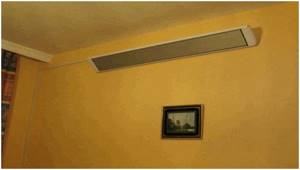
2) Above the window. Infrared heaters can provide effective protection against drafts. To do this, they are installed above the windows. The Frico company produces special infrared moldings of the Comfort and Thermoplus series, which help to effectively combat drafts or serve as additional heating in rooms with a large glass area. They are small in size, so they are often used where the presence of heating devices should not be noticeable.
|
Infrared heater Frico Comfort ECV 30021
3) Heating of the local zone. In this case, wall-mounted infrared heaters are mounted in the intended location.
To do this, it is better to choose a device with a built-in thermostat. The advantage of this option is that it works autonomously and there is no need for complex installation work - the heater just needs to be hung on the wall and plugged into the nearest outlet, and the built-in thermostat will automatically turn it on and off when the set room temperature is reached.
|

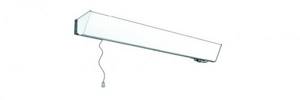
4) In the bathroom. To quickly and efficiently heat bathrooms, you can use infrared quartz heaters with an open heating element. For example, Noirot heaters of the Royat series. The heating element is quartz tubes. These devices are compact and the important thing is that they provide almost instant heating of the room. What is usually needed in the bathroom.
The device is mounted on the wall, at a distance of up to 40 cm from the ceiling, with the radiating surface directed towards the area where the person will be. The device must be installed so that a person using the bathtub or shower cannot accidentally touch the switch or other controls. The tilt angle and power are adjustable. Such heaters have additional splash protection (IP 24) and can be used in damp rooms.
|

An example of installing the Noirot Royat-2 heater in a bathroom.
5) In the form of a painting or panel in the recreation area. An infrared heater can serve as an additional source of heating the room and at the same time perform a decorative function. This picture of a heater is hung on the wall and, due to the decorative coating, looks like an ordinary picture. The thickness of the electric heating panel itself is only a few millimeters. A variety of decorative coatings makes it easy to fit an infrared heater into any interior, since you can decorate its surface with your own photo posters, self-adhesive films, etc.
|

Principle of operation
If we talk about the principle of operation of such a thermostat, it should be noted that this is not an ordinary household appliance, but an entire climate system with an intellectual twist. To better understand the essence of its work, you need to understand that this is not just a thermostat, but also a kind of sensor. After all, it not only measures the temperature, but also activates and turns off heating equipment if the temperature in a closed space reaches certain maximum values. At first glance, it seems that the thermostat for an infrared heater is the same as for others, but it has a difference. Typically, these devices simply measure the temperature at the heating devices, rather than in the room. Then the thermal relay is supplied in its own housing and is fixed at the owner’s request where he wants it. For example, it can be floor- or wall-mounted. In addition, thermostats allow you to:
- program the shutdown of the entire system after several hours of use;
- set an auto-start program at a certain time;
- maintain the selected temperature;
- create cyclic programs for various time periods.
Price overview
Some models of mechanical thermostats for infrared heaters and approximate prices:
- Eberle rtr-e 6163 – about 900 -1200 rub.
- Eberle rtr-e 6121 – 900 – 1100 rub.
- Mr. Hit CEWAL RQ10 – 900 rub.
- Ballu BMT-1 – 900-1000 rub.
- Aox t25 (aox t25) – 800 rub.
Selected examples of electronic thermostats:
- Bilux T5 – 10,000 rub.
- Uth-10 a – 8500 rub.
- Вilux gsm t9 – 6500 rub.
- Devireg touch - about 6500 rub.
- Eberle Instat+3R – 5000 – 6000 rub.
- Electrolux thermotronic touch ett-16 – 4500 rub.
- Frontier th-0108F – 4000 rub.
- Vilux T02 – 3600 rub.
How to choose the right IR device for your garden
Decide on the installation location of the heating device (ceiling, wall, floor). Choose the appropriate power, which depends on the purpose (to warm up a certain area of the room for a comfortable stay or to heat the entire room as the main source of heating). Decide what type of thermostat you need (mechanical, electronic, with or without remote control, built-in or remote type). Decide on the presence of additional functions (protective sensors against overheating, emergency sensors when tipping over, etc.). It is also important to know how much money can be allocated for the purchase of an infrared heating device with a thermostat. You need to pay attention to manufacturers and their best and high-quality models (for more details, see the article rating the best infrared heaters).
When choosing a heating device for your dacha, you need to select its size so that it correlates with the size of the heated room.

Types and their characteristics
Note that the principle of use and structure of various thermal regulators can vary significantly. There are two categories of thermostats:
electronic;
In the case of mechanics, it is a small plastic box with a switch. Usually it has a round shape, which makes it possible to smoothly change its position. The value of one division may differ - from 1 degree to different values. Also on the box there is usually a power key and a light indicator that indicates the activity of the device at a certain moment. There are also more advanced mechanical solutions equipped with a display. Despite this, they do not display as much information as we would like, and you can control the temperature with just a couple of keys.
In addition, there are electromechanical devices. These are standard devices that are mounted on the body of the heating device or inside and react to the temperature of the surface of the heater or the liquid in the radiator. They are divided into regulated and unregulated. Adjustable ones control air heating in the room thanks to the device’s on-off cycle, which is carried out after the heater enters operating mode according to a certain process. Typically, the device heats up first, after which the regulator turns off the heating element. Then it cools down and the regulator activates it again. It turns out that the heating of the room can be controlled by pre-selecting a certain degree of heating of the device.
It should be added that the design of controlled devices can be of two types:
- capillary;
- with a bimetallic strip.
In the first case, there is a special relay, similar to a small narrow cylinder, where there is a cylindrical capsule with a liquid that has a high coefficient of thermal expansion. When the temperature changes, the circuit can close and open contacts using a special drive. In the second case, we are talking about an element that is combined from two different metals that have a serious difference in thermal expansion coefficients - when heated, half of the plates elongate so much that they bend in the seat and simply open the electrical circuit, and after cooling they again become the same size and close the contacts.
Connection diagrams
Let's start with the fact that a household infrared heating device operates from an alternating current network, that is, from a regular outlet or from a machine installed in a distribution panel.
This means that it includes two wires - zero and phase. Hence the standard connection diagram, or rather, several diagrams. The thermostat is built into this circuit, that is, it is installed between the machine and the heater.
Option No. 1 - normal connection
Standard thermostats have four terminals - two input (zero and phase) and two output (zero and phase). To create a circuit, two wires are pulled from the panel through the machine, connecting zero and phase. And from the thermostat, two wires are routed through the output terminals to the IR unit. In essence, it turns out to be a serial connection of all devices from the network.
If the connection diagram includes not one heating device, but several (usually two), then in any case you can use one thermostat. To do this, wires are connected between the machine and the thermostat in the same way as in the previous case. But 4 wires are routed from the output terminals to each heater separately. So it turns out to be a parallel connection.
Although you can also use a serial connection. In this case, one wire will go from the thermostat terminals to the first heater, and from it to the second. And so on in the same sequence.
There is another simple connection option, when the phase wire from the machine is pulled to the heating element, and the zero wire is connected through a thermostat. This is not the best way, since the thermostat may not work entirely correctly. Although in some situations it is impossible to use anything else other than this option.
Scheme No. 2
This circuit allows you to control a large number of IR heating devices or one industrial type heater. It will require the installation of an additional element - a magnetic starter. This switching device operates automatically to turn on and off high-power electrical units.
There are a lot of connection diagrams in this case. Let's look at one of them - the simplest one. To do this, a magnetic starter is built into junction No. 1 between the thermostat and the heating apparatus. Two wires are led from the output terminals on the thermal regulator to the starter, and from it to the infrared heating element.
How to choose?
If we talk about choosing a thermostat for such a thing as electric IR heaters, then from the very beginning you should focus on ease of control and functionality. But the main parameter that indicates the device’s ability to perform the required task will be the load current. If this parameter is exceeded, then the switching part, which is usually a solid-state or electromechanical relay, will definitely break. It is quite simple to independently calculate the load current. First you need to calculate the current value consumed by the heater. To do this, you need to divide the device reading by the voltage, which is usually measured in volts. The number that will be obtained will be measured in amperes.
For example, for a 2200-watt home heater, the current draw will be about 10 amps. If you add 15-20 percent to this number, you get a value of about 12 amperes. This is the value you need to focus on when selecting equipment. Often in the instructions for the device the manufacturer writes the highest power that can be switched. This number means the amount of load that can be safely applied to the thermostat.
Types and principle of operation of thermostats for IR heaters
The operating principle of infrared heaters is that they heat the surrounding objects rather than the air. These, in turn, begin to emit heat, creating a warm atmosphere in the room. Thanks to this operating scheme, infrared heaters are characterized by high efficiency. They provide quick warm-up and can work in any type of room. It can be:
The main difference between an infrared device is that it heats not the air, but the objects around it.
- living quarters - kitchens, rooms, corridors and much more;
- industrial premises - warehouses and production workshops;
- administrative premises – work rooms and offices;
- utility rooms - sheds, premises for pets and garages.
They are also used for heating outdoor areas - pool areas, children's and sports grounds, terraces, verandas and much more.
When using infrared heaters to heat rooms, it is necessary to ensure temperature control. Otherwise, you can waste electricity, creating a real Tashkent in the room. Simple portable heaters connected to an outlet are equipped with the simplest thermostats or no less simple step-by-step power regulators - in this case you have to monitor the temperature yourself.
As for wall and ceiling infrared heaters, they most often represent separate heating modules without any controls - like a regular lamp that is connected to the network through a regulator or switch. In order to provide temperature control, you must purchase a separate thermostat. After this, all that remains is to connect the device to the infrared heater - this is no more difficult than installing a lamp with a switch.
There are two types of thermostats for infrared heaters:
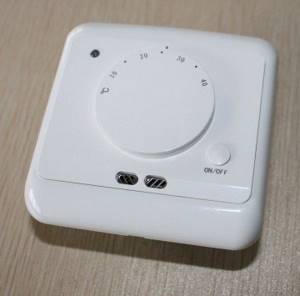
Simple mechanical devices are reliable in operation, but are not highly accurate.
- mechanical thermostats;
- electronic thermostats.
The main advantage of mechanical thermostats is their extreme simplicity. Their design includes a simple bimetallic element that responds to changes in ambient temperature. As soon as the temperature rises to the set value, the electrical contact opens, stopping the heating element in the infrared heater from operating. Detecting a drop in temperature, the sensor closes the contacts, restoring power to the heating element.
The operating principle of a mechanical thermostat for an IR heater is extremely simple. But you can’t expect accuracy from it - the discrepancy can be several degrees. Most often, there is no graduation in degrees, and the temperature is set approximately, based on a scale with numbers from 0 to 9. Because of this, energy consumption suffers, as a result of which the numbers on electricity bills increase.
Electronic thermostats for IR heaters are more accurate - they are able to maintain the set temperature with an accuracy of 0.5-1 degrees. This is already a more acceptable indicator. In addition to maintaining temperature, such electronic devices can:
- work according to schedule;
- work according to a given program;
- work as part of security systems;
- controlled via GSM channel;
- work in the “Antifreeze” mode.
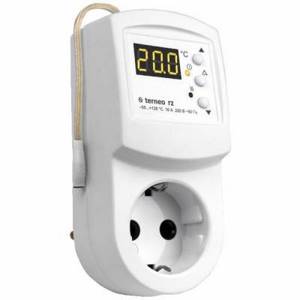
The plug-in temperature controller is easy to install and replace.
Electronic thermostats can be simple or complex, have a lot of settings or have none at all. Some models are equipped with remote control modules and touch screens. All this allows you to make heating control more convenient.
The simplest temperature controller is a small unit that is plugged into an outlet. This unit has its own socket, controlled by a built-in electronic module with a temperature sensor. The module monitors the room temperature by turning the outlet on or off. More complex electronic thermostats are aimed at controlling powerful heaters or several units of heating equipment at once - they are built into the wall in a place convenient for control.
About the thermostat device
Depending on the design, all devices can be divided into:
- Mechanical.
- Electronic.
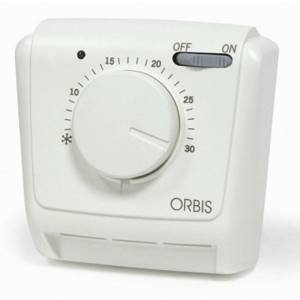
Mechanical
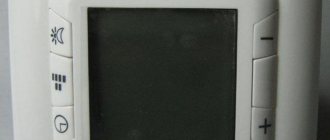
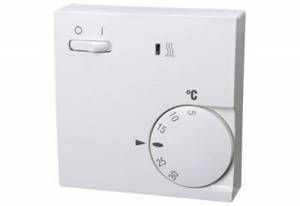
Mechanical thermostat
This is a plastic box slightly larger than a socket. It is equipped with an on/off button. and a wheel with a printed temperature scale.
Some models also have an LED indicating whether the device is currently working. Other manufacturers have equipped their creations with an LCD display on which data is displayed.
The number “20 0C” on the wheel of individual instruments has a bulge - it is not difficult to feel it in the dark or with poor vision.
There are thermostats:
- Mortise (can be “drowned” into the wall).
- Overhead (mounted on the wall).
Such devices do not consume electricity: the operating principle is based on the properties of different materials to react differently to temperature changes.
The degree of heating varies depending on the level of pressure of the contact group. Typically, mechanical thermostats for a heater operate within the range of 5 - 30 0C; if the device is working properly, the error will be from 0.5 to 2 degrees.
Mechanics remains in demand for a number of reasons:
- It is easy to understand the controls even for those who are far from technology;
- A simple design provides reliability and durability;
- The price is lower than electronic ones.
If we talk about maximum comfort, then the mechanical option is not suitable. Only one temperature value can be adjusted on it.
Electronic (programmable)
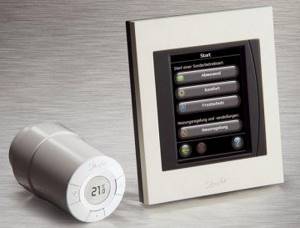
Electronic thermostat
This is a mini-computer with a screen and a keypad (or touch screen). There are a lot of design options here. The front side can be hidden under a plastic cover.
Many of the thermostats are suitable not only for IR heaters. They are universal and if the owner decides to install, for example, heated floors, there is no need to specifically buy a new device.
The self-monitoring function diagnoses the condition of the regulator and, if it detects a breakdown, switches the device to a reduced activity mode (30%).
An electronic thermostat will provide a full range of programming options. And it can even be controlled remotely using mobile devices.
The owner will be able to turn on the heating when he arrives home and not worry if in a hurry he forgot to turn off the heater.
Types of thermostats
Today there are two types of thermostats:
- Mechanical. The device looks like a small plastic box. On the outside there is a switch, usually round in shape, that allows you to adjust the temperature in the room;
- Electronic. These devices have much more control options and are equipped with additional functions. This type of heaters is considered more popular and modern.
Important! The mechanical type of thermostats is suitable if someone is constantly present at home. It is not recommended to leave the device turned on if there is no one nearby who can monitor its operation
Infrared heaters: advantages and disadvantages
At first, you may be surprised by the wide range of prices for infrared heaters. The information below will help you determine the pros and cons of using such a device in your home.
Let's consider the main advantages of this type of heaters:
- high speed of warming up even very large rooms and a feeling of warming almost immediately after the heater starts operating;
- absence of convection currents during the heating process;
- The efficiency of such devices is almost 100%;
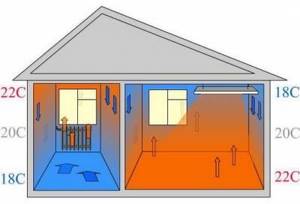
- comfortable distribution of air throughout the room: the warmest is near the floor, the coolest is near the ceiling;