We eliminate flaws
If the surface is decorated with small torn fragments, from which it is necessary to obtain a single whole, straighten the edges of the fragments with a brush or fingers.
If there is color unevenness somewhere, dilute the paint of the desired shade and paint over the translucent base. When the surface is no longer very wet, but has not yet dried, you can use thin brushes and acrylic paints to draw in the details, add brightness and clarity.
The next step is to decorate the edges of the product. There are different approaches here. In some places you have to trim the edges evenly, painting the sides, in others you can wrap the napkin on the back side and glue it there. In general, this is also a whole science.
Getting it to the finish line is an equally creative process.
After this, you can leave the product to dry. To speed up the process, you can use a hair dryer, but you need to keep it at a considerable distance, move it all the time and make sure that it dries evenly. If after drying you see that there is a fold on the glued napkin, you can still fix it. Take fine-grained sandpaper and sand it. We act gently so as not to damage the drawing around.
Instructions for performing decoupage
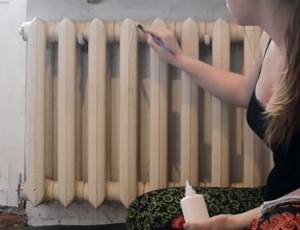
Before you start decorating cast iron radiators or other types of heating devices, you need to mark and, if necessary, cut the napkins. If you decide to glue ordinary serving napkins, then first you need to separate the first thin layer with a pattern from the rest. You will no longer need them for work, put them aside. Next, you need to proceed as follows:
- Apply PVA glue to the surface of the radiator with a brush, spreading it thoroughly so as not to leave dry areas;
- take a napkin with a pattern and carefully fix it on the heating radiator. This is the most critical stage, the thin paper is glued almost immediately and in case of failure it will have to be torn off and remade all over again;
- Gently level and press the paper to the surface with your hands. Places where the napkin does not stick to the coating (especially around the edges) should be moistened with a brush with glue. The paper will absorb it and stick in place;
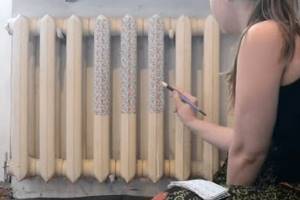
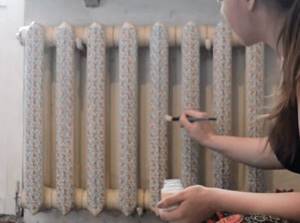
- glue all prepared drawings in the same way;
- When the decoupage on the batteries is completely dry, acrylic varnish is applied on top with a soft brush. This is done to give the surface a matte or glossy tint, as well as to protect it from abrasion when cleaning the room.
In principle, the technique of decoupage with rice paper is no different from the method of gluing napkins. Only the fibers of rice paper are very thin, so when working with them, concentration and great care are required. Wet paper tears very easily.
Having fixed the stencil by pressing it to the entire surface, you can apply the design. This is done with acrylic paints; after drying, it is not necessary to protect them with varnish. At the end, the stencil is easily removed.
Decoration method 1
Decorating radiators is not such a difficult task, and you will soon see it. The first method is the most common staining. You don't have to paint your radiators white. Indeed, today you can find paints in a wide variety of shades and colors on the market.
Places that do not need to be painted should be sealed with masking tape. If the radiator has not been painted, then it must be treated with an alkyd base primer with pigment.
Decorating radiators using painting is almost an ancient method. And previously, a mitten was used for this; such a device helped to do such work efficiently and without unnecessary smudges and layers. The paint also mixed well.
Let's tell you a little about this method: the mitten itself is made from fur - you take a piece of it, fold it in half, and sew it together to make a bag. Now you need to put the mitten on your hand - but first put on a rubber glove so as not to stain your hand. Next, you can use a mitten to paint the batteries - the paint applies evenly and in a thin layer.
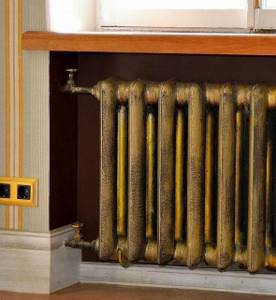
Black and red colors are taken, mixed, the resulting bronze color is applied with gauze to the places that are marked. So, we will get a heating radiator that looks like a piece of jewelry. And such decoration of heating radiators can be additionally decorated with drawings.
Decoupage of a battery or a new life for an old one
You have renovated your apartment, but decided to keep the old heating system. After all, cast iron or other metal heating devices are time-tested and heat your home well. But the radiators somehow don’t fit into the overall modern interior. What to do?
You can purchase decorative frames for radiators, which are abundant in stores. Or you can decorate your old battery and finish it yourself, that is, decoupage the old thing and thereby give it a second life and at the same time decorate your home. And most importantly, it won’t take a lot of time and money. It will also help you unleash your creative potential.
Conditions for starting work
Each owner of an apartment or house sees in advance what finishing of the house needs to be done to suit the design of his

home and roughly imagines what will be in the final version and what kind of decoupage he needs. Therefore, the main thing is to see an updated version of your battery, which should completely fit into the overall interior of the given room and thus decorate it. You can look at photographs and videos that are located on the Internet, then find a suitable decoupage option and start working with your own hands. Thus, for finishing you need only three things:
- Wish.
- Old battery.
- Upgrade option.
Decoupage options
In fact, there are many options for decorating your old heating devices, but the most common, reliable and proven are:
- Taping old batteries.
- Drawing on radiators.
- Applying stucco.
Let's look at each decoupage separately.
Pasting
You have decided that your decoupage is sticking pictures with your own hands on your batteries that will harmoniously fit into the interior. And we found pictures for finishing. These could be napkins, stickers, favorite images from magazines, stickers on rice paper. When the necessary pictures that are suitable for the pasting area have been found, you need to prepare:
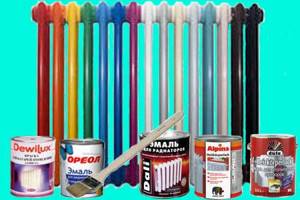
- Sandpaper.
- PVA glue.
- White enamel paint.
- Brushes for both gluing and painting.
- Actually the pictures.
- Heat-resistant colorless varnish.
First you need to thoroughly rinse the heating device. In cast iron radiators, it is necessary to wash even hard-to-reach places. Then thoroughly sand the battery to achieve a smooth surface without roughness or gouges.
Then apply heat-resistant white paint (or a different color to suit your taste) with a brush. Let it dry for a day. After which we begin the creative process itself - we begin to decorate the battery with our own hands. If the choice fell on colored napkins, then:
That's it, your new-old batteries are decorated and decorate your home, as in the photo and video.
Drawing
For finishing in the form of applying drawings you need:
- Acrylic paints
- Brushes.
The technology is the same:
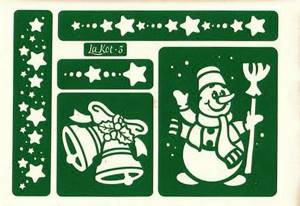
You can decorate radiators in the form of drawings with your own hands or use special stencils (see photo) to apply flowers, butterflies, and patterns. Choose paint colors to match the color of your room. For detailed information on applying patterns to decorate a heating medium, you can watch the video. To select a design, look at the photo.
Stucco molding
Stucco as a decor is often used for wall design. If you have this option, then hand-made stucco on batteries will look harmonious in your interior. It fits well on metal, sticks quickly and looks original.
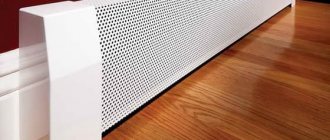
Screen box
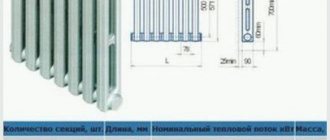
Allows you to completely decorate the entire heating radiator, while you can simply make such a screen for the battery yourself from wood, the diagram is shown in Fig. 1.
Fig 1. Screen assembly diagram - box
In this case, the box can not only hide an aesthetically unsightly radiator, but also act as an additional element of furniture, for example, a stand for vases, shelves, or can become part of a rack or console. A decorative wooden box can be made so that it fully matches the style and decor of the room. Its main disadvantage is the closed top, which significantly reduces the efficiency of convection. In addition, the tree dries out when the temperature changes. In this regard, screens (boxes) made of MDF, which are both cheaper and more durable, look preferable.
A decorative wooden box is perhaps the most aesthetic solution
Wooden box in a modern style interior
Advice! If the radiator is located far enough from the wall, then by combining a window sill and a frame, you can make a bench for romantic gatherings by the window.
Radiator box with seating bench
Let's learn step by step how to make beautiful decoupage of a heating battery with your own hands
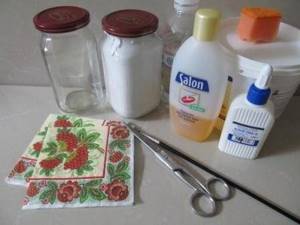
In order to decorate the battery with our own hands, we will need ordinary three-layer paper napkins or a special card for decoupage, alcohol for degreasing the surface, oil-based white paint, PVA glue, heat-resistant varnish, sponge, brush, sandpaper.
If you are decorating a new heating radiator, then simply degrease it and prime it with a thin layer of paint. If it is a cast iron battery, then it must be prepared more carefully.
First of all, thoroughly wash the entire surface, including hard-to-reach places. After drying, sand the battery, level the entire surface, getting rid of irregularities and flying paint.
The next step is degreasing; alcohol or solvent is suitable for this purpose.
Having completed all the preparations, we cover the battery with white paint; it is best to give preference to oil-based enamel, which is heat-resistant and will not bubble over time. To avoid shine, choose matte enamel.
Leave the battery for a day until completely dry.
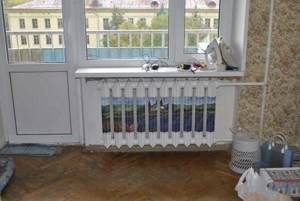
When all the preparatory work is completed and the surface is completely dry, we proceed to decoration.
We measure the entire battery and each section separately.
Since we will decorate the surface with paper napkins, they must be cut into strips of the required size.
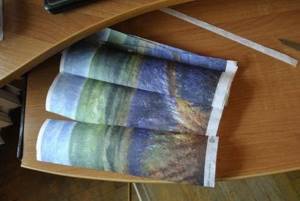
Separate the top layer of the napkin with the pattern and apply it to the first section.
Before work, PVA glue must be diluted with water in a 1:1 ratio.
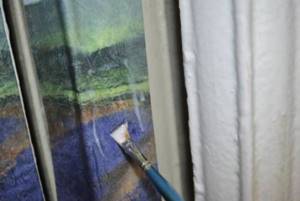
Carefully coat with glue and glue the top edge of the picture.
We continue to glue the design with a sponge, smearing the napkin on top. Be sure to make sure that no bubbles, creases or folds form.
Having carefully leveled the entire surface, we additionally go over it with a wide dry brush.
Make sure that the design does not move or skew, as paper napkins are easily deformed and stretched; you need to work with them very carefully and slowly
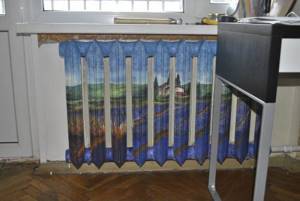
Thus, we glue the pattern to the remaining sections of the battery.
Since it is not always possible to find napkins of the right size, you can choose a not very complex pattern that can be connected to each other or pre-paint the battery in the desired color, which will serve as a background. If you have artistic skills, you can try to complement the drawing.
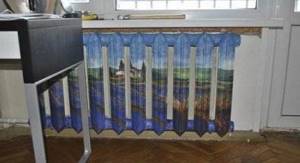
We leave the battery until the glue has completely dried, and then coat it with varnish in several layers, allowing each layer to dry separately.
Thus, we gave new life to an old cast-iron battery.
Using the same method, you can decorate a new flat radiator and another battery of any shape and material.
This master class will help even a beginner to cope with the work. There is nothing complicated in decoupage of surfaces, the main thing is patience and accuracy in work. And the result will definitely please you. After all, decoupage of the heating zone is a beautiful and simple, and nowadays also a very fashionable way to decorate a room.
And finally, a few photos with interesting solutions for decorating batteries.
Flat screens
Such screens are used to hide the heating radiator, which is built into a niche. They are quite popular because they have many options - lattice (the simplest), with a pattern (geometric or floral), with carvings; specimens with various forgings are perfect for the Baroque style.
Advice! If the battery is installed in a niche, then by installing a wide window sill, you can organize a workplace near the window.
If the battery is in a niche, it can be covered with a flat screen
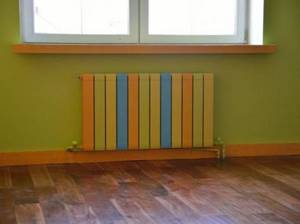
Painting the radiator box to match the wall color
Drawings on the radiator
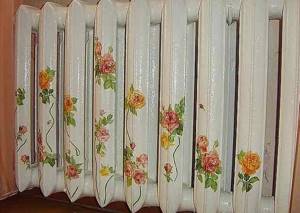
Drawing abilities open up great opportunities in decoupage. You can bring any creative idea to life, create images of any subject on the battery. Luxurious roses or modest daisies may bloom on the sections of the radiator, ladybugs, butterflies, birds or reptiles may “settle”, ethnic ornaments, ornate patterns or futuristic symbols will appear. It all depends on personal preferences and imagination.
Acrylic paints are used in this work. They are durable, resistant to external influences, and dry quickly. These paints differ in density and purpose, so when purchasing them you should make sure that they are suitable for indoor work. The beauty of the applied design will last for many years. No additional varnish is required.
You can also create voluminous decorations on the radiator. Craftsmen who have skills in modeling and have creative abilities should use them to decoupage the battery. On sections you can create elements of stucco from the Renaissance or ancient times, use floral, plant, and animal motifs. In a children's room, fairy tale and cartoon characters can become excellent decorations.
This type of decoupage uses a self-hardening mass. It easily takes any shape, attaches well to metal, and has high heat resistance. The completed decorations will dry quickly. They can be painted with acrylic paints to give the necessary brightness, and then covered with a double layer of heat-resistant varnish.
Glass screen
A glass panel, as a rule, is a rectangular sheet made of translucent thick glass, which is attached to the wall with steel holders. Making it possible to decorate the heating device from the front, it leaves open space below and above and does not interfere with free air convection. A popular solution is a glass panel with photo printing.
Glass screen with fireplace image
Glass screen with mirror surface in the bathroom
Decoration stages
Before you start decoupaging the battery, you need to prepare its surface.
First, thoroughly flush the radiator. It is especially worthwhile to work hard when cleaning sections of cast iron batteries.
Secondly, you should sand the radiator with coarse sandpaper to smooth out any existing irregularities and remove the old paint.
And thirdly, paint the battery with heat-resistant light enamel. It is not recommended to use nitro paint, because... it swells when heated.
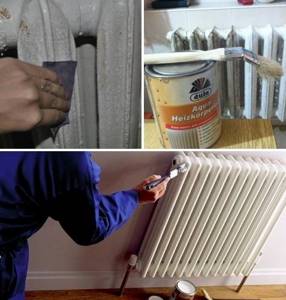
Then, when the paint is completely dry, you can proceed directly to decoupage.
Drawing
You can first draw a sketch on paper, this will make it easier for you to work later.
Prepare pieces of decoupage paper. You need to do this in the following way: you take the picture you like and tear off the edges of the paper so that you only have a fragment in your hands that you will paste.
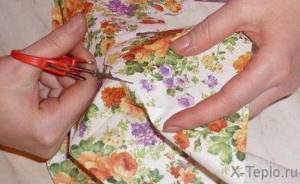
This is done not only for better adhesion of the pieces of paper to each other, but also to mask the boundaries of the decoupage fragments. The transitions are almost imperceptible, and one pattern can smoothly transition into another.
You should first try on the prepared fragments on the sections themselves.

To decoupage radiators, use PVA glue diluted with water in a 1:1 ratio. It glues various types of materials well and is easy to use. Special glue is sold in craft stores, but using it for decoupage on batteries is not economically profitable.
We apply a piece of napkin to the radiator fin, apply glue from above to the center of the design. Using smoothing movements of the brush, distribute the PVA over the entire surface evenly from the center to the edge.
If desired, you can paint some details with acrylic paint and glue voluminous plastic decorations.
https://youtube.com/watch?v=PrYB-QK4a8I
Recommendations from experts
And finally, let’s reveal a few secrets. Do not apply many layers of napkins on top of each other without drying in between; a thick layer of paper may warp.
If you have a bad part and you notice it after drying, don’t be upset. Just paint over this part with white paint, let it dry, and then cover it with a new piece on top.
If you are generally satisfied with the result, but there are sharp transitions between the fragments, paint them with paint to match with light tapping movements of an end brush or using a sponge.
The decoupage of the battery will last much longer if it is secured with interior varnish.
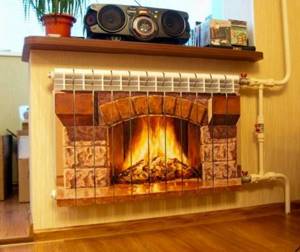
The interior of a city apartment equipped with a central heating system can be varied in various ways. Including by decorating cast iron radiators, which become more attractive and stylish - real works of art. To do this, you can use decoupage of a heating radiator with your own hands - a technology that requires not so much skills as time and suitable materials. Also read: “Decorative screens for heating appliances: selection and installation.”
How to hide a pipe and heating radiators: tips from a heating engineer
The main task of a heating radiator is to heat the room, which it does by a combination of two methods. The first is infrared radiation, in which heat is transferred directly to objects located in the room. It is this thermal energy that we feel when we bring our hands close to the battery. The second method is convection, by heating the air, which, rising upward, displaces the cold air, thus organizing air circulation in the room, which leads to a more or less uniform distribution of temperature.
If you hide the batteries nicely in the house, this will not affect the efficiency of heating devices.
Excellent combination of radiator shield and interior style
Therefore, you should immediately decide on the main thing - no matter what method is chosen to hide pipes and radiators in the apartment, any decoration of the radiator will definitely lead to a loss of heater power. A simple example is installing a glass screen that almost completely blocks infrared radiation. And the larger the solid (without holes) area of the cover (screen) on the battery, the “deeper” the battery is hidden, the more significant the losses will be. Solid (solid, without holes) boxes on top of the radiator are especially unacceptable - because they block the warm air rising upward. The photo below shows a particularly unfortunate design designed to decorate the battery.
An example of unsuccessful battery decoration
On the one hand, it never fully fulfills its role - the supply pipe is very clearly visible. On the other hand, there are very small holes that significantly reduce the movement (convection) of warm air, and a solid screen (even a metal one) blocked thermal radiation. That is why, from the point of view of thermal engineering, the ideal choice is a panel made as a coarse mesh.
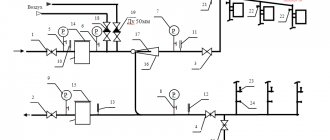
In Fig. Figure 2 shows a cross-section of an almost optimal grille model for a heating radiator.
Rice. 2. Installation diagram of the grille (panel) on the radiator.
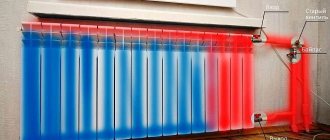
Infrared (also known as direct thermal) radiation, indicated by red arrows (3), passes through the grating (D) with minimal losses. It is worth paying attention to the thermal insulation screen (A), which reflects heat (part of the infrared radiation) and, instead of aimlessly heating the walls, returns it back to the room.
Cold air (indicated by blue arrow 1), entering from below, heats up and rises. To prevent heated air from stagnating under the window sill, forming a thermal cushion that blocks convection, install a visor (B) that directs the air flow outward. It is also worth installing an injector (two metal plates) in the upper part, which allows heated air to be removed from the front side of the radiator. It is especially effective at high temperatures, due to the narrowing at the top, the draft increases significantly and the volume of exhaust air increases significantly. Despite the installed grille, the overall energy efficiency of such a design will be significantly higher than with simply installing the battery near the wall.
A long box will allow you to hide not only the battery, but also the pipes
A beautiful radiator box can become a decorative element
A battery with a bench is perfect for a living room
Master class on decoupage of a battery or radiator with your own hands
The simplest and most accessible type of decoupage for everyone is pasting. It doesn't require any special talent. All you need is accuracy and the ability to choose the right materials. Such work will not require much time. But the result will certainly please you and become a source of pride.
We use napkins
For decoupage you will need napkins
- First you need to prepare the battery: wash it thoroughly using detergents. A brush will come in handy for this work, since the radiator has many hard-to-reach places.
- Then, using sandpaper, you need to clean all the places where the paint has peeled off so that the surface of the ribs becomes smooth.
After this, the battery will have to be washed again. The battery must first be cleaned with sandpaper. - In decoupage, ready-made images printed on rice paper are most often used.
You can choose the type for your battery at your discretion. But please note that the standard sizes of this paper are: 34*100. If such an image is used, it will not be enough to completely cover the edges. We'll have to complete the picture. Therefore, you should choose options where the top and bottom are not difficult: earth, grass, sky. Think in advance about the design you want to apply. - First, the base is created using oil-based white paint.
The painted battery should be left for a day to dry completely. After cleaning, the battery must be painted with oil paint and wait until completely dry. - Then you need to measure the width of the section, draw and cut the design into appropriate strips.
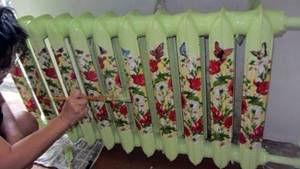
They are glued using regular PVA glue. The stripes must be carefully smoothed, removing air bubbles. When the glue has dried, you need to start finishing the drawing, painting the remaining parts of the ribs, mixing paints to obtain the desired shade. You need to glue the fragments with PVA glue - In order to give the decoration strength and a more attractive look, after the paint has dried, the battery is coated with heat-resistant varnish in two layers.
After all work is completed, the battery is varnished
You can cover the radiator with ordinary multi-layer table napkins. They are offered in a large assortment, allowing you to choose any pattern. Before gluing, you need to separate the top layer from the napkins and cut them into strips of the required width. The work also uses PVA glue. You can cover the surface with decoupage varnish.
Coloring
Drawing abilities open up great opportunities in decoupage. You can bring any creative idea to life, create images of any subject on the battery. Luxurious roses or modest daisies may bloom on the sections of the radiator, ladybugs, butterflies, birds or reptiles may “settle”, ethnic ornaments, ornate patterns or futuristic symbols will appear. It all depends on personal preferences and imagination.
Acrylic paints are used in this work. They are durable, resistant to external influences, and dry quickly. These paints differ in density and purpose, so when purchasing them you should make sure that they are suitable for indoor work. The beauty of the applied design will last for many years. No additional varnish is required.
You can also create voluminous decorations on the radiator. Craftsmen who have skills in modeling and have creative abilities should use them to decoupage the battery. On sections you can create elements of stucco from the Renaissance or ancient times, use floral, plant, and animal motifs. In a children's room, fairy tale and cartoon characters can become excellent decorations.
This type of decoupage uses a self-hardening mass. It easily takes any shape, attaches well to metal, and has high heat resistance. The completed decorations will dry quickly. They can be painted with acrylic paints to give the necessary brightness, and then covered with a double layer of heat-resistant varnish.
Video: how to decorate and design heating radiators
You have renovated your apartment, but decided to keep the old heating system. But radiators do not fit into the overall modern interior. What to do?
You can purchase decorative frames for radiators. Or you can decorate your old battery and finish it yourself, that is, an old thing.
What is the essence of decoupage technique?
Decoupage is a technique of transferring drawings from colored paper to any surface: wood, ceramics, metal, etc. In this way you can decorate anything, from dishes to pieces of furniture. The technology itself is several hundred years old. The fashion for such decoration arose in the Middle Ages in France and does not fade to this day. Some craftsmen even decorate clothes in this way.
People usually try to update old furniture or decorate unsightly interior items with decoupage elements. Many people are especially dissatisfied with old cast iron radiators. They cannot be hidden behind furniture, as it can block access to warm air. Painting doesn't help the situation either. White color makes you bored. Craftsmen found a way out of this situation and turned ordinary radiators into a work of art, decorating them with beautiful and stylish designs.
Hanging screens
A battery screen is the most affordable way to hide a radiator, although it is far from the most aesthetically pleasing. There is no need to install them specially; they can be installed simply by hanging them on the heating device. True, by closing the radiator itself, they do not solve the problem with the supply pipes. The hinged panel, allowing you to hide the radiator itself, very slightly reduces the level of convection and heat transfer, plus - they are mostly metal (although if you catch them, they do not ring very pleasantly).
Hanging screens are cheap and easy to install
Decoupage. Technology
Decoupage is an imitation of painting. And any painting requires a flat base. New radiators are produced with smooth-walled sections, so the pattern will fit perfectly. But you will have to work on old cast-iron rarities to level the surface as much as possible and remove layers of old paint, drips and rust stains.
Old batteries require preparation for decoupage
Step one. Removing old paint
Old paint is not easy to remove.
You can try using a solvent, applying it to the surface of the radiator and scraping off the softened enamel with a metal spatula. But if there are too many layers of paint, the option is too tedious. Plus, the pungent odors of solvents have a detrimental effect on health.
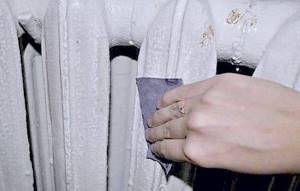
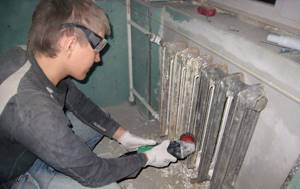
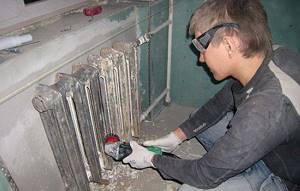
Another way is mechanical. Sandpaper with different grain sizes and an angle grinder with abrasive attachments will be used.
Many craftsmen advise cleaning the surface of batteries using a drill and a brush attachment (wire or polymer-abrasive). Old paint will fly off in no time, but it’s worth coordinating noisy work with your neighbors.
Repair and auto repair shops often offer sandblasting services. This method is highly effective, but will require dismantling and transporting a heavy radiator.
And another option is thermal. Old paint can be removed by heating the surface of the radiator with a hair dryer, and then scraping off the peeling enamel with a spatula. If there is an opportunity and desire to dismantle the radiator and take it out of the room, then a burner is used for cleaning. All that remains is to lightly sand the cast iron surface.
After removing the old paint, the radiator should be degreased with white spirit and then coated with a layer of anti-corrosion alkyd primer to improve the adhesion of the paint layer to the metal. The drying time of the putty is from 20 minutes to several hours.
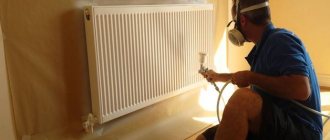
Step two. Radiator painting
First of all, you should choose a paint that will meet the following requirements:
- wear and heat resistance;
- non-toxic;
- no change in the shade of the coating over time.
In addition, it is recommended to choose paint that matches the wall located behind the radiator. Plus, it is advisable to purchase matte water-dispersion paint (labeled “for painting radiators”), decoupage will look more impressive on it, and during the painting process unpleasant chemical odors will not bother you.
The most convenient way to apply paint is with a fur double-sided mitten. A rubber glove is put on the hand, and a fur mitten is placed on top. This makes it very convenient to paint hard-to-reach areas. Don't forget to place oilcloth or newspapers under the radiator so as not to stain the floor.
Step three. Preparation of materials
To begin, take a napkin with the desired pattern and separate the layer with the pattern. We measure the battery sections (length and width) in order to cut the napkin exactly to size. We cut the napkins based on the measurements obtained.
If you don’t have ready-made napkins, you can make them yourself. To do this, find the desired drawing on the Internet. Take a two-layer white paper napkin, place it on top of the printed design and secure it on one side with masking tape. We cut off the excess napkin. Now print out the design you like on a sheet of paper with a napkin attached. Peel off the tape and the napkin is ready.
Video - How to make a napkin for radiator decoupage
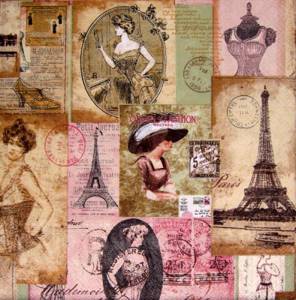
For the living room, it is best to select images of nature and abstraction, for the nursery, cartoon characters are appropriate, and in the kitchen, floral motifs and still lifes will look best.
This completes the preparation. Let's get started with creative design.
Step four. DIY decoupage of a heating battery
We take a strip of napkin and glue it with the wrong side to the section of the radiator coated with glue. Smooth the napkin with your hand or a wide brush with soft bristles. If some areas of the strip do not stick, coat these areas with glue directly on top of the napkin. We make sure that no bubbles or unevenness are formed during the process.
We rinse the brush from glue and open the acrylic varnish for decoupage, which can be glossy, matte or with various holographic effects. Using light, precise movements, coat the battery with varnish. The varnish will fix the design and give the work a finished look.
If desired, you can use acrylic paint to apply any lines or additional drawings on top of the napkins to make the work truly exclusive.
We wait until the varnish dries and turn on the heating. The work is completed.