Do I need to drain the water from the water heater?
- if the water heater is located in a country house or in another periodic residence. With the onset of frost, the water inside can turn into ice and “break” the sealed storage tank;
- draining water is useful when there is a water supply accident and there is no water in the apartment. The storage tank can provide 80-100 liters of water. It can be used to wash hands, vegetables or flush the toilet.
- If the tank is made of stainless steel, it is not afraid of corrosion in water. But it will corrode faster in humid air;
- For copper heaters, it is better to drain the water. Copper is more degraded in hard water than in humid air. And the service life of heaters is always shorter than that of a storage tank (they have to be changed more often);
- If the water in the water heater comes from a centralized water supply, it contains disinfecting components (bleach). They limit the growth of any bacteria and the appearance of an unpleasant, stagnant odor;
- If the water in the tank comes from a well, it does not contain chlorine. Therefore, it may stagnate with the formation of a putrid, unpleasant odor. Draining such water prevents its stagnation and decay.
To get rid of the smell of stagnant water, you should rinse the boiler (turn on the tap and drain the water from the tank for a long time until all the stagnant liquid comes out). Then fill the heater and turn on maximum heat (90-95? C). This “boiling” can be done several times if necessary.
Why is this necessary?
The need for a draining procedure depends on the operating conditions of titanium, its design and frequency of operation. There are the following categories of reasons that force the tank to be completely emptied of liquid:
- Location of the water heater in periodically heated or unheated rooms. At negative ambient temperatures in winter, water will turn into ice and literally “tear” the sealed walls of the storage tank.
- A prolonged absence of liquid in the apartment during a water supply accident. In such a situation, 80–100 liters can be used for washing hands, vegetables, cleaning, flushing the toilet, etc.
- The need for repair work, for example, replacing a failed heating element.
- The departure of apartment owners for a long time leads to stagnation of the contents of the tank and the appearance of an unpleasant odor due to the proliferation of bacteria. This reason is relevant for water supply not from the central water supply system, but from an individual well: chlorination inhibits the growth of any microorganisms.
- Preventive descaling of water heating elements, allowing you to save 25–50% of energy costs.
- Rinsing the storage tank from dirt particles, cleaning the walls from scale, etc.
Drain valve device for water heater
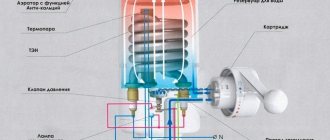
The design of storage water heaters from different manufacturers has similar characteristics. Differences can only be observed in design and advanced functionality. The basis is a large tank. Inside it there is a heating element and a temperature sensor.
Cold water is supplied to the boiler using a pipe, which is directed down the tank to a shallow depth. The pipe ends with a head, which performs the function of spraying water. Cold water is marked in blue and is usually located on the right side.
Hot liquid is supplied from above or below. Inside the container, the pipe ends at the very top. Hot water is marked in red and is supplied from the left side.
Heating device diagram:
- Tank;
- heating element;
- Temperature sensor;
- Hot water removal;
- Thermal insulation;
- External body;
- Magnesium anode;
- Cold water drainage.
The design guarantees uniform heating and removal of hot water that rises to the top. But the liquid that enters the container does not flow out completely, it does not fall below a certain level. This way the heating element is protected from overheating.
The check valve prevents you from simply draining the tank through the hot water tap. This way, only a small top layer can be drained. To completely drain the water, a number of other operations are performed.
How to turn it on
The design of all boilers (storage water heaters) is the same, so it depends little on the model and brand. Considering that, according to statistics, the most popular manufacturers among Russian consumers are Thermex and Ariston, using their example, we will tell you separately how to turn on the Thermex boiler and how to turn on the Ariston water heater.
The initial installation of equipment is mainly done by specialists, but switching on must be done by the users themselves.
So, how to turn on a Thermex water heater so as not to damage it and prevent mistakes. Connecting an instantaneous water heater is not fundamentally different - the air is also vented, the hot water pipe is shut off, the settings are set and it starts up. The only difference is that the storage one takes 2.5-3 hours to heat the water, and the flow-through one dispenses it after 5-15 seconds.
- The shut-off valve on the hot water pipe is closed.
Even if a tap is installed on the pipe, shut-off valves are still used. The taps can let water through, and then the water from the boiler will go into the common riser.
- Air is released from the system by opening the hot water tap and the outlet of hot water from the boiler itself; lastly, open the cold water tap. The presence of air can be determined by a ragged stream - it will flow intermittently and a “snorting” sound will be heard.
- After the water flow has leveled off, close all the taps, including those on the device itself. Next, connect it to the network.
A separate grounded socket is always used for connection.
- Before turning on the boiler, set the temperature and check the operation.
To make sure it works, do the following:
- check the indicators;
- check the temperature;
- If the device is working properly, the temperature will rise after 15-20 minutes.
If the water heater does not turn on
The first thing you do is check the network elements - electricity, sockets, RCDs, automatic devices. Use a tester to check the voltage in the boiler to rule out a broken cable.
The most common problem is electronics. If power is supplied, but the Thermex water heater does not turn on, look at the error code on the display and check the instructions to see what it means.
- breakdown of the heating element, contamination of the heating element with lime and calcium deposits;
- thermostat failure - when the water temperature rises above 90-92 degrees, the RCD may be triggered;
- there is no water in the tank - if there is water in the system, but it does not flow into the boiler, the reason may be that the air has not been bled.
Even if there was water in the tank before turning it on, but it has not been used for a long time, you should first drain the water, and then be sure to drain the air.
Let us repeat that there is no fundamental difference in connecting storage devices, so we will schematically describe how to turn on an Ariston boiler.
- If we are talking about an apartment or house with a centralized supply of hot water, close the pipe with shut-off valves.
- Open the tap in the place where the unit is installed and drain the water, close it.
- You bleed the air from the boiler, for which you first open the inlet tap (the pipe is marked in blue), then the heated water tap (marked in red). Wait until all the air comes out and the water flows in an even stream without interruption.
- Do not close the cold water supply tap - its quantity in the boiler is regulated automatically.
- Plug it in and set the temperature on the device.
- Check the functionality - after a few minutes the temperature in the tank should begin to increase.
What errors can you encounter during operation?
Instantaneous water heaters
As for compact water heating devices, we note that their installation is very simple:
- remove the old tap;
- install the unit;
- connect to a pipe with cold water;
- turn off the hot one;
- plug into the outlet.
At this point, the installation is complete and then you just need to turn on the hot water tap and use it. With this equipment, there should be no questions about how to turn on the boiler when it is already installed. If you don’t risk installing it yourself, contact a specialist.
All listed devices belong to high power equipment (from 3 to 7 kW), they are prohibited from being connected to a common outlet. A separate outlet should only be located in a dry place, and power should be supplied directly from the distribution panel.
General procedure
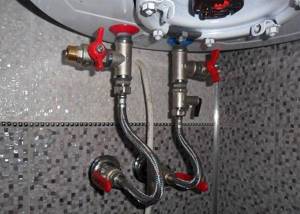
To completely drain water from the storage tank of the water heater, it is necessary to provide access to air inside it, and the easiest way to do this is through the hot water pipe. The basic procedure is as follows:
- the boiler MUST be disconnected from the power supply;
- the cold water supply valve for the heater is closed;
- to relieve excess pressure in the tank, the hot water tap is opened;
- unscrew the screw securing the safety valve flag located between the titanium and the water supply line;
- if there is no provision for draining the liquid flowing from the safety valve into the sewer system, place an empty bucket or similar container under it;
- By raising and lowering the valve flag as the bucket is filled, we drain the water from the heater.
Draining water from the storage tank through the safety valve is accompanied by the characteristic gurgling of air bubbles in the boiler. Its absence means that the force of atmospheric pressure is not enough to lift the water in the empty container.
What if it doesn't gurgle?..
In this case, the procedure must be expanded:
the connection between the DHW heater output and the system is disassembled
If it is non-separable, the connection closest to the “hot” outlet of the boiler is disconnected; as a last resort, a small piece of rubber hose of suitable diameter is placed on the bend of the hot water tap closest to the water heater; it is necessary to blow strongly into the hose - this will forcefully displace the liquid from the hot water supply line into the water heater tank; you can use a compressor or a hand pump - but with precautions.. After all the procedures performed, the water from the boiler will be drained
But - not completely... below the edge of the cold water supply tube, the liquid in the container will still remain. Its volume will depend on the installation height of this tube and can reach several liters
After all the procedures have been completed, the water from the boiler will be drained. But - not completely... below the edge of the cold water supply tube, the liquid in the container will still remain. Its volume will depend on the installation height of this tube and can reach several liters.
The final drainage of water “to dryness” can only be done through the mounting holes for attaching the heating element, and it is most often required when replacing a faulty heating element. The second situation when complete emptying of the storage tank is necessary is conservation of the water heater.
From the technical side, dismantling a heating element is a simple operation and does not require special qualifications of the performer. You just need to be careful to avoid damage to the gaskets between the heating element and the tank wall.
It's good when everything is according to the rules!
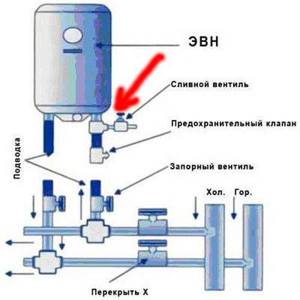
This connection diagram allows you to quickly drain water from the storage water heater.
The described technology for draining water from a water heater implies that the connection of the device to utilities was done according to all the rules - and this, alas, is not always the case. The most common deviations from the rules are the absence of a shut-off valve that shuts off the supply of cold water to the boiler, the absence of a flag on some safety valve models, the inability to access the threaded connections of the inlet and outlet pipes...
Such violations are not critical and do not have a special impact on the performance of the boiler as a whole - but they make the process of draining water from it very difficult. The process can be significantly simplified only if you foresee its need already at the stage of installing the cold-hot water supply system and install a special tap to supply air to the boiler storage tank.
Turning off the boiler at night
If you use hot water in the morning, it will, of course, not be convenient for you to get up 2 hours in advance to heat it, so whether you need to turn off the boiler is up to you, but it would be more logical to leave it in operating mode. If there is no urgent need for it in the morning, then turn off the power to the device to save electricity.
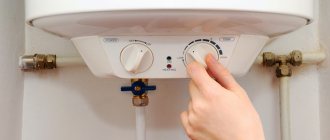
Let's look at how to do this using the following models as an example: Termex, Ariston, Electrolux. On mechanically controlled units, you will need to move the water heating adjustment toggle switch to the extreme left position, turn off the power button, and, of course, unplug from the outlet.
If you have an electronically controlled device, everything is still much simpler. Just press the OFF button on the control panel and disconnect from the power supply, and if you have a separate automatic machine installed on the heating device, turn it off.
If you have a storage water heater with a timer, you can set the time in the evening and receive heated water in the morning. The most popular model with this function is Thermex 1D 50V.
However, in this model, users are faced with the problem of “demo mode”: the heating device is turned on, the temperature is set, however, cold liquid still flows from the tap. Disabling demo mode is very simple - you need to simultaneously press the up and down arrows on the display and hold them for about two to three seconds.
How to drain water from a water heater according to the rules
Before draining the water from the water heater, it is worth understanding a little about the design of the device. It consists of 2 tubes that are connected to the tank. One of them is necessary for water entry, and the other for exit. Another important element is the shut-off valve in the form of a non-return safety valve. If you simply unscrew the liner on it, you will only be able to release a couple of liters.
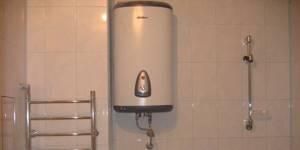
To drain liquid from the tank of a water heater of any brand, you must first disconnect the device from the power supply. Further actions vary depending on the manufacturer - for example, the popular Polaris, Termex or Ariston. Each of them has its own design features characteristic of heating devices. Termex water heaters are distinguished by an internal surface that is coated with stainless steel and titanium. The outer part is made of impact-resistant plastic.
Taking into account the specific features, instructions are being developed on how to properly drain water from a Termex or Ariston water heater. For the first of these brands it looks like this:
- Close the cold water valve.
- When the liquid inside has cooled down on its own or you have used it up, turn on the hot water at the closest faucet. This is necessary to relieve pressure.
- After all the hot liquid has flowed out, close the tap.
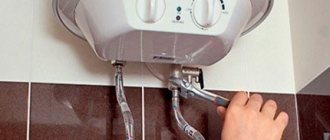
- Using an adjustable wrench at the cold water supply point, i.e. from the bottom of the check valve, unscrew the nuts. Twist the last one too.
- Immediately attach a hose to the freed tube, which will be needed to drain the remaining liquid into the sewer.
Unlike the Termex company, the manufacturer Ariston has a slightly different principle for emptying the device:
- After disconnecting the device from the mains, unscrew the top plug of the mixer.
- Remove the shower hose, turn off the cold water and close the faucet taps.
- Tighten the valves on the supply and discharge pipes together with the plastic nuts.
- Remove the cap from the faucet, unscrew the screw, remove the gaskets and handle.
- Do not completely disconnect the device body from the internal tank, then open the required plug.
- Open the faucet tap to allow water to flow out of the hole that was closed with a plug.
How to drain water from a boiler with a tee
When the water heater is equipped with a tee, i.e. drain valve, you must use special instructions for emptying it. This part is located at the outlet of the tank - between the valve and the cold water supply tube. To drain water, you must first shut off its supply at the entrance to the device. After this, all that remains is to open this tee with the tap.
How to drain water from a water heater using a trigger lever
The second method of draining water from a water heater is intended for models that have a special lever called a trigger in their design. The element is located on the safety valve, vertically and parallel to the cold water supply pipe. To empty the tank, you need to bend the trigger at an angle of 90 degrees. Some craftsmen even connect a hose to the “spout” of the valve and release the liquid into the sewer. The process is very comfortable, but long, because it takes almost 1-2 hours.
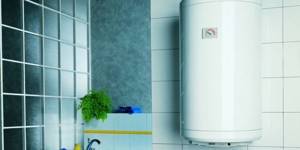
How to drain water from a boiler by removing the check valve
The last option, how to drain water from an electric water heater, is used if there is a check valve that performs the function of emergency pressure reduction. This option is considered the most extreme of all, so you should arm yourself with basins, rags, and even call a partner. In the first seconds, liters of liquid will flow in a large stream. First you need to unscrew the hot water supply, and only then the safety valve.
How to drain water from a water heater if it breaks down
If the equipment breaks down, you cannot drain it yourself, especially if the warranty period has not yet expired. In such a situation, you need to seek help from the employees of the company where the water heating device was purchased, or from the specialists who installed it. In most cases, repairs are made on site, but if dismantling is necessary, the technicians release the liquid themselves. If the warranty has already expired, then you can try to carry out repairs on your own, although it is better to leave it to specialists.
Recommended insulation for a well made of concrete rings
| Type of insulation | Features of the material | Installation technology |
| Styrofoam | Inexpensive, has good thermal conductivity, does not deform, and does not absorb water. Not resistant to rodents and insects. Sold in the form of ready-made elements corresponding to the sizes of reinforced concrete rings. | The walls of the well are cleaned of debris, façade glue is applied tightly, without gaps. Styrofoam is attached. If the foam does not adhere well, you can secure it with concrete dowel nails. Any barrier insulation material is laid on the foam. The trench is filled with earth and compacted. |
| Extruded polystyrene foam | Resistant to low temperatures, aggressive environments, and withstands loads well. Approximately 20% more expensive than polystyrene foam, produced in the form of slabs. | Installation is no different from installing foam plastic. The joints are sealed with polyurethane foam. The insulation is wrapped with rolled waterproofing material. |
We invite you to see how a member of our portal with the nickname pdp000 insulated his well
The insulation of the blind area is made of EPS, the walls of the ring are insulated with expanded clay. An insulated lid-liner is also made.
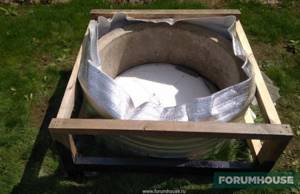
You can insulate a well with a little blood. Here are a few methods tested on FORUMHOUSE.
- Our user with the nickname Accurate covers the concrete ring of the ring with plastic film. Since then, the water supply pipe has not frozen even once - it was heated by well water, and the water did not freeze because the film did not allow the cold to pass through.
- Our participant with the nickname Hodok has been insulating a well from the inside for 40 years. Attach two frames made of thick wire in the form of inverted letters P to the last ring at a distance of 25 cm from each other. They descend to ground level. On them, Walker places two semicircles cut out of iron - this creates a flooring on which a plastic film is placed. He covers all the cracks with the same film, puts old clothes inside and leaves the well until spring. But this needs to be done when stable frosts arrive, so that the improvised insulation does not get wet from the fumes from the well.
How is it even constructed?
To properly drain water from a heating device, you need to know the principle of its operation and internal structure - at least in the most general terms.
General device
The traditional design of an electric boiler is not complicated, but it is very reliable in operation. Essentially, this is a large thermos with built-in heating of the contents: a storage tank for storing water, inside of which a heating element is installed. The structural design is common to all models of Thermex and Ariston storage water heaters, and differs only in the shape and material of manufacture of individual elements, the presence of certain components and parts that improve and facilitate the operation of the device, and the degree of “sophistication” of the control units.
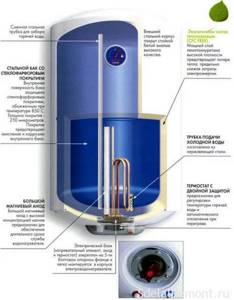
Structure of the Termex boiler
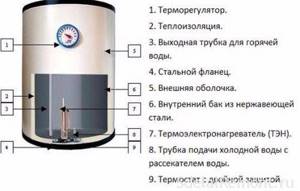
Structure of the Ariston boiler
Storage capacity
All manufacturers make storage tanks from anti-corrosion materials, but the quality of this material can vary greatly. Stabilized steel coated with a layer of glass porcelain is considered the best - scale practically does not “stick” to such a surface, and water is not contaminated by particles of the walls. The cheapest material is galvanized steel; It lasts quite a long time, but is highly susceptible to scale formation and adds metal to the composition of the heated water.
Pipe, pipe, pipe all around...
To replenish cold water and draw hot water, two tubes are installed vertically in the container - the cut of the first is at the bottom, and the cut of the second is at the top. The “cold” pipe usually has a divider that ensures uniform distribution of water throughout the volume of the tank; The cold water entering through this tube displaces the already heated liquid upward, and it enters the hot water system through the “hot” pipe. There is no mixing of liquids inside the tank.
Video:
Where would we be without convenience...
In order to automate the operation of the water heater and facilitate its operation, a thermostat is also installed inside the tank, which allows you to regulate the heating temperature of the water and avoid boiling, and a magnesium anode to reduce the level of electrochemical corrosion in the storage tank. The heating element (heating element), also located inside the tank, is a spiral of wire with high resistivity (usually nichrome) placed in a copper casing.
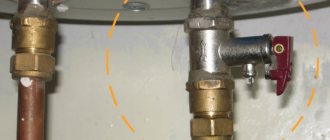
A mandatory structural element of any heater is a safety valve installed on the “cold” pipe. Its purpose is to relieve excess pressure in the line, equalize the pressures of heated and feed water in the line, and prevent arbitrary flow of liquid from the tank when the “supply” is turned off.
It's time to drain the water
Ariston and Thermex electric boilers belong to pressure vessels and apparatus and, like all such devices, have a sealed design. That is why it will not be possible to empty it completely by simply turning on the analysis of heated water - only the liquid will drain above the cut of the “hot” intake tube and directly from it...
Do I need to dump water and when to do it?
It doesn’t always make sense to empty the reservoir of a household appliance. For example, in the event of a breakdown of the automation unit - sensor, thermostat - replacement is carried out without complete disassembly, there is no need to drain the water. In what situations is defecation done:
- for the winter in an unheated building - a country house, a bathhouse, etc.;
- before cleaning the heating element, washing the container from the inside;
- when it is necessary to change the magnesium anode;
- in case of moving the boiler to another location or completely replacing the water heating device.
Advice. To get rid of stagnant water and bacteria (in particular, legionella), it is enough to “fry” the device at maximum mode at a temperature of +75 °C for an hour. Then update the contents of the tank.
Let us remind you how to properly dial a water heater. We open the cold water valve, the “hot” tap and wait. When the container is full, water will flow through the intake pipe into the hot water system and then flow out of the mixer.
In what cases should you drain the water from the water heater?
So that a person does not doubt whether it is necessary to drain the water from the tank or whether this procedure can be done without, you need to clearly define the problem that has arisen. Many water heater manufacturers do not recommend leaving the device without water for a long time due to the risk of corrosion of metal parts.
The mandatory need to drain the water occurs in three cases:
- A water heater installed in a dacha requires mandatory drainage of water. The question of how to do this arises for the owner at the end of the season. If you do not drain the water for the winter, then at negative temperatures the liquid will freeze and burst the storage tank of the water heater. The problem does not affect owners who live year-round in a country house.
- The need to drain the water occurs when the water heater breaks down, as well as preventive cleaning of the container from scale and dirt. The frequency of scheduled maintenance depends on the design of the device, as well as the quality of the liquid. The harder the water, the faster scale forms. However, on dry heating elements, solid accumulations are deposited longer than in devices with open heating elements.
- You cannot do without draining water in an apartment in the event of a water supply failure. From a storage tank designed for 80 or 100 liters, you can take liquid for technical needs: flushing the toilet, washing hands and other purposes.
If, according to the instructions, the device is not designed for long periods of downtime without water, then in the event of a water supply failure, you can try to find another solution to the problem. Alternatively, purchased bottled water will help.
It is not necessary to empty the storage tank at the dacha when the owners leave. Although, here it is worth taking into account the duration of absence, the design features of the water heater, the minimum indoor temperature and the source of water intake. And now, first things first:
- If a long departure from the dacha falls during the winter, then during severe frosts the temperature inside the room will drop to negative levels. No matter how the lack of water is detrimental to the device, the liquid must be drained.
- Indoors, where the air temperature does not drop below 0°C, it is better not to empty the stainless tank. In the presence of water, less corrosion occurs.
- It is better to empty appliances with copper heaters when not in use. Here the corrosion process occurs in the opposite direction. Copper in water with increased hardness breaks down faster.
- Leaving a water heater idle for a long time can lead to infection. Stagnant water begins to rot, which can be recognized by its unpleasant odor. This happens faster when the water heater is fed from a home well.
- Chlorination is carried out in the centralized water supply, due to which putrefactive bacteria are destroyed. If you leave the boiler not drained for a week, then the likelihood of water rotting is minimal.
In general, during short-term departures from the dacha, it is not necessary to empty the water heater tank. Stagnant water can simply be drained, and the collected fresh liquid can be heated a couple of times to maximum temperature.
Features of Thermex water heaters
Water heater Tthermex ER 80 V
The Tthermex ER 80 V water heater is a reliable source of hot water. The electric storage boiler heats up in advance, so residents have the opportunity to use hot water at any time. For increased safety, the device is equipped with an emergency shutdown system.
Design
A storage electric water heater of simple design allows you to quickly diagnose and eliminate malfunctions in a timely manner. The device consists of several parts:
- Cold water enters the device through a special pipe located at the bottom of the device. It is connected to the cold water supply system (CWS) in the apartment or to a pipe coming from a well in a private house. The pipe is equipped with a valve that prevents hot water from flowing back into the cold water system.
- On the cold water pipe there is a pressure switch that regulates the rate of water flow and prevents damage to the device.
- After the relay, the water flows into a large eighty-liter tank made of copper. Outside the tank there is a layer of heat-insulating material that prevents the water from quickly cooling.
- There is a heating element (heating element) located inside the tank. Its operation is regulated by a manually controlled thermostat located on the instrument panel. With its help, the owners independently set the temperature to which the water needs to be heated.
- Some heater models are equipped with a silver anode that disinfects water.
- At the top of the tank there is a thermal fuse that regulates heating. When the water reaches the set temperature, the heating element stops working and turns off. When the water in the tank cools, it begins to function again. The fuse prevents water from boiling, a sharp increase in pressure in the tank and destruction of the water heater.
- When you open a hot water tap, the contents of the tank are supplied outside through the outlet pipe connected to the home DHW network.
In addition to the main elements for heating water, the device is equipped with a terminal, block and clamp. They ensure a safe connection of the product to the electrical network.
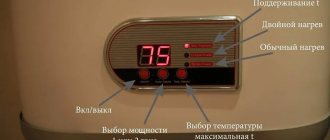
The device is equipped with several sensors. When heating is complete, a green light on the panel lights up. There is a thermostat at the top of the tank. It controls the water heating process; a light bulb is connected to it, which turns on when the heating element starts operating and turns off when the required temperature is reached.
Advantages
Location of controls on the device
People often choose one of the Thermex 80 liter water heater models. This is the best option for most families. Advantages:
- Powered by electricity. Not all private sectors and dacha cooperatives have gas, but electricity is available everywhere. The water heater can be connected in any home.
- The volume of 80 liters is designed for a family of three people taking showers one after another.
- Connects to three plumbing fixtures at once, providing hot water for showers and a pair of sinks in the kitchen and bathroom.
- Allows you to heat water in advance and simply maintain its temperature throughout the day. This will ensure uninterrupted operation of the hot water supply.
- The water heats up in just 2 hours 10 minutes.
The combination of positive qualities makes the product popular equipment for providing private houses and apartments with hot water.
Materials
One of the important advantages of Thermex water heaters is the materials from which they are made. Strength, durability and ease of use depend on their combination. The devices are made of high-quality materials that are resistant to mechanical damage and attractive in appearance:
- polished stainless steel;
- low carbon steel;
- high strength plastic.
The storage tank is made of stainless steel with the addition of titanium. This protects the tank from corrosion and extends its service life.
To increase energy efficiency and reduce the cost of maintaining high water temperatures, the space between the tank and the outer walls is filled with a material with low thermal conductivity - polyurethane.
Procedure for draining a water heater
Before draining the water, close the tap on the cold water pipe and unscrew the drain valve, disconnecting the device from the outlet
If you decide to empty the tank, you can do this only after the contents have cooled to room temperature. When the water supply is closed and the hot tap is opened, at most a liter and a half will pour out of the tank, everything else will remain inside. To understand why this happens and further properly drain the water, you need to know how an electric water heater works:
- Heated water is taken from the top of the tank through a special tube and enters the bottom of the water heater.
- The cold water pipe is connected through a non-return poppet valve, which prevents water from flowing back into the main. It is also responsible for releasing excess pressure that appears when the liquid heats up and expands.
- In a storage-type electric heater, water from the tank is supplied under the pressure of the main cold water pipe.
- If you shut off the flow of cold water and the system stops working, liquid will not flow from the tank itself. Only the water that was above the intake pipe will flow out of the mixer.
Drain with standard, improved and simplified connection type
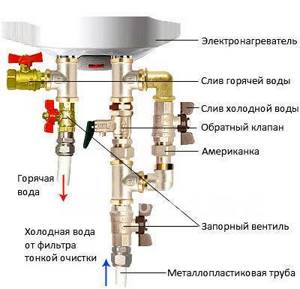
The method of emptying the boiler is chosen depending on its connection and design
With the standard version, emptying the boiler tank is much easier. But in the piping diagram it is necessary to have a drain valve mounted on the tee after the non-return valve.
To empty the tank:
- Turn off the cold pipe with the valve, unplug the electrical appliance from the outlet, and turn on the hot water on the mixer.
- Connect a hose of the required length to the drain tap.
- Prepare a bucket or other large container.
- Drain the contents in parts through an open tap.
There is no need to disconnect the pipes; when filling the drain container, just close the valve. The hose does not spray because the amount of air entering the tank is limited by the mixer.
An improved version of the standard connection involves a more convenient draining procedure, since the tee is mounted on both sides: at the cold water inlet and the heated water outlet. With this type of piping, you first need to close the valve at the entrance to the unit. After this, the drain hose is put on and the faucet is opened to relieve the pressure inside the tank and drain the residue in the outlet pipe. The free end is directed into the sewer or a prepared container and the shut-off valve is opened to allow air to enter at the tee of the “hot” pipe.
With a simplified connection option, it is necessary to stop the flow of moisture into the electric heater. Then the hot water valve is opened to drain the residue from the connecting pipe. Next, the check valve lever is moved to the open position, and the remaining liquid is drained. This is quite a long process.
Quick and complete devastation
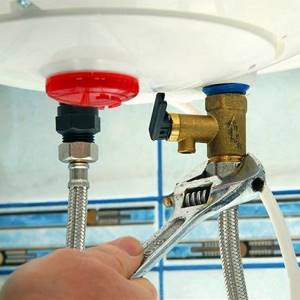
The fastest way to drain the water is through the safety valve by unscrewing it with a key
In the event of an emergency, there is a need to quickly drain the liquid. The procedure is carried out as follows:
- Close the cold water valve installed on the supply pipe. If there is no such regulator at the inlet to the tank, the shutoff is carried out on the riser.
- Open the valve at the boiling water outlet from the electric heater to equalize the pressure from inside and outside. Then close the valve again.
- Place a large saucepan or basin under the boiler and unfasten the hose that delivers hot water.
- Unscrew the tee with the relief valve.
After this, the liquid will drain very quickly. It is necessary to ensure that the basin does not overfill, otherwise you may flood your neighbors. During the process of changing containers, it is necessary to shut off the air supply to the water heating tank. The process will be easier if the boiler is mounted above the sink, bathtub, or toilet.
Before cleaning the inside of the tank or preserving the country heater for the winter, be sure to drain the residue from the tank. First, most of the liquid is drained using any of the above methods. After this, it is necessary to remove the water that remains at the bottom.
- Remove the decorative panel from the bottom of the boiler, holding it, disconnect the wires leading to the indicator light.
- Disconnect the contacts of the electrical wires. In order not to confuse everything during assembly, it is better to take a photo of the boiler filling first.
- Slowly unscrew the flange that supports the heating element. First, loosen the nuts, and when the excess liquid has drained, unscrew the element completely.
- Remove the heating element and allow the remaining water to drain.
How to empty the storage boiler?
First of all, to simplify the emptying process, the water heater must be correctly connected to the water supply networks. The connection diagram looks like this:
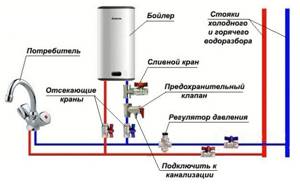
When everything is done in accordance with the diagram, the water is drained from the water heater in the following sequence:
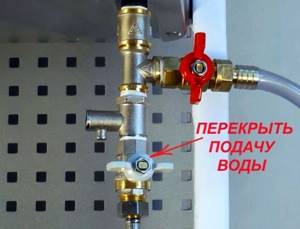
- the tap on the water supply to the house is turned off;
- the boiler must be disconnected from the power supply and the plug must be removed from the socket;
- close the tap that cuts off the unit from the cold water supply pipeline;
- open the hot tap on the nearest faucet and wait until the water drains;
- leave the mixer open so that air can flow into the tank instead of water;
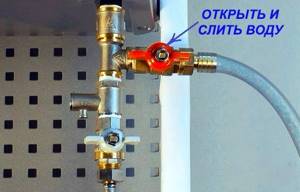
- connect a hose to the drain tap and direct it to the sewer;
- open the drain valve and drain the water from the boiler.
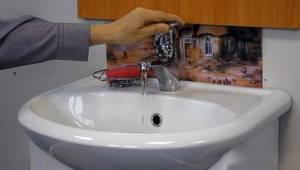
Advice. Before starting the procedure, it is recommended to wait until the water in the container has cooled to a temperature of 40-45 ºС, so as not to get burned. The wait will take quite a long time - about 6 hours. When this is not possible, you must take all safety measures and perform the operation very carefully.
This is the most convenient method, due to the correct piping of the boiler. When emptying is completed, all taps should be closed and maintenance or repair work can then begin. Once completed, the water heater must be filled again; do not forget to do this before plugging in the electrical appliance. To fill, you need to supply water to the house, and then alternately open the shut-off valves of the boiler and the hot water on the mixer. The signal that the container is full will be a stream of water from the mixer.
Emptying a boiler that is not connected correctly
You will have to tinker a little when the water boiler is connected to the networks incorrectly. This happens if some unfortunate master took on the installation and did not bother to install not only a tee for draining, but also shut-off ball valves. Unfortunately, such situations occur quite often; an example of how not to connect the boiler is shown in the diagram:
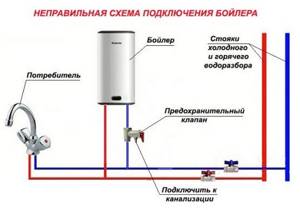
First, similar operations are carried out to cut off the water supply entering the apartment or private house. Water flows as much as possible through the hot tap of the mixer. Then the problem is solved in two ways - slow and fast, it’s your choice which one to choose.
If you have enough time at your disposal and the safety valve is in good condition, then there is an option to get by with little blood. After placing a tube on the valve's discharge pipe and directing it into the sewer, or simply placing a bucket, press the valve lever. It must be said that forced discharge through the valve will take a lot of time. A boiler with a capacity of 80 l will empty for at least 2 hours.
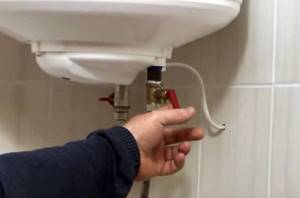
There is a way to empty the water boiler much faster, but to implement it you will still have to wait for the device to cool down, since it will not be possible to avoid getting your hands wet. Having completed all the manipulations of shutting off and draining the water through the mixer, as well as disconnecting the device from the network, you need to unscrew the pipe from the outlet fitting of the water heater with an adjustable wrench or gas wrench. Don’t forget to place a bucket in advance; some water will flow out through the fitting.
The next step is to unscrew the pipe from the safety valve. Since it does not allow the flow to flow in the opposite direction, nothing will happen as a result. Water will flow after you completely unscrew the safety valve. To control the process, you must first loosen it with a key and substitute a bucket. Then, plugging the outlet pipe with the finger of one hand, unscrew the valve completely with the other hand. By releasing your finger, you can drain the water from the boiler into the bucket, and when filling, close it again, creating a vacuum. This method is clearly shown in the video:
The complete disassembly method is also suitable for emptying a small water tank with a water heater whose pipes are directed upward. Here you can’t do without removing the tank from its brackets, then turning it over and draining the water.
Quick emptying via cold water pipe
To quickly drain water from a boiler connected according to factory instructions, you will need a pipe (gas) or adjustable wrench. We will disconnect the pipes, there is no other way. Procedure:
- We wait until the full tank cools down, or we turn it off and use the heated water as much as possible.
- We close the cold water supply to the house, release some of the water from the mixer, and leave the tap open. Again, turn off the power supply to the water heater.
- Using a gas wrench, unscrew both connections to the boiler. It is worth placing a bucket so as not to flood the floors and other objects under the water heating apparatus.
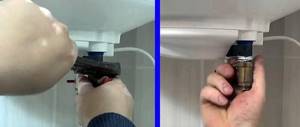
- Use the key to grab the edges of the valve and slowly unscrew it. Use your finger to close the hole in the “hot” pipe, otherwise air will pass freely into the container and water will flow out.
- We finally twist the safety group, place a bucket below and release the finger. If you need to stop the flow, plug the hot water pipe of the boiler again.
- Before assembling and filling the tank, thoroughly clean the pressure relief valve (preferably blow it out).
Advice. It is more convenient to carry out manipulations when there is a tap at the outlet fitting. You can find a valve with a ½” (internal) thread in advance, screw it on instead of the removed pipe and regulate the air supply/water flow.
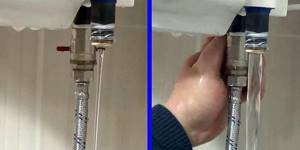
The advantage of this method is the speed of emptying; the procedure will take a maximum of 30 minutes. Negative points:
- disassembly is required - you need to remove at least the cold water pipe;
- the water heater must be cooled, otherwise you will get burned;
- the pressure from the fitting is difficult to control, the vacuum does not work immediately.
The flow of water can be slowed down - do not disconnect the hot water supply line from the boiler. Air flows through the mixer more slowly and the flow is intermittent. How to drain an Atlantic 80 liter water heater, watch the video:
Care and maintenance features
Both storage and flow models require care and periodic maintenance.
Trouble-free equipment service can be ensured by:
- correct operation;
- care;
- timely service.
By following the manufacturer's instructions and recommendations for operating the water heater, you can protect the equipment from accidental breakdowns.
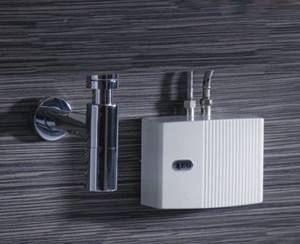
It is advisable that during operation the device should not be splashed with water, and that it should be securely fastened to the wall
As for care, all models, without exception, are extremely undemanding. It is enough to periodically wipe off dirt from the surface of the device. A soft rag or sponge soaked in a soap solution is suitable for this.
Neither storage nor instantaneous water heaters should be watered with detergents. Also, as necessary, you need to change/clean the coarse filter.
As for maintenance, all requirements are clearly indicated by the manufacturer in the instructions for a specific model. If this is gas equipment, then specialists from the relevant service will definitely come to check it.
Electric models can be serviced independently, if this option does not contradict the warranty conditions.
Some manufacturers stipulate that installation, first start-up of equipment, periodic maintenance and replacement of spare parts must be carried out by a specialist from the dealer company.
He is obliged to put a mark on the warranty card about all work performed, certifying his signature with the company’s seal. Otherwise, the owner of the water heater loses the right to use the warranty card if such a need arises.
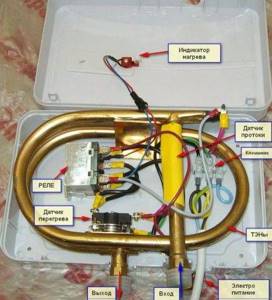
Many home craftsmen neglect the warranty and carry out all installation, further maintenance and repair work themselves. This option costs them much less than calling specialists
Servicing of storage water heaters is most often suggested to be carried out once a year. Carry out all the work yourself or invite authorized specialists - this depends on the manufacturer’s recommendations. Do-it-yourself maintenance often risks voiding the warranty.
For cumulative models, the following work must be carried out annually:
- clean the heating element from scale;
- remove sediment accumulated in the tank cavity;
- assess the condition of the magnesium anode and replace it if worn.
All work is carried out with the water heater turned off and disconnected from the network. In some cases, if the water has a large amount of impurities, you will have to change the filter more often and remove scale. The magnesium anode may wear out faster.
You may be interested in the step-by-step instructions for replacing the heating element with your own hands, discussed in our other article.
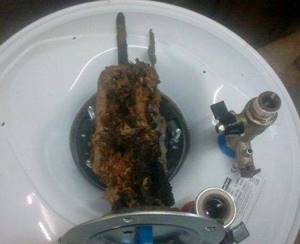
The internal space of the storage heater should be cleaned as plaque and scale forms on the walls and on the heating element
If the storage unit is installed in the country house and no one will use it during the cold season, then you must take care of draining the water from the container. Also, you must remember to completely disconnect the device from the power supply before doing this.
Maintenance of instantaneous water heater models is also carried out as needed. The frequency of these works will become clear during operation.
As soon as the water pressure has noticeably weakened and scale has appeared, it is necessary to clean the individual elements of the device:
- a mesh filter or coarse filter installed on the water supply;
- aerator-tabs installed in the tap hole;
- tab installed in the shower head, if the device is equipped with this element.
Clean the outside and remove filters only when the power to the water heater is turned off. If you do not remove the plug from the outlet, you may receive an electric shock when removing the prefilter.
