How to make and connect a heating register
Do-it-yourself heating register
Today we will tell you how to make a heating register with your own hands, as they say, from what is on the farm, because this is what usually happens. We will talk about how to make a drawing of the future design and how to connect the registers to the heating. You can calculate the length of the sections and their number based on an existing pipe of a certain cross-section, or make a calculation for purchasing a new rental. If the production of heating registers is supported by the desire to save money, hiring an experienced welder is out of the question. Yes, and there is nothing complicated there. You will soon see this for yourself.
Materials for making a register for a heating system
It is very rare, but there are stainless steel pipes. But this is a very expensive pleasure. Galvanized pipes are difficult to process. They cannot be boiled.
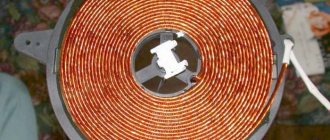
A do-it-yourself heating register made of copper pipe demonstrates remarkable heat transfer (four times higher than steel), but its price is very high. Although, in some cases, registers are also made of copper. In cases where the CO's wiring is equipped with pipes made of the same material. At the same time, the total length of the pipes and their diameters are less than steel registers of the same productivity.
A significant advantage of Cu copper is its high ductility; they are easily bent in the desired direction. Welding is required exclusively to connect different pipes. But there are many more disadvantages. We have already talked about the first one – very high cost. The second is associated with increased requirements for the conditions in which pipes can be used:
- a clean coolant is required, without abrasive particles;
- Metals incompatible with Cu are strictly prohibited from being used in CO. Therefore, problems may arise with the selection of fittings and fittings;
- high-quality grounding is required. Otherwise, chemical corrosion is actively occurring in the pipes;
- The material is very soft, so boxes are required to protect it.
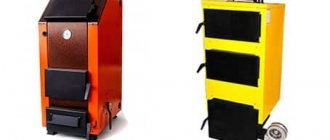
Occasionally, heating registers are made from cast iron pipes. But these are quite cumbersome structures. And quite massive. Sturdy stands are required for installation. Another disadvantage is the high fragility of cast iron. Therefore, protection covers are required that reduce the heat transfer rate.
The advantages of cast iron are its reliability and neutral reaction to any chemically active substances. Conclusion. The best choice is steel.
Calculation of parameters and drawing
The first stage of making a heating register with your own hands is design. It is clear that it will not be possible to make a heating register normally by eye. Therefore, it is necessary to carry out a number of additional calculations, based on which it will be possible to select the optimal heat exchanger. When making heating registers, many factors need to be taken into account:
Before you make heating registers with your own hands, you need to understand that this is a heating device, which means it must warm up a certain room. Its heat transfer must correspond to the situation; do not install a heat exchanger covering the entire wall in a small room. One meter should account for from 100 to 200 kilowatts, depending on the region. There is a formula for calculating the heat transfer of heating registers. It includes the following values:
To determine heat transfer, you need to multiply all the components of the calculation. Of course, from this formula you can separately determine each of the above values. So, knowing the square footage of the room, you can determine what dimensions the structure should have. Often, homemade heating registers are made from scrap materials, so it is not possible to select some parameters. It is necessary to adjust the entire structure to the existing characteristics, while not forgetting about the functionality of the heat exchanger.
When calculating the length of the heat exchanger, you need to remember that the resulting value indicates the total length of the pipes.
For example, according to the formula we got a value of five meters. This means that both one five-meter pipe around the perimeter and several sections, the sum of the lengths of which will be the same five meters, are suitable for heating. The point is to maintain the heat exchange area.
There are two methods for placing main (thick) pipes:
In principle, there is no difference in manufacturing. If you take a horizontal structure and rotate it 90 degrees clockwise, you get a vertical heat exchanger. This will make a difference when installing on a circuit.
That's the whole difference between vertical and horizontal register
In addition, the heating registers are secured with special jumpers. There may be one or two such jumpers. Also, the connection of horizontal sections can be carried out using couplings of the same diameter, which are welded into the end. These are the so-called serpentine registers. You can choose any method of assembling a heating register from pipes with your own hands, the main thing is that you have enough skills to perform it.
Do you want to learn more about heating elements for heating radiators, features of selection and operation?
Reviews about infrared heating can be read here.
In order not to complicate the register manufacturing process, we will use a scheme for connecting horizontal sections with two pipes. Heating register, drawing:
Heating register drawing
For work we will need:
The distance between the heating register pipes may be larger, but not smaller. Moreover, if pipes of large diameter are used, the distance between them is determined by the formula: diameter x 1.5. This distance is optimal. The next stage is welding.
Conclusions and useful video on the topic
You can learn about the sequence of manufacturing a heating register from a profile pipe and the secrets of welding from the video:
Homemade heating equipment continues to be actively made and used in rural areas or in private industries for heating office technical premises. But many refuse to use such irrational structures, especially where metering and monitoring devices for coolant consumption are being introduced.
Would you like to tell us how you assembled a register for your garage or cottage with your own hands? Do you have information that could be useful for DIYers? Please write comments in the block below, share useful information and photos on the topic of the article, and ask questions.
Heating devices are an essential element of any water heating system. They are usually the most expensive part. A good opportunity to save money would be to use homemade radiators. They are made from smooth round steel pipes or from profile pipes. The latter option is somewhat more expensive, but allows you to reduce the depth of the device and get a more aesthetic appearance.
The use of a profile pipe for the manufacture of heating registers has a number of features. When starting to work with your own hands or deciding to buy a “homemade” product, you need to carefully weigh the pros and cons. Studying the basic rules by which heating registers are made from a profile pipe will help you avoid mistakes when working independently and will make it possible to make a competent choice of the necessary parameters.
How to properly weld a heating register
The individual structural elements are assembled together by welding metal. This can be done in any way convenient for you. How to weld a heating register correctly? In fact, it all depends on what kind of welding machine you have:
Electric arc manual welding machines are the most widely used, as they are the cheapest and simplest. With this device you can both connect metal parts and cut them. On large parts you need to cut holes for the pipes. This should be done near the edge, retreating one diameter of the pipe. There will be four holes on the middle section, two on the first and outer sections.
Holes for connecting pipes
After this, on a flat horizontal surface we lay out all the elements in one structure and make tacks at the base of the pipes. You need to make either two tacks along the equator of the pipe, or three evenly around the entire circumference, as in the Mercedes badge. If the position of the tacks is incorrect, the part may fail during welding. After making sure that the register geometry is correct, you can proceed to welding.
While working in the melting bath, you need to maintain a high temperature and distribute the molten metal. The electrode must constantly move along a certain trajectory. How to weld a heating register, the simplest trajectories of electrode movement:
The most important point is the formation of the root of the weld on the tack and the exit from the tack. The process is performed with a gap, since the welder needs to change the position of the electrode. Although, with proper skill, you can cook without interruption. After the seam has cooled, you need to knock off the sludge with a hammer. So, all that remains is to weld the ends with plugs, which must first be cut from metal of the same thickness.
By the way, to produce registers you need to take at least three millimeters of steel.
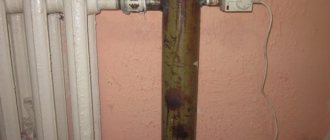
As a result, we have a blank in which holes for supply and return, as well as an air vent, will be cut in the future. The air vent, the same Mayevsky valve, removes air pockets that reduce the efficiency of the heat exchanger. You can also read in more detail about the air in the heating system. Connecting the registers to the heating system is the last stage, after which you can carry out a hydraulic test and put the equipment into operation.
Read about repairing heating radiators, how to do it and when it is appropriate.
In addition, this blank can be used to manufacture a register with an electric heating element. A hole for the heating element is cut out in the lower end, and an open-type expansion tank is installed in the upper part.
How to improve heat dissipation of registers
The efficiency of registers depends on the heat-transfer surface area, which is relatively small for these devices. In this connection, to improve heat transfer, it is desirable to increase the mentioned area, which can be achieved by welding metal plates. Such elements are installed vertically, providing a kind of ribbing of the pipes.
It is also possible to create something similar to convection heating. This is possible if you weld not metal plates, but profile pipes that are mounted on the front of the device in a vertical position. As a result, cold air will enter these pipes from below, heat up and exit through their upper part.
What is a register in a heating system?
Any type of home heating is directly related to the choice of heating devices that send heat. As a rule, they are considered heating radiators, however, heating registers that closely resemble them can also solve this problem.
Registers in heating are pipes placed in parallel, which are connected by jumpers, which are also heat carriers. On one side, the register pipe is filled with liquid, on the other it leaves in the form of waste heating fluid. As you can see, they are identical to heating batteries and can successfully replace them. Register devices are used for heating industrial premises, garage heating and other buildings.
More recently, heating registers were very popular, since there were not enough conventional batteries, and even those that were available were not of high quality. Consequently, many industrial organizations produced heating registers themselves for their needs, but they are not considered a surrogate for heating devices.
Types of registers
Registers made of aluminum weigh little, transfer heat well, are resistant to corrosion, have a long service life, and do not have welding seams or various joints. Heating pipes are made from aluminum using monolithic casting. The only drawback of aluminum registers is their high price.
Types of heating registers
Heating registers made of cast iron are easy to install; they consist of a monolithic flange connection. When the registers are installed, the pipeline is supplemented with a second flange, then a strong connection is made using bolts.
Another type of registers in heating are steel registers. Self-installation of registers for the heating system is carried out using welding. If it is done well, long-term operation is guaranteed.
I also distinguish between stationary and mobile registers. Stationary ones are installed in buildings where there are heating boilers. Mobile ones are used where there is an electric heating element that operates from a network with a voltage of two hundred and twenty volts. This type of device is used for buildings where construction or repair work is going on, where construction workers temporarily live.
Material of manufacture
If you make a selection depending on the material of manufacture, then the registers can be classified into the following categories:
- Steel;
- Aluminum;
- Cast iron.
Which heating registers are best to choose? Steel registers became the most common. Their connection to the heating system is carried out by threading or welding. Such devices have good heat transfer and reasonable cost.
Aluminum registers are much lighter than steel registers. In addition, they are resistant to corrosion, are made without connecting seams and have good heat dissipation. The main disadvantage of such devices is their very high price.
Installation of registers in the heating system
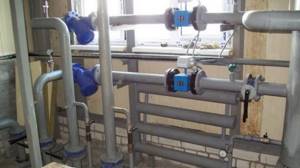
Heating registers in a production room
Correct installation of heating registers can be done in two ways - using threaded connections or using a welding machine. It all depends on the total mass of the structure, its dimensions and the parameters of the heating system.
In general, experts recommend following the same rules as when installing radiators. The difference is only in the size of the structure. If it is necessary to connect the heating register to the gravity system, the required slope must be observed. The heat supply device must be tilted towards the movement of the coolant. There are no such requirements for systems with natural circulation.
To ensure correct installation of heating registers, the following rules must be followed:
Despite the fact that the heat transfer rate of the heating register will decrease, the maintenance-free service life of the structure will increase significantly.
Installation is recommended to be carried out outside the heating season. After a trial run of the heating system, you can compare the calculated power of the register with the actual power and, if necessary, make operational changes to the design.
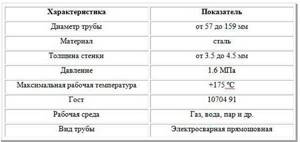
Specifications
Option for connecting registers to heating
However, it should be noted that the technical characteristics of heating registers are still worse than batteries of the same size. They associate this with their surface, because it is this that gives off heat to the building.
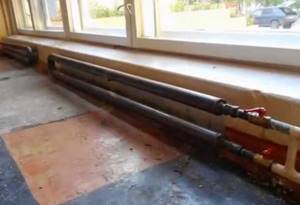
Heating registers are made from steel pipes, their diameter ranges from 32 to 200 millimeters and more. In terms of the number of pipes, placement and shape, they are completely different. Such heating devices in their design have two pipes for inlet and outlet of liquid, a fitting that connects an air mass diverter.
Making a register yourself
When creating registers with your own hands, the following algorithm is used:
- First, pipes of appropriate diameters are prepared and the blanks are cut;
- The internal space of the pipe is cleaned to reduce the resistance to the energy carrier;
- It is necessary to weld plugs at the ends. Some plugs must be provided with holes;
- It is now possible to connect large diameter horizontal pipes with smaller vertical pipes;
- At this stage, taps are installed that will allow air accumulated in the system to be removed;
- The last step is to clean all the seams and paint the surface of the register with oil paint.
Heating registers made from a profile pipe will have all the necessary parameters. When assembling portable structures, it is necessary to install a heating element with a power of 1.5-6 W, which can be connected to an outlet. By connecting registers to heating boilers, you can increase the performance of the system by installing a circulation pump.
Construction of heating registers
Despite the fact that such heaters are considered outdated and do not have a very attractive appearance, they continue to be widely used in a variety of areas, for example:
A stove register made of smooth heating pipes is calculated and manufactured depending on the power and design of the stove.
By design, heating devices are divided into 2 types: sectional and in the form of a coil. In the first case, the role of 1 section is played by each horizontal pipe, the flow of coolant through them is ensured by vertical jumpers. They are made of smaller diameter pipes in order to create artificial resistance to flow and increase heat transfer from each section. The pipes from which the sectional heating register is made are plugged at the ends, and the coolant is supplied according to the “top to bottom” scheme.
The design of the heater in the form of a coil is clear from its name. Here the diameters do not narrow; water flows freely through the entire device, changing direction several times. The heat transfer of this register is lower than that of a sectional one, but the hydraulic resistance is less and it is somewhat simpler to manufacture.
It is preferable to make sectional heaters for utility rooms or garages, where uniform heating and comfortable air temperature are important. It is better to install coils as standby heaters at the very end of a two-pipe system. They work great there because of their low resistance.
Heating registers from smooth pipes of round and rectangular cross-section are welded. However, the generally accepted design is ordinary round pipes made of low-carbon steel such as St3, St10 and even St0. If the battery is intended to work with a steam system, then St20 steel is used. It is not recommended to make sections with a rectangular cross-section; they are less washed by the convective air flow, which means they will give off less heat. For garage heating, autonomous registers are made, filled with antifreeze or transformer oil, and an electric heating element is built into the lower section at the end.
Advantages and disadvantages
Heating registers made of smooth pipes have many advantages:
- For large premises they are one of the best options for heating devices. Due to their considerable length, they provide uniform heating and create comfortable conditions. The heating is not local, but extensive.
- The hydraulic resistance is very low compared to cast iron or steel radiators. This allows you to significantly reduce pressure losses in the system, and, accordingly, the costs of pumping coolant. This same feature makes it possible to use an open heating system with natural circulation for large rooms.
- Straight sections of large diameter pipes are less susceptible to silting and overgrowing, unlike radiators of complex shapes. Therefore, heating registers practically do not need to be flushed.
- A simple design can be made with your own hands from available materials with significant savings.
- The service life is quite long, at least 25 years. The degree of reliability depends mainly on the quality of the welds.
- The smooth surface makes cleaning easy. This feature allows registers to be used in rooms with increased sanitary standards.
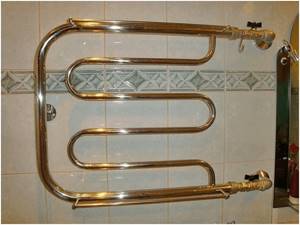
- Convenient for drying towels, linen and clothes.
*
The disadvantages of registers made of smooth pipes include:
- Small heating surface per unit length, which forces the use of large-sized devices;
- High metal consumption;
- Large diameters force the use of a large volume of coolant, which makes the system very inertial and difficult to regulate;
- The unattractive appearance of budget models and the huge price of non-standard design configurations.
Calculation of heating registers
To prevent the house from being cold and the heating to evenly warm all rooms, it is important to calculate the number of registers for each room. For purchased devices, their power is looked at in the passport and the number of devices is calculated; for homemade tubular heaters, the length of the pipes will have to be determined by yourself.
Calculation of the required thermal power to heat the room
If your house is built according to a project, then data on the required power of heating devices is available in the documents - you need to find and use them.
If there is no design of engineering systems, then use traditional approximate data on heat loss:
The total heat losses are calculated, the resulting power is increased by 20% (multiplied by 1.2) and the total power of all heating devices is obtained. In the northern regions of Russia, it is desirable to increase the resulting power by another 20 percent.
The power of the appliances in each room is calculated based on the above data (heat loss in the room multiplied by 1.2).
The exact method for calculating the heat loss of a house is very complex and is used by design organizations.
Calculation of register thermal power
The amount of heat (W) supplied from the pipe to the room is determined by the formula:
∆t – temperature difference, 0С, determined in turn by the formula:
For a steel structure, the heat transfer coefficient to air is 11.3 W/(m2 0C). For a multi-row register, a reduction factor of 0.9 is accepted for each row.
For calculations, you can use a calculation calculator - there are many of them on the Internet, but manually is more reliable.
Heat transfer of registers made of smooth pipes. Table
The values of heat transfer coefficients for steel smooth-tube registers are given in the table.
In private homes, the temperature difference is usually 60-70 °C.
How to calculate the required number of register sections
The number of purchased registers is determined by dividing the required power by the rated power of the device.
For homemade registers, divide the required power in each room by the heat transfer of one linear meter of pipes used. The required total length of pipes is obtained. Then this length is distributed between the devices, divided by the number of pipes - their length is obtained. There are options here - there may be several short devices or one long one.
What other parameters should be taken into account
If there is a need to increase the power of the device, then it is necessary to increase the length of the pipes, and not their diameter. The efficiency of the system decreases with increasing pipe diameter.
If the system uses oil or antifreeze, it should be noted that they have a lower heat capacity than water. When using them, heating devices must have a larger area than devices in a water system.
If ribbed structures are used, then their heat transfer must be looked at in the passport and taken into account in the calculations.
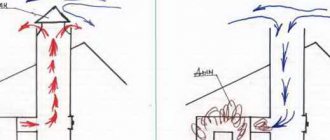
Connection diagrams for heating registers
Setting the heating register to cotrur
Now that the heat exchanger is ready, you need to install the heating register on the circuit. Like a regular battery, it can be connected in different ways, but the flow should always be higher than the return. We wrote about heating system wiring diagrams in one of the previous articles. Installation of pipes to the heating register is carried out:
- at one end;
- at different ends.
The latter connection scheme for heating registers is called diagonal and is more preferable. When we know where the supply and return will be, we can make holes in the ends for threaded couplings. Fittings connecting the heat exchanger to the circuit will then be screwed to these couplings. An air vent is welded on the opposite side of the supply. It can be located at the end, but it is better for the valve to be at the top.
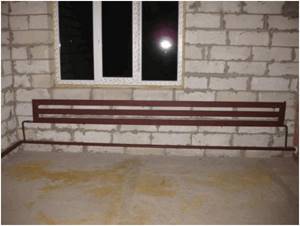
Before installing the heating registers, remember that it is quite heavy, even without coolant, and even more so when filled with water. Therefore, it is necessary to provide reliable fastenings. The heat exchanger can be placed on the floor or hung on the wall. It is better, of course, to make legs and place it on the floor, additionally securing it with fastenings to the wall. Do not forget that there should be about 25 centimeters from the surface of the heat exchanger to the walls and floor.
Another recommendation concerns the location of the heat exchanger. As you may have noticed in apartments, the battery is always under the window. On the one hand, it heats the cold air coming from the glass, and on the other hand, it warms the outer wall. That is, you need to try to install registers along the walls that are in contact with the street.
Heating devices are an essential element of any water heating system. They are usually the most expensive part. A good opportunity to save money would be to use homemade radiators. They are made from smooth round steel pipes or from profile pipes. The latter option is somewhat more expensive, but allows you to reduce the depth of the device and get a more aesthetic appearance.
The use of a profile pipe for the manufacture of heating registers has a number of features. When starting to work with your own hands or deciding to buy a “homemade” product, you need to carefully weigh the pros and cons. Studying the basic rules by which heating registers are made from a profile pipe will help you avoid mistakes when working independently and will make it possible to make a competent choice of the necessary parameters.
Steel pipe register
Key Features
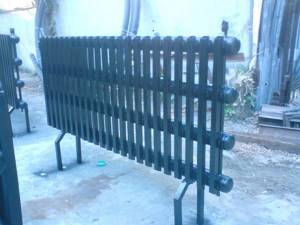
The register is several parallel pipes held by vertical jumpers.
To construct a heating system, steel or cast iron products of round or rectangular cross-section are used. The layout of the elements is sectional or serpentine. The coil is a classic design with efficient heat transfer. In sectional registers, transitions are made close to the edge to increase the heat transfer rate.
Heating structures can be portable (contain heating elements that heat water) or stationary (connected to the boiler). The coolant moves from top to bottom. The pipes can be connected to the pipe by threaded connection or welding. Additional jumpers make the structure more rigid.
To heat 1 m2 you need 1 m of pipe with a diameter of 60 mm.
Calculation of a heating structure made of round pipes
This calculation technique is not suitable for finned registers, since they have a larger surface area and heat transfer. Specific thermal power is calculated using the formula:
where Δt is the temperature difference between the air and the working medium of the pipe, K is the thermal conductivity coefficient (for metal it is equal to 11.63 W/m²*C), L is the length of one section, D is the diameter of the pipe, P is the number P = 3.14 .
When calculating the remaining sections, the resulting value is multiplied by a factor of 0.9.
Source
Peculiarities
The issue of saving and rational use of heating devices in the current situation is quite relevant. Purchasing registers today is quite simple; purchases can be made through numerous online stores or in specialized departments of supermarkets. In most cases, these heating devices are an effective design that can be used in any type of premises - residential, industrial, technical and others.
In addition, registers are widely used in heating systems of multi-apartment residential buildings. By using large-diameter pipes, even with a minimum length, it is possible to make an autonomous vertical or horizontal heating device, which, despite its small dimensions, will have a high level of heating efficiency.
There is an opinion that, compared to registers, radiators cope with their main task better, since they have additional area. But registers, in the production of which smooth-bore pipes are used, have heat transfer rates that significantly exceed those of radiators. And additional modernization of the design, which involves attaching metal plates to the system, will have a positive effect on the efficiency of the register.
If you plan to install general-purpose registers, connecting thin tubes arranged in parallel will result in the formation of a high-quality and attractive design, which in some cases is called design radiators. The production of such devices is relevant for use in public buildings.
How to make a heating register with your own hands: assembly and installation instructions
Heating radiators are elements of engineering plumbing systems that are functionally designed to heat the air in a room. According to SNiP (2.03.01-84), radiators that comply with heat balance calculations should be used in any room. They are quite sufficient to maintain normal temperatures inside buildings.
However, for a garage or small workshop it is better to make a heating register yourself. In terms of dimensions and heat transfer, this device goes beyond the parameters of classical designs, but is much more suitable for these premises. The article we presented describes in detail the technology of its manufacture.
Advantages
This type of heat exchanger has the following advantages:
- They have a large heat transfer area with small sizes;
- Easy to use;
- Easy to clean;
- Fireproof;
- Heaters equipped with heating elements consume little electricity;
- Can be used for drying linen, clothes or towels;
- Suitable for use in premises with increased fire safety requirements and increased sanitary standards: in hospitals, workshops, warehouses, shopping pavilions, administrative buildings, hangars, etc.
Homemade heating registers
By increasing the heat exchange area and the volumetric component of the coolant, of course, it is easier to achieve the desired temperature in the room. Therefore, quite a lot of property owners, taking advantage of the lack of control over heat extraction at each specific point, increase heat removal by manufacturing radiators of non-standard designs.
In fact, this is prohibited, as it is seen as an irrational approach to energy consumption. In practice, they think less about resources than about their own well-being. The following article will introduce you to options for economical garage heating, the contents of which we recommend that you familiarize yourself with. However, closer to the point.
Making a heating register with your own hands is a relatively simple task, especially if you have welding skills and have a welding machine at hand. All that remains is to purchase the required quantity of pipes of suitable diameter and sheet metal.
How to calculate heat transfer?
The required amount of material can be calculated based on the temperature parameters that need to be obtained in the room. At the household level, this step is usually skipped - they make heating registers with their own hands “by eye” according to the principle “the more, the better.”
But it is better to make simple calculations of heat transfer, for which you do not need to be a mathematician. All you need is:
The area of a room is calculated by multiplying its length by its width (S = L*W). However, for more accurate calculations, it is recommended to calculate the volumetric parameter by adding the height (H) value to the calculations.
So, the final calculation formula takes the form:
V = L*W*H
First of all, the required amount of heat per calculated volume of the room is calculated to achieve the required internal temperature (W):
Qп.т = V * k (Tin – Tout),
where V is the volume of the room; k – heat transfer coefficient of the building walls; Tin – temperature inside; Tout – outside temperature.
The amount of heat generated by one register can be calculated using the formula:
Qр = q * L * (1-n),
where: q – heat flow from each horizontal and vertical pipe of the register (approximately 20-30 W/m); L – length of vertical and horizontal pipes of the register (m); n – coefficient of unaccounted heat flows (for metal pipes – 0.1).
Selecting a heating device configuration
Homemade radiator designs are mainly made on the basis of metal pipes with a diameter of 80 - 150 mm.
Design features are limited to two versions:
The lattice design of the heating battery differs from the “snake” in a slightly different circuit design, and, depending on the variations in such batteries, the distribution of the coolant may be different.
Coil structures actually have a monotonous design, implying strictly sequential movement of the coolant.
Lattice registers are constructed according to different schematics:
The number of pipes in one assembly can range from two to four or more. Rarely, there is also the practice of making single-pipe registers.
A coil assembly usually contains at least two pipes connected on one side by a blind jumper and on the other by a through jumper, which are made from two pipe bends (2x45º). It should be noted that the design of heating registers in the form of a coil is used much less frequently than “grid” designs.
Both manufacturing options - lattice and coil - can be made not only on the basis of classic round pipes, but also on the basis of profile pipes.
Profile pipes seem to be a somewhat specific material, since they require a slightly different approach when assembling heating radiators. However, registers made from a profile pipe are more compact and take up less usable space, and this factor is also important.
Work order
- The jumpers are fixed in place and secured by welding at 2-3 points.
- Having positioned the structure vertically, the jumpers are finally welded. It is recommended to first make a thin seam at low current, which will allow the gaps to be filled well. Next, a thick main seam is performed at increased current.
- The internal space of the register is cleared of metal debris and slag.
- The plugs are applied, tacked and welded to the ends of the profile pipes.
- Welding seams are processed. The protruding parts are knocked down with a hammer, then each seam is cleaned with a grinder.
- Holes in the register are drilled depending on the selected connection diagram. In this case, it is better to place them not in the center of the ends, but slightly higher or lower.
- Connecting pipes are welded to the holes.
- The seams are cleaned and all holes except one are plugged. The register is filled with water under pressure and the welding quality is checked. The seams must withstand pressure up to 13 atm.
- The outer surface is cleaned, degreased and painted with heat-resistant paint.
- A fitting is welded to the top row and a Mayevsky valve is installed.
Instructions for making a radiator
To make a heating register yourself, it is recommended to initially carry out the necessary calculations (methodology above in the text). And the point here is not to save resources, but to make batteries that are really useful in all respects.
Surviving the winter with the windows open - this option is suitable for “walruses”. Everyone else who is not part of the hardened group runs the risk of getting a serious cold. And powerful radiators are just as bad as too weak ones.
So, the calculation is done, you can start choosing the material.
An economical and quite suitable choice for a homemade design can be considered steel pipes and fittings for them produced for steel pipes:
Gates may also be required, which are often not installed directly on the registers. Manufacturing skills and knowledge of gas welding technology would be useful if the future performer has them.
Pipe preparation and welding
According to the calculated length parameters, the pipes of the future radiator are cut to size. A convenient tool for cutting is a circular saw. Then plugs for the ends of the pipes are cut out of a metal sheet. The round-shaped plugs are convenient to cut with an oxygen cutter.
First of all, circles of the required diameter are marked with chalk on the surface of the metal sheet and then carefully cut. Some of the sliced pancakes (the quantity is calculated) are made with holes for the coolant inlet and outlet pipes.
It is also immediately recommended to cut holes (one or two, depending on the assembly project) in the wall of each pipe, with a distance of 100 - 150 mm from the end edge. These holes are intended for through-connection of pipes during battery assembly.
After cutting the holes, it is recommended to clean the inside of each pipe from slag and scale. Next, place pancakes at the ends of the pipes and carefully scald them in a circle. One pancake with a hole is welded on the first and last pipe.
Heating battery assembly
Finished pipes must be combined into a battery. To do this, determine the configuration of the radiator (if it is decided to make a lattice structure). Based on the accepted choice of configuration, jumpers are prepared - through and blind.
The material for jumpers is usually small diameter pipes. For example, d = 25 mm or d = 32 mm. Tubes for the supply/return pipes are also prepared (length 150 - 200 mm, diameter 25 - 32 mm).
The pipes prepared for the heating register (2 – 3 – 4) are laid out on a flat surface and aligned along the end edges. The first (upper) and last (lower) are laid out with end edges with holes, according to the selected connection diagram: one-sided (input and output on one side) or double-sided (input and output on opposite sides).
All that remains is to carefully weld the through and blind jumpers between the pipes, the inlet and outlet pipes, after which the heating register is ready for installation in the system. Before starting work, a novice master will need to study the rules of electric welding, described in detail in the article devoted to this issue.
Features of the “snake” design
The coil register is assembled a little differently. Here, instead of vertical jumpers, metal bends are used, with the help of which the end parts of individual pipes are connected.
To assemble a register with a snake you need:
Coil heating registers are large in size due to the limited possibility of adjusting the interpipe distance. In this regard, “snakes” are superior in parameters to lattice structures. However, from the point of view of the efficiency of coolant flow, the “snake” looks like a more preferable option.
There are practically no air pockets formed inside such registers, which is typical for products of the “grid” type. In addition, thanks to large-diameter arc bends, coil structures have less hydraulic resistance. However, it is quite rare to make such registers with your own hands.
Difference between profile registers
An interesting design compared to those described above is a register made from a profile pipe. More compact, but no less efficient batteries are assembled using almost the same technology.
The only peculiarities of the assembly can be noted in the preparation and adjustment of inter-pipe jumpers. As a rule, welding is not used here. It is enough to have a good metal-cutting tool.
The ends of the interpipe jumpers and the register pipes themselves are cut at an angle of 45º, achieving an exact match along the edges on the connection line. If a “grid” type register is being assembled, the interpipe jumper is made with angular cuts at the ends and straight cuts at the points of supply of the central pipes.
After preparation, the jumpers are placed in place and carefully scalded. On the “snakes”, blind reinforcing jumpers are additionally installed parallel to the passages.
Homemade registers were widely used for domestic needs in the recent past. Now this type of heating devices is used less frequently.
An alternative to registers, especially if the garage is not connected to a centralized heating system, is a miracle diesel stove. Our proposed article will introduce you to the method of its manufacture.