The underfloor heating system can hardly be called a novelty in the construction market, because back in the era of the ancient Romans it was successfully used for heating marble buildings. In those days, architects tried to design houses so that the steam coming out of the bathhouse would heat the floors and walls of adjacent rooms.
Since then, many new technologies have appeared, and today we have access to not only steam, but water and electric heating systems. All of them are quite actively used for heating rooms, but infrared floors have gained the most popularity.
Why they are so in demand, what features they have and how infrared film works, we will consider in this article.
The principle of operation of film floors
The operating principle of infrared heating is based on the emission of heat rays by a film. This process can be compared to heating the earth under the influence of the sun. Its rays warm up the earth, water, buildings, and they, in turn, give off heat to the surrounding space.
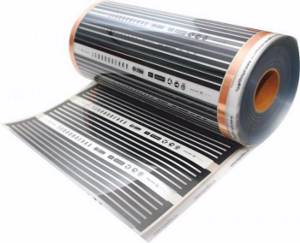
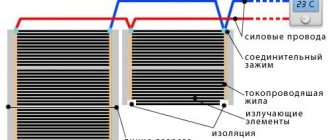
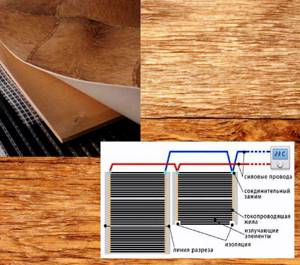
Infrared film works in a similar way. It itself is very thin (from 0.2 to 0.4 mm), and consists of three layers:
- The heating element is responsible for converting electrical energy into heat.
- The foil acts as a conductor to distribute heat evenly over the entire surface of the film.
- The protective coating prevents damage and penetration of moisture to the working elements.
In simple terms, the heating process begins with the fact that an electric current entering the heating element is converted into thermal energy, which heats the film. It, in turn, warms up the floor covering, which transfers the resulting heat to objects standing in the room.
The operating principle of infrared floors and their main technical parameters
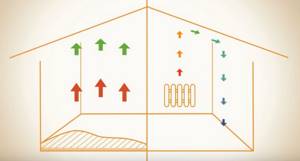
This innovative heating system is capable of providing effective heating of the room without occupying any living space. Infrared floors use the principle of secondary convection, according to which the human body and home furnishings are initially heated, which then gives off their heat to the air around them.
The main parameters characterizing IR floors include:
- supply voltage – 220 V;
- specific power consumption - 45÷65 W/mh;
- emitted wavelength - 5÷20 µm;
- the share of IR rays in the emitted spectrum is 95%;
- the maximum permissible length of the thermal film panel is 8 m;
- panel width – 0.5 m;
- film melting temperature – 130°.
Specifications
To understand how much infrared heating film you will need and what is necessary for its proper functioning, you need to familiarize yourself with its technical characteristics. It will be useful to know that:
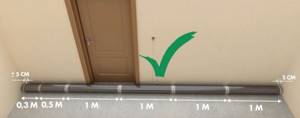
- the film is produced in rolls, the maximum length of which is 50 cm;
- the width of one roll varies between 0.5-1 meters;
- the installed system operates from a 220V network;
- electricity consumption per day (on average) from 20 to 70 W/m²;
- maximum daily energy consumption is 210 W/m²;
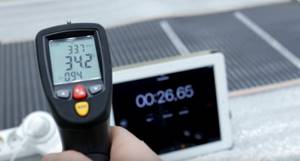
- heating to the maximum possible temperature occurs in 2-3 minutes;
- the average weight of one roll is 55 kg;
- the surface temperature of the working film can reach 50 degrees.
In order for the system to warm the room well, it must cover at least 80% of the entire floor surface.
In this case, energy savings will be more than 25%. When choosing IR products, please note that high-quality infrared film for heated floors should have a warranty service life of about 10 years.
Principle of operation
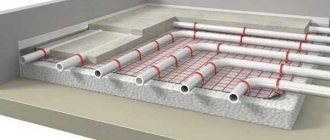
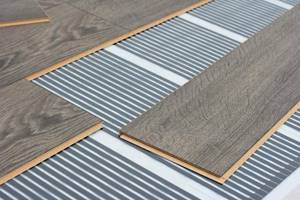
The infrared heated floor is laid under the final floor covering (laminate, linoleum, tiles, etc.). If electric and water heated floors simply heat the coating located above them, and it already heats the air (convection method), then IHP acts differently. Infrared rays pass through the floor covering and affect all objects located indoors, including humans. These objects warm up the air in the room.

About 90% of ITP radiation consists of rays of the far infrared spectrum, and have a wavelength in the range of 5–20 microns. It is in this range that the human body is accustomed to working (the range of 5–20 microns is characteristic of solar rays). This means that, to some extent, infrared heated floors are an analogue of solar heat. In order to understand how ITP works, you can make a stand where you place a small piece of water, electric and infrared heated floors. In contrast to the first two, heat will only be felt in close proximity (maximum, at a distance of 5–10 cm), since their level of infrared radiation is negligible. The heat from the ITP will be felt at a distance of a meter or more. It is important to understand that such a “range” does not mean that IHP is more powerful than water and electric heated floors. It’s just that, due to special radiation, a warm floor has a different operating principle: it heats only objects, not air.
On the other hand, it should be borne in mind that infrared heated floors also have negative reviews. In science, there is the concept of an absolute black body (ABB) - a substance that absorbs any radiation. Conventionally, the blackbody is indexed by the number 1. The lower the throughput of the material, the closer its index is to one. And most floor coverings (linoleum, tiles, laminate, etc.) have a “blackness” index of around 0.9. In practice, this means that infrared radiation weakly penetrates the floor, which means that its principle of operation is in many ways similar to water and electric heated floors: first the floor covering is heated, and from it the entire room is heated. However, a certain amount of radiation still penetrates through the floor.
Advantages of wave heating
The film heating system has a number of advantages over other home heating options available today. According to users, these include the following facts:
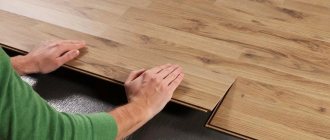
- Infrared floor film is very easy to install. To install it, it is not necessary to dismantle the old base. If the surface is fairly flat, you just need to vacuum it and insulate it.
- After installing this system, the ceiling height in the room remains at the same level, which is very important for owners of low rooms.
- The laid film does not need to be filled with a concrete screed, which allows you to reduce repair time and avoid additional costs.
- Absolutely any floor covering can be laid on top of the heating layer.
- The film evenly warms the room, which eliminates the occurrence of temperature changes in different corners of the room.
- The system is able to withstand strong dynamic loads, making it suitable for use even in public buildings.
- Energy costs for this heating method are much lower compared to the costs of using other heating devices.
- Infrared film is mobile. When moving to another place of residence, it can be easily rolled up and laid out on another surface.
- The heating element can easily withstand sudden voltage surges, so the service life of film floors is quite long. If one segment does fail, the remaining modules of the system will continue to operate.
What finishing coatings are suitable for infrared floors?
The top finishing layer for an infrared floor can be any covering: tiles, porcelain stoneware, parquet, linoleum, laminate, and so on. In this regard, it is worth noting that when choosing laminate or linoleum, you will no longer have to install a leveling screed. The work is carried out using the dry method. At the same time, most people consider it necessary to use such a system under tiles, which, in principle, for many seems to be a cold material, but has high thermal conductivity and, when paired with underfloor heating, creates an excellent insulating effect, which is highly valued in rooms such as kitchens, bathrooms and corridors, where Additional heat is always needed.
At the same time, it is necessary to take into account the fact that the top covering, arranged according to the heating system, is divided into hard and soft materials. For certain types of coatings, there is a separate system for installing heated floors with the selection of a specific model and, accordingly, technology option. For example, rod models of self-regulating samples are more suitable for the same tile. But soft materials (for example, you can take laminate or linoleum) require the installation of film IR floors with the obligatory laying of an intermediate layer of plywood sheets or fibreboards.
Benefits of infrared underfloor heating
The design has a wide range of advantages, and therefore is very popular. The choice of using an additional heating system in homes is influenced by the following factors.
- Ability to heat local areas. Heaters can be placed arbitrarily, at specific points. This largely determines the rational use of materials during the installation process and clearly reflects energy savings during the operation of the system.
- A distinctive feature of infrared floors is the direct impact on the surface of objects intended to be heated and the absence of a drying effect on the internal air. This explains why this method is more rational for residential premises.
- The heating system is not afraid of sharp colds and in the event of a long absence of owners in winter, which often happens in country houses, it works perfectly the moment it is turned on when they return with the onset of spring. An important fact in this case is the rapid achievement of a comfortable temperature when putting the system into operation, due to the low thermal inertia.
- Significant reduction in electricity costs.
- Possibility to install the structure yourself.
- High installation speed. Even if you do the work yourself, it won’t take much time.
- Heating occurs throughout the entire height of the premises, achieving maximum thermal comfort in the lower part.
- A significant advantage is the quick dismantling of the heaters and their transfer for installation in another location. This factor allows the floors to be considered quite mobile.
- Providing a choice of design system can also be considered a plus. There are two main types: infrared film flooring and rod flooring. The first one is made from film and is a roll material. The second is the rod type, which consists of rods made of carbon fiber and connected by thin wires.
Flaws
Unfortunately, even the most innovative materials are not without negative qualities, and this type of heating is no exception. What are the disadvantages of infrared film? Customer reviews indicate the following negative aspects of this product:
- upon contact with sharp and thin objects, the system quickly fails;
- the electrostaticity of the surfaces in the room increases, and they attract dust more strongly;
- infrared film for heated floors is very susceptible to moisture;
- in places where this roll material is laid, heavy furniture cannot be installed, as this will lead to overheating of the module and it will quickly fail;
- purchasing infrared film will cost the buyer a tidy sum. Cost of 1 sq. m of system (with installation) reaches about 700 rubles, so it is more often used in small rooms.
First start
When you first turn on an infrared heated floor mounted under a laminate, wood or parquet board, there is such a subtlety that the surface should not warm up to the recommended surface temperature (it is different for each coating) not immediately, but gradually. You should use your thermostat to raise the floor temperature by 1 degree per day. Then you will avoid possible deformations of the flooring. The recommended temperature to which the floor can be safely heated can be found on the manufacturers' websites or from sellers. Usually it does not exceed 26 degrees Celsius.
Video about installing infrared film
Types of films and their application
All film heaters are similar in their structure and operating principle. Depending on the manufacturer, infrared heating film may differ in appearance, width, thickness and maximum heating temperature. The latter indicator greatly influences the choice of installation method and use of this system. Let's look at exactly how.
The fact is that the maximum temperature of the heated film can reach about 50 degrees, and not every floor covering can withstand such thermal effects.
If the IR system will be installed under linoleum or laminate, you should choose products that heat up by no more than 27 degrees. But this option is not suitable for ceramic coating, since it will not be able to heat a sufficiently thick material. In this case, you can choose high-temperature systems (which heat up by more than 45 degrees).
Universal heating film (infrared) can be installed on both horizontal and vertical surfaces. The thinnest varieties are laid exclusively on the floor.
Advantages and disadvantages
Infrared floor has the following advantages:
- Good compatibility with almost all floor coverings;
- Possibility of creating uniform heating of the entire area of the room;
- Simple operating principle;
- Economical. The fact is that the system has low energy consumption;
- Very easy installation of this floor;
- You can make the connection yourself;
- Infrared film heated floors have a high level of efficiency - about 95%;
- Environmental Safety;
- There is no risk of fire due to short circuit;
- Good technical characteristics;
- Installation is possible in rooms even with high humidity levels;
- Quiet, no electromagnetic radiation.
However, there are some disadvantages, for example, the film is afraid of overheating. In addition, such products are quite expensive. And a film floor will only be effective if it is correctly connected to the electrical network.
How to choose the right option
Modern infrared film for heated floors is very diverse, which can throw the most collected buyers into confusion. However, when making a choice, it is important to simply consider the conditions in which it will be used.
If your home already has centralized heating, but you want to install an additional heat source (in poorly heated rooms), give preference to low-temperature products. It will not greatly increase your electricity consumption and will make your home much warmer.
To heat balconies, wall or ceiling panels are often used. And if you need to heat a large and damp room, choose a film with a power of 300 W/m².
To equip saunas or drying rooms, purchase film products with a power of 400 W/m².
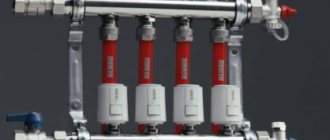
Selection of system components
In addition to carbon heating strips sealed in Mylar film, the film floor system requires a thermostat equipped with a temperature sensor.
Calculation of the required quantity
Installation of film flooring with infrared heating is carried out only in the usable area of the room.
The percentage of area covered depends on whether the IR system acts as the main or additional heat source:
- 80% of the area - as the main heating;
- 40-50% of the area - as a supplement to radiator heating.
A pre-drawn diagram of the system zones layout on a sheet will help determine the total length of all strips. By calculating the length of each fragment and adding up their number, it is not difficult to calculate the required total length of the coating.

When calculating the area to be covered, it should be taken into account that according to the standards, each wall will need to be indented by 10 - 20 centimeters
When placing fragments on the plan and calculating their length, also keep in mind that the length of each strip should be a multiple of 17-18 centimeters, since it is in these places that the cutting lines are located.
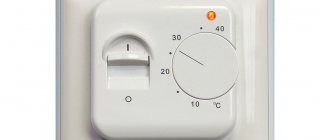
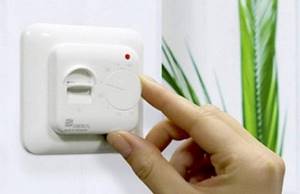
Thermostat for temperature control
The operation of the IR system is controlled by the thermostat. The temperature sensor included with it is placed between the heating elements and connected to the device through contacts. The sensor reads the temperature from the surface of the film and transmits the data to the thermostat, which, in turn, operates and puts the system into operation.

The main purpose of the device is to monitor the floor temperature using sensor readings and adjust the heating power in accordance with the specified parameters.
There are a huge variety of options for modifications of regulators that differ in functionality on the market today.
All of them are divided into two types:
- Mechanical - equipped with keys and mechanical wheels and are suitable for arranging small systems.
- Electronic – equipped with push-button control and a display, suitable for small, unzoned rooms.
Programmable models are equipped with touch screens, with which you can set 4 time modes at once, thereby saving up to 50% of energy consumption.
Temperature sensors, depending on the type of device and type of floor covering, come in two versions. For soft surfaces they are available in the form of compact plastic containers. For hard ones - in the form of larger elements equipped with gel protection against the impact of adhesive compositions on the strips and to prevent mechanical damage.
Some models of thermostats are capable of reading information about the heating of the floor surface, others are able to additionally analyze the degree of heating of the air in the room
When choosing a device, you should focus on the power of the thermostat. It is calculated based on the fact that one square meter of film consumes on average 50-70 W. To determine the required value, the indicator is multiplied by the size of the working area covered with heating elements.
Budget models operating from the network often suffer from the fact that in the event of a power outage they cannot resume operation on their own. Therefore, it is better to give preference to models that have a battery. Read more about choosing and installing a thermostat for a heated floor.
If the film system is supposed to be combined with a porcelain stoneware or tile coating, you will need to build a cement-sand screed
What to pay special attention to when purchasing IR film
Truly reliable products have the main characteristics of a quality product. Namely:
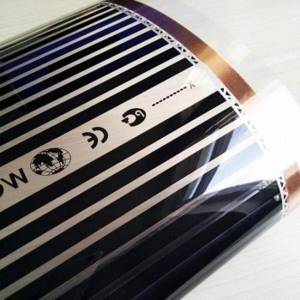
- Infrared warm film should be made on the basis of high-quality and fireproof polymer. Its distinctive feature is its milky tint. Transparent films are short-lived and quickly deform when exposed to high temperatures.
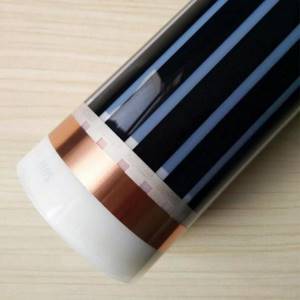
- The current-conducting strip must be made of copper and have a width of at least 15 cm. Any damage in this area is unacceptable.
- The silver strip should extend slightly beyond the copper busbar. It is good if it has clear contours and does not show through. Experts advise giving preference to options that contain at least 70% silver.
- Also pay attention to the type of connection between the copper and silver strip. If they are connected to each other using glue, this option is less durable. A “dry” connection using high pressure and temperature is considered more reliable.
- When choosing the type of main operating element, you should not give preference to a non-standard arrangement of heating elements. Curly spraying does not affect the operation of the system in any way, so it makes no sense to overpay for them.
- The protective lamination film (located on both sides of the product) must be of the same quality as the base. The use of thinner material is not recommended.
- Give preference to products made by professional manufacturers, since cheap film can be deformed by heat and thereby ruin an expensive floor covering.
- While in the store, ask the seller to check the heating rate of the film. High-quality options should become warm within a couple of seconds from the moment you connect to the network.
- Consider the width of the product. As practice shows, the narrower the roll, the greater the risk of system overheating. If you have a small room, solid infrared film will be the best option.
All about film infrared heated floors
Film infrared underfloor heating is currently the newest thing in electric heating.
Fits under laminate, carpet, linoleum and parquet boards. The Warm Floor Center sells and installs infrared heated floors based on Korean film Lavita. Film widths of 0.5 meters or 1 meter are always available. Thickness - 0.34mm. The cutting multiplicity is 20 cm. Roll or sheet thermal insulation that does not conduct electric current is placed under the film. When installing such a warm floor, there are no wet stages of work and you can turn it on immediately after installation.
Infrared film Lavita 220w/sq.m. per piece per 1 square meter
Self-regulating continuous film Marpe Black Heat
Connection kit (2 clamps, bitumen tape)
Thermal insulation Penoterm 3mm
In addition, the Warm Floor Center's assortment includes ready-made boxed sets of film heated floors ranging in size from 1 to 10 square meters. I came, I saw, I bought. With us you will receive comprehensive information on the selection, calculation of the required amount of film and its installation. Including with your own hands. From the moment of purchase until the heated floor is turned on, no more than an hour will pass.
Due to its structural and technical parameters (smooth rise and uniform temperature distribution, limited overall power), infrared heated floors are ideal for heating laminate, wood, linoleum or carpet coverings. It is mandatory to use a thermostat to limit the coating temperature below those recommended by the manufacturer. Electricity consumption of such a floor with an installed power of 220 W/sq.m. will be about 50 W/hour per 1 square meter, and even less when using a programmable thermostat.
Preparing the base for laying the film
So, when you have purchased all the necessary materials, it’s time to think about their installation. As mentioned earlier, the process of installing infrared floors is quite simple, but maximum attention should be paid to each stage.
First of all, it is necessary to properly prepare the base for laying the film.
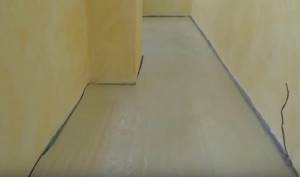
If the old concrete screed is sufficiently level, it does not need to be dismantled. In this case, you can limit yourself to cleaning up debris and dust. Very often, during the preparation of the base, cracks and chips are found on its surface. These defects must be carefully covered with any suitable glue or solution.
If the screed is already starting to move away from the subfloor, it needs to be dismantled and refilled. If the base is still quite strong, but there are a lot of differences and chips on it, the surface is leveled using a small layer of self-leveling floors.
Particular attention should be paid to the junctions between walls and floors, since cracks in the corners of the room can cause large heat losses. All chips, gouges and other defects are embroidered, cleaned and filled with polyurethane foam.
When the repair materials have completely dried, the screed is cleaned of dust again, and the excess sealant is cut off.
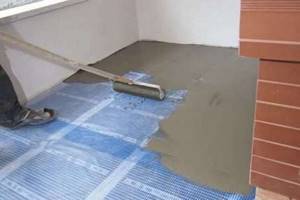
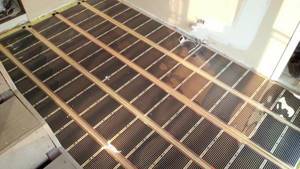
Thermal insulation material is laid and secured on top of a flat base, on which the infrared film for the floor will be laid. Most often, a foamed polyethylene reflector is used for these purposes. Its structure allows you to compensate for the slightest differences in the surface and protect the expensive film from damage. The foil side reflects heat so it doesn't escape into the floor.
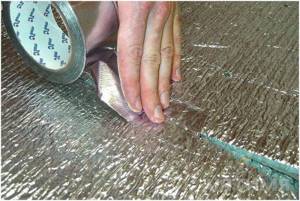
The joints between adjacent panels are taped with special tape. At this point, preparation of the foundation can be considered complete.
Installation of infrared floor
One of the main advantages of the IR system is the ability to install it yourself. The entire installation procedure for infrared heated floors consists of several simple steps:
- Preparing the surface for film installation. Any debris should be carefully removed, because during operation its sharp edges can push through or puncture the film, depriving it of its protective properties. To avoid this, we also carefully examine the surface for protruding nail heads and screws. Existing large gaps and cracks are sealed with cement mortar or putty.
- The next step is to cover the floor surface with a layer of hydro- and thermal insulation. For these purposes, it is better to use thin rolled materials, but dense slabs of polystyrene foam are also suitable.
- Next, we prepare the infrared heated floor for installation. All work must be performed in strict accordance with the instructions from the manufacturer. It is necessary to cut the rolled film sheet exclusively along the cutting lines marked on it, so as not to damage the integrity of the carbon heating strips and the internal wiring connecting them.
- According to the attached diagram, thermostats are installed on the edges of the film sheets, where the wiring exits.
- The canvases are laid on the prepared surface so that the edges with installed thermostats are located towards one of the walls. The black carbon strips should be located at the top, and the copper wiring should be located at the bottom of the film.
- Then all the canvases are connected to each other using contact clamps and wires into a single system.
- After performing a test run and making sure that the system is working, you can lay the final floor covering.
Self-installation of underfloor heating system
Installing infrared film is not particularly difficult even for beginners. In this matter, the main thing is to strictly adhere to the instructions and not neglect the basic rules.
So, let's look at how to install infrared film with your own hands.
- When installing a heated floor, you first need to determine where the temperature controller will be installed. This will help you understand how to correctly position the film on the base and make preliminary markings. Please note that the film should only be laid on open areas of the floor; it is better not to cover the areas where furniture will stand.
- Using the completed markings, measure the required length of the film.
- Unwind the required amount of material from the roll and cut it very carefully along the indicated lines. They are usually indicated by a scissors pattern or a dotted line.
- The material is laid with copper strips to the base. The cut infrared film is laid according to the markings and fixed to the base using tape or silicone sealant.
- Recesses are made in the thermal insulation substrate in which wires, terminals and a temperature sensor will be located. The work must be done so that the listed elements do not protrude above the surface of the film.
- The temperature sensor is located in the center of the heating strip, at a distance of at least 50 cm from the wall. Its wire is connected to the temperature controller.
- Next, the terminals are installed and crimped to the silver busbars of the heating element. Wires are connected to the terminals.
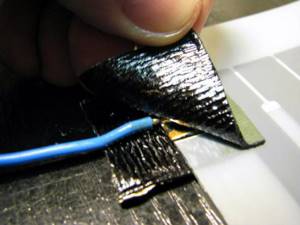
- Now all connections must be carefully insulated. Special tar pads are used on both sides of the terminals. The exit points of copper bars from each cut edge of the film are treated in a similar way.
- The next step is to connect all the wires to the temperature controller, after which it is attached to the wall.
- Upon completion of installation, the correctness of all connections and the functionality of the heating system are checked.
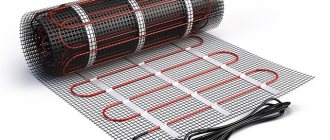
Design and principle of operation of the system
So, infrared heated floors can be sold in the form of a mat or rolled into a roll. It works thanks to carbon paste, which is enclosed in a polyester or polypropylene film. The device is equipped with conductive busbars, which are located along the edges. They are usually made of copper or silver.
The operating principle of this product is very simple. When the carpet is connected to the network, an electric current passes through the carbon fiber, resulting in a large amount of heat being released. It should be noted that the infrared floor is made very conveniently. All carbon strips are assembled into small sections of a couple of pieces. Between them there is a strip separating the blocks, and along which the film can be cut. However, sections should be divided very carefully and strictly along the intended line.
The standard design diagram of the product is as follows:
- A heating film containing carbon conductors.
- A thermostat that allows you to regulate the degree of heating of the product.
- Thermal sensor.
- Power cord, thanks to which the film is connected to the network.
Safety precautions during work
To ensure that the infrared film for heating the room does not immediately fail and serves you for many years, pay attention to the rules that should be followed during its installation.
- The film strips should be positioned so that they are at a short distance from the wall (from 12 to 40 cm).
- Under no circumstances should adjacent sheets be laid overlapping, as this is unsafe! The optimal distance between two stripes is 5 mm.
- The thermostat should be installed at a height of 10-20 cm from the floor level.
- It is not recommended to lay the film more than 8 meters in length.
- You should not install a heated floor system in high humidity and sub-zero temperatures.
- It is unacceptable for the wires connecting the film and the thermostat to intersect on the surface of the base.
- The rolled material is laid without bends or kinks. Attaching it to the surface with screws is prohibited!
- Some types of infrared floors can be installed using exclusively branded clamps that come with the film.
To summarize, I would like to note that the use of infrared film allows you to create an optimal microclimate in the room. Unlike stationary heating, it does not dry out the air, does not “eat up” oxygen and has a positive effect on the human body.
The ease of installation makes the underfloor heating system accessible to a wide range of people, because anyone can install it with their own hands.
We hope that after reading our article, you have found answers to all your questions. We wish you easy repairs and warmth in your home!
System characteristics
The main property of infrared heated floors is their high energy efficiency. With the help of infrared radiation, maximum heat transfer is achieved when energy is spent not on heating the air, but on heating directly those objects that are in the room.
The main technical characteristics of the IR film heating system are as follows:
- Electricity consumption - from 150 to 300 watts per hour per square meter. meter of floor.
- The length of the emitted IR waves is from 7 to 20 micrometers.
- The thickness of the protective film is from 0.25 to 0.45 mm.
- The melting temperature of the film is from 130 to 265°C.
- The heating rate to operating temperature is from 30 seconds to 4 minutes.
- Efficiency - 93-95%.
Despite such impressive performance and technical characteristics, like other heating systems used to heat homes, infrared heated floors have their pros and cons.
Advantages
The undoubted advantages of IR floors include:
- Low energy costs for heating, compared to electric boilers or cable heated floors.
- High heating efficiency. Heat transfer comes from the floor, and it is the lower half of the room that heats up the fastest. For comparison, heating radiators-convectors initially heat the air that rises. And only after the upper ceiling part of the room has been warmed up, will the lower half of the room begin to warm up.
- Almost complete absence of electromagnetic radiation that has a negative effect on the human body.
- Easy to install. You can install the infrared system yourself, without resorting to the services of specialists.
- Multifunctionality. IR floors can be successfully combined with any type of floor covering: ceramics, cement screed, laminate, parquet. In addition, it can also be installed to insulate the ceiling in attic rooms.
- Low system inertia. The film floor warms up to operating temperature in a matter of minutes, and also cools down quickly when it is turned off.
- Resistance to high humidity. Thanks to this, infrared floors can be installed even in bathrooms, kitchens, and saunas.
- Durability. A film floor can last for many years without any repairs or additional maintenance. Even if one section is damaged, with a modular connection type, the remaining sections will continue to function
Flaws
Infrared film floors are practically free of serious drawbacks. Their only disadvantages include:
- Higher cost per square meter of surface than water or cable heated floors.
- Electrostaticity. During operation, film floors tend to accumulate static electricity on their surface and attract dust.
- In regions with harsh winters, this heating method may not be sufficient to heat the entire house. In such a situation, IR film floors should be used in conjunction with other heating sources.
As you can see, infrared heated floors have much more advantages, which makes them the preferred option for heating both a private home and an apartment.
Features of installing film heated floors under linoleum
Installing an infrared floor under linoleum has its own characteristics. Let's look at this process step by step:
- First, the thermal insulation material is laid.
- Next, you need to cut the IR fabric into pieces of the required length.
- At the third stage, film heated floors are installed. It is important to remember that they must be laid with the copper elements facing down.
- Then, using pliers, clamp terminals are mounted on the copper wire elements of the film.
- At this stage, the strips are fixed with double-sided tape. This is necessary in order to avoid their free movement.
- Next, you need to complete the procedure for connecting the heated film floor to the electrical network.
- After connecting the IR floor, you need to check its functionality.
- Then a protective polyethylene film is placed on the heating elements, which is fixed with tape.
- The penultimate stage takes into account the installation of the base under the linoleum. Fiberboard sheets can be used as a base.
- At the last stage, the linoleum is laid.
The packaging with a roll of linoleum must have a pictogram indicating the possibility of using it in combination with a heated floor.
Thus, a film heated floor is installed under linoleum. If you are not confident in your own skills, then it is recommended to contact the masters who will do all the work efficiently and in a matter of hours.
Induction heated floor in the bathroom
If you plan to install a film induction heater in the bathroom, then it should be done according to option 1 above. In this case, you need to pay special attention to waterproofing the floor. It may make sense to arrange double protection, using, in addition to film, applying a layer of bitumen mastic. If there is constant humidity in the room, there is always a risk of electric shock. You also need to install double protection on all elements of the electrical circuit, both the power part and the control part.