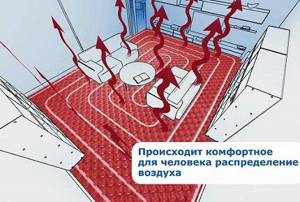
Despite the complexity of installation, underfloor heating using a water circuit is considered one of the most cost-effective methods of heating a room. In order for the system to function as efficiently as possible and not cause failures, it is necessary to correctly calculate the pipes for heated floors - determine the length, loop pitch and circuit laying pattern.
The comfort of using water heating largely depends on these indicators. It is these questions that we will examine in our article - we will tell you how to choose the best option for pipes, taking into account the technical characteristics of each type. Also, after reading this article, you will be able to choose the correct installation step and calculate the required diameter and length of the heated floor contour for a specific room.
Data for calculating pipeline length
In order to calculate the length of pipelines for a certain space in a room, you will need the following data: diameter of the coolant, pitch of laying the heated floor pipe, heated surface.
Pipe length for circuit
The length of the coolant directly depends on the outer diameter of the pipe. Therefore, if you miss this point in the calculation at the initial stage, difficulties will arise with water circulation, which in turn will lead to poor-quality floor heating. You can consider the permissible standards for the cross-section of a heated floor pipe and its length according to the following diagram.
| Pipe outer diameter | Maximum pipe size |
| 1.6 – 1.7 cm. | 100 – 102 m. |
| 1.8 – 1.9 cm. | 120 – 122m. |
| 2 cm. | 120 – 125 m. |
But since the circuit must be made of solid material, the number of circuits for the heating area will be influenced by the step of laying the water heated floor.
Warm floor installation step
Not only the length of the pipeline, but also the heat transfer power will depend on the laying step. Therefore, with proper installation of coolants, it will be possible to save on the energy consumption of heated floors.
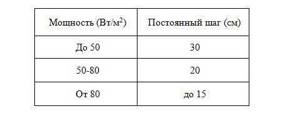
The recommended step for laying underfloor heating pipes is considered to be 20 cm. This indicator is determined by the fact that when used, the floor is heated evenly, and installation work is also simplified. In addition to this indicator, the following standards are also allowed: 10 cm. 15 cm. 25 cm. and 30 cm.
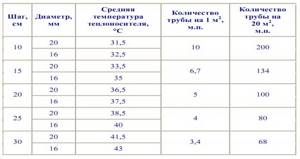
Let us give an illustrative example: pipeline flow at the optimal pitch of a heated floor.
| Step, see | Consumption of working material per 1 sq.m., m. |
| 10 — 12 | 10 – 10,5 |
| 15 — 18 | 6,7 – 7,2 |
| 20 — 22 | 5 – 6,1 |
| 25 — 27 | 4 – 4,8 |
| 30 — 35 | 3,4 – 3,9 |
With a denser installation, the turns of the product will be loop-shaped, which will complicate the circulation of the coolant. And with a larger installation step, the heating of the room will not be uniform.
Online calculator for calculation
Since the contour of the heated floor should cover the total area of the room as much as possible, it is necessary to draw up a diagram of its location. To do this you will need a millimeter sheet of paper and a pencil. The scheme is drawn up in the following order:
- The total area of the room is drawn on paper.
- The dimensions of large furniture and floor electrical equipment are measured.
- In the appropriate arrangement, all measurements are transferred to paper.
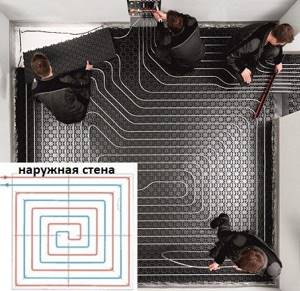
- It is strictly forbidden for the coolant to pass close to the walls, so an indent of 20 cm is made along the entire drawn area.

By shading all the marked measurements and indentations, you can visually calculate the area of the room where the coolants will be located.
So, knowing all the necessary data, you can begin to directly calculate the working material of the heating system.
The length is calculated using the following formula:
D = P/T ˟ k, where:
D – pipe length;
P – heated area of the room;
T – pipe pitch for a warm water floor;
k is a reserve indicator located in the range of 1.1-1.4.
Having considered the entire sequence of calculating a pipeline for a water system, we can conclude that it is not so difficult to complete it. When performing it, the most important thing is to adhere to the recommended standards for the step of laying the contours and the area of the heated surface. If you lose sight of these indicators, you may not only overpay when purchasing working material, but also not get the desired heating of your living space.
A specific example of calculating a heating branch
Let's assume that you need to determine the parameters of the thermal circuit for a house with an area of 60 square meters.
For the calculation you will need the following data and characteristics:
- room dimensions: height – 2.7 m, length and width – 10 and 6 m, respectively;
- the house has 5 metal-plastic windows of 2 sq. m;
- external walls - aerated concrete, thickness - 50 cm, Kt = 0.20 W/mK;
- additional wall insulation – polystyrene foam 5 cm, Kt=0.041 W/mK;
- ceiling material – reinforced concrete slab, thickness – 20 cm, Kt=1.69 W/mK;
- attic insulation – 5 cm thick polystyrene foam boards;
- dimensions of the entrance door - 0.9 * 2.05 m, thermal insulation - polyurethane foam, layer - 10 cm, Kt = 0.035 W/mK.
Next, let's look at a step-by-step example of performing the calculation.
Step 1 - calculation of heat loss through structural elements
Thermal resistance of wall materials:
- aerated concrete: R1=0.5/0.20=2.5 sq.m*K/W;
- expanded polystyrene: R2=0.05/0.041=1.22 sq.m*K/W.
The thermal resistance of the wall as a whole is: 2.5 + 1.22 = 3.57 sq. m*K/W. We take the average temperature in the house to be +23 °C, the minimum temperature outside is 25 °C with a minus sign. The difference in indicators is 48 °C.
Calculation of the total wall area: S1=2.7*10*2+2.7*6*2=86.4 sq. m. From the obtained indicator it is necessary to subtract the size of the windows and doors: S2 = 86.4-10-1.85 = 74.55 sq. m. m.
Substituting the obtained indicators into the formula, we obtain wall heat loss: Qc=74.55/3.57*48=1002 W
By analogy, heat costs through windows, doors and ceilings are calculated. To assess energy losses through the attic, the thermal conductivity of the flooring material and insulation is taken into account
The final thermal resistance of the ceiling is: 0.2/1.69+0.05/0.041=0.118+1.22=1.338 sq. m*K/W. Heat loss will be: Qp=60/1.338*48=2152 W.
To calculate heat leakage through windows, it is necessary to determine the weighted average value of the thermal resistance of the materials: double-glazed window - 0.5 and profile - 0.56 sq. m*K/W respectively.
Ro=0.56*0.1+0.5*0.9=0.56 sq.m*K/W. Here 0.1 and 0.9 are the proportion of each material in the window structure.
Window heat loss: Qо=10/0.56*48=857 W.
Taking into account the thermal insulation of the door, its thermal resistance will be: Rd=0.1/0.035=2.86 sq. m*K/W. Qd=(0.9*2.05)/2.86*48=31 W.
The total heat loss through the enclosing elements is: 1002+2152+857+31=4042 W. The result must be increased by 10%: 4042*1.1=4446 W.
Step 2 - heat for heating + general heat loss
First, let's calculate the heat consumption for heating the incoming air. Room volume: 2.7*10*6=162 cubic meters. m. Accordingly, ventilation heat loss will be: (162*1/3600)*1005*1.19*48=2583 W.
According to these room parameters, the total heat costs will be: Q=4446+2583=7029 W.
Step 3 - required power of the thermal circuit
We calculate the optimal circuit power required to compensate for heat loss: N=1.2*7029=8435 W.
Next: q=N/S=8435/60=141 W/sq.m.
Based on the required performance of the heating system and the active area of the room, it is possible to determine the heat flux density per 1 sq. m
Step 4 - determining the laying pitch and contour length
The resulting value is compared with the dependence graph. If the coolant temperature in the system is 40 °C, then a circuit with the following parameters is suitable: pitch – 100 mm, diameter – 20 mm.
If water heated to 50 °C circulates in the main, then the interval between branches can be increased to 15 cm and a pipe with a cross-section of 16 mm can be used.
We calculate the length of the contour: L=60/0.15*1.1=440 m.
Separately, it is necessary to take into account the distance from the collectors to the heating system.
As can be seen from the calculations, to install a water floor you will have to make at least four heating loops. We looked at how to properly lay and secure pipes, as well as other installation secrets here.
Installation of water heated floors in the house
The coolant in the floor is mounted in the form of a single or double snake or spiral. The total length of the pipe depends on the choice of circuit location. The ideal option is coils of the same size. However, in practice, creating uniform loops is difficult and impractical.
When the flooring is done throughout the house, the parameters of the premises are taken into account. In a bathroom, bathroom, hallway, which occupy a smaller area compared to the living room, bedroom or other rooms, it is difficult to create long coils. They do not require many pipes to heat them. Their length can be limited to several meters.
Some prudent owners bypass these rooms when installing a water circuit. This saves materials, labor and time. It is more difficult to install heated floors in small rooms than in spacious ones.
If the system bypasses such nooks and crannies, it is important to correctly calculate the maximum pressure parameters in the system. For this purpose, balancing fittings are used.
It is designed to equalize pressure loss across different circuits.
What are the optimal intervals for laying?
The pitch of the water heating pipe determines the following properties of this heating system:
- Pipeline length . The smaller the step, the higher the length.
- Heat dissipation power . It will be minimal if the pitch is zero - just a straight tube is used to connect the input and output of the wiring: then practically no heat will be transferred from the floor to the air in the room. The maximum is when laying the tube in a continuous layer, side by side on different turns: the return will be very cold, the air will warm up the most - but this is the most wasteful method of installation.
Attention
The easiest installation step is from 15 to 20 cm. Here the pipe is not too long, but the floor warms up well.
Design Features
All calculations of water heated floors must be made extremely carefully. Any defects in the design can only be corrected by completely or partially dismantling the screed, which can not only damage the interior decoration of the room, but will also lead to a significant expenditure of time, effort and money.
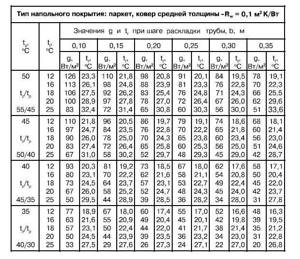
Recommended temperature indicators for the floor surface, depending on the type of room, are:
- living space - 29 °C;
- areas near external walls - 35 °C;
- bathrooms and areas with high humidity - 33 °C;
- under parquet flooring - 27 °C.
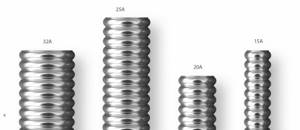
Short pipes require the use of a weaker circulation pump, which makes the system economical. A circuit with a diameter of 1.6 cm should not be longer than 100 meters, and for pipes with a diameter of 2 cm the maximum length is 120 meters.
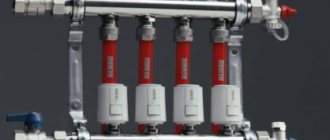
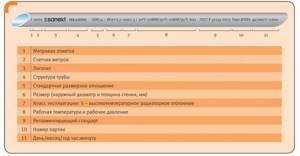
Decision table for choosing a water heated floor system
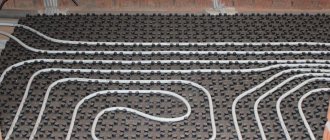
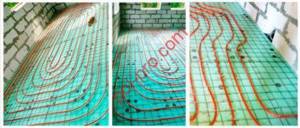
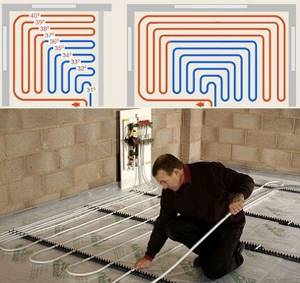
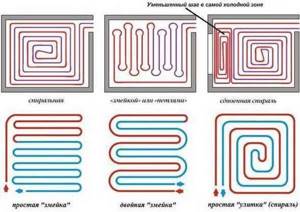
Possible ways to lay out the contour
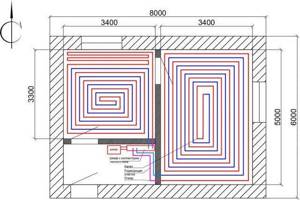
In order to determine the pipe consumption for arranging a heated floor, you should decide on the layout of the water circuit. The main task of planning the layout is to ensure uniform heating, taking into account the cold and unheated areas of the room.
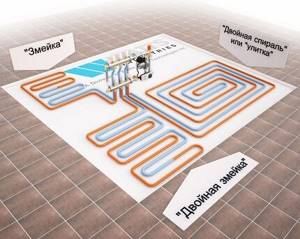
The following layout options are possible: snake, double snake and snail. When choosing a scheme, you need to take into account the size, configuration of the room and the location of the external walls
Method #1 – snake
The coolant is supplied to the system along the wall, passes through the coil and returns to the distribution manifold. In this case, half of the room is heated with hot water, and the rest with cooled water.
When laying with a snake, it is impossible to achieve uniform heating - the temperature difference can reach 10 ° C. The method is applicable in narrow spaces.
The corner snake design is optimal if you need to maximally insulate a cold zone near the end wall or in the hallway
The double snake allows for a softer temperature transition. The forward and reverse circuits run parallel to each other.
Method #2 – snail or spiral
This is considered the optimal scheme to ensure uniform heating of the floor covering. Direct and reverse branches are laid alternately.
An additional advantage of the “shell” is the installation of a heating circuit with a smooth bend rotation. This method is relevant when working with pipes of insufficient flexibility.
For large areas, a combined scheme is implemented. The surface is divided into sectors and a separate circuit is developed for each, leading to a common collector. In the center of the room the pipeline is laid out like a snail, and along the outer walls - like a snake.
We have another article on our website in which we examined in detail the installation diagrams for laying heated floors and provided recommendations for choosing the best option depending on the characteristics of a particular room.
Selection of pipes for heated floors
It is not always possible to install a warm water floor in multi-storey buildings. Such a system must be a separate heating circuit. Otherwise, the residents of subsequent apartments will not receive a lot of heat. Before starting work, you need to obtain permission from the utility companies.
In a private house, the owner independently decides how the heating system will function. Having purchased the necessary equipment, he can only choose one of the types of pipes offered by the modern market:
- Metal-plastic
- Cross-linked polyethylene
- Polypropylene
- Copper
Metal-plastic
One of the most common pipes for warm water floors are metal-plastic products. They have several significant advantages:
- Long service life
- Capable of withstanding various loads
- Do not lose their structure during heating
- A light weight
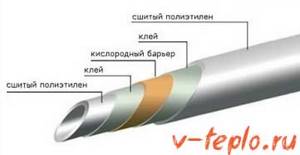
If we consider a metal-plastic pipe in cross-section, it represents the imposition of five layers at once:
- Inside and outside – polyethylene protective coating
- Middle layer – aluminum foil
- To ensure that the resulting cake does not delaminate, use a special adhesive composition
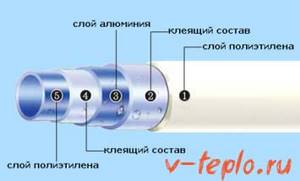
The thickness of the foil layer can reach 2.5 mm depending on the diameter of the purchased product. After wrapping, it is overlap or butt welded. The outer layer can consist of various types of polyethylene, but an important criterion for it is high density. The inner layer is always made using the extrusion method from cross-linked polyethylene.
This structure determines one of the most important properties of metal-plastic products - the ability to maintain the adopted shape after bending. This is an important criterion, since heated floors are often laid in the form of a spiral or snake.
Various fittings and other pipe fittings are used as connections.
The average price on the market is 1-2 USD. e. per meter.
Cross-linked polyethylene
A worthy competitor to metal-plastic models are pipes for warm water floors made from cross-linked polyethylene. The market is rich in products with different crosslinking densities, but the most optimal value lies in the range of 65-80%.
Video demonstration
Polyethylene pipes can be processed using several methods:
- Electron irradiation in magnetic fields – cross-linking density reaches 60%
- Peroxide – cross-linking density reaches 75%
- Silane (gas) – cross-linking density reaches 65%
The higher the density, the higher the cost of such products. Some of the models may have an oxygen barrier as a middle layer - they are best suited for heated floors. Disadvantage
What puts off many buyers is the very
high price
.
Connecting cross-linked polyethylene pipes takes just a few minutes:
- A special ring is placed on one end of the pipe
- It is then expanded using a specialized tool
- The fitting is installed inside and the upper ring is clamped
The average cost on the market is $4-5 per meter.
Polypropylene
Constant improvement of plastic products has led to the emergence of polypropylene pipes. Due to their technical and operational advantages, they have become in demand. They are often used for arranging heating systems.
However, they are practically not used for insulated floors. The reason lies in the large bending radius, which is about 8 diameters. For example, for a product with a diameter of 20 mm, the minimum distance between two parallel sections will be immediately 320 mm.
The average cost on the market is $1.5-2 per meter.
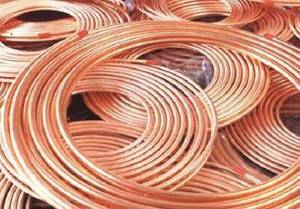
Copper
The most significant properties of copper are durability and high heat transfer. This has led to the widespread use of such products in modern underfloor heating systems. This material is much more reliable than all of the above.
However, there are negative aspects that must be taken into account:
- Laying pipes requires special equipment and certain skills
- Copper is a metal, therefore it is susceptible to corrosion.
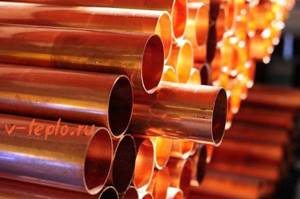
A pipe for a warm water floor made of copper is connected to each other using brass fittings. However, when interacting with other metals, the corrosion process only accelerates. Over the years, wandering dots may appear stitching through the product.
To increase the lifespan of copper inside the floor, it is necessary to wrap it in a waterproofing, non-flammable layer. This will protect the pipe from contact with other materials, extending its service life.
The average cost on the market is $7-15 per kilogram.
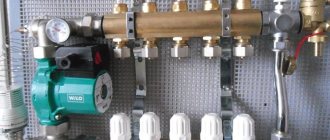
Calculating the circulation pump
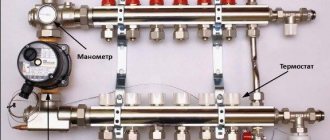
To make the system economical, you need to select a circulation pump that provides the required pressure and optimal water flow in the circuits. Pump passports usually indicate the pressure in the circuit of the longest length and the total coolant flow in all loops.
The pressure is influenced by hydraulic losses:
∆ h = L*Q²/k1 , where
- L —contour length;
- Q - water consumption l/sec;
- k1 is a coefficient characterizing losses in the system; the indicator can be taken from hydraulic reference tables or from the equipment passport.
Knowing the pressure value, calculate the flow rate in the system:
Q = k*√H , where
k is the flow coefficient. Professionals assume the flow rate for every 10 m² of a house is within 0.3-0.4 l/s.
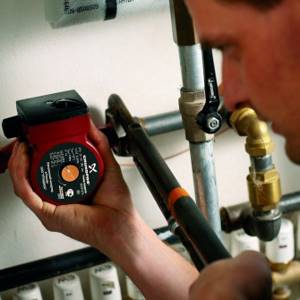
Among the components of a warm water floor, a special role is given to the circulation pump. Only a unit whose power is 20% higher than the actual coolant flow will be able to overcome the resistance in the pipes
The figures regarding pressure and flow rates indicated in the passport cannot be taken literally - this is the maximum, but in fact they are influenced by the length and geometry of the network. If the pressure is too high, reduce the length of the circuit or increase the diameter of the pipes.
Pipeline length calculation
Before choosing a pipe for a warm water floor, you need to decide on its diameter, which depends on the area of the heated room, or more precisely, on the length of the coil that needs to be laid to ensure a normal degree of heating.
When calculating the length of the pipeline, use graph paper and proceed as follows:
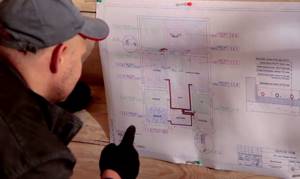
Determined with the pipe layout. They can be laid in a spiral, in the shape of a “snail” or “snake”, and in different variations. The installation technology largely depends on the presence of window and door openings in the room - they are areas that require additional heating. The selected layout of the heating circuit is transferred to paper, taking into account the scale and installation step, having previously reduced the area of the room into areas where large furniture is located. Perform calculation
When making final calculations, you should take into account the distance between the room and the heating equipment.
Calculation taking into account furniture
Experts recommend installing heated floors only where there will be no bulky pieces of furniture - cabinets, fireplaces, sofas, etc. Accordingly, you need to take into account when calculating the place where there will be no heated floor. To do this we use the formula:
(S – S1) / H x 1.1 + D x 2 = L
In this formula (all values in meters):
- L – Required length of pipes;
- S – Total area of the room;
- S1 – Total area of the room where there will be no heated floor (empty areas);
- H – Pipe spacing;
- D – Distance from the room to the collector.
An example of calculating the length of underfloor heating pipes with empty sections
- Room length 4 meters;
- The width of the room is 3.5 meters;
- The distance between the pipes is 20 cm;
- Distance to the collector – 2.5 meters;
The room contains:
- Sofa dimensions 0.8 x 1.8 meters;
- Wardrobe, dimensions 0.6 x 1.5 meters.
We calculate the area of the room: 4 x 3.5 = 14 sq.m.
We calculate the area of empty plots: 0.8 x 1.8 + 0.6 x 1.5 = 2.34 sq.m.
We substitute the values into the formula and get: (14 – 2.34) / 0.2 x 1.1 + 2.5 x 2 = 69.13 linear meters of pipes.
Water floor power calculation
Calculations of the heating water system must be made extremely carefully. Any mistakes in the future can lead to additional costs, since they can be corrected only with complete or partial dismantling of the screed, and this can damage the interior decoration of the room.
Before you start calculating the amount of power, you need to know several parameters.
Parameters for a water floor
The power of the heating system is influenced by several factors, such as:
- diameter of pipelines;
- pump power;
- room area;
- type of flooring.
These parameters also help to calculate the length of pipes for underfloor heating and their branches for heating rooms.
But how is power calculated?
Power calculation method
It is very difficult to independently calculate power, since it requires skill and experience. For these reasons, it is better to order it from the appropriate organization where process engineers work. If, however, the calculation is made independently, then the average value is 100 watts per square meter. This technique is used in multi-story buildings.
In private houses, the average power value will depend on the area of the building. Thus, experts have compiled the following indicators:
- area up to 150 sq. m. – 120 W/m2;
- area from 150 to 300 sq. m. – 100 W/m2;
- area from 300 to 500 sq. m. – 90 W/m2.
Having considered the methodology for calculating power, you need to calculate the number of pipes. But to do this, you should first familiarize yourself with the methods of installing them.
Floor installation steps
After you have chosen high-quality and reliable pipes, it is recommended to begin installing the heated floor. This needs to be done in several stages.
Installation of thermal insulation
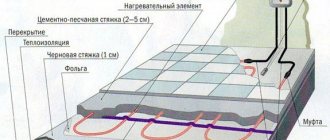
At this stage, preparatory work is carried out, the floor is cleared and a layer of thermal insulation is laid. Polystyrene foam can act as thermal insulation. Layers of foam plastic are laid on the subfloor. The thickness of the foam should not exceed 15 cm. It is recommended to calculate the thickness depending on the size of the room, its location in the apartment, as well as the individual preferences of the person.
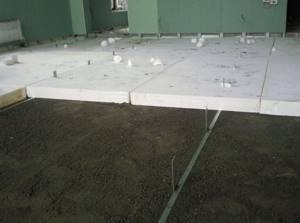
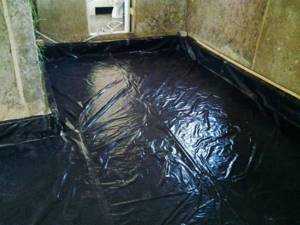
Installation of waterproofing
After the foam has been laid, it is necessary to lay a layer of waterproofing. Polyethylene film is suitable as waterproofing. Polyethylene film is fixed to the walls (near the baseboard), and the floor is reinforced with mesh on top.
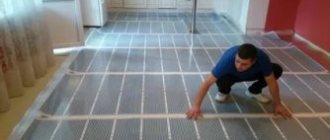
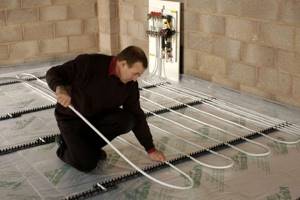
Laying and securing pipes
Next, you can lay the pipes for the heated floor. Once you have calculated and chosen a pipe laying scheme, this process will not take you much time. When laying pipes, they must be secured to the reinforcing mesh with special braces or clamps.
Crimping
Pressure testing is practically the last stage of installing a heated floor. Pressure testing must be carried out within 24 hours at operating pressure. Thanks to this stage, mechanical damage to pipes can be identified and eliminated.
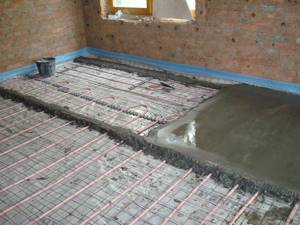
Pouring concrete mortar
All floor pouring work is carried out under pressure. It is worth noting that the thickness of the concrete layer should not exceed 7 cm.
After the concrete has dried, you can lay the floor. It is recommended to use tiles or linoleum as flooring. If you choose parquet or any other natural surface, due to possible temperature changes, such a surface may become unusable.
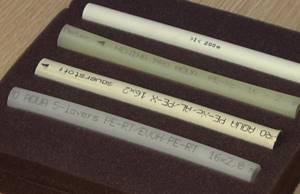
Polyethylene pipes
For heated floors, two types of polyethylene are used - cross-linked PEX and specialized PERT. The term "sewn" does not mean the presence of any seams. It is not sheets of material that are stitched together, but its molecules. “Crosslinking” refers to physical or chemical processing methods that change the molecular structure of polyethylene.
As a result of cross-linking, new molecular bonds appear in polyethylene, making it stronger and more reliable.
Due to this procedure, the strength and flexibility of the material increases significantly, and the temperature of the transported medium increases (40°C is the maximum for untreated polyethylene and 95°C for cross-linked). So that cross-linked polyethylene (as well as its properties) can be distinguished, it has different designations, depending on the type of processing:
- PE-Xa: heat treatment using peroxides. As a result, the cross-linking strength is 75%.
- PE-Xc: electron bombardment and strength increased by 60% (irradiation, i.e. physical impact).
- PE-Xb: wet silane treatment with catalyst. Stitching - 65%.
- PE-Xd: Nitrogen treatment is the rarest technology available today.
For heated floors, cross-linked polyethylene with a cross-linking strength of 65% to 80% is used. It is clear that the more durable the material used, the better, but as this indicator increases, the price also increases. However, it is recommended to use PE-Xa or PE-Xc cross-linked polyethylene for underfloor heating, as it has the most suitable characteristics. Moreover, the PE-Xc pipe is preferable, since when bombarded with electrons, cross-linking occurs evenly, but with chemical methods of exposure, the outer layers of the material acquire greater strength, and with deepening, the degree of processing decreases.
The best pipes for water floors - PERT
Actually, this material has one drawback - high elasticity. This leads to the fact that although the pipe bends well, it must be rigidly tied to the frame, otherwise it will return to its original shape. That is, such installation is not the easiest. Many companies produce special backing mats that perform two functions at once: they serve to improve thermal insulation and have a fixation system in which cross-linked polyethylene pipes are well secured. This installation method is much faster and easier. And the result in any case is high reliability, durability and a relatively low price. In addition, at any speed of coolant movement, the system remains silent. So PEX pipe for underfloor heating is a good choice and is recommended by many professionals.
There is another polyethylene pipe that has better characteristics - PE-RT (perth). Moreover, these characteristics are not acquired, like those of cross-linked polyethylene, but “innate” - the molecular structure of this material is such that it has high flexibility and tolerates elevated temperatures and pressure well. Therefore, a PERT pipe for underfloor heating is the best choice: the performance of PEX pipes depends on the quality of chemical treatment (PEX-a and PEX-b), and in this material they are constant. There is only one advantage of PEX-a pipes - the presence of molecular memory, which is why it is easier to connect them (use regular compression fittings) and you can restore the original shape after bending. How to do this, watch the video where a Rehau pipe for heated floors is tested.
It is also worth noting that a polyethylene pipe for underfloor heating of any type must necessarily have an oxygen-proof barrier made from a layer of EVOH film (this name must be present on the pipe marking). Only in this case will the metal parts of the system be protected from oxidation and the heating will be durable. That is, it turns out that for heating both PERT pipes and PERT pipes must be five-layer.
It is often difficult to decide which pipes to use for a warm water floor, which ones are better and why - similar characteristics, many varieties that are difficult for a non-specialist to understand. The difference between PE-Rt and PE-X pipes, between them and metal-plastic products, their features and signs of good quality pipes is described in the video.
Types of pipelines for a water system
Currently, the consumer market offers several options for materials and components for water heating systems. When choosing a pipeline for a heated floor, you need to take into account their cost, characteristics and service life.
Let's look at the most common types of pipelines and their characteristics.
Polypropylene
In a building materials store you can find two options for polypropylene pipes, such as metal-polymer and polymer. They are characterized by good resistance to corrosion, resistance to the abrasive action of the coolant and a durable top layer that does not deform when in contact with cement mortar. Manufacturers of metal-plastic pipelines guarantee that they will last about 40 - 45 years, polymer products - more than 50 years.
Polyethylene
A distinctive feature of these pipes is that no components are needed for installation. The joining of products is carried out using a soldering iron. To make the pipeline elastic, it will be enough to warm it with a hairdryer. Polyethylene products are reliable and durable, but for a water floor they must have a reinforcing layer. The average lifespan of a pipeline is 50 years.
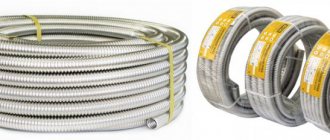
Stainless
Corrugated pipes made of this material are considered the most durable; their service life has not yet been established. They do not corrode, do not deform from high temperatures and do not freeze during frosts. The flexibility of the material allows the pipeline to be laid in increments of different sizes, which simplifies installation work. The only drawback of stainless pipes is that their rubber seals have a service life of only 30 years.
Copper
According to consumer reviews, pipes made of this material have the highest heat transfer. You can use coolants such as antifreeze or antifreeze with them. They are easy to use. Due to its optimal size, the strength of the concrete screed is not reduced during installation. Their service life is about 60 years.
In addition to the above characteristics, when choosing pipes for laying heated floors, you need to pay attention to their technical parameters. They must meet the following requirements:
- Linear expansion no more than 0.055 mm/mK;
- Thermal conductivity is no less than 0.43 W/mK;
- Diameter – from 1.6 cm to 2 cm.
It is also worth paying attention to their purpose. Many beginners make a big mistake by choosing conventional hot water pipes for heated floors. Therefore, before purchasing, it is very important to read the attached instructions, where you can make sure that the product is suitable for the heating system.
Selection of pipes by material
For a warm water floor, you can use pipes made from the following types of materials:
polypropylene or cross-linked polyethylene. Plastic pipes do not have the great flexibility required for laying the floor and a sufficient level of heat transfer, therefore they are used exclusively on a limited budget;
Plastic pipes for underfloor heating
metal-plastic. The metal-plastic pipe is made of durable plastic. The outer side of the pipe is reinforced with aluminum, which leads to increased heat transfer. A metal-plastic pipe costs slightly more than a plastic one. A distinctive feature is the increased heat transfer coefficient, which contributes to wider application;
The main layers of a metal-plastic pipe
copper Copper pipes have the highest thermal conductivity, but at the same time they bend rather poorly and are relatively expensive;
Metal pipes for floors
corrugated stainless steel pipes. The most modern and optimal material for heated floors. Corrugated pipes are somewhat more expensive than metal-plastic pipes, but have a high level of thermal conductivity.

Stainless steel corrugated pipe
Since the main criteria when choosing pipes are flexibility and heat transfer coefficient, which affects the amount of materials required, experts recommend purchasing metal-plastic or corrugated pipes.
How to calculate a pipe for a heated floor? To determine the required length of pipes, you can use one of the following methods:
- calculate using the formula;
- determine the length of the pipeline according to the diagram;
- use an online calculator or specialized program.
How to calculate the required number of pipes
Before starting installation work on installing the pipeline, it is necessary to carry out a number of preparatory work. Thus, the most important stage in preparing a heating equipment project is calculating the number of pipes for installing a heated floor.
If furniture or household appliances will be placed in the room in the future, it is prohibited to lay pipes for heated floors underneath it. Accordingly, the area of the heat source will be an order of magnitude smaller. It is also necessary to take into account the fact that the heating element should be laid at a distance of 20 cm from the wall ceilings.
As for the material from which the pipeline is made. There are four types:
- plastic,
- metal-plastic,
- aluminum,
- copper.
Of course, the best option would be the last two options, which have high performance characteristics, durability and excellent thermal conductivity. But at the same time, a thermal element made of such materials will cost you very much.
The most suitable option for installing a water heating unit are metal-plastic pipes - they are durable (their minimum service life is 50 years) and have good performance characteristics.

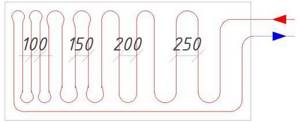
The calculation of the length of the heated floor circuit is also affected by the loop pitch, which can vary from 10 cm to 30 cm. Thus, there are some standards for pipeline flow depending on the pitch. For convenience, we have summarized this data in a table.
In addition to these standard values, many experts claim that the length of the required pipeline can be calculated using the following formula:
| L = S / N*1.1 |
- S – working area of the coolant,
- N – laying step
- 1.1 – safety factor for bending.
Also, during the calculation, it is necessary to add the number of meters from the floor to the collector installation and back.
Basic parameters for TP design
The location of heating elements that influence the specific power of a heated floor per 1 m2 is designed based on the thermophysical characteristics of the structure. In this rather complex process, many different factors must be taken into account, including:
- regional thermal standards - minimum outside air temperature in the coldest period of the year;
- the average temperature in each room and their location;
- features of building structures - material and thickness of walls, floors and ceilings or interfloor ceilings;
- the number and type of windows, their total area, heat loss coefficient, which largely depends on the type of double-glazed windows installed;
- positioning of the building relative to the cardinal directions;
- the height of the premises, as well as a number of others.
The proposed list of parameters that influence the calculation of heated floors is far from complete - an experienced heating engineer will indicate a dozen more important thermophysical characteristics.
However, the primary task of such a design is to select such a thermal performance of the TP that is guaranteed to be able to compensate for all the energy losses of the heated building. We must also not forget that it is recommended to increase the calculated theoretical power by 10-15% so that the thermal installation does not operate at the limit of its capabilities.
Regardless of whether the calculation of heated floors is carried out with your own hands or by specialized specialists, in all cases they are based on the requirements of GOST R 55656-2013 “Energy characteristics of buildings. Calculation of energy use for space heating." Below is a simplified method for independently designing a small apartment floor heating installation.
Date: September 25, 2021
Calculation rules
To install a heating system on an area of 10 square meters, the best option would be:
- use of 16 mm pipes with a length of 65 meters;
- the flow rate of the pump used in the system cannot be less than two liters per minute;
- the contours must be of equal length with a difference of no more than 20%;
- the optimal distance between pipes is 15 centimeters.
It should be taken into account that the difference between the temperature of the surface and the coolant can be about 15 °C.
The optimal method for laying a pipe system is represented by a “snail”. It is this installation option that promotes the most uniform distribution of heat over the entire surface and minimizes hydraulic losses, which is due to smooth turns. When laying pipes in the area of external walls, the optimal step is ten centimeters. To perform high-quality and competent fastening, it is advisable to carry out preliminary markings.
Table of heat consumption of various parts of the building