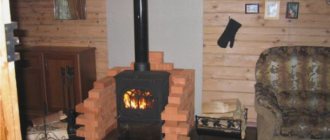
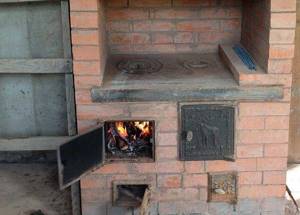
The Dutch stove is a design for heating rooms, which is very popular all over the world. This is especially true for models with a stove, which allows you to effectively heat the room and prepare your favorite dishes for the whole family. To make a Dutch oven from bricks, you need to carefully consider the operating principle and design features.
Dutch - an effective and multifunctional stove
Structural features of the Dutch oven
This stove operates on the principle of long burning.
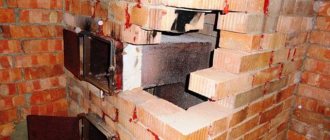
This effect is achieved by design features. After fuel combustion, hot air currents are formed. They pass through a specially equipped channel, where they transfer thermal energy to the brick walls. After cooling, the combustion products fall back into the combustion chamber. The exhaust gases are then reheated, raised and removed through the chimney. When arranging a Dutch oven, it is necessary to take into account the following design features of this unit:
- given the significant weight of the stove, for its effective operation it is necessary to equip the foundation;
- the base for the Dutch woman should have a thickness of 10-15 cm. It is formed from concrete and a reinforcement frame;
- instead of monolithic reinforced concrete, a solid slab can be used as a foundation for the stove;
- the dimensions of the foundation should exceed the dimensions of the Dutch by 5-10 cm in all directions;
- for laying a heating stove, you can use hollow bricks, which may even have minor cracks;
- high-quality refractory bricks should be used to construct the firebox;
- to connect masonry elements, a sand-clay solution (proportion 2:1) is used, which has a creamy consistency;
- to install a Dutch oven, it is forbidden to use cement-based mortar, which cracks under significant thermal load;
- the classic Dutch model is not equipped with a grate;
- the movement of gases in the system is carried out through six channels - three upper and three lower;
- the thickness of the stove walls is usually 0.5 bricks, which allows the heating device to heat up quite quickly;
- to increase the efficiency of the device, a metal casing or heat exchanger is included in its design;
- the shape of the stove can be rectangular or round, but the firebox itself is always rectangular;
- due to the absence of a blower, the combustion process is not as intense, which is what is required for the Dutch oven to work effectively.
Which firewood is better?
Heating a stove to heat a home or bathhouse with wood is the most economically efficient way. However, different types of wood produce different efficiency indicators. The duration of burning of logs depends on the density of the tree, therefore, the denser its structure, the longer the logs will burn and the more thermal energy they will release into the room. This is important to consider when choosing firewood.
Which tree species is the hottest?
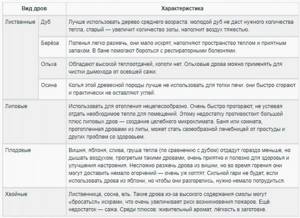
Of course, oak is an ideal fuel in terms of efficiency, but this type of wood is very expensive and heating a stove with oak wood is an unforgivable luxury. That's why
In the middle zone and northern regions of the Russian Federation, it is most acceptable to use birch. Wood of this type optimally combines price and quality. In the southern regions, it is better to use white acacia to fire stoves.
At the same time, in order to heat buildings as efficiently as possible, you need to carefully prepare for the heating process.
Preparation for work, materials and tools
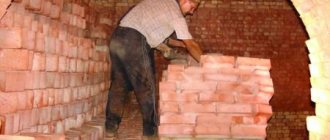
In order to begin the main work, you need to familiarize yourself with the materials in detail. So, what working tool should you buy? You will need a red solid ceramic brick, which can be of average quality. You can also use the old one, which is often denser and has greater thermal conductivity. But when using old brick, cladding will be required. You need to decide what kind of clay you are dealing with in order to adjust its properties. To get strong seams that will not crumble, the solution is made plastic, and clay should be used with medium fat content. There is a way to increase the strength of clay plaster by adding 100 - 150 g of ordinary salt to the composition. However, this works when the oven is constantly running.
When idle, the salt picks up moisture and the solution, swelling, crumbles. However, it is much more important to determine its fat content. Skinny ones will have to be washed out, and excessively fatty ones are mixed with an additional amount of sand, the proportion of which can reach up to 5 parts by volume. It is not difficult to determine the proportion of sand and clay for masonry mortar. Take about a liter of clay and divide it into 5 parts. Next, each part must be mixed with sand in the following proportions:
- don't add
- four to one
- two to one
- one to one
- one to two
Add water to each mixture until it resembles dough, roll into balls and leave them to dry for 3 days. “Correct” balls should not crack and, when dropped from a meter height, should not fall apart. The composition of the cake that has passed the test is what is required for the work.
Other tips
The living room with the kitchen can be combined and decorated with various shortcomings
It is important to calculate and anticipate everything in advance. Decorators and craftsmen share tips that will help avoid problems during repairs and furnishings:
The result depends on how detailed the project is drawn up. Oddly enough, it is worth taking into account the growth of loved ones and relatives. It is also recommended to calculate the approximate number of possible guests. You can get rid of food smells by installing a strong hood or ventilation system.
Small models are more suitable for housewives who do little cooking. If you plan to have a sleeping place in the living room, then it is important that the ringing of appliances and other kitchen utensils is not heard. Silent dishwashers and other appliances will come in handy.
In addition, you can install a sliding door and install a soundproof partition. If there is sensitivity to ultraviolet radiation, the owners hang thick curtains made of light-proof fabric. If household appliances do not match the direction of the interior, they are hidden behind furniture or put away in kitchen cabinets. When installing luminaires and lamps, they are guided by several criteria
It is important that the light falls evenly throughout the entire space. Especially bright lighting is preferable in the kitchen area and where the dining table is installed
In the living room, designers create a subdued atmosphere using wall sconces and table lamps. Multi-level stretch ceilings with LED strip also look good in this room. Moisture-resistant finishing materials are more durable and easy to clean. Thus, they retain their appearance for a long time. The kitchen combined with the living room combines:
- personal tastes of the owners;
- reliable finishing materials;
- current design ideas;
- convenience;
- trends. The best photos of kitchen living room design
Design features
The Dutch woman does not have a grate. Unlike many other stove models, it has several smoke channels. There is no blower. This feature prevents the fuel from burning intensely. Therefore, firewood burns slowly, evenly and releases heat energy to the room for a long time. That is, the design of the stove is suitable in its operational characteristics for long-burning stoves. Oxygen for combustion enters through the firebox door.
The shape of the Dutchman is elongated upward. The firebox has a rectangular shape. In the classic version, the function of the Dutch oven is heating. The hob, oven and benches were added by craftsmen later. Thus, over time, the standard look of the Dutch woman has changed.
The stove has very thin walls—half a brick. This feature allows the structure to quickly warm up. Combustion products, passing through a long chimney, give off heat to the walls and go out into the street. The design of the furnace can be changed, the main thing is to maintain the basic proportions and maintain the principle of operation.
The principle of operation of the Dutch oven is not to make the logs burn with a strong flame, they should smolder intensely. If the fire is strong, the flue gases will escape through the chimney ducts into the street very quickly and will not have time to transfer thermal energy to the walls. Therefore, small logs, shavings, sawdust and other types of fuel that burn through quickly should not be loaded into the combustion chamber. If the stove is fired correctly, it will warm up quickly and will transfer heat to the room for a long time. The temperature of the outer surface of the wall is usually about 60 degrees.
How to drown a Dutch oven correctly? First, make sure that there is no ash in the fuel chamber and ash pan. Fuel should be placed on the grate. The fuel must be dry. Before setting fire to the logs, cover the ash pit. The logs are laid out horizontally in even rows. Then the firebox door needs to be closed and the ash pan opened.
Description
Tall rectangular oven. big. Under
chambers are solid (solid), without. Air enters the firebox through the slightly open combustion door.
multi-turn
, consisting of 3-10 (usually 6) vertical channels connected in series: smoke from the combustion chamber rises through the first channel and falls through the second, rises again through the third, and so on. As the gases pass through the long chimney, they cool down greatly and heat the stove unevenly, which contributes to the formation of cracks in the stove. Insufficiently high temperature of the exhaust gases and significant resistance of the chimney lead to weak. is about 40-55%.
The positive qualities of the Dutch oven are its simplicity of design and good heating of its lower part.
Furnace laying
Before you start laying, you need to prepare a solution and perform a few simple steps to prepare the foundation.
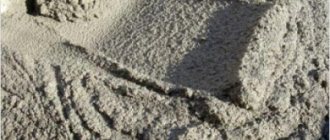
Preparation of the solution
Sift the sand and break up large pieces of clay. The crushed clay also needs to be sifted. The mesh from an armored bed will perfectly cope with the functions of a sieve. If this is not available, use a simple sieve with cells of similar sizes.
Soak the clay in water for several hours. Drain off any excess water not absorbed by the clay.
Let the clay swell and mix it with sand in equal quantities. Add about 1/8 of clean water to the same mixture. Carry out the calculation in accordance with the resulting volume of sand-clay mixture.
Prices for fireproof mortar for stoves and fireplaces
Fireproof mortar for stoves and fireplaces
Preliminary preparation of the foundation
Cover the frozen foundation with waterproofing material. Roofing felt will do. You can also use waterproofing or other material with similar properties.
Waterproofing
Order
Order
Let's start laying.
Laying out the first row. It will consist of 12 bricks. We make sure that the masonry is level using a level and only after that we fill the surface of the base with clay mortar.
An example of laying bricks on insulation
Install the ash door. We first wrap it with asbestos cord. We use steel wire to secure the door. Insert the wire into the box and twist it twice. We make a cut in the top edge of the brick. We insert the wire into it, bend it and intertwine it with the masonry.
We lay out the second row in order.
Laying the stoveBe sure to pull plumb lines so that the stove is strictly vertical
The third and next rows, marked in yellow, are laid out from refractory bricks.
Between the 3rd and 4th rows we lay a grate with dimensions of 200 x 300 mm.
The grate is laid
We place the bricks of the fourth row on edge. The diagram contains bricks marked in red. We lay the internal partition in the chimney on them. We make the back brick “knock out”, i.e. lay it down without mortar. In the future, we will be able to remove such bricks and clean the oven. A convenient solution that eliminates the need to install a door.
Furnace masonry Furnace masonry
Install the combustion chamber door. The recommendations are the same as in the case of the blower door.
Installation of the combustion door. The photo shows how to insert and twist the wire - lockInstalling the fire door
We lay out the fifth row similarly to the previous one. We lay the bricks flat.
In the 6th row we lay out the bricks on edge. We work in order.
Dutch masonry
In the 7th row we place bricks flat everywhere except the back wall - we lay it out “on edge”. In all subsequent rows we place the bricks flat.
Dutch masonry Fire door
On the eighth row we close the firebox door. We bevel the internal fire bricks above the combustion chamber. This will allow us to use the stove as a fireplace if desired. This can be seen in the diagram.
Dutch masonryDutch masonry Stove coverStove cover
We move the ninth row back. We lay asbestos cardboard on top of it, and then a cast iron hob, if necessary. We fill the joints between the slab and the brick with asbestos cord.
On the 10th row we begin to lay out the base for the chimney. The continuation of the structure will be metal.
Lay out the 11th row and install the valve. We first wrap the valve with asbestos cord.
Construction of a DutchwomanConstruction of a DutchwomanConstruction of a DutchwomanConstruction of a Dutchwoman
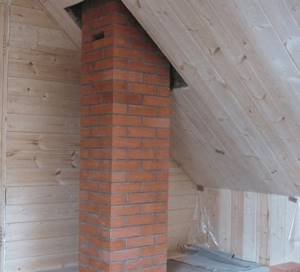
When laying the 12th row, we make a joint between the metal pipe and the chimney. The chimney is taken out of the house through the roof. We line the intersections with mineral wool or other heat-insulating material. The height of the structure is determined individually. It should rise at least 50 cm above the highest point of the roof.
Construction of a Dutch ovenConstruction of a Dutch ovenConstruction of a furnaceConstruction of a furnaceConstruction of a furnaceConstruction of a furnaceConstruction of a furnaceConstruction of a furnaceDetailed diagram of the laying of a Dutch oven
Perform the final finishing of the Dutch at your discretion. It can be whitewashed, beautifully tiled with tiles or tiles, or left without decoration at all - the bricks look beautiful anyway.
The finished oven must be allowed to dry for at least 2 weeks. Do not close the firebox door. Only after the specified time will it be possible to build a full-fledged fire in the oven. Before putting the Dutch oven into permanent use, burn some paper in the firebox to check the draft. The smoke must escape through the chimney.
Now you know how to build a Dutch oven yourself. Follow the recommendations received and everything will definitely work out.
Pre-furnace steel sheet
Good luck!
Preparatory work before assembling the stove
Before installing the stove, the foundation is poured and holes are made in the interfloor and attic floors.
Pouring the foundation
If the installation of the stove is planned during the construction stage of the house, then the foundation is poured at its location. According to the rules, it is not connected to the general foundation of the house, but is laid separately. This prevents unwanted distortions that may occur during shrinkage. The construction of the building is carried out simultaneously with the laying of the stove; when positioning the load-bearing floor beams, the height of the stove body and chimney is taken into account.
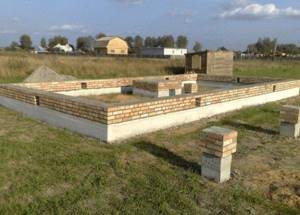
For furnace equipment, a foundation is poured that is not connected to the main foundation of the house
If the decision to install a heating unit has arisen in a finished house, carefully weigh and evaluate the work that will have to be done. The most significant ones include preparing the foundation and laying a chimney through the attic or interfloor ceilings. Sometimes it is more expedient to lead the pipe through the wall: the Dutch woman has such an opportunity.
The foundation is prepared in advance. The cement mortar must dry and shrink for at least 30 days. Only after this does the installation of the furnace begin. Otherwise, deformations are possible during operation, which leads to cracking of the thin walls of the stove and a violation of the tightness of the chimney. To avoid such consequences, the foundation is poured in accordance with the rules:
- The foundation is based on dense soil; concrete should not be poured into the soil near groundwater;
- the depth of the pit for filling should not be less than the depth of soil freezing in this region (usually 0.8–0.9 m, with the exception of the Far North);
- the concrete solution is laid on a well-established (within 2 days) sand cushion, which has a depth of 15 to 20 cm and serves as a hydraulic compensator for further operation;
- a reinforcing grid with a metal rod thickness of 5 mm or more is placed inside the concrete;
- the linear dimensions of the foundation should be 15–20 cm larger than the dimensions of the stove base;
- the height of the upper plane does not reach the floor level by 2 brick rows.
Several layers of basalt cardboard are laid between the base of the furnace and the waterproofing, which serves as a heat insulator and prevents the heat of the furnace from escaping into the foundation.

Basalt cardboard is an inexpensive but effective material for thermal insulation
Preparing holes in the floors between floors and the attic
The holes are cut taking into account fireproof cuts and fluffs, which must be built in the chimney in contact with flammable materials. This is especially true in wooden houses. The location of the pipe must be calculated so that it does not intersect with load-bearing beams and other structural elements of the house. The hole in the roof is made last, when the main part of the masonry is completed.
The hole for the chimney is prepared in advance so that plumb lines can be hung
The procedure for venting the chimney outside can be as follows:
- Remove the roof where the pipe exits. If the roof is covered with a continuous layer of material that cannot be separated (for example, corrugated sheeting, slate, etc.), use measurements to determine the location of the exit and the size of the hole, and then cut it out with a grinder or jigsaw.
- Install jumpers to restore the rigidity of the damaged area. Usually these are additional cross rafters made of wooden blocks.
- Lay and secure a heat-insulating layer between the chimney and the roof. Typically, it consists of asbestos sheet or mineral panels.
Make the hole taking into account the fact that at the outlet of the pipe there must be an “otter” laid - a horizontal displacement of the masonry that protects the attic space from water penetration.
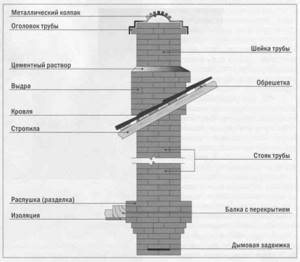
The otter is located directly at the pipe exit from the roof
After this, you can remove the brickwork above the roof.
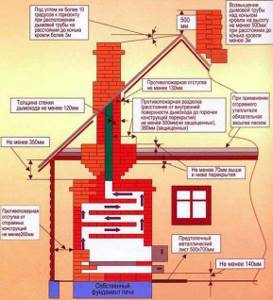
Fire safety standards for chimneys are important to follow when building a Dutch oven
Fire safety
Mandatory fire safety standards for the construction of stoves in residential buildings are shown in Figure 13.
Although the Dutch oven is highly fire resistant, when installing it you must take into account all safety regulations.
To prevent fire from accidentally falling coals, a pre-furnace steel sheet is placed in front of the stove.
Systematic inspection and cleaning of the combustion channels prevents the accumulation of soot and reduces the risk of fire.
It is prohibited to light the stove with fuel that does not fit into the firebox. Protruding logs can spread fire to nearby objects. Furniture and other interior items are placed at a distance of at least 50 centimeters from the stove.
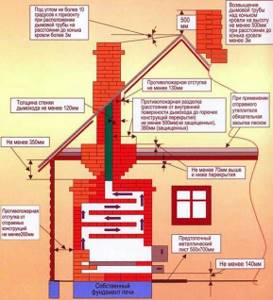
Mandatory fire safety standards
The lineup
The described heating stove may have a different design, which determines the scope of its application and operating features. On this basis, several of the most common models are identified.
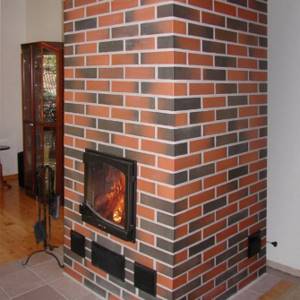
Classic stove option
The classic version of the Dutch woman can have a rectangular or round shape. Such units usually look simple, but quite elegant. Brick is used to finish the walls. Inside, the stove consists of a combustion chamber and six channels. That is why heating of brick walls occurs gradually, which eliminates the appearance of cracks.
When constructing classic devices, it is necessary to pay special attention to the height of the firebox. It should be placed at a height of 25 cm from the floor
This will ensure uniform heating of the room.
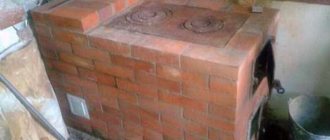
Models with hob
A traditional Dutch oven can be equipped with tiles. This allows you to expand the scope of its application. Such a heating device can be used for cooking. In this case, a cast-iron slab is placed above the combustion chamber, which is framed with brickwork.
Due to the uniform heating of the unit body and its gradual cooling, the design of the stove may include an oven. It can be used for both heating and cooking.
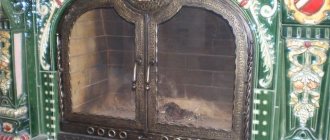
Option with fireplace
The Dutch oven with fireplace is slightly different from the traditional model. It should have a wide base. The construction of the chimney pipe and the ash collection pit begins from the second row. In the same place, a hole is formed to clean the system from fuel combustion products.
In order for such a fireplace to function effectively over a long period, experts recommend using a basalt cardboard gasket for its construction. It will prevent the formation of cracks and isolate gas flows.
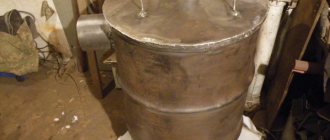
Column furnaces
Models made in the form of a column can operate on almost any fuel (wood, coal, gas). They are highly efficient and very popular. To increase productivity, engineers came up with the idea of constructing a metal casing around a brick wall. During the combustion process, it absorbs a large amount of thermal energy, after which it intensively releases it into the environment.
Fuel procurement
It is a mistake to think that any wood can be put into a stove. That is, you can load it, but what effect will it give when burned? To obtain maximum heat transfer, wood for the stove must have a humidity of no higher than 25%, maximum 30%. During the combustion of raw wood, the lion's share of thermal energy will be spent on the evaporation of moisture, in addition, soot will be intensely released, settling on the inner walls of the flues.
Important! To avoid the formation of a soot layer, plastic, rubber and other household waste should also not be burned in stoves.
The moisture content of freshly cut wood ranges from 45 to 55% depending on its species. It is believed that drying firewood to the required humidity requires storage in a barn or under a shed for 1-1.5 years. The logs must be prepared so long that they fit into the firebox with a gap of several centimeters. It wouldn’t hurt to make some of the firewood shorter and thinner, so it will be more convenient to stack it for kindling.
The coal used to fire the stove also requires close attention. If it is briquetted anthracite, then there will be no problems, but fuel with a high content of dust fraction must be sorted. Otherwise, dust and coal fines will partially spill through the grates into the ash pan and go to waste. In this case, the other part will block the passage of air through the grate, and the combustion process will proceed sluggishly. You can make homemade briquettes from fine coal mixed with dust.
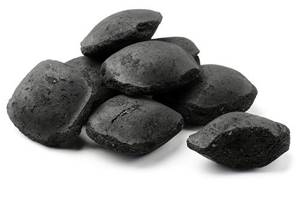
Advice. Since ancient times, our grandfathers heated stoves with coal dust, after making cakes from it. The fuel is mixed with water, and from the resulting thick mass, you make fuel for the stove in the form of cakes with your own hands, which are then dried in the sun. In winter they burn amazingly.
Installation of a Dutch oven on a foundation
One of the main advantages of a Dutch oven is the ability to fit it into any design while providing high-quality room heating. The shapes and designs of these stoves are varied, and you can choose a model according to the desired size and function. The compactness of the Dutch ovens and the fact that both the stove and its service area take up very little room area speak in favor of these heating units. It is possible to build a stove designed by Utermark - it is perfect for heating a country house or a private house. A brick stove lined with tiles, majolica or tiles will not only heat, but also serve as an additional decoration for the house.
All brick ovens are massive and require a solid, reliable foundation. A reinforced concrete foundation is most suitable for this purpose. Reinforcement must be done not with flat meshes and frames, but with a three-dimensional frame. Reinforcement, concreting and maintenance of concrete are carried out using standard technology; full strength gains occur after 28 days. It is possible to start masonry work earlier, when the strength has reached 75% of the brand strength. Before masonry is carried out, the foundation is waterproofed, vertically and horizontally. You can use both coating and roll materials.
Basic materials for laying the furnace:
- A clay-sand mortar mixture in an approximate proportion of 1:1 (the ratio is unstable and must change to adjust the fat content of the solution. It all depends on the fat content of the clay used; the higher it is, the greater the proportion of sand in the solution required).
- Brick for the combustion chamber - fireclay or red ceramic refractory; brick for chimney ducts and furnace walls - ordinary ceramic brick, it is possible to use slotted and hollow bricks. Sand-lime bricks and dry-pressed products - adobe bricks, slip bricks, etc. - are not used.
The specificity of Dutch ovens is their special elongated vertical design, so the height of the combustion chamber from the level of the foundation edge can be greater than that of other models of ovens. But the fireboxes are usually located no higher than 250 mm above the floor level so that the stove heats up more evenly.
Laying order (example - a small stove 52*52 cm)
- Sand is poured onto the foundation waterproofing in a layer of up to 50 mm, leveled horizontally and carefully poured with water until the layer is completely wetted.
- A feature of the stove masonry of many stove models is that the first rows are laid dry - without bonding with mortar. For a small oven, 12-14 bricks are needed to lay rows along the base. The first row of bricks is laid as a bed.
- The second and third row of bricks are placed on the bed, but already on the mortar.
- The fourth and fifth row will be the beginning of the internal partition of the chimney channel. For future cleanings of the chimney, it is necessary to leave holes; for this, bricks are laid dry in these rows, they will be “knocked out”. Masonry, even without mortar, retains heat much better than a built-in metal door; for this reason, they prefer not doors, but knock-out bricks laid without mortar.
- The firebox door is installed, but the height of its installation depends on the overall height of the stove, and can be installed not in the sixth row, but much higher.
- In the seventh row, the bricks are laid flat (in a bed), except for the back ones - they are placed edge-on. Then all the rows are laid on the bed, and in the eighth row (or in the row closing the firebox door) the laying is done as in fireplaces - with bevels.
- Along the ninth row, an offset is made to the inner surface of the combustion chamber. Heat-resistant material is laid out on the shelf under the hob - kaolin wool, asbestos cords. Then install the slab.
- In this example, chimney channels are formed from the tenth row. In small stoves, it is more rational to make chimneys from metal rather than brick, so as not to burden the structure.
- The view, or stove valve, is installed in this example in the eleventh row, then the chimney pipe is installed.
- The sand, which serves as a shock-absorbing layer, should not spill out along the contour, so it is protected with a plank or plinth, installing them on the upper edge of the foundation up to the first brick row or slightly higher.
- They finish the stove - jointing, plastering or tiling, tiles and so on.
The stove dries out and the clay mortar in the seams sets only naturally, and the first firebox is made no earlier than two weeks later - after the stove masonry has completely dried.
Assembling a Dutch oven with your own hands
There are several varieties:
- Dutch heating stove
- Dutch oven with fireplace
- Dutch oven with oven
- Dutch oven Lukashevich
- Dutch oven with stove
When planning a house, of course, it is better to immediately determine a place for the stove and pre-prepare the foundation - reinforce the floor and fill the space between the stove and the foundation of the house with sand.
But this will only be needed for a large stove, and a Dutch stove, especially one assembled with your own hands, will do without a foundation.
The Dutch oven is significantly different from its sisters:
- a voluminous and roomy firebox without a vent (in the classic version, modern Dutch women equip almost all stove makers with a vent);
- tile cladding (again, in the classics);
- rectangular shape;
- channels for removing hot air (they are called lifting and lowering - gases move through them in a clear sequence, staying as long as possible and giving off all the heat to the brick walls);
- slow burning of firewood (especially in the classic version without a blower), which, on the one hand, gives a lower combustion temperature, but prolonged heat release (for example, at night) on the other.
Construction Materials
To start building a Dutch oven, we need to collect materials according to the following list:
- Red bricks 250*120*65 mm;
- Fireclay refractory bricks (optional);
- Ordinary building clay;
- River sand;
- Water;
- Door for the firebox (about 250*210 mm) and the blower (about 270*140 mm);
- Grate (30*20 cm);
- Steel wire with a diameter of 2-3 mm;
- Asbestos cord;
- Asbestos cardboard and cast iron hob (optional);
- Gate valves (from 130*130 mm to 130*250 mm);
- Cleaning doors (optional);
- Steel strip, 5 cm wide, 5 mm thick (optional).
When considering the project, adjust the dimensions of the materials to suit your future stove, the main thing is that everything is built into the masonry tightly, without cracks or play.
When you have everything ready to start laying out, prepare a clay solution (ordinary cement for ovens is by no means suitable). After soaking it in water, add sand in the same amount as the clay, pour water into 1/4 of the volume of clay and mix until sour cream is thick.
Also, do not forget to dip each brick in water before use so that it does not absorb moisture from the mortar.
Assembly instructions
- After a trial laying out and preparing the mortar, follow the plan on which each row of bricks is painted (order), check the result every three rows and check the order.
- The door fastenings should be made of steel wire.
- As you go, scrape off any excess solution and remove it carefully.
- When the masonry (and, accordingly, the stove itself) is ready, let it dry for about two weeks. You can speed up this process by periodically firing the oven for half an hour.
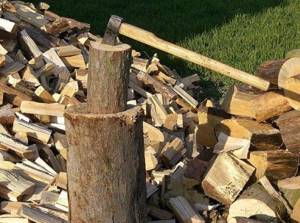
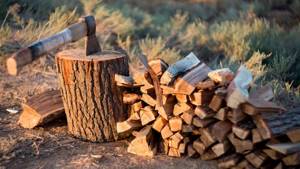
Firewood selection
Firewood made from different types of wood behaves differently in the stove. The best fuel is considered to be hard deciduous trees (oak, birch, linden, aspen). Birch gives more heat compared to aspen or pine and does not spark when burning. The aspen burns through, leaving virtually no ash. Wood from fruit and coniferous trees is not recommended for kindling.
In terms of heat transfer during combustion, oak fuel is considered the most efficient. If we take the volume of oak firewood as 1, then to ensure equal thermal energy it is necessary to burn the same volume of firewood of other species: birch - 1.33, pine and alder - 1.6, spruce - 1.73, aspen - 2.
- the wood is sawn into logs and logs;
- logs are split into logs, their cross-section approaches a sector of a circle with a height
- logs up to 5 cm in size are left untouched, and logs up to size are split in half or into quarters;
- Firewood is stored in woodpiles under a canopy or indoors (shed); It is best to use firewood that has been air-dried for at least years;
- preliminary drying of firewood before stacking is carried out near the stove or in the woodshed;
- The stove's firewood is constantly replenished to provide the necessary kindling material.
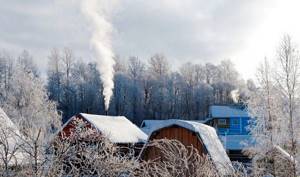
Special combustion conditions
Some problems with furnace combustion occur after long periods of inactivity and in winter . First of all, they are associated with excessive cooling of the chimney. In this case, during kindling, the smoke does not rise upward, but penetrates into the room.
To eliminate possible problems, it is necessary to warm up the chimney well, for which the ash door and the vent are fully opened, which ensures maximum draft. A lit tube made of paper or cardboard is inserted through the cleaning window door. Warming up is carried out until a hum is heard in the pipe.
Next, the cleaning window door is closed, and paper leaves or sawdust are poured into the firebox. Everything is set on fire, and while the combustion is going on, the quality of the chimney is checked by changing the position of the valve and the blower door.
In winter, it is necessary to burn the heating material. To do this, half the usual volume of fuel is loaded and their uniform combustion is ensured at maximum thrust. After this part turns into coals, a full load of firewood is carried out, and the valve is covered by 2/3.
When using a stove in winter, it is important to use dried firewood, for which purpose the stove is constantly replenished. It is also important to check that the pipe on the roof is not clogged with snow, because... when it melts, water will fall down the chimney, causing corrosion of the metal.
The stove will provide warmth in the house even in the coldest weather. To ensure that this process does not cause problems, the firebox must be carried out according to all the rules. Their implementation will not cause great difficulties, and violation leads not only to ineffective work and unnecessary waste of fuel, but also to the risk of dangerous effects on the body of carbon monoxide.
How to deal with condensation
When burning wood, resin condensate settles on the walls of the chimney, which flows down and forms peculiar stalactites in the stove. Of course, some of these stalactites burn, but some of them harden and create an obstacle to the flow of escaping gases. To avoid this you can do the following:
- pre-dry the wood;
- increase combustion temperature;
- From time to time, burn the structure to a “red heat”.
It is impossible to neutralize such negative factors, but they can be reduced.
- The chimney assembly must be carried out against the movement of gases - this way most of them will be burned.
- The chimney must be quickly dismantled if necessary. To do this, it is connected with self-tapping screws.
- You can experiment with different combustion modes and find the optimal temperature. To visually assess fuel combustion, you need to inspect the combustion chamber after cooling. If stalactites have formed, then the temperature needs to be increased.
Basic principles of efficient and safe combustion
The question of how to properly heat stoves in order to bask in soft warmth in a country house, in a country house or in a bathhouse worries many. At the same time, I want this process to be as simple as possible, but with maximum heat transfer.
Effective heating depends on three basic principles: the serviceability of the heating structure itself, the use of high-quality fuel and proper kindling.
If you heat the stove incorrectly, you won’t have to wait long for negative consequences:
- fuel consumption will increase by 20%;
- structural elements become clogged;
- the house will be poorly heated even if a large volume of fuel is consumed;
- the chimney will become clogged and it will become impossible to use the stove.
To avoid such problems, it is necessary to follow the basic principles of efficient and safe combustion of a household stove:
- Always check the suitability of the structure and all its components before each use.
- To increase the flow of air masses for better fuel combustion, regularly clean the grate and ash pan.
- After the stove has been idle for a long time, first warm up the chimney (to do this, light a mini-fire in the firebox), and only then proceed to light the stove itself in the usual way.
- Place firewood, coal or briquettes strictly in the middle of the firebox, not allowing them to move to the rear; it is better to place the fuel closer to the door.
- Regulate the air flow by opening/closing the ashlar and combustion chamber doors.
- To improve draft, push in/out the chimney damper and viewer.
- Do not “gut” the fuel until most of it has burned.
Compliance with these simple principles will allow you to organize maximum heat transfer from the device and its safe use.